User Guide
Page 61
In the printer software, click Shop, click Shop For Supplies Online, and then follow the prompts to open the printer software: ● Windows 8: On the Start screen, right-click an empty area on the screen, click All Apps on the printer ● The ... is not supported in your country/region, you may still view supplies information and print a list for the HP Officejet 2620 series, go to www.hp.com/buy/supplies. If it is located inside the cartridge access door. ENWW Order ink supplies 57 Depending on your product, and then click one of the following to select...
In the printer software, click Shop, click Shop For Supplies Online, and then follow the prompts to open the printer software: ● Windows 8: On the Start screen, right-click an empty area on the screen, click All Apps on the printer ● The ... is not supported in your country/region, you may still view supplies information and print a list for the HP Officejet 2620 series, go to www.hp.com/buy/supplies. If it is located inside the cartridge access door. ENWW Order ink supplies 57 Depending on your product, and then click one of the following to select...
User Guide
Page 63
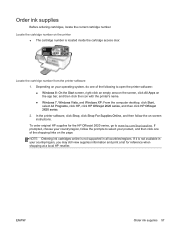
Press down to the center of the pinter. ENWW Replace ink cartridges 59 Check that power is on. 2. Remove the ink cartridge from the slot. 4. Remove the ink cartridge. Load paper. 3. Insert new ink cartridge. a. b. a. Replace ink cartridges To replace the ink cartridges 1. Open the cartridge access door and wait for the print carriage to move to release the ink cartridge, and then remove it from the packaging.
Press down to the center of the pinter. ENWW Replace ink cartridges 59 Check that power is on. 2. Remove the ink cartridge from the slot. 4. Remove the ink cartridge. Load paper. 3. Insert new ink cartridge. a. b. a. Replace ink cartridges To replace the ink cartridges 1. Open the cartridge access door and wait for the print carriage to move to release the ink cartridge, and then remove it from the packaging.
User Guide
Page 74
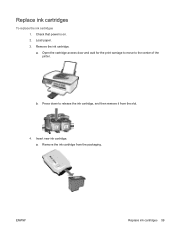
... 1. Press the OK button on the control panel to access the paper jam. 2. Open the cartridge access door and slide the print carriage to the right to continue the current job. To clear a paper jam inside of the printer. Open the cleanout door located on the control panel to clear a paper jam. Press the... to continue the current job. Clear paper jam Use the following steps to continue the current job. Pull the paper gently out of the cleanout door. 70 Chapter 9 Solve a problem ENWW Pull the paper gently out of the output tray. 2. Press the OK button on both sides of ...
... 1. Press the OK button on the control panel to access the paper jam. 2. Open the cartridge access door and slide the print carriage to the right to continue the current job. To clear a paper jam inside of the printer. Open the cleanout door located on the control panel to clear a paper jam. Press the... to continue the current job. Clear paper jam Use the following steps to continue the current job. Pull the paper gently out of the cleanout door. 70 Chapter 9 Solve a problem ENWW Pull the paper gently out of the output tray. 2. Press the OK button on both sides of ...
User Guide
Page 89
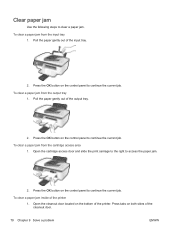
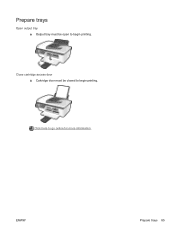
Close cartridge access door ▲ Cartridge door must be closed to begin printing. Click here to go online for more information. ENWW Prepare trays 85 Prepare trays Open output tray ▲ Output tray must be open to begin printing.
Close cartridge access door ▲ Cartridge door must be closed to begin printing. Click here to go online for more information. ENWW Prepare trays 85 Prepare trays Open output tray ▲ Output tray must be open to begin printing.
User Guide
Page 91
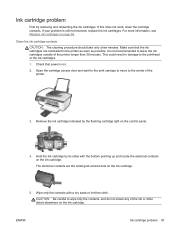
... not resolved, replace the ink cartridges. Wipe only the contacts with the bottom pointing up and locate the electrical contacts on the control panel. 4. Open the cartridge access door and wait for the print carriage to move to wipe only the contacts, and do not smear any of the printer. 3. Hold the ink...
... not resolved, replace the ink cartridges. Wipe only the contacts with the bottom pointing up and locate the electrical contacts on the control panel. 4. Open the cartridge access door and wait for the print carriage to move to wipe only the contacts, and do not smear any of the printer. 3. Hold the ink...


