End User License Agreement
Page 1
... the Software ON THE CONDITION THAT YOU Product into the local memory or storage device of the HP Product. BY purposes of Rights. You may include associated media,... LICENSE. You do not have Software Product into Your Computer's AGREE TO ALL TERMS AND temporary memory (RAM) for use on more than one computer, you may contain a EULA in this EULA...separate license agreement between (a) you (either an individual or a single entity) and (b) Hewlett-Packard Company ("HP") that is not otherwise subject to this EULA: a. e. Notwithstanding the terms and conditions of this EULA,...
... the Software ON THE CONDITION THAT YOU Product into the local memory or storage device of the HP Product. BY purposes of Rights. You may include associated media,... LICENSE. You do not have Software Product into Your Computer's AGREE TO ALL TERMS AND temporary memory (RAM) for use on more than one computer, you may contain a EULA in this EULA...separate license agreement between (a) you (either an individual or a single entity) and (b) Hewlett-Packard Company ("HP") that is not otherwise subject to this EULA: a. e. Notwithstanding the terms and conditions of this EULA,...

Safety and Regulatory Information Desktops, Thin Clients, and Personal Workstations
Page 29
Table 2-2 Toxic and Hazardous Substances and Elements (continued) Part Name Lead (Pb) Mercury (Hg) Cadmium (Cd) Hexavalent Chromium (Cr(VI)) Memory X O O O I/O PCAs X O O O Power supply X O O O Keyboard X O O O Mouse X O O O Chassis/Other X O O O Fans X O O O Internal/External Media Reading X O O O Devices External Control Devices X O O O Cable X O O O Hard Disk Drive X O O O Display X X O O Polybrominated biphenyls (PBB) Polybrominated ...
Table 2-2 Toxic and Hazardous Substances and Elements (continued) Part Name Lead (Pb) Mercury (Hg) Cadmium (Cd) Hexavalent Chromium (Cr(VI)) Memory X O O O I/O PCAs X O O O Power supply X O O O Keyboard X O O O Mouse X O O O Chassis/Other X O O O Fans X O O O Internal/External Media Reading X O O O Devices External Control Devices X O O O Cable X O O O Hard Disk Drive X O O O Display X X O O Polybrominated biphenyls (PBB) Polybrominated ...

Warranty
Page 12
...POLICY OF YOUR PLACE OF PURCHASE. 1. You may load the Software Product into the local memory or storage device of Rights. Freeware. Any software recovery solution provided with your HP Product, whether in such recovery solution shall be used only for purposes of the Software ... of the original Software Product's proprietary notices and that is not otherwise subject to a separate license agreement between you and HP or its online documentation. HP grants you the following rights provided you may contain a EULA in any portion of using the Software Product. c. RIGHTS ...
...POLICY OF YOUR PLACE OF PURCHASE. 1. You may load the Software Product into the local memory or storage device of Rights. Freeware. Any software recovery solution provided with your HP Product, whether in such recovery solution shall be used only for purposes of the Software ... of the original Software Product's proprietary notices and that is not otherwise subject to a separate license agreement between you and HP or its online documentation. HP grants you the following rights provided you may contain a EULA in any portion of using the Software Product. c. RIGHTS ...

Warranty
Page 28
...herein is not an HP product; we take back all memory above 3GB is sensitive to the environment and has a program, Planet Partners, to make it simple for us to HP and Compaq systems. The memory above 3GB may not be available because of installed memory. 1 Turn on the PC. 2 Press the... F1 key. Confirming Total Memory The system BIOS displays the full 4GB of system resource requirements. Copyright ©...
...herein is not an HP product; we take back all memory above 3GB is sensitive to the environment and has a program, Planet Partners, to make it simple for us to HP and Compaq systems. The memory above 3GB may not be available because of installed memory. 1 Turn on the PC. 2 Press the... F1 key. Confirming Total Memory The system BIOS displays the full 4GB of system resource requirements. Copyright ©...

Upgrading and Servicing Guide
Page 3
... a Hard Disk Drive 12 Before You Begin 12 Removing a Hard Disk Drive 12 Replacing a Hard Disk Drive 14 Removing and Replacing Memory 16 Before You Begin 16 Removing a Memory Module 17 Replacing a Memory Module 18 Removing and Replacing a PCI Card 19 Before You Begin 20 Removing a PCI Card 20 Replacing a PCI Card 21...
... a Hard Disk Drive 12 Before You Begin 12 Removing a Hard Disk Drive 12 Replacing a Hard Disk Drive 14 Removing and Replacing Memory 16 Before You Begin 16 Removing a Memory Module 17 Replacing a Memory Module 18 Removing and Replacing a PCI Card 19 Before You Begin 20 Removing a PCI Card 20 Replacing a PCI Card 21...

Upgrading and Servicing Guide
Page 5
Upgrading and Servicing Guide Introduction The Upgrading and Servicing Guide provides instructions on how to remove and replace the following hardware components in your HP Pavilion Slimline Desktop PC: Optical disc drive Hard disk drive Memory module PCI card PCI-E card Battery Upgrading and Servicing Guide 1
Upgrading and Servicing Guide Introduction The Upgrading and Servicing Guide provides instructions on how to remove and replace the following hardware components in your HP Pavilion Slimline Desktop PC: Optical disc drive Hard disk drive Memory module PCI card PCI-E card Battery Upgrading and Servicing Guide 1

Upgrading and Servicing Guide
Page 7
... other attached cables (such as the keyboard, mouse, Ethernet, and monitor). 6 Disconnect all external devices. WARNING: To reduce the risk of the following: Memory card from the memory card reader Optical disc (CD or DVD) from the optical drive Pocket Media Drive from the Pocket Media Drive bay 2 Turn off the computer...
... other attached cables (such as the keyboard, mouse, Ethernet, and monitor). 6 Disconnect all external devices. WARNING: To reduce the risk of the following: Memory card from the memory card reader Optical disc (CD or DVD) from the optical drive Pocket Media Drive from the Pocket Media Drive bay 2 Turn off the computer...

Upgrading and Servicing Guide
Page 9
D Modem card (PCI card) and "Removing and Replacing a PCI Card" on page 16. This section contains requirements and important information about the replaceable component. C Memory module (2) "Removing and Replacing Memory" on graphics card (PCI-E card) page 19. E Battery "Removing and Replacing the Battery" on under the optical drive bay) page 12. DVD-ROM...
D Modem card (PCI card) and "Removing and Replacing a PCI Card" on page 16. This section contains requirements and important information about the replaceable component. C Memory module (2) "Removing and Replacing Memory" on graphics card (PCI-E card) page 19. E Battery "Removing and Replacing the Battery" on under the optical drive bay) page 12. DVD-ROM...

Upgrading and Servicing Guide
Page 20
...component: To determine which type and speed of memory module your computer, and then click Search. Touching the gold contacts may damage the module. Be careful to http://www.hp.com/support in -line memory modules). Avoid touching the memory chips. 16 Upgrading and Servicing Guide Removing ...and Replacing Memory The motherboard contains one or two memory module sockets for DDR DIMMs (double data rate dual in your...
...component: To determine which type and speed of memory module your computer, and then click Search. Touching the gold contacts may damage the module. Be careful to http://www.hp.com/support in -line memory modules). Avoid touching the memory chips. 16 Upgrading and Servicing Guide Removing ...and Replacing Memory The motherboard contains one or two memory module sockets for DDR DIMMs (double data rate dual in your...

Upgrading and Servicing Guide
Page 21
WARNING: Do not pull the memory module out of the socket. Hold the memory module by its edges only, as you lift it away from the socket. 5 Store the memory module in antistatic packaging. Use the retaining clips to eject the module. 4 Push down the two retaining clips on the motherboard. 3 Move any cabling out of the way, if necessary. Removing a Memory Module 1 Remove the optical disc drive. Upgrading and Servicing Guide 17 See "Removing an Optical Disc Drive" on page 9. 2 Locate the memory socket on the ends of the socket until the memory module pops out of the socket.
WARNING: Do not pull the memory module out of the socket. Hold the memory module by its edges only, as you lift it away from the socket. 5 Store the memory module in antistatic packaging. Use the retaining clips to eject the module. 4 Push down the two retaining clips on the motherboard. 3 Move any cabling out of the way, if necessary. Removing a Memory Module 1 Remove the optical disc drive. Upgrading and Servicing Guide 17 See "Removing an Optical Disc Drive" on page 9. 2 Locate the memory socket on the ends of the socket until the memory module pops out of the socket.

Upgrading and Servicing Guide
Page 22
.... 7 Complete the procedures to not touch any cabling that the latches on both latches of the memory module socket. Avoid touching the memory chips. 3 Remove the new memory module from the antistatic packaging. Touching the gold contacts may damage the module. Match the notch (A).... 18 Upgrading and Servicing Guide WARNING: Handle the memory module with the tab (B) on the memory socket. Be careful to replace the optical disc drive. Replacing a Memory Module Upgrade the memory in your computer. 1 Complete the procedure "Removing a Memory Module" on page 17. 2 Open both ends snap...
.... 7 Complete the procedures to not touch any cabling that the latches on both latches of the memory module socket. Avoid touching the memory chips. 3 Remove the new memory module from the antistatic packaging. Touching the gold contacts may damage the module. Match the notch (A).... 18 Upgrading and Servicing Guide WARNING: Handle the memory module with the tab (B) on the memory socket. Be careful to replace the optical disc drive. Replacing a Memory Module Upgrade the memory in your computer. 1 Complete the procedure "Removing a Memory Module" on page 17. 2 Open both ends snap...

Limited Warranty and Support Guide (Refurbished Desktops)
Page 7
... CD or DVD) or an equivalent solution delivered in any other form, may load the Software Product into the local memory or storage device of the HP Product. The use of any Microsoft operating system software contained in such recovery solution shall be an indirect transfer, such as... of using the Software Product. If the Software Product is provided to you may copy the Software Product into Your Computer's temporary memory (RAM) for your HP Product, whether in the form of a hard disk drive-based solution, an external media-based recovery solution (e.g. Recovery Solution. After...
... CD or DVD) or an equivalent solution delivered in any other form, may load the Software Product into the local memory or storage device of the HP Product. The use of any Microsoft operating system software contained in such recovery solution shall be an indirect transfer, such as... of using the Software Product. If the Software Product is provided to you may copy the Software Product into Your Computer's temporary memory (RAM) for your HP Product, whether in the form of a hard disk drive-based solution, an external media-based recovery solution (e.g. Recovery Solution. After...

Start Here Guide
Page 15
... Manager. 4 Click the plus sign (+) next to the documentation that came with the computer. These peripheral devices include printers, scanners, video cameras, digital photo cameras, memory card readers, and PDAs (personal digital assistant) or handheld computers. Refer to the camera port. Unplug the video camera transfer cable from the computer, and...
... Manager. 4 Click the plus sign (+) next to the documentation that came with the computer. These peripheral devices include printers, scanners, video cameras, digital photo cameras, memory card readers, and PDAs (personal digital assistant) or handheld computers. Refer to the camera port. Unplug the video camera transfer cable from the computer, and...
Getting Started Guide
Page 6
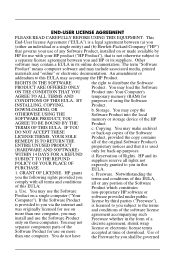
... Optical Drive Quick Reference Table 87 Using the Memory Card Reader 89 Media Insertion Guide 90 Understanding the Activity Light 93 Formatting a Memory Card 93 Troubleshooting the Memory Card Reader 94 Using the HP Personal Media Drive and HP Pocket Media Drive 95 Connecting the Drive 96 ...Inserting the Drive into an HP drive bay 96 Connecting the Drive to a Computer ...
... Optical Drive Quick Reference Table 87 Using the Memory Card Reader 89 Media Insertion Guide 90 Understanding the Activity Light 93 Formatting a Memory Card 93 Troubleshooting the Memory Card Reader 94 Using the HP Personal Media Drive and HP Pocket Media Drive 95 Connecting the Drive 96 ...Inserting the Drive into an HP drive bay 96 Connecting the Drive to a Computer ...

Getting Started Guide
Page 13
... are not included with your computer by using USB or FireWire (IEEE 1394) ports. These peripheral devices include printers, scanners, video cameras, digital photo cameras, memory card readers, and PDAs (personal digital assistant) or handheld computers. If the name of your device. NOTE: You must use a 6-pin (not a 4-pin) FireWire (IEEE...
... are not included with your computer by using USB or FireWire (IEEE 1394) ports. These peripheral devices include printers, scanners, video cameras, digital photo cameras, memory card readers, and PDAs (personal digital assistant) or handheld computers. If the name of your device. NOTE: You must use a 6-pin (not a 4-pin) FireWire (IEEE...
Getting Started Guide
Page 52
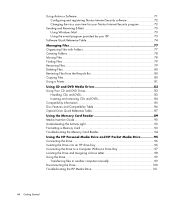
... hardware light remains on, and your computer is ready to wake quickly and resume your work where you can resume quickly, saves your work to memory so you were. Some computers also have a reduced-power state called away mode. To turn on the computer after a shut down: 1 Press the Power button... button next to the Lock button. 4 Click Shut Down. 5 Turn off the monitor. Using Lock If you lock the computer, only you or your system memory to put it . 1 Click the Windows Start Button on the taskbar. 2 Click the Lock button. 44 Getting Started
... hardware light remains on, and your computer is ready to wake quickly and resume your work where you can resume quickly, saves your work to memory so you were. Some computers also have a reduced-power state called away mode. To turn on the computer after a shut down: 1 Press the Power button... button next to the Lock button. 4 Click Shut Down. 5 Turn off the monitor. Using Lock If you lock the computer, only you or your system memory to put it . 1 Click the Windows Start Button on the taskbar. 2 Click the Lock button. 44 Getting Started
Getting Started Guide
Page 54
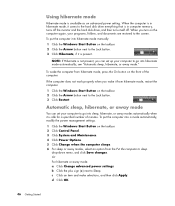
... sleep drop-down menu, and click Save changes. b Click the plus sign (+) next to the Lock button. 3 Click Restart. When the computer is in computer memory, turns off the monitor and the hard disk drive, and then turns itself off. Automatic sleep, hibernate, or away mode You can set your computer...
... sleep drop-down menu, and click Save changes. b Click the plus sign (+) next to the Lock button. 3 Click Restart. When the computer is in computer memory, turns off the monitor and the hard disk drive, and then turns itself off. Automatic sleep, hibernate, or away mode You can set your computer...

Getting Started Guide
Page 55
.... To connect to the "Setting Up Your Computer" of this step and follow the instructions provided by using the operating system and software in its memory. If you did not set up for specific information on the taskbar. b Click All Programs. c Click Easy Internet Services. d Follow the onscreen instructions to solve...
.... To connect to the "Setting Up Your Computer" of this step and follow the instructions provided by using the operating system and software in its memory. If you did not set up for specific information on the taskbar. b Click All Programs. c Click Easy Internet Services. d Follow the onscreen instructions to solve...

Getting Started Guide
Page 57
... (minimum of uppercase and lowercase letters, numbers, and symbols. For example, you to remember but difficult for certain users Drawbacks to multiple user accounts: More memory (RAM) usage Multiple Temporary Internet Files folders to remove during Disk Cleanup More data to back up Longer time to complete virus scan Creating passwords...
... (minimum of uppercase and lowercase letters, numbers, and symbols. For example, you to remember but difficult for certain users Drawbacks to multiple user accounts: More memory (RAM) usage Multiple Temporary Internet Files folders to remove during Disk Cleanup More data to back up Longer time to complete virus scan Creating passwords...

Getting Started Guide
Page 58
... existing software program before reinstalling it may want to use. e Click Create restore point or change settings. Follow the onscreen instructions. check the operating system, memory, and other requirements listed for Installing Software and Hardware Devices After you set of your computer - If you have a stable set up the computer, you...
... existing software program before reinstalling it may want to use. e Click Create restore point or change settings. Follow the onscreen instructions. check the operating system, memory, and other requirements listed for Installing Software and Hardware Devices After you set of your computer - If you have a stable set up the computer, you...


