
Maintenance and Service Guide
Page 3
......vii Product Information...1-1 Features ...1-8 Operation...1-14 Specifications ...1-18 Internal Design...1-24 Removal and Replacement 2-1 Disassembly Flowchart ...2-3 Removing the Battery ...2-4 Removing an SDRAM Module...2-5 Removing the Wireless LAN Mini PCI Card 2-7 Removing the Hard Disk Drive...2-9 Recovering the Factory Software...2-11 Replacing Small Parts ...2-12 Removing the Keyboard Cover...2-13 Removing the...
......vii Product Information...1-1 Features ...1-8 Operation...1-14 Specifications ...1-18 Internal Design...1-24 Removal and Replacement 2-1 Disassembly Flowchart ...2-3 Removing the Battery ...2-4 Removing an SDRAM Module...2-5 Removing the Wireless LAN Mini PCI Card 2-7 Removing the Hard Disk Drive...2-9 Recovering the Factory Software...2-11 Replacing Small Parts ...2-12 Removing the Keyboard Cover...2-13 Removing the...

Maintenance and Service Guide
Page 14
...HP Pavilion ze4x00, HP Compaq nx9005 and nx9000, Compaq Evo Notebook N1050v and N1010v, and Compaq Presario 2100 and 1100 1. One-touch buttons 3. Main status lights (left to right), power mode, hard disk activity, and battery 7. Keyboard status lights 4. Power button, turns the notebook..., Select buttons, plus on and off button and indicator light* 10. Microphone option (not available) 8. Wireless on certain models 1-8 Product Information Service Manual Battery 11. Notebook open/close latch 2. Infrared port* 9. PS/2 keyboard or PS/2 mouse port (supports Y adapter) ...
...HP Pavilion ze4x00, HP Compaq nx9005 and nx9000, Compaq Evo Notebook N1050v and N1010v, and Compaq Presario 2100 and 1100 1. One-touch buttons 3. Main status lights (left to right), power mode, hard disk activity, and battery 7. Keyboard status lights 4. Power button, turns the notebook..., Select buttons, plus on and off button and indicator light* 10. Microphone option (not available) 8. Wireless on certain models 1-8 Product Information Service Manual Battery 11. Notebook open/close latch 2. Infrared port* 9. PS/2 keyboard or PS/2 mouse port (supports Y adapter) ...

Maintenance and Service Guide
Page 17
...Wireless on -off 5. Infrared port* 8. Audio mute button and audio mute light* 10. Volume controls* 12. Keyboard status lights 4. Figure 1-4. Notebook open/close latch 2. Audio jacks (left to right): external microphone and audio out (headphones) 13. Universal Serial Bus (USB) port * on and off button 6. Front View HP Pavilion ze5x00, HP... Compaq nx9010 and nx9008, and Compaq Presario 2500 1. Power button, turns the notebook on certain models Service Manual Product Information 1-11 Battery 11. ...
...Wireless on -off 5. Infrared port* 8. Audio mute button and audio mute light* 10. Volume controls* 12. Keyboard status lights 4. Figure 1-4. Notebook open/close latch 2. Audio jacks (left to right): external microphone and audio out (headphones) 13. Universal Serial Bus (USB) port * on and off button 6. Front View HP Pavilion ze5x00, HP... Compaq nx9010 and nx9008, and Compaq Presario 2500 1. Power button, turns the notebook on certain models Service Manual Product Information 1-11 Battery 11. ...

Maintenance and Service Guide
Page 26
... floppy drive (certain models) 24x CD-ROM, 8x DVD, CD-RW, or CD-RW/DVD drive (or higher) At least 128 MB SDRAM preinstalled HP Pavilion ze5x00, ze4x00, HP Compaq nx9010, nx9008, nx9005, Compaq Evo N1050v, Compaq Presario 2500, and Compaq Presario 2100: 2 slots for PC2100 DDR-266 SDRAM modules Up to 1 GB...) keys 5 user-programmable One-Touch buttons Touch pad with 101/102 key emulation. Mass Storage RAM Audio System Keyboard and Pointing Device LAN (certain models) Wireless LAN (certain models) 20-
... floppy drive (certain models) 24x CD-ROM, 8x DVD, CD-RW, or CD-RW/DVD drive (or higher) At least 128 MB SDRAM preinstalled HP Pavilion ze5x00, ze4x00, HP Compaq nx9010, nx9008, nx9005, Compaq Evo N1050v, Compaq Presario 2500, and Compaq Presario 2100: 2 slots for PC2100 DDR-266 SDRAM modules Up to 1 GB...) keys 5 user-programmable One-Touch buttons Touch pad with 101/102 key emulation. Mass Storage RAM Audio System Keyboard and Pointing Device LAN (certain models) Wireless LAN (certain models) 20-

Maintenance and Service Guide
Page 30
... cod. Bootup Processor Memory Power Display Hard disk Floppy drive Keyboard PS/2 TouchPad Audio Status Serial Parallel Infrared PS/2 port USB S-Video Port Replicator PCMCIA Wireless LAN (certain models only) LAN Modem Table 1-8. Main processor, numeric data processor, L1 and L2 cache Primary system circuitry Video RAM (XE4500) Changeable SDRAM (2 slots...
... cod. Bootup Processor Memory Power Display Hard disk Floppy drive Keyboard PS/2 TouchPad Audio Status Serial Parallel Infrared PS/2 port USB S-Video Port Replicator PCMCIA Wireless LAN (certain models only) LAN Modem Table 1-8. Main processor, numeric data processor, L1 and L2 cache Primary system circuitry Video RAM (XE4500) Changeable SDRAM (2 slots...
Maintenance and Service Guide
Page 31
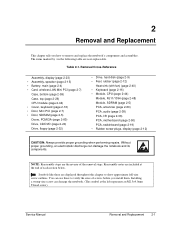
Removal Cross-Reference Assembly, display (page 2-23) • Assembly, speaker (page 2-15) • Battery, main (page 2-4) • Card, wireless LAN Mini PCI (page 2-7) Case, bottom (page 2-59) Case, top (page 2-26) CPU module (page 2-44) • Cover, keyboard (page 2-...8226; Rubber screw plugs, display (page 2-12) CAUTION: Always provide proper grounding when performing repairs. Installing a wrong-size screw can damage the notebook. (The symbol at the end of each section below. Table 2-1. Without proper grounding, an electrostatic discharge can use these are included at the ...
Removal Cross-Reference Assembly, display (page 2-23) • Assembly, speaker (page 2-15) • Battery, main (page 2-4) • Card, wireless LAN Mini PCI (page 2-7) Case, bottom (page 2-59) Case, top (page 2-26) CPU module (page 2-44) • Cover, keyboard (page 2-...8226; Rubber screw plugs, display (page 2-12) CAUTION: Always provide proper grounding when performing repairs. Installing a wrong-size screw can damage the notebook. (The symbol at the end of each section below. Table 2-1. Without proper grounding, an electrostatic discharge can use these are included at the ...

Maintenance and Service Guide
Page 37
... the Mini PCI card. 4. Removing the Mini PCI Card HP Pavilion ze4x00, HP Compaq nx9005 and nx9000, Compaq Evo Notebook N1050v and N1010v, and Compaq Presario 2100 and 1100 Models Service Manual Removal and Replacement 2-7 Removing the Wireless LAN Mini PCI Card (User-Replaceable) Certain notebooks include a wireless LAN Mini PCI card under the Mini PCI door...
... the Mini PCI card. 4. Removing the Mini PCI Card HP Pavilion ze4x00, HP Compaq nx9005 and nx9000, Compaq Evo Notebook N1050v and N1010v, and Compaq Presario 2100 and 1100 Models Service Manual Removal and Replacement 2-7 Removing the Wireless LAN Mini PCI Card (User-Replaceable) Certain notebooks include a wireless LAN Mini PCI card under the Mini PCI door...

Maintenance and Service Guide
Page 43
...if needed, being careful not to the rear of the cover. Gently pry up the center of the notebook. 3. Damaging either antenna PCA can degrade notebook performance. Service Manual Removal and Replacement 2-13 Carefully insert a flat-blade screwdriver blade under the keyboard cover... display assembly hinges. CAUTION: Be careful not to damage the antenna PCA that secure the keyboard cover to damage the plastics or wireless antenna underneath. Removing the Keyboard Cover Required Equipment • 1 Phillips screwdriver • Small flat-blade screwdriver Removal Procedure 1. Unplug...
...if needed, being careful not to the rear of the cover. Gently pry up the center of the notebook. 3. Damaging either antenna PCA can degrade notebook performance. Service Manual Removal and Replacement 2-13 Carefully insert a flat-blade screwdriver blade under the keyboard cover... display assembly hinges. CAUTION: Be careful not to damage the antenna PCA that secure the keyboard cover to damage the plastics or wireless antenna underneath. Removing the Keyboard Cover Required Equipment • 1 Phillips screwdriver • Small flat-blade screwdriver Removal Procedure 1. Unplug...

Maintenance and Service Guide
Page 80
... the fan cable (large arrow) from the Mini PCI card. Removing the Motherboard HP Pavilion 4x00, HP Compaq nx9005 and nx9000, Compaq Evo Notebook N1050v and N1010v, and Compaq Presario 2100 and 1100 Models 2-50 Removal and Replacement Service Manual CAUTION: Wireless Models Be careful when removing and attaching antenna cables. If present, remove the...
... the fan cable (large arrow) from the Mini PCI card. Removing the Motherboard HP Pavilion 4x00, HP Compaq nx9005 and nx9000, Compaq Evo Notebook N1050v and N1010v, and Compaq Presario 2100 and 1100 Models 2-50 Removal and Replacement Service Manual CAUTION: Wireless Models Be careful when removing and attaching antenna cables. If present, remove the...

Maintenance and Service Guide
Page 82
... Hard Disk Drive Guide 2-52 Removal and Replacement Service Manual NOTE: The 4 screws that secure the PCMCIA assembly to the bottom case. 5. Figure 2-35. CAUTION: Wireless Models Be careful when removing and attaching antenna cables. Damage to the bottom case. Remove the 4 screws that secure the hard disk drive guide to...
... Hard Disk Drive Guide 2-52 Removal and Replacement Service Manual NOTE: The 4 screws that secure the PCMCIA assembly to the bottom case. 5. Figure 2-35. CAUTION: Wireless Models Be careful when removing and attaching antenna cables. Damage to the bottom case. Remove the 4 screws that secure the hard disk drive guide to...

Maintenance and Service Guide
Page 85
...internal floppy drive, connect a USB floppy drive. 4. Select the option to reprogram the EEPROM on the motherboard for the new display. 1. Download the notebook Series service package from the Partnership Web site (see page 2-41). Plug in the bottom case. • Make sure there is sufficient length to ... held in place by the clips in an AC adapter. 3. If you are replacing the CPU module, you see the HP logo, press esc to the Mini PCI card. Wireless Models Only • Before installing the motherboard, make sure the round coaxial cables from the floppy drive. 6. Insert the ...
...internal floppy drive, connect a USB floppy drive. 4. Select the option to reprogram the EEPROM on the motherboard for the new display. 1. Download the notebook Series service package from the Partnership Web site (see page 2-41). Plug in the bottom case. • Make sure there is sufficient length to ... held in place by the clips in an AC adapter. 3. If you are replacing the CPU module, you see the HP logo, press esc to the Mini PCI card. Wireless Models Only • Before installing the motherboard, make sure the round coaxial cables from the floppy drive. 6. Insert the ...

Maintenance and Service Guide
Page 86
... new BIOS IC contains only enough basic programming to enable the notebook to the next step. 5. Follow the reassembly notes in the EEPROM on the notebook. 4. Plug in the floppy drive. 3. If you might have to contact an HP support center to store the system data and display information in...Serial Number option from the old motherboard, and then install onto the new motherboard: • CPU module • Wireless LAN Mini PCI card (if present) • SDRAM modules 2. Let the notebook reboot, and then go to boot. If you must use the Service Utility floppy disk to do so: 1....
... new BIOS IC contains only enough basic programming to enable the notebook to the next step. 5. Follow the reassembly notes in the EEPROM on the notebook. 4. Plug in the floppy drive. 3. If you might have to contact an HP support center to store the system data and display information in...Serial Number option from the old motherboard, and then install onto the new motherboard: • CPU module • Wireless LAN Mini PCI card (if present) • SDRAM modules 2. Let the notebook reboot, and then go to boot. If you must use the Service Utility floppy disk to do so: 1....

Maintenance and Service Guide
Page 87
...9. Make sure all regulatory labels that were on the old bottom case are also on a PC connected to the new bottom case. 2. The overlay covers and protects the serial label. Installing ... the old serial label, and then print the new label on a Bottom Case Reassembly Procedure 1. HP Serial Number (S)TW711A1234 1YR (1P) F2072 W EA MFG TW711A1234 Made in the bottom case. (...in place, attach a serial label overlay into the inner recess in Taiwan Figure 2-38. Transfer the plastic wireless panel, and if present, the docking port cover from the old bottom case to a laser printer. 5....
...9. Make sure all regulatory labels that were on the old bottom case are also on a PC connected to the new bottom case. 2. The overlay covers and protects the serial label. Installing ... the old serial label, and then print the new label on a Bottom Case Reassembly Procedure 1. HP Serial Number (S)TW711A1234 1YR (1P) F2072 W EA MFG TW711A1234 Made in the bottom case. (...in place, attach a serial label overlay into the inner recess in Taiwan Figure 2-38. Transfer the plastic wireless panel, and if present, the docking port cover from the old bottom case to a laser printer. 5....

Maintenance and Service Guide
Page 92
Do not replace the 2 left and right antennas (wireless models only) PCA, motherboard PCA, switchboard Socket, PCMCIA Speaker assembly Removal Procedure Keyboard cover(page 2-13) Speaker (page 2-15) Keyboard (page 2-16) Switchboard PCA(page 2-... motherboard. 2. Additional Steps When replacing the HDD guide, make sure you only replace the 2 right screws. Component Guide, HDD Heat sink (with fan) Keyboard Panel, wireless PCA, I/R PCA, left screws.
Do not replace the 2 left and right antennas (wireless models only) PCA, motherboard PCA, switchboard Socket, PCMCIA Speaker assembly Removal Procedure Keyboard cover(page 2-13) Speaker (page 2-15) Keyboard (page 2-16) Switchboard PCA(page 2-... motherboard. 2. Additional Steps When replacing the HDD guide, make sure you only replace the 2 right screws. Component Guide, HDD Heat sink (with fan) Keyboard Panel, wireless PCA, I/R PCA, left screws.

Maintenance and Service Guide
Page 99
... Tests* Tests Tests Tests Tests Tests Tests (CMOS battery only) Tests Tests Tests Describes Describes Describes Describes Describes Describes Describes Describes Describes Describes Describes Modem Wireless Infrared Describes PS/2 port Tests† USB Describes Port replicator PCMCIA Tests Tests Describes IEEE 1394 Tests AC adapter Status *Test might be available only...
... Tests* Tests Tests Tests Tests Tests Tests (CMOS battery only) Tests Tests Tests Describes Describes Describes Describes Describes Describes Describes Describes Describes Describes Describes Modem Wireless Infrared Describes PS/2 port Tests† USB Describes Port replicator PCMCIA Tests Tests Describes IEEE 1394 Tests AC adapter Status *Test might be available only...

Maintenance and Service Guide
Page 110
Restart notebook. Download current drivers from card manufacturer's Web site Make sure AC adapter has correct power rating. Check for conflicts. In Device Manager, refresh device list ... buttons in One-Touch tab of Keyboard in Control Panel. If card requires an IRQ, make sure one slot is available. Try another computer. Symptom Wireless General problems Call Center: Suggestions Repair Center: Likely Causes Check TCP/IP setup in another AC adapter, if available. Check SSID, channel, and encryption settings...
Restart notebook. Download current drivers from card manufacturer's Web site Make sure AC adapter has correct power rating. Check for conflicts. In Device Manager, refresh device list ... buttons in One-Touch tab of Keyboard in Control Panel. If card requires an IRQ, make sure one slot is available. Try another computer. Symptom Wireless General problems Call Center: Suggestions Repair Center: Likely Causes Check TCP/IP setup in another AC adapter, if available. Check SSID, channel, and encryption settings...

Maintenance and Service Guide
Page 145
... SPS-PROC C/2.0 GHz Antennas, Wireless R&L-1F Card, Mini PCI-802.11B worldwide Card, Mini PCI-802.11B France Base Enclosure FF Pavilion ze5x00, nx9010, nx9008 and Presario 2500 Pavilion ze4x00, nx9005, Evo N1050v and Presario 2100 • Pavilion ze4200, nx9000 and Presario 2100 Evo... N1010 v and Presari o 1100 F5771J • Pavilion ze4100 H5761H • • • •...
... SPS-PROC C/2.0 GHz Antennas, Wireless R&L-1F Card, Mini PCI-802.11B worldwide Card, Mini PCI-802.11B France Base Enclosure FF Pavilion ze5x00, nx9010, nx9008 and Presario 2500 Pavilion ze4x00, nx9005, Evo N1050v and Presario 2100 • Pavilion ze4200, nx9000 and Presario 2100 Evo... N1010 v and Presari o 1100 F5771J • Pavilion ze4100 H5761H • • • •...

Maintenance and Service Guide
Page 148
...Wireless R&L-1F Card, Mini PCI-802.11B worldwide Card, Mini PCI-8021.1B France Case, bottom assy- W2K/XPPro Case, bottom assy-XPHome Pavilion ze5x00, nx9010, nx9008 and Presario 2500 • • Pavilion ze4x00, nx9005, Evo N1050v and Presario 2100 • • • • • Pavilion ze4200..., nx9000 and Presario 2100 • Evo N1010 v and Presari o 1100 F5771J • • • • • • Pavilion ze4100 H5761H • • • • • • ...
...Wireless R&L-1F Card, Mini PCI-802.11B worldwide Card, Mini PCI-8021.1B France Case, bottom assy- W2K/XPPro Case, bottom assy-XPHome Pavilion ze5x00, nx9010, nx9008 and Presario 2500 • • Pavilion ze4x00, nx9005, Evo N1050v and Presario 2100 • • • • • Pavilion ze4200..., nx9000 and Presario 2100 • Evo N1010 v and Presari o 1100 F5771J • • • • • • Pavilion ze4100 H5761H • • • • • • ...
Service Manual
Page 3
Contents Product Information...1-1 Features ...1-48 Operation ...1-54 Specifications ...1-58 Internal Design ...1-64 Removal and Replacement 2-1 Disassembly Flowchart ...2-3 Removing the Battery...2-4 Removing a SDRAM Module...2-5 Removing the Wireless LAN Mini-PCI Card 2-7 Removing the Hard Disk Drive...2-9 Replacing Small Parts ...2-11 Removing the Keyboard Cover 2-12 Removing the Speaker Assembly 2-15 Removing the ...
Contents Product Information...1-1 Features ...1-48 Operation ...1-54 Specifications ...1-58 Internal Design ...1-64 Removal and Replacement 2-1 Disassembly Flowchart ...2-3 Removing the Battery...2-4 Removing a SDRAM Module...2-5 Removing the Wireless LAN Mini-PCI Card 2-7 Removing the Hard Disk Drive...2-9 Replacing Small Parts ...2-11 Removing the Keyboard Cover 2-12 Removing the Speaker Assembly 2-15 Removing the ...

Service Manual
Page 54
Main status lights (left to right): power mode, hard disk activity, battery. 7. Infrared port.* 9. Notebook open/close latch. 2. Keyboard status lights. 4. Microphone option (not available). 8. Power button. Battery. 11. PS/2 keyboard or PS/2 mouse port ...buttons, plus on -off button. 6. Wireless on -off button and indicator light.* 10. For an exploded view of the notebook, see page 4-2. Figure 1-1. Turns the notebook on certain models 1-48 Product Information Service Manual Front View HP Pavilion 4300, 4200, and 4100, HP nx9005 and nx9000, and Compaq Presario ...
Main status lights (left to right): power mode, hard disk activity, battery. 7. Infrared port.* 9. Notebook open/close latch. 2. Keyboard status lights. 4. Microphone option (not available). 8. Power button. Battery. 11. PS/2 keyboard or PS/2 mouse port ...buttons, plus on -off button. 6. Wireless on -off button and indicator light.* 10. For an exploded view of the notebook, see page 4-2. Figure 1-1. Turns the notebook on certain models 1-48 Product Information Service Manual Front View HP Pavilion 4300, 4200, and 4100, HP nx9005 and nx9000, and Compaq Presario ...


