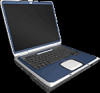

Maintenance and Service Guide
Page 3
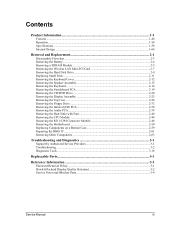
... Cover...2-13 Removing the Speaker Assembly ...2-15 Removing the Keyboard ...2-16 Removing the Switchboard PCA ...2-19 Removing the CD/DVD Drive...2-20 Removing the Display Assembly...2-23 Removing the Top Case ...2-26 Removing the Floppy Drive...2-32 Removing ...44 Removing the RJ11/1394 Connector Module 2-48 Removing the Motherboard ...2-50 Replacing Components on a Bottom Case 2-59 Repairing the BIOS IC...2-61 Removing Other Components...2-63 Troubleshooting and Diagnostics 3-1 Support Service Partners...3-2 Troubleshooting ...3-3 Diagnostic Tools ...3-18 Replaceable Parts...4-1 Reference ...
... Cover...2-13 Removing the Speaker Assembly ...2-15 Removing the Keyboard ...2-16 Removing the Switchboard PCA ...2-19 Removing the CD/DVD Drive...2-20 Removing the Display Assembly...2-23 Removing the Top Case ...2-26 Removing the Floppy Drive...2-32 Removing ...44 Removing the RJ11/1394 Connector Module 2-48 Removing the Motherboard ...2-50 Replacing Components on a Bottom Case 2-59 Repairing the BIOS IC...2-61 Removing Other Components...2-63 Troubleshooting and Diagnostics 3-1 Support Service Partners...3-2 Troubleshooting ...3-3 Diagnostic Tools ...3-18 Replaceable Parts...4-1 Reference ...

Maintenance and Service Guide
Page 91
...drive CPU module Display assembly Doors, PCMCIA Floppy drive Removal Procedure Keyboard cover(page 2-13) Speaker (page 2-15) Keyboard (page 2-16) Switchboard PCA(page 2-19) CD/DVD (page 2-20 Display (page 2-23) Top case (page 2-26) Floppy (page 2-32) Heat sink (page 2-40) Motherboard (page 2-50) See page... (page 2-50) See page 2-32 Additional Steps Reassembly Notes: After replacing the CMOS battery, set the correct time and date using the BIOS Setup utility or Date/Time in the table below. Remove the assemblies, and then follow the additional steps listed in the Control Panel. Removing...
...drive CPU module Display assembly Doors, PCMCIA Floppy drive Removal Procedure Keyboard cover(page 2-13) Speaker (page 2-15) Keyboard (page 2-16) Switchboard PCA(page 2-19) CD/DVD (page 2-20 Display (page 2-23) Top case (page 2-26) Floppy (page 2-32) Heat sink (page 2-40) Motherboard (page 2-50) See page... (page 2-50) See page 2-32 Additional Steps Reassembly Notes: After replacing the CMOS battery, set the correct time and date using the BIOS Setup utility or Date/Time in the table below. Remove the assemblies, and then follow the additional steps listed in the Control Panel. Removing...
Maintenance and Service Guide
Page 101
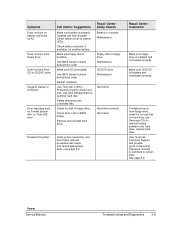
...provide proof of ownership. Check battery contacts. Restart notebook. Delete temporary and unneeded files. Make sure floppy disk is bootable. Use BIOS Setup to optimize hard disk. Use BIOS Setup to check hard disk. Make sure CD/DVD is installed and connected correctly. Remove and reinstall... drive, replace hard drive. Repair Center: Likely Causes Battery or contacts Motherboard Floppy disk or floppy drive Motherboard. If notebook boots from CD in CD/DVD drive Sluggish startup or shutdown Error message such as "Invalid system disk" or "Auto IDE error" Call Center:...
...provide proof of ownership. Check battery contacts. Restart notebook. Delete temporary and unneeded files. Make sure floppy disk is bootable. Use BIOS Setup to optimize hard disk. Use BIOS Setup to check hard disk. Make sure CD/DVD is installed and connected correctly. Remove and reinstall... drive, replace hard drive. Repair Center: Likely Causes Battery or contacts Motherboard Floppy disk or floppy drive Motherboard. If notebook boots from CD in CD/DVD drive Sluggish startup or shutdown Error message such as "Invalid system disk" or "Auto IDE error" Call Center:...

Maintenance and Service Guide
Page 117
...ATA drives (optional) Initialize hard-disk controllers Initialize local-bus hard-disk controllers Jump to UserPatch2 Build MPTABLE for multi-processor boards Install CD-ROM for boot Clear huge ES segment register Fix up Multi Processor table Check for SMART Drive (optional) Shadow option ROMs Set ... ROMPilot about the end of POST POST done-prepare to boot OS Terminate QuietBoot (optional) Check password (optional) Initialize ACPI BIOS Prepare Boot Initialize SMBIOS Initialize PnP Option ROMs Clear parity checkers Display MultiBoot menu Clear screen (optional) Troubleshooting and Diagnostics 3-25
...ATA drives (optional) Initialize hard-disk controllers Initialize local-bus hard-disk controllers Jump to UserPatch2 Build MPTABLE for multi-processor boards Install CD-ROM for boot Clear huge ES segment register Fix up Multi Processor table Check for SMART Drive (optional) Shadow option ROMs Set ... ROMPilot about the end of POST POST done-prepare to boot OS Terminate QuietBoot (optional) Check password (optional) Initialize ACPI BIOS Prepare Boot Initialize SMBIOS Initialize PnP Option ROMs Clear parity checkers Display MultiBoot menu Clear screen (optional) Troubleshooting and Diagnostics 3-25

Maintenance and Service Guide
Page 121
... nnnn Cache SRAM Passed nnnn KB Shadow RAM Passed nnnn KB System RAM Passed Operating system not found Description RAM cache failed and BIOS disabled the cache May require replacing the motherboard A disabled cache slows system performance considerably CPU socket number for Multi-Processor error ServerBIOS2 test... too long Address conflict for the specified device Run ISA or EISA Configuration Utility to resolve a resource conflict for the specified device CD-ROM drive identified Starting BIOS Setup Hex number nnnn is a map of the bits at the RAM address that failed the memory test Each 1 (one)...
... nnnn Cache SRAM Passed nnnn KB Shadow RAM Passed nnnn KB System RAM Passed Operating system not found Description RAM cache failed and BIOS disabled the cache May require replacing the motherboard A disabled cache slows system performance considerably CPU socket number for Multi-Processor error ServerBIOS2 test... too long Address conflict for the specified device Run ISA or EISA Configuration Utility to resolve a resource conflict for the specified device CD-ROM drive identified Starting BIOS Setup Hex number nnnn is a map of the bits at the RAM address that failed the memory test Each 1 (one)...

Maintenance and Service Guide
Page 127
... Does not affect password, date, or time changes Updating the Notebook's BIOS Hewlett-Packard might from time to time provide updates to the notebook's BIOS Use e-DiagTools for Windows to change , or clear the administrator password, which protects BIOS Setup settings The password can have no more than 8 characters ... Password is Administrator Password is Set User Password Set Administrator Password Password Required to Boot Boot Menu Hard Disk Removable Device CD/DVD Built-in LAN Exit Menu Save Changes and Exit Discard Changes and Exit Get Default Values Description Default Sets whether ...
... Does not affect password, date, or time changes Updating the Notebook's BIOS Hewlett-Packard might from time to time provide updates to the notebook's BIOS Use e-DiagTools for Windows to change , or clear the administrator password, which protects BIOS Setup settings The password can have no more than 8 characters ... Password is Administrator Password is Set User Password Set Administrator Password Password Required to Boot Boot Menu Hard Disk Removable Device CD/DVD Built-in LAN Exit Menu Save Changes and Exit Discard Changes and Exit Get Default Values Description Default Sets whether ...
Service Manual
Page 3
...the Keyboard Cover 2-12 Removing the Speaker Assembly 2-15 Removing the Keyboard...2-16 Removing the Switchboard PCA 2-19 Removing the CD/DVD Drive ...2-20 Removing the Display Assembly 2-23 Removing the Top Case ...2-26 Removing the Floppy Drive ...2-32 Removing......2-44 Removing the RJ11/1394 Connector Module 2-48 Removing the Motherboard ...2-50 Replacing Components on a Bottom Case 2-59 Repairing the BIOS IC ...2-61 Removing Other Components ...2-63 Troubleshooting and Diagnostics 3-1 Support by Authorized Service Providers 3-1 Troubleshooting ...3-2 Diagnostic Tools ...3-18 ...
...the Keyboard Cover 2-12 Removing the Speaker Assembly 2-15 Removing the Keyboard...2-16 Removing the Switchboard PCA 2-19 Removing the CD/DVD Drive ...2-20 Removing the Display Assembly 2-23 Removing the Top Case ...2-26 Removing the Floppy Drive ...2-32 Removing......2-44 Removing the RJ11/1394 Connector Module 2-48 Removing the Motherboard ...2-50 Replacing Components on a Bottom Case 2-59 Repairing the BIOS IC ...2-61 Removing Other Components ...2-63 Troubleshooting and Diagnostics 3-1 Support by Authorized Service Providers 3-1 Troubleshooting ...3-2 Diagnostic Tools ...3-18 ...

Service Manual
Page 134
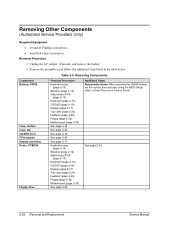
... cover (page 2-12). Motherboard (page 2-50). See page 2-20. See page 2-23. Removal Procedure 1. Component Battery, CMOS Case, bottom Case, top CD/DVD drive CPU module Display assembly Doors, PCMCIA Floppy drive Table 2-5. Switchboard PCA (page 2-18). Floppy (page 2-32). See page 2-26. Floppy (page...page 2-59. Heat sink (page 2-40). Additional Steps Reassembly Notes: After replacing the CMOS battery, set the correct time and date using the BIOS Setup utility or Date/Time in the table below. Unplug the AC adapter, if present, and remove the battery. 2. Speaker (page 2-15)....
... cover (page 2-12). Motherboard (page 2-50). See page 2-20. See page 2-23. Removal Procedure 1. Component Battery, CMOS Case, bottom Case, top CD/DVD drive CPU module Display assembly Doors, PCMCIA Floppy drive Table 2-5. Switchboard PCA (page 2-18). Floppy (page 2-32). See page 2-26. Floppy (page...page 2-59. Heat sink (page 2-40). Additional Steps Reassembly Notes: After replacing the CMOS battery, set the correct time and date using the BIOS Setup utility or Date/Time in the table below. Unplug the AC adapter, if present, and remove the battery. 2. Speaker (page 2-15)....

Service Manual
Page 141
... likely causes of a problem, determine which replaceable modules are involved in CD/DVD drive. SDRAM module. Display assembly. Check battery level on AC or battery. Use BIOS Setup to check default boot order. Restart notebook. Motherboard. If power status light turns on . CPU module. Switchboard ...use touch pad while booting or resuming. Reinsert any PC cards, press the reset button to turn notebook on but display remains off , then reconnect power and try again. Beeps once, spins hard disk, repeats, but BIOS does not complete, replace display assembly. Does not ...
... likely causes of a problem, determine which replaceable modules are involved in CD/DVD drive. SDRAM module. Display assembly. Check battery level on AC or battery. Use BIOS Setup to check default boot order. Restart notebook. Motherboard. If power status light turns on . CPU module. Switchboard ...use touch pad while booting or resuming. Reinsert any PC cards, press the reset button to turn notebook on but display remains off , then reconnect power and try again. Beeps once, spins hard disk, repeats, but BIOS does not complete, replace display assembly. Does not ...

Service Manual
Page 142
...then follow removal procedure with owner and record appropriate data-see page 5-1. Remove and reinstall hard drive. Motherboard. Repair Center: Comments If notebook boots from floppy drive, check for disk in disk's Properties sheet to certain sites. Call Center: Suggestions Use Tools tab in floppy drive...adapter connected. Power No power. Check for corrupt files on hard drive, use Recovery CDs to optimize hard disk. Repair Center: Likely Causes Hard drive. See page 5-1. Check boot order in BIOS Setup. Make sure charged battery is restricted to check hard disk. AC adapter. Try...
...then follow removal procedure with owner and record appropriate data-see page 5-1. Remove and reinstall hard drive. Motherboard. Repair Center: Comments If notebook boots from floppy drive, check for disk in disk's Properties sheet to certain sites. Call Center: Suggestions Use Tools tab in floppy drive...adapter connected. Power No power. Check for corrupt files on hard drive, use Recovery CDs to optimize hard disk. Repair Center: Likely Causes Hard drive. See page 5-1. Check boot order in BIOS Setup. Make sure charged battery is restricted to check hard disk. AC adapter. Try...

Service Manual
Page 154
... Settings in the Connect window and enter the settings recommended by a sequence of the notebook's components require service. The basic hardware test shows a recommended replacement part. When the notebook boots, its system BIOS runs a series of one or more POST tests as a hardware, software, or ... to view the Support Ticket. 11. Boot from the Recovery CD or DVD. After each run it from the CD or DVD and select the diagnostics option. In Windows, click Start > All Programs (or Programs) > Hewlett-Packard > Notebook > HP e-Diagtools > e-Diagtools for Windows, use the e-Diagtools menu...
... Settings in the Connect window and enter the settings recommended by a sequence of the notebook's components require service. The basic hardware test shows a recommended replacement part. When the notebook boots, its system BIOS runs a series of one or more POST tests as a hardware, software, or ... to view the Support Ticket. 11. Boot from the Recovery CD or DVD. After each run it from the CD or DVD and select the diagnostics option. In Windows, click Start > All Programs (or Programs) > Hewlett-Packard > Notebook > HP e-Diagtools > e-Diagtools for Windows, use the e-Diagtools menu...

Service Manual
Page 156
.... Load custom defaults (optional). Check for unexpected interrupts. Initialize Intelligent System Monitoring. Late POST device initialization. Initialize PC-compatible PnP ISA devices. Set time of ATA drives (optional). Initialize SMBIOS. Initialize PnP Option ROMs. Service Manual... Management. Configure non-MCD IDE controllers. Configure Motherboard Configurable Devices (optional). Initialize Extended BIOS Data Area. Initialize local-bus hard-disk controllers. Install CD-ROM for SMART Drive (optional). Check for boot. Initialize typematic rate. Erase F2 prompt...
.... Load custom defaults (optional). Check for unexpected interrupts. Initialize Intelligent System Monitoring. Late POST device initialization. Initialize PC-compatible PnP ISA devices. Set time of ATA drives (optional). Initialize SMBIOS. Initialize PnP Option ROMs. Service Manual... Management. Configure non-MCD IDE controllers. Configure Motherboard Configurable Devices (optional). Initialize Extended BIOS Data Area. Initialize local-bus hard-disk controllers. Install CD-ROM for SMART Drive (optional). Check for boot. Initialize typematic rate. Erase F2 prompt...

Service Manual
Page 159
... in the I /O device IRQ conflict error. Parity Check 2 nnnn Parity error found in System, Extended, or Shadow memory. CD ROM Drive CD-ROM drive identified. BIOS attempts to display the previous screen (usually an initialization error of shadow RAM in kB successfully tested. Starting... BIOS Setup. See errors 230, 231, or 232 above for checking errors in kB successfully tested. I/O device IRQ conflict I /O ...
... in the I /O device IRQ conflict error. Parity Check 2 nnnn Parity error found in System, Extended, or Shadow memory. CD ROM Drive CD-ROM drive identified. BIOS attempts to display the previous screen (usually an initialization error of shadow RAM in kB successfully tested. Starting... BIOS Setup. See errors 230, 231, or 232 above for checking errors in kB successfully tested. I/O device IRQ conflict I /O ...

Service Manual
Page 163
... needed (page 2-61). 3-28 Troubleshooting and Diagnostics Service Manual Restores default settings, and remains in LAN Updating the Notebook's BIOS Hewlett-Packard might from time to time provide updates to the notebook's BIOS. Hard Disk 2. CD/DVD 4. Use e-DiagTools for changes. System Devices Menu Video Display Device External Pointing Devices Legacy USB Support Wake On...
... needed (page 2-61). 3-28 Troubleshooting and Diagnostics Service Manual Restores default settings, and remains in LAN Updating the Notebook's BIOS Hewlett-Packard might from time to time provide updates to the notebook's BIOS. Hard Disk 2. CD/DVD 4. Use e-DiagTools for changes. System Devices Menu Video Display Device External Pointing Devices Legacy USB Support Wake On...

HP Pavilion ze4x00, ze5x00 and specific xt notebook series - Startup Guide
Page 25
...down Windows. Select Start > Turn Off Computer > Restart. 2. To change the boot device The notebook normally boots from a specific device whenever it is present, change the boot order using the BIOS Setup utility. If you want to restart. Use the arrow keys to display the Boot menu. 3.... You can also boot the notebook from a diskette drive, a CD-ROM drive, or an internal network interface card. 1. Startup Guide...
...down Windows. Select Start > Turn Off Computer > Restart. 2. To change the boot device The notebook normally boots from a specific device whenever it is present, change the boot order using the BIOS Setup utility. If you want to restart. Use the arrow keys to display the Boot menu. 3.... You can also boot the notebook from a diskette drive, a CD-ROM drive, or an internal network interface card. 1. Startup Guide...

HP Pavilion ze4x00, ze5x00 and specific xt notebook series - Startup Guide
Page 35
... located at a time, in the order in which they are other sources of 1024 × 768 or higher, depending on the Documentation Library CD included with your notebook. • Use the Windows troubleshooters. If the screen is blank • Move the mouse or tap the TouchPad. If an external display does... not work • Check the connections. • The external monitor may not be detected. In the BIOS Setup utility, try setting Video Display Device to Both in Display-off mode. • If the notebook is cold, allow it is in the System Devices menu. • If you're using a TV ...
... located at a time, in the order in which they are other sources of 1024 × 768 or higher, depending on the Documentation Library CD included with your notebook. • Use the Windows troubleshooters. If the screen is blank • Move the mouse or tap the TouchPad. If an external display does... not work • Check the connections. • The external monitor may not be detected. In the BIOS Setup utility, try setting Video Display Device to Both in Display-off mode. • If the notebook is cold, allow it is in the System Devices menu. • If you're using a TV ...

HP Pavilion ze4x00, ze5x00 and specific xt notebook series - Startup Guide
Page 36
...If the TouchPad does not work • Press the TouchPad on the light. • Do not touch the TouchPad while the notebook is connected, the built-in or external devices. You can format the hard drive and reinstall the original factory software using the QuickRestore... System Recovery CD included with the BIOS Setup utility. • Restart the notebook. Troubleshooting and Maintenance Troubleshooting Your Notebook Hard drive problems If the notebook hard drive does not spin • Make sure the...
...If the TouchPad does not work • Press the TouchPad on the light. • Do not touch the TouchPad while the notebook is connected, the built-in or external devices. You can format the hard drive and reinstall the original factory software using the QuickRestore... System Recovery CD included with the BIOS Setup utility. • Restart the notebook. Troubleshooting and Maintenance Troubleshooting Your Notebook Hard drive problems If the notebook hard drive does not spin • Make sure the...

HP Pavilion ze4x00, ze5x00 and specific xt notebook series - Startup Guide
Page 41
..., 24 troubleshooting, 30 BIOS Setup utility using, 32 boot device order, 17 brightness, adjusting, 19 C Caps Lock, 9 CD-ROM drive location, 2, 3 configuring BIOS settings, 32 D devices... temporary boot order, 17 diskette drive location, 5 display brightness, 19 port, 5 docking port, 6, 7 Documentation Library CD,...built-in, 12 port location, 5 monitor port, 5 mouse, troubleshooting, 29 mute button location, 3 N notebook changing BIOS settings, 32 opening/closing, 2, 3 resetting, 17 turning on, 13 Num Lock, 9 O off button location...
..., 24 troubleshooting, 30 BIOS Setup utility using, 32 boot device order, 17 brightness, adjusting, 19 C Caps Lock, 9 CD-ROM drive location, 2, 3 configuring BIOS settings, 32 D devices... temporary boot order, 17 diskette drive location, 5 display brightness, 19 port, 5 docking port, 6, 7 Documentation Library CD,...built-in, 12 port location, 5 monitor port, 5 mouse, troubleshooting, 29 mute button location, 3 N notebook changing BIOS settings, 32 opening/closing, 2, 3 resetting, 17 turning on, 13 Num Lock, 9 O off button location...

HP Pavilion & Compaq Presario Notebook PC - Service Manual
Page 3
...Information...1-1 Features ...1-15 Operation ...1-18 Turning the Notebook On and Off 1-18 Checking the Status of the Notebook 1-19 Using Fn Hot Keys ...1-20 Resetting the Notebook ...1-21 Specifications ...1-22 Internal Design ...1-27 Removal...the Keyboard (User-Replaceable 2-13 Removing the Switchboard PCA (User-Replaceable 2-15 Removing the CD/DVD Drive (User-Replaceable 2-16 Removing the Display Assembly (Authorized Service Providers Only 2-......3-19 Sycard PCCtest 450/460 PC Card (Optional 3-25 Windows Management Instrumentation (WMI 3-26 BIOS Setup Utility ...3-26 Service Manual iii
...Information...1-1 Features ...1-15 Operation ...1-18 Turning the Notebook On and Off 1-18 Checking the Status of the Notebook 1-19 Using Fn Hot Keys ...1-20 Resetting the Notebook ...1-21 Specifications ...1-22 Internal Design ...1-27 Removal...the Keyboard (User-Replaceable 2-13 Removing the Switchboard PCA (User-Replaceable 2-15 Removing the CD/DVD Drive (User-Replaceable 2-16 Removing the Display Assembly (Authorized Service Providers Only 2-......3-19 Sycard PCCtest 450/460 PC Card (Optional 3-25 Windows Management Instrumentation (WMI 3-26 BIOS Setup Utility ...3-26 Service Manual iii
HP Pavilion & Compaq Presario Notebook PC - Service Manual
Page 72
...(page 2-20). Motherboard (page 2-30). Additional Steps Reassembly Notes: After replacing the CMOS battery, set the correct time and date using the BIOS Setup utility or Date/Time in the table below. Removing Other Components (Authorized Service Providers Only) Required Equipment • #0 and #1 Phillips ...Procedure 1. Table 2-5. Switchboard PCA (page 2-13). Keyboard (page 2-13). Motherboard (page 2-30). Speaker (page 2-12). Floppy (page 2-22). CD/DVD (page 2-16). Top case (page 2-20). See page 2-16. Removing Components Component Battery, CMOS Case, bottom Case, top...
...(page 2-20). Motherboard (page 2-30). Additional Steps Reassembly Notes: After replacing the CMOS battery, set the correct time and date using the BIOS Setup utility or Date/Time in the table below. Removing Other Components (Authorized Service Providers Only) Required Equipment • #0 and #1 Phillips ...Procedure 1. Table 2-5. Switchboard PCA (page 2-13). Keyboard (page 2-13). Motherboard (page 2-30). Speaker (page 2-12). Floppy (page 2-22). CD/DVD (page 2-16). Top case (page 2-20). See page 2-16. Removing Components Component Battery, CMOS Case, bottom Case, top...

