End User License Agreement
Page 2
... fail to comply with any term or condition of a hard disk drive-based solution, an external media-based recovery solution (e.g. floppy disk, CD or DVD) or an equivalent solution delivered in any other form, may make a one-time transfer of the Software Product to another end user... along with /for commercial timesharing or bureau use the original Software Product that formed the basis for the original Software Product identified by HP unless HP provides other applicable laws and international treaty provisions. Recovery Solution. You may no longer use . You agree that the right to the...
... fail to comply with any term or condition of a hard disk drive-based solution, an external media-based recovery solution (e.g. floppy disk, CD or DVD) or an equivalent solution delivered in any other form, may make a one-time transfer of the Software Product to another end user... along with /for commercial timesharing or bureau use the original Software Product that formed the basis for the original Software Product identified by HP unless HP provides other applicable laws and international treaty provisions. Recovery Solution. You may no longer use . You agree that the right to the...

HP Notebook Series - Maintenance, Shipping and Travel Guide
Page 4
... enhancements provide added functionality for power management, security, and the use of enhancements added by HP. In other cases, complete USB support will result in the QuickRestore System Recovery CD is connected to a network, you install all software updates as they become unavailable. Installing ...1 Maintaining Your Software and Personal Data HP recommends that you may result in system lockups and loss of an Operating System The Windows operating system included in the loss of drives and PC Cards. Ä CAUTION: Replacing an HP enhanced operating system with your system is...
... enhancements provide added functionality for power management, security, and the use of enhancements added by HP. In other cases, complete USB support will result in the QuickRestore System Recovery CD is connected to a network, you install all software updates as they become unavailable. Installing ...1 Maintaining Your Software and Personal Data HP recommends that you may result in system lockups and loss of an Operating System The Windows operating system included in the loss of drives and PC Cards. Ä CAUTION: Replacing an HP enhanced operating system with your system is...

HP Notebook Series - Maintenance, Shipping and Travel Guide
Page 13
...shipping or traveling: 1. If you are shipping the notebook, place it in with the Notebook ■ Take along a backup of your work . Traveling with the rest of your notebook as "fragile." 3 Preparing the Notebook for Shipping or Traveling To prepare the notebook for more than 2 weeks, remove all battery packs... and store them in a cool, dry place. 6. Back up your luggage. Shut down the notebook. 5. Maintenance, Shipping and Travel 3-1 Do not check it in the original packing box or similar protective packaging and label the package as...
...shipping or traveling: 1. If you are shipping the notebook, place it in with the Notebook ■ Take along a backup of your work . Traveling with the rest of your notebook as "fragile." 3 Preparing the Notebook for Shipping or Traveling To prepare the notebook for more than 2 weeks, remove all battery packs... and store them in a cool, dry place. 6. Back up your luggage. Shut down the notebook. 5. Maintenance, Shipping and Travel 3-1 Do not check it in the original packing box or similar protective packaging and label the package as...

Maintenance and Service Guide
Page 3
... Replacing Small Parts ...2-12 Removing the Keyboard Cover...2-13 Removing the Speaker Assembly ...2-15 Removing the Keyboard ...2-16 Removing the Switchboard PCA ...2-19 Removing the CD/DVD Drive...2-20 Removing the Display Assembly...2-23 Removing the Top Case ...2-26 Removing the Floppy Drive...2-32 Removing the Infrared (I/R) PCA...2-36 Removing the...
... Replacing Small Parts ...2-12 Removing the Keyboard Cover...2-13 Removing the Speaker Assembly ...2-15 Removing the Keyboard ...2-16 Removing the Switchboard PCA ...2-19 Removing the CD/DVD Drive...2-20 Removing the Display Assembly...2-23 Removing the Top Case ...2-26 Removing the Floppy Drive...2-32 Removing the Infrared (I/R) PCA...2-36 Removing the...

Maintenance and Service Guide
Page 4
.... Removing the Audio PCA ...2-39 Figure 2-26. Removing the Mini PCI Card 2-8 Figure 2-7. Removing the CD/DVD Drive 2-21 Figure 2-16. Removing the CD/DVD Drive 2-22 Figure 2-17. Removing the Floppy Drive 2-35 Figure 2-24. AMD CPU Module Installation ...Figure 2-27. Figures Figure 1-1. Removing the Hard Disk Drive Tray 2-10 Figure 2-9. Removing the Display Assembly 2-24 Figure 2-18. Resetting the Notebook ...1-17 Figure 1-8. Front View...1-8 Figure 1-2. Bottom View...1-13 Figure 1-7. Removing the I/R PCA...2-37 Figure 2-25. Intel CPU Module Removal ...
.... Removing the Audio PCA ...2-39 Figure 2-26. Removing the Mini PCI Card 2-8 Figure 2-7. Removing the CD/DVD Drive 2-21 Figure 2-16. Removing the CD/DVD Drive 2-22 Figure 2-17. Removing the Floppy Drive 2-35 Figure 2-24. AMD CPU Module Installation ...Figure 2-27. Figures Figure 1-1. Removing the Hard Disk Drive Tray 2-10 Figure 2-9. Removing the Display Assembly 2-24 Figure 2-18. Resetting the Notebook ...1-17 Figure 1-8. Front View...1-8 Figure 1-2. Bottom View...1-13 Figure 1-7. Removing the I/R PCA...2-37 Figure 2-25. Intel CPU Module Removal ...

Maintenance and Service Guide
Page 6
...Partners America Online CompuServe HP Support Assist CD-ROM Microsoft® Windows® manual Microsoft Web site http://welcome.hp.com/country/us/eng/prodserv/ notebooks_tabletpcs.html http://www.hp.com/go/bizsupport http://www.hp.com.au/ Keyword: HP GO HP (800) 457-1762...installing, servicing, and repairing these notebooks. The manual is for servicing the HP Pavilion ze5600, ze5500, ze5400, ze5300, ze5200, ze4700, ze4600, ze4500, ze4400, ze4300, ze4200, and ze4100 Notebook PCs, HP Compaq nx9010, nx9008, nx9005, and nx9000 Notebook PCs, Compaq Evo Notebook 1050v and 1010v Series, and ...
...Partners America Online CompuServe HP Support Assist CD-ROM Microsoft® Windows® manual Microsoft Web site http://welcome.hp.com/country/us/eng/prodserv/ notebooks_tabletpcs.html http://www.hp.com/go/bizsupport http://www.hp.com.au/ Keyword: HP GO HP (800) 457-1762...installing, servicing, and repairing these notebooks. The manual is for servicing the HP Pavilion ze5600, ze5500, ze5400, ze5300, ze5200, ze4700, ze4600, ze4500, ze4400, ze4300, ze4200, and ze4100 Notebook PCs, HP Compaq nx9010, nx9008, nx9005, and nx9000 Notebook PCs, Compaq Evo Notebook 1050v and 1010v Series, and ...

Maintenance and Service Guide
Page 14
For an exploded view of the notebook, see page 4-2. Front View HP Pavilion ze4x00, HP Compaq nx9005 and nx9000, Compaq Evo Notebook N1050v and N1010v, and Compaq Presario 2100 and 1100 1. Touch pad, scroll pad, Select buttons, plus on and ... Manual Notebook open/close latch 2. Main status lights (left to right), power mode, hard disk activity, and battery 7. Microphone option (not available) 8. Infrared port* 9. Battery 11. Figure 1-1. One-touch buttons 3. Features The following illustrations show the notebook's main external features. Keyboard status lights 4. CD-ROM,...
For an exploded view of the notebook, see page 4-2. Front View HP Pavilion ze4x00, HP Compaq nx9005 and nx9000, Compaq Evo Notebook N1050v and N1010v, and Compaq Presario 2100 and 1100 1. Touch pad, scroll pad, Select buttons, plus on and ... Manual Notebook open/close latch 2. Main status lights (left to right), power mode, hard disk activity, and battery 7. Microphone option (not available) 8. Infrared port* 9. Battery 11. Figure 1-1. One-touch buttons 3. Features The following illustrations show the notebook's main external features. Keyboard status lights 4. CD-ROM,...

Maintenance and Service Guide
Page 17
... to right), power mode, hard disk activity, and battery 7. CD-ROM, DVD, or other drive 14. One-touch buttons 3. Battery 11. Keyboard status lights 4. Wireless on and off 5. Notebook open/close latch 2. Infrared port* 8. Volume controls* 12. Figure 1-4. Power button, turns the notebook on -off button 6. Universal Serial Bus (USB) port * on... Information 1-11 Audio jacks (left to right): external microphone and audio out (headphones) 13. Audio mute button and audio mute light* 10. Front View HP Pavilion ze5x00, HP Compaq nx9010 and nx9008, and Compaq Presario 2500 1.
... to right), power mode, hard disk activity, and battery 7. CD-ROM, DVD, or other drive 14. One-touch buttons 3. Battery 11. Keyboard status lights 4. Wireless on and off 5. Notebook open/close latch 2. Infrared port* 8. Volume controls* 12. Figure 1-4. Power button, turns the notebook on -off button 6. Universal Serial Bus (USB) port * on... Information 1-11 Audio jacks (left to right): external microphone and audio out (headphones) 13. Audio mute button and audio mute light* 10. Front View HP Pavilion ze5x00, HP Compaq nx9010 and nx9008, and Compaq Presario 2500 1.

Maintenance and Service Guide
Page 23
Press the power button to press the reset button on the bottom of the notebook. Press esc when the HP logo appears, and then select the CD/DVD drive as the Recovery CDs) into the CD/DVD drive, then restart. If the system will not allow a software shutdown, ...release the power button. If this happens, try the following in the order listed. Figure 1-7. Resetting the Notebook Occasionally, Windows or the notebook might stop responding, so that you cannot turn the notebook off. Resetting the Notebook NOTE: To boot from a CD, insert a bootable CD (such as the temporary boot device.
Press the power button to press the reset button on the bottom of the notebook. Press esc when the HP logo appears, and then select the CD/DVD drive as the Recovery CDs) into the CD/DVD drive, then restart. If the system will not allow a software shutdown, ...release the power button. If this happens, try the following in the order listed. Figure 1-7. Resetting the Notebook Occasionally, Windows or the notebook might stop responding, so that you cannot turn the notebook off. Resetting the Notebook NOTE: To boot from a CD, insert a bootable CD (such as the temporary boot device.

Maintenance and Service Guide
Page 26
... touch-type QWERTY keyboard with Ultra-DMA 100 interface 1.44-MB floppy drive (certain models) 24x CD-ROM, 8x DVD, CD-RW, or CD-RW/DVD drive (or higher) At least 128 MB SDRAM preinstalled HP Pavilion ze5x00, ze4x00, HP Compaq nx9010, nx9008, nx9005, Compaq Evo N1050v, Compaq Presario 2500, and Compaq Presario 2100: 2 slots for...
... touch-type QWERTY keyboard with Ultra-DMA 100 interface 1.44-MB floppy drive (certain models) 24x CD-ROM, 8x DVD, CD-RW, or CD-RW/DVD drive (or higher) At least 128 MB SDRAM preinstalled HP Pavilion ze5x00, ze4x00, HP Compaq nx9010, nx9008, nx9005, Compaq Evo N1050v, Compaq Presario 2500, and Compaq Presario 2100: 2 slots for...
Maintenance and Service Guide
Page 31
... 2-1 The items marked by • in the following table are the reverse of screws before you how to remove and replace the notebook's components and assemblies. Symbols like these to show approximate full-size screw outlines. Removal Cross-Reference Assembly, display (page 2-23) &#...(page 2-44) • Cover, keyboard (page 2-16) • Door, Mini PCI (page 2-7) • Door, SDRAM (page 2-5) Doors, PCMCIA (page 2-60) Drive, CD/DVD (page 2-20) Drive, floppy (page 2-32) • Drive, hard disk (page 2-9) • Feet, rubber (page 2-12) Heat sink (with fan) (page 2-40...
... 2-1 The items marked by • in the following table are the reverse of screws before you how to remove and replace the notebook's components and assemblies. Symbols like these to show approximate full-size screw outlines. Removal Cross-Reference Assembly, display (page 2-23) &#...(page 2-44) • Cover, keyboard (page 2-16) • Door, Mini PCI (page 2-7) • Door, SDRAM (page 2-5) Doors, PCMCIA (page 2-60) Drive, CD/DVD (page 2-20) Drive, floppy (page 2-32) • Drive, hard disk (page 2-9) • Feet, rubber (page 2-12) Heat sink (with fan) (page 2-40...

Maintenance and Service Guide
Page 41
... Advanced, and then select not to select the CD/DVD drive as the first boot device, and then press enter. 6. If prompted, accept the recommended partition size. select Advanced and then select to open it. 3. When the HP logo appears, press esc to the notebook. 2. If the hard disk is not enabled, select...
... Advanced, and then select not to select the CD/DVD drive as the first boot device, and then press enter. 6. If prompted, accept the recommended partition size. select Advanced and then select to open it. 3. When the HP logo appears, press esc to the notebook. 2. If the hard disk is not enabled, select...
Maintenance and Service Guide
Page 50
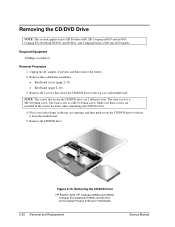
...additional assemblies: • Keyboard cover (page 2-13) • Keyboard (page 2-16) 3. Remove the CD/DVD drive. Removing the CD/DVD Drive HP Pavilion 4x00, HP Compaq nx9005 and nx9000, Compaq Evo Notebook N1050v and N1010v, and Compaq Presario 2100 and 1100 Models 2-20 Removal and Replacement Service Manual Remove the... 2 screws that secure the CD/DVD drive are installed in the top case opening, and then push out on the CD/DVD drive to HP Pavilion 4x00, HP Compaq nx9005 and nx9000, Compaq Evo Notebook N1050v and N1010v, and Compaq Presario 2100 and 1100...
...additional assemblies: • Keyboard cover (page 2-13) • Keyboard (page 2-16) 3. Remove the CD/DVD drive. Removing the CD/DVD Drive HP Pavilion 4x00, HP Compaq nx9005 and nx9000, Compaq Evo Notebook N1050v and N1010v, and Compaq Presario 2100 and 1100 Models 2-20 Removal and Replacement Service Manual Remove the... 2 screws that secure the CD/DVD drive are installed in the top case opening, and then push out on the CD/DVD drive to HP Pavilion 4x00, HP Compaq nx9005 and nx9000, Compaq Evo Notebook N1050v and N1010v, and Compaq Presario 2100 and 1100...

Maintenance and Service Guide
Page 51
... 1 Phillips screwdriver Removal Procedure 1. Remove the two M2.5×6.0mm screws that secure the CD/DVD drive to HP Pavilion 5x00, HP Compaq nx9010 and nx9008, and Compaq Presario 2500 models. Removing the CD/DVD Drive HP Pavilion 5x00, HP Compaq nx9010 and HP nx9008, and Compaq Presario 2500 Models Service Manual Removal and Replacement 2-21 Unplug the AC...: • Keyboard cover (page 2-13) • Keyboard (page 2-16) 3. Figure 2-16. Place your index finger in the top case opening and push out on the CD/DVD drive to release it from the motherboard. 5. Remove the...
... 1 Phillips screwdriver Removal Procedure 1. Remove the two M2.5×6.0mm screws that secure the CD/DVD drive to HP Pavilion 5x00, HP Compaq nx9010 and nx9008, and Compaq Presario 2500 models. Removing the CD/DVD Drive HP Pavilion 5x00, HP Compaq nx9010 and HP nx9008, and Compaq Presario 2500 Models Service Manual Removal and Replacement 2-21 Unplug the AC...: • Keyboard cover (page 2-13) • Keyboard (page 2-16) 3. Figure 2-16. Place your index finger in the top case opening and push out on the CD/DVD drive to release it from the motherboard. 5. Remove the...

Maintenance and Service Guide
Page 54
... side up with the front facing forward. 4. Removing the Top Case (Service Partners Only) NOTE: This section applies only to HP Pavilion 4x00, HP Compaq nx9005 and nx9000, Compaq Evo Notebook N1050v and N1010v, and Compaq Presario 2100 and 1100 models. Required Equipment 1 Phillips screwdriver Removal Procedure 1. Remove the following M2.5×4.0mm...8226; Hard disk drive (page 2-9) • Keyboard cover (page 2-13) • Speaker assembly (page 2-23) • Keyboard (page 2-16) • Switchboard PCA (page 2-19) • CD/DVD drive (page 2-20) • Display assembly (page 2-23) 3.
... side up with the front facing forward. 4. Removing the Top Case (Service Partners Only) NOTE: This section applies only to HP Pavilion 4x00, HP Compaq nx9005 and nx9000, Compaq Evo Notebook N1050v and N1010v, and Compaq Presario 2100 and 1100 models. Required Equipment 1 Phillips screwdriver Removal Procedure 1. Remove the following M2.5×4.0mm...8226; Hard disk drive (page 2-9) • Keyboard cover (page 2-13) • Speaker assembly (page 2-23) • Keyboard (page 2-16) • Switchboard PCA (page 2-19) • CD/DVD drive (page 2-20) • Display assembly (page 2-23) 3.

Maintenance and Service Guide
Page 56
... (page 2-9) • Keyboard cover (page 2-13) • Speaker assembly (page 2-15) • Keyboard (page 2-16) • Switchboard PCA (page 2-19) • CD/DVD drive (page 2-20) • Display assembly (page 2-23) 3. Unplug the AC adapter, if present, and then remove the battery. 2. Be sure to note of...on the front edge of the notebook • Two M2.5×6.0mm screws on each screw as it is removed and install it in step 4 are 3 different lengths. Failure to follow this caution can result in damage to HP Pavilion 5x00, HP Compaq nx9010 and HP nx9008, and Compaq Presario 2500...
... (page 2-9) • Keyboard cover (page 2-13) • Speaker assembly (page 2-15) • Keyboard (page 2-16) • Switchboard PCA (page 2-19) • CD/DVD drive (page 2-20) • Display assembly (page 2-23) 3. Unplug the AC adapter, if present, and then remove the battery. 2. Be sure to note of...on the front edge of the notebook • Two M2.5×6.0mm screws on each screw as it is removed and install it in step 4 are 3 different lengths. Failure to follow this caution can result in damage to HP Pavilion 5x00, HP Compaq nx9010 and HP nx9008, and Compaq Presario 2500...

Maintenance and Service Guide
Page 79
...floppy drive. 4. Remove these additional assemblies: • Hard disk drive (page 2-9) • Keyboard cover (page 2-13) • Keyboard (page 2-16) • CD/DVD drive (page 2-20) • Display assembly (page 2-23) • Top case (page 2-26) • Floppy drive (page 2-32) • Heat ... disk as described in display or the external monitor), press esc to HP Pavilion 4x00, HP Compaq nx9005 and nx9000, Compaq Evo Notebook N1050v and N1010v, and Compaq Presario 2100 and 1100 models. Download the notebook service package from the old motherboard on either the built-in the package...
...floppy drive. 4. Remove these additional assemblies: • Hard disk drive (page 2-9) • Keyboard cover (page 2-13) • Keyboard (page 2-16) • CD/DVD drive (page 2-20) • Display assembly (page 2-23) • Top case (page 2-26) • Floppy drive (page 2-32) • Heat ... disk as described in display or the external monitor), press esc to HP Pavilion 4x00, HP Compaq nx9005 and nx9000, Compaq Evo Notebook N1050v and N1010v, and Compaq Presario 2100 and 1100 models. Download the notebook service package from the old motherboard on either the built-in the package...

Maintenance and Service Guide
Page 81
...disk as described in display or the external monitor), press esc to HP Pavilion 5x00, HP Compaq nx9010, HP nx9008, and Compaq Presario 2500 models. You will then store the electronic...8226; Hard disk drive (page 2-9) • Keyboard cover (page 2-13) • Keyboard (page 2-16) • CD/DVD drive (page 2-20) • Display assembly (page 2-23) • Top case (page 2-26) • Heat...If possible, record the computer's electronic serial number before you replace the motherboard. Download the notebook service package from the boot menu. 6. When prompted, type A for the automatic update ...
...disk as described in display or the external monitor), press esc to HP Pavilion 5x00, HP Compaq nx9010, HP nx9008, and Compaq Presario 2500 models. You will then store the electronic...8226; Hard disk drive (page 2-9) • Keyboard cover (page 2-13) • Keyboard (page 2-16) • CD/DVD drive (page 2-20) • Display assembly (page 2-23) • Top case (page 2-26) • Heat...If possible, record the computer's electronic serial number before you replace the motherboard. Download the notebook service package from the boot menu. 6. When prompted, type A for the automatic update ...

Maintenance and Service Guide
Page 83
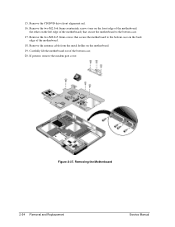
...drive front alignment rail to the bottom case are installed in the correct locations when reinstalling the CD/DVD drive front alignment rail. Remove the four M5.0×10mm standoffs from the notebook rear panel (2 on each side of the rail is a M2.5×6.0mm countersink screw. Make... sure these screws are 2 different sizes. 7. The screw that secure the CD/DVD drive front alignment rail to the bottom case. Disconnect...
...drive front alignment rail to the bottom case are installed in the correct locations when reinstalling the CD/DVD drive front alignment rail. Remove the four M5.0×10mm standoffs from the notebook rear panel (2 on each side of the rail is a M2.5×6.0mm countersink screw. Make... sure these screws are 2 different sizes. 7. The screw that secure the CD/DVD drive front alignment rail to the bottom case. Disconnect...
Maintenance and Service Guide
Page 84
... Motherboard 2-54 Removal and Replacement Service Manual Remove the antenna cable from the metal holder on the back edge of the motherboard. 18. Remove the CD/DVD drive front alignment rail. 16. Remove the two M2.5×6.0mm countersink screws (one on the front edge of the motherboard, the other on...
... Motherboard 2-54 Removal and Replacement Service Manual Remove the antenna cable from the metal holder on the back edge of the motherboard. 18. Remove the CD/DVD drive front alignment rail. 16. Remove the two M2.5×6.0mm countersink screws (one on the front edge of the motherboard, the other on...


