End User License Agreement
Page 2
... CONSENT TO USE OF DATA. You agree that HP and its suppliers and are owned by HP unless HP provides other terms will also terminate upon conditions set forth elsewhere in this EULA or if you may not reverse engineer, decompile, or disassemble the Software Product, except and only to the ...extent that formed the basis for your HP Product, whether in the Software Product and user documentation are protected by law, including but not ...
... CONSENT TO USE OF DATA. You agree that HP and its suppliers and are owned by HP unless HP provides other terms will also terminate upon conditions set forth elsewhere in this EULA or if you may not reverse engineer, decompile, or disassemble the Software Product, except and only to the ...extent that formed the basis for your HP Product, whether in the Software Product and user documentation are protected by law, including but not ...

Maintenance and Service Guide
Page 3
Contents Introduction...vii Product Information...1-1 Features ...1-8 Operation...1-14 Specifications ...1-18 Internal Design...1-24 Removal and Replacement 2-1 Disassembly Flowchart ...2-3 Removing the Battery ...2-4 Removing an SDRAM Module...2-5 Removing the Wireless LAN Mini PCI Card 2-7 Removing the Hard Disk Drive...2-9 Recovering the Factory Software...2-11 ...
Contents Introduction...vii Product Information...1-1 Features ...1-8 Operation...1-14 Specifications ...1-18 Internal Design...1-24 Removal and Replacement 2-1 Disassembly Flowchart ...2-3 Removing the Battery ...2-4 Removing an SDRAM Module...2-5 Removing the Wireless LAN Mini PCI Card 2-7 Removing the Hard Disk Drive...2-9 Recovering the Factory Software...2-11 ...

Maintenance and Service Guide
Page 4
... Removing the CPU Module 2-39 Figure 2-33. Removing the Hard Disk Drive Guide 2-53 iv Service Manual Back View ...1-12 Figure 1-6. Disassembly Flow...2-3 Figure 2-2. Removing the Mini PCI Card 2-7 Figure 2-6. Removing the CD/DVD Drive 2-22 Figure 2-17. Removing the Heat Sink...Assembly 2-15 Figure 2-12. Removing the Top Case...2-27 Figure 2-19. Removing the Top Case Screws 2-30 Figure 2-21. Resetting the Notebook ...1-17 Figure 1-8. Removing the Switchboard PCA 2-19 Figure 2-15. Removing the RJ11/1394 Connector Module 2-49 Figure 2-34. AMD CPU ...
... Removing the CPU Module 2-39 Figure 2-33. Removing the Hard Disk Drive Guide 2-53 iv Service Manual Back View ...1-12 Figure 1-6. Disassembly Flow...2-3 Figure 2-2. Removing the Mini PCI Card 2-7 Figure 2-6. Removing the CD/DVD Drive 2-22 Figure 2-17. Removing the Heat Sink...Assembly 2-15 Figure 2-12. Removing the Top Case...2-27 Figure 2-19. Removing the Top Case Screws 2-30 Figure 2-21. Resetting the Notebook ...1-17 Figure 1-8. Removing the Switchboard PCA 2-19 Figure 2-15. Removing the RJ11/1394 Connector Module 2-49 Figure 2-34. AMD CPU ...

Maintenance and Service Guide
Page 33
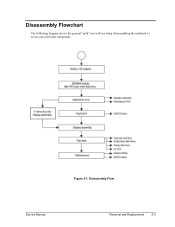
Figure 2-1. Disassembly Flowchart The following diagram shows the general "path" you will use when disassembling the notebook to access any particular component. Disassembly Flow Service Manual Removal and Replacement 2-3
Figure 2-1. Disassembly Flowchart The following diagram shows the general "path" you will use when disassembling the notebook to access any particular component. Disassembly Flow Service Manual Removal and Replacement 2-3
Service Manual
Page 3
Contents Product Information...1-1 Features ...1-48 Operation ...1-54 Specifications ...1-58 Internal Design ...1-64 Removal and Replacement 2-1 Disassembly Flowchart ...2-3 Removing the Battery...2-4 Removing a SDRAM Module...2-5 Removing the Wireless LAN Mini-PCI Card 2-7 Removing the Hard Disk Drive...2-9 Replacing Small Parts ...2-11 Removing the ...
Contents Product Information...1-1 Features ...1-48 Operation ...1-54 Specifications ...1-58 Internal Design ...1-64 Removal and Replacement 2-1 Disassembly Flowchart ...2-3 Removing the Battery...2-4 Removing a SDRAM Module...2-5 Removing the Wireless LAN Mini-PCI Card 2-7 Removing the Hard Disk Drive...2-9 Replacing Small Parts ...2-11 Removing the ...

Service Manual
Page 4
...Module 2-45 Figure 2-29. Removing the Hard Disk Drive Guide 2-53 Figure 2-33. Replacing the Antennas 2-60 Figure 2-37. Exploded View...4-2 Figure 4-2. Resetting the Notebook 1-57 Figure 1-8. Removing the Battery ...2-4 Figure 2-3. Removing the Keyboard Cover 2-13 Figure 2-10. Removing the CD/DVD Drive 2-21 Figure 2-16. Removing the Top...Figure 2-27. Basic Troubleshooting Steps 3-2 Figure 4-1. Removing an SDRAM Module 2-5 Figure 2-4. Removing an SDRAM Module 2-6 Figure 2-5. Removing the Speaker Assembly 2-15 Figure 2-12. Disassembly Flow ...2-3 Figure 2-2.
...Module 2-45 Figure 2-29. Removing the Hard Disk Drive Guide 2-53 Figure 2-33. Replacing the Antennas 2-60 Figure 2-37. Exploded View...4-2 Figure 4-2. Resetting the Notebook 1-57 Figure 1-8. Removing the Battery ...2-4 Figure 2-3. Removing the Keyboard Cover 2-13 Figure 2-10. Removing the CD/DVD Drive 2-21 Figure 2-16. Removing the Top...Figure 2-27. Basic Troubleshooting Steps 3-2 Figure 4-1. Removing an SDRAM Module 2-5 Figure 2-4. Removing an SDRAM Module 2-6 Figure 2-5. Removing the Speaker Assembly 2-15 Figure 2-12. Disassembly Flow ...2-3 Figure 2-2.

Service Manual
Page 74
Figure 2-1. Disassembly Flow Service Manual Removal and Replacement 2-3 Disassembly Flowchart The following diagram shows the general "path" you will use when disassembling the notebook to access any particular component.
Figure 2-1. Disassembly Flow Service Manual Removal and Replacement 2-3 Disassembly Flowchart The following diagram shows the general "path" you will use when disassembling the notebook to access any particular component.

HP Pavilion ze4x00, ze5x00 and specific xt notebook series - Startup Guide
Page 2
... rights are reserved. Hewlett-Packard Company makes no warranty of any kind with the furnishing, performance, or use of certain U.S. is prohibited. Reverse engineering or disassembly is also prohibited. registered trademarks of Intel Corporation. Adobe® and Acrobat® are U.S. Pentium® and the Intel Inside logo are trademarks of merchantability...
... rights are reserved. Hewlett-Packard Company makes no warranty of any kind with the furnishing, performance, or use of certain U.S. is prohibited. Reverse engineering or disassembly is also prohibited. registered trademarks of Intel Corporation. Adobe® and Acrobat® are U.S. Pentium® and the Intel Inside logo are trademarks of merchantability...

HP Pavilion & Compaq Presario Notebook PC - Service Manual
Page 3
... Product Information...1-1 Features ...1-15 Operation ...1-18 Turning the Notebook On and Off 1-18 Checking the Status of the Notebook 1-19 Using Fn Hot Keys ...1-20 Resetting the Notebook ...1-21 Specifications ...1-22 Internal Design ...1-27 Removal and Replacement 2-1 Disassembly Flowchart ...2-3 Removing the Battery (User-Replaceable 2-4 Removing ... 3-5 Diagnostic Tools ...3-18 e-Diagtools Diagnostic Program 3-18 Power-On Self-Test ...3-19 Sycard PCCtest 450/460 PC Card (Optional 3-25 Windows Management Instrumentation (WMI 3-26 BIOS Setup Utility ...3-26 Service Manual iii
... Product Information...1-1 Features ...1-15 Operation ...1-18 Turning the Notebook On and Off 1-18 Checking the Status of the Notebook 1-19 Using Fn Hot Keys ...1-20 Resetting the Notebook ...1-21 Specifications ...1-22 Internal Design ...1-27 Removal and Replacement 2-1 Disassembly Flowchart ...2-3 Removing the Battery (User-Replaceable 2-4 Removing ... 3-5 Diagnostic Tools ...3-18 e-Diagtools Diagnostic Program 3-18 Power-On Self-Test ...3-19 Sycard PCCtest 450/460 PC Card (Optional 3-25 Windows Management Instrumentation (WMI 3-26 BIOS Setup Utility ...3-26 Service Manual iii

HP Pavilion & Compaq Presario Notebook PC - Service Manual
Page 4
... 2-18 Figure 2-13. Removing the Heatsink (with Fan 2-26 Figure 2-17. Removing the CPU Module 2-29 Figure 2-18. Disassembly Flow ...2-3 Figure 2-2. Removing the Switchboard PCA 2-15 Figure 2-11. Removing the Floppy Drive 2-23 Figure 2-15. Removing the ...Antennas 2-35 Figure 2-21. Replaceable Module Diagram 1-27 Figure 2-1. Removing the Hard Disk Drive Tray 2-8 Figure 2-7. Resetting the Notebook 1-21 Figure 1-5. Removing the Keyboard 2-14 Figure 2-10. Replaceable Parts...4-1 Reference Information 5-1 Password Removal Policy...5-1 Hewlett-Packard Display...
... 2-18 Figure 2-13. Removing the Heatsink (with Fan 2-26 Figure 2-17. Removing the CPU Module 2-29 Figure 2-18. Disassembly Flow ...2-3 Figure 2-2. Removing the Switchboard PCA 2-15 Figure 2-11. Removing the Floppy Drive 2-23 Figure 2-15. Removing the ...Antennas 2-35 Figure 2-21. Replaceable Module Diagram 1-27 Figure 2-1. Removing the Hard Disk Drive Tray 2-8 Figure 2-7. Resetting the Notebook 1-21 Figure 1-5. Removing the Keyboard 2-14 Figure 2-10. Replaceable Parts...4-1 Reference Information 5-1 Password Removal Policy...5-1 Hewlett-Packard Display...
HP Pavilion & Compaq Presario Notebook PC - Service Manual
Page 37
Figure 2-1. Disassembly Flowchart The following diagram shows the general "path" you will use when disassembling the notebook to access any particular component. Disassembly Flow Service Manual Removal and Replacement 2-3
Figure 2-1. Disassembly Flowchart The following diagram shows the general "path" you will use when disassembling the notebook to access any particular component. Disassembly Flow Service Manual Removal and Replacement 2-3
HP Pavilion PC - Safety and Comfort Guide
Page 46
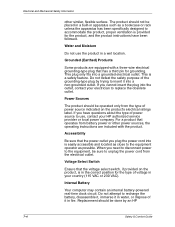
... outlet. Do not defeat the safety purpose of it in a wet location. If you need to disconnect power to recharge the battery, disassemble it, immerse it into is in the correct position for the product, and the product instructions have questions about the type of voltage in...possible. Replacement should not be done by trying to use the product in fire. The product should be placed in a built-in your HP authorized service provider or local power company. Internal Battery Your computer may contain an internal battery-powered real-time clock circuit. Electrical and ...
... outlet. Do not defeat the safety purpose of it in a wet location. If you need to disconnect power to recharge the battery, disassemble it, immerse it into is in the correct position for the product, and the product instructions have questions about the type of voltage in...possible. Replacement should not be done by trying to use the product in fire. The product should be placed in a built-in your HP authorized service provider or local power company. Internal Battery Your computer may contain an internal battery-powered real-time clock circuit. Electrical and ...

Start-Up Guide - Enhanced for Accessibility
Page 2
All rights reserved. Reverse engineering or disassembly is also prohibited. Pentium® and the Intel Inside logo are trademarks of Hewlett-Packard Company, except as is" and are reserved. Use of ...technology that control this manual or the examples herein. © Copyright 2002, 2004 Hewlett-Packard Company. registered trademarks of Intel Corporation. HP Notebook PC Startup Guide First Edition (December 2002) Reference Number: ze4200/ze5200 Part Number: 311075-001 ii Startup Guide Hewlett-Packard Co. patents and other rights owners. Microsoft®, MS-DOS®...
All rights reserved. Reverse engineering or disassembly is also prohibited. Pentium® and the Intel Inside logo are trademarks of Hewlett-Packard Company, except as is" and are reserved. Use of ...technology that control this manual or the examples herein. © Copyright 2002, 2004 Hewlett-Packard Company. registered trademarks of Intel Corporation. HP Notebook PC Startup Guide First Edition (December 2002) Reference Number: ze4200/ze5200 Part Number: 311075-001 ii Startup Guide Hewlett-Packard Co. patents and other rights owners. Microsoft®, MS-DOS®...

HP Notebook PC - Startup Guide
Page 2
... home and other rights owners. HP Notebook PC Startup Guide First Edition (December 2002) Reference Number: ze4200/ze5200 Part Number: 311075-001 ii Startup Guide Microsoft®, MS-DOS®, and Windows® are U.S. registered trademarks of Intel Corporation. trademarks of Microsoft Corporation. All rights reserved. Reverse engineering or disassembly is also prohibited. Portions of...
... home and other rights owners. HP Notebook PC Startup Guide First Edition (December 2002) Reference Number: ze4200/ze5200 Part Number: 311075-001 ii Startup Guide Microsoft®, MS-DOS®, and Windows® are U.S. registered trademarks of Intel Corporation. trademarks of Microsoft Corporation. All rights reserved. Reverse engineering or disassembly is also prohibited. Portions of...


