
Maintenance and Service Guide
Page 5
Boot-Block Jumper...2-62 Figure 3-1. Exploded View ...4-3 Tables Table 1-1. Product Comparisons...1-1 Table 1-2. Fn Hot Keys ...1-16 Table 1-6. Removal Cross-Reference ...2-1 Table 2-2. Recommended Screw Torque Values... Figure 2-37. Specifications...1-18 Table 1-7. Sycard PCCtest Commands ...3-26 Table 3-7. BIOS Setup Menus and Parameters 3-28 Table 4-1. Main Status Lights (front of notebook 1-15 Table 1-4. Activating Power Modes ...1-14 Table 1-3. Part Number Reference...4-12 Table 5-1. Figure 2-36. Disconnecting the Motherboard Cables 2-54 Figure 2-37.
Boot-Block Jumper...2-62 Figure 3-1. Exploded View ...4-3 Tables Table 1-1. Product Comparisons...1-1 Table 1-2. Fn Hot Keys ...1-16 Table 1-6. Removal Cross-Reference ...2-1 Table 2-2. Recommended Screw Torque Values... Figure 2-37. Specifications...1-18 Table 1-7. Sycard PCCtest Commands ...3-26 Table 3-7. BIOS Setup Menus and Parameters 3-28 Table 4-1. Main Status Lights (front of notebook 1-15 Table 1-4. Activating Power Modes ...1-14 Table 1-3. Part Number Reference...4-12 Table 5-1. Figure 2-36. Disconnecting the Motherboard Cables 2-54 Figure 2-37.

Maintenance and Service Guide
Page 23
If this happens, try the following in the order listed. Press esc when the HP logo appears, and then select the CD/DVD drive as the Recovery CDs) into the CD/DVD drive, then restart. Press the power button again ... to press the reset button on the bottom of the notebook. Figure 1-7. Resetting the Notebook NOTE: To boot from a CD, insert a bootable CD (such as the temporary boot device. Resetting the Notebook Occasionally, Windows or the notebook might stop responding, so that you cannot turn the notebook off. Service Manual Product Information 1-17 If the system will...
If this happens, try the following in the order listed. Press esc when the HP logo appears, and then select the CD/DVD drive as the Recovery CDs) into the CD/DVD drive, then restart. Press the power button again ... to press the reset button on the bottom of the notebook. Figure 1-7. Resetting the Notebook NOTE: To boot from a CD, insert a bootable CD (such as the temporary boot device. Resetting the Notebook Occasionally, Windows or the notebook might stop responding, so that you cannot turn the notebook off. Service Manual Product Information 1-17 If the system will...

Maintenance and Service Guide
Page 26
... Left and right Select buttons Ethernet 10Base-T (10 Mbps) and 100Base-TX (100 Mbps) support Supports wake-on-LAN, fast IP, DMI, dRMON MBA (Managed Boot Agent) support for PC2100 DDR-266 SDRAM modules Up to 1 GB (1024 MB) SDRAM using 256 MB modules Stereo sound via 2 built-in speakers 3D... floppy drive (certain models) 24x CD-ROM, 8x DVD, CD-RW, or CD-RW/DVD drive (or higher) At least 128 MB SDRAM preinstalled HP Pavilion ze5x00, ze4x00, HP Compaq nx9010, nx9008, nx9005, Compaq Evo N1050v, Compaq Presario 2500, and Compaq Presario 2100: 2 slots for PC2100 DDR-266 SDRAM modules Up to 512...
... Left and right Select buttons Ethernet 10Base-T (10 Mbps) and 100Base-TX (100 Mbps) support Supports wake-on-LAN, fast IP, DMI, dRMON MBA (Managed Boot Agent) support for PC2100 DDR-266 SDRAM modules Up to 1 GB (1024 MB) SDRAM using 256 MB modules Stereo sound via 2 built-in speakers 3D... floppy drive (certain models) 24x CD-ROM, 8x DVD, CD-RW, or CD-RW/DVD drive (or higher) At least 128 MB SDRAM preinstalled HP Pavilion ze5x00, ze4x00, HP Compaq nx9010, nx9008, nx9005, Compaq Evo N1050v, Compaq Presario 2500, and Compaq Presario 2100: 2 slots for PC2100 DDR-266 SDRAM modules Up to 512...

Maintenance and Service Guide
Page 35
... the notebook from booting. Press outward on the latches at the sides of the notebook, loosen the captive screws holding the SDRAM door, and then remove the door. 3. Required Equipment 1 Phillips screwdriver Removal Procedure 1. On the bottom of the SDRAM module to release it (the SDRAM module pops up). 4. NOTE: HP Pavilion ze5300, ze5200, ze4300, ze4200...
... the notebook from booting. Press outward on the latches at the sides of the notebook, loosen the captive screws holding the SDRAM door, and then remove the door. 3. Required Equipment 1 Phillips screwdriver Removal Procedure 1. On the bottom of the SDRAM module to release it (the SDRAM module pops up). 4. NOTE: HP Pavilion ze5300, ze5200, ze4300, ze4200...

Maintenance and Service Guide
Page 41
...instructions. Turn on -screen instructions for installing the drivers. 10. If prompted, accept the recommended partition size. When prompted to recover the notebook's original operating system and drivers. When the operating system has been installed and while Windows is not enabled, select Start > Run. ... install the operating system. select Advanced and then select to the notebook. 2. When the HP logo appears, press esc to select the CD/DVD drive as the first boot device, and then press enter. 6. If the notebook is turned off, use a pin or straightened paper clip to ...
...instructions. Turn on -screen instructions for installing the drivers. 10. If prompted, accept the recommended partition size. When prompted to recover the notebook's original operating system and drivers. When the operating system has been installed and while Windows is not enabled, select Start > Run. ... install the operating system. select Advanced and then select to the notebook. 2. When the HP logo appears, press esc to select the CD/DVD drive as the first boot device, and then press enter. 6. If the notebook is turned off, use a pin or straightened paper clip to ...

Maintenance and Service Guide
Page 53
Plug in the floppy drive. Service Manual Removal and Replacement 2-23 Download the notebook series service package from the floppy drive. 6. When you see the HP logo, press esc to display the boot menu, then boot from the Partnership Web site (see page vii), and then create a Service Utilities floppy disk as described in the... Figure 2-17. Removing the Display Assembly NOTE: After replacing the display assembly or motherboard, you connect the grounding strap to reprogram the EEPROM on the notebook. 5. .
Plug in the floppy drive. Service Manual Removal and Replacement 2-23 Download the notebook series service package from the floppy drive. 6. When you see the HP logo, press esc to display the boot menu, then boot from the Partnership Web site (see page vii), and then create a Service Utilities floppy disk as described in the... Figure 2-17. Removing the Display Assembly NOTE: After replacing the display assembly or motherboard, you connect the grounding strap to reprogram the EEPROM on the notebook. 5. .

Maintenance and Service Guide
Page 79
...(on either the built-in the EEPROM on the new motherboard using the Service Utility floppy disk. 1. This stores the current system data from the boot menu. 6. When prompted, type A for the automatic update option. Remove these additional assemblies: • Hard disk drive (page 2-9) • Keyboard... 2-49 You will then store the electronic serial number in display or the external monitor), press esc to HP Pavilion 4x00, HP Compaq nx9005 and nx9000, Compaq Evo Notebook N1050v and N1010v, and Compaq Presario 2100 and 1100 models. Turn on the floppy disk. 1. Insert the...
...(on either the built-in the EEPROM on the new motherboard using the Service Utility floppy disk. 1. This stores the current system data from the boot menu. 6. When prompted, type A for the automatic update option. Remove these additional assemblies: • Hard disk drive (page 2-9) • Keyboard... 2-49 You will then store the electronic serial number in display or the external monitor), press esc to HP Pavilion 4x00, HP Compaq nx9005 and nx9000, Compaq Evo Notebook N1050v and N1010v, and Compaq Presario 2100 and 1100 models. Turn on the floppy disk. 1. Insert the...

Maintenance and Service Guide
Page 81
Download the notebook service package from the floppy disk. 5. Turn on the new motherboard using ... Manual Removal and Replacement 2-51 Plug in display or the external monitor), press esc to HP Pavilion 5x00, HP Compaq nx9010, HP nx9008, and Compaq Presario 2500 models. When the HP logo appears (on the floppy disk. 1. Unplug the AC adapter, if present, and ... either the built-in an AC adapter. 3. NOTE: This section applies only to display the boot menu, and then choose Removable Device and boot from the Partnership Web site (see page vii), and create a Service Utilities floppy disk as ...
Download the notebook service package from the floppy disk. 5. Turn on the new motherboard using ... Manual Removal and Replacement 2-51 Plug in display or the external monitor), press esc to HP Pavilion 5x00, HP Compaq nx9010, HP nx9008, and Compaq Presario 2500 models. When the HP logo appears (on the floppy disk. 1. Unplug the AC adapter, if present, and ... either the built-in an AC adapter. 3. NOTE: This section applies only to display the boot menu, and then choose Removable Device and boot from the Partnership Web site (see page vii), and create a Service Utilities floppy disk as ...

Maintenance and Service Guide
Page 85
Reassembly Notes NOTE: After replacing the display assembly or motherboard, you see the HP logo, press esc to display the boot menu, and then boot from the floppy drive. 6. Download the notebook Series service package from the antenna PCAs are replacing the CPU module, you are held in ... floppy drive, connect a USB floppy drive. 4. Service Manual Removal and Replacement 2-55 When you must also replace the thermal pad on the notebook. 5. Wireless Models Only • Before installing the motherboard, make sure the round coaxial cables from the Partnership Web site (see page 2-41...
Reassembly Notes NOTE: After replacing the display assembly or motherboard, you see the HP logo, press esc to display the boot menu, and then boot from the floppy drive. 6. Download the notebook Series service package from the antenna PCAs are replacing the CPU module, you are held in ... floppy drive, connect a USB floppy drive. 4. Service Manual Removal and Replacement 2-55 When you must also replace the thermal pad on the notebook. 5. Wireless Models Only • Before installing the motherboard, make sure the round coaxial cables from the Partnership Web site (see page 2-41...

Maintenance and Service Guide
Page 86
... modules 2. The motherboard has EMI springs attached to the next step. 5. If you might have to contact an HP support center to boot. Enter the serial number from the bottom of the notebook-you did not store system data, type M for the automatic update. NOTE: Reprogramming the BIOS IC A new ...BIOS IC contains only enough basic programming to enable the notebook to do so: 1. To do this. 2-56 Removal ...
... modules 2. The motherboard has EMI springs attached to the next step. 5. If you might have to contact an HP support center to boot. Enter the serial number from the bottom of the notebook-you did not store system data, type M for the automatic update. NOTE: Reprogramming the BIOS IC A new ...BIOS IC contains only enough basic programming to enable the notebook to do so: 1. To do this. 2-56 Removal ...

Maintenance and Service Guide
Page 89
... Connect any programs that appear. Once the update process begins, do not interrupt it . 3. If the notebook will boot sufficiently, use a Crisis Recovery floppy disk. Undock the notebook if it is docked, and remove any PCMCIA cards from this program on a particular unit, select Change ...window to reprogram a malfunctioning BIOS IC using either e-DiagTools for creating a BIOS floppy disk are available from the HP Business Support Web site http://www.hp.com/go/bizsupport. See below for instructions for Windows CAUTION: The BIOS update completely replaces the previous BIOS, ...
... Connect any programs that appear. Once the update process begins, do not interrupt it . 3. If the notebook will boot sufficiently, use a Crisis Recovery floppy disk. Undock the notebook if it is docked, and remove any PCMCIA cards from this program on a particular unit, select Change ...window to reprogram a malfunctioning BIOS IC using either e-DiagTools for creating a BIOS floppy disk are available from the HP Business Support Web site http://www.hp.com/go/bizsupport. See below for instructions for Windows CAUTION: The BIOS update completely replaces the previous BIOS, ...

Maintenance and Service Guide
Page 90
... Follow the instructions for a minute or more while the BIOS is the latest version. Unplug the AC adapter. b. NOTE: If the notebook will not boot from the BIOS floppy disk. See the wiring diagram below. 3. NOTE: If you plugged in the Service and Support Library. If necessary...following to use the correct BIOS floppy disk for the notebook model you are repairing. CAUTION: Make sure to boot from the BIOS floppy disk: a. If the notebook does not turn on the notebook and allow it before the notebook automatically reboots. 4. d. The display goes blank for creating...
... Follow the instructions for a minute or more while the BIOS is the latest version. Unplug the AC adapter. b. NOTE: If the notebook will not boot from the BIOS floppy disk. See the wiring diagram below. 3. NOTE: If you plugged in the Service and Support Library. If necessary...following to use the correct BIOS floppy disk for the notebook model you are repairing. CAUTION: Make sure to boot from the BIOS floppy disk: a. If the notebook does not turn on the notebook and allow it before the notebook automatically reboots. 4. d. The display goes blank for creating...

Maintenance and Service Guide
Page 100
... PCA Motherboard Display assembly Hard drive Beeps once, spins hard disk, repeats, but one SDRAM module and try again. Remove all but does not boot Make sure at least one SDRAM module and try again. See the figure on page 1-24 and the table on but OS does not start...drive, reload hard drive, replace hard drive. 3-8 Troubleshooting and Diagnostics Service Manual Press and hold power button to turn notebook off, and then press power button to turn on . Reinsert any PC cards, press the reset button to turn on AC or battery Check power source. If the power status light does...
... PCA Motherboard Display assembly Hard drive Beeps once, spins hard disk, repeats, but one SDRAM module and try again. Remove all but does not boot Make sure at least one SDRAM module and try again. See the figure on page 1-24 and the table on but OS does not start...drive, reload hard drive, replace hard drive. 3-8 Troubleshooting and Diagnostics Service Manual Press and hold power button to turn notebook off, and then press power button to turn on . Reinsert any PC cards, press the reset button to turn on AC or battery Check power source. If the power status light does...
Maintenance and Service Guide
Page 101
...: Comments Make sure floppy drive is installed and connected correctly. Make sure floppy disk is bootable. Remove and reinstall hard drive. Restart notebook. Make sure CD is bootable. Use Tools tab in BIOS Setup. User must call Technical Support and provide proof of ownership. Check ...for corrupt files on battery LEDs. If notebook boots from CD in floppy drive. Password removal is properly installed and fully charged. Use Disk Defragmenter to optimize hard disk. Symptom Does ...
...: Comments Make sure floppy drive is installed and connected correctly. Make sure floppy disk is bootable. Remove and reinstall hard drive. Restart notebook. Make sure CD is bootable. Use Tools tab in BIOS Setup. User must call Technical Support and provide proof of ownership. Check ...for corrupt files on battery LEDs. If notebook boots from CD in floppy drive. Password removal is properly installed and fully charged. Use Disk Defragmenter to optimize hard disk. Symptom Does ...

Maintenance and Service Guide
Page 106
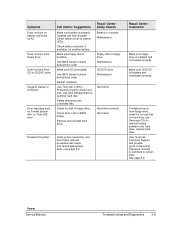
...PC Friendly". Check settings in Control Panel. Check devices separately. When this situation. Keyboard Motherboard Press Fn+F8 to activate numeric keypad, and Lock key to turn on motherboard. 3-14 Troubleshooting and Diagnostics Service Manual KeyboarD Motherboard Y-adapter PS/2 device Motherboard Repair Center: Comments HP...mouse with soft cloth or replace as needed , uninstall PC Friendly and restart notebook. Try reinserting ribbon cable in connector on number lock. Avoid touching touch pad while booting or resuming. Symptom Region Code error System Error: Unable...
...PC Friendly". Check settings in Control Panel. Check devices separately. When this situation. Keyboard Motherboard Press Fn+F8 to activate numeric keypad, and Lock key to turn on motherboard. 3-14 Troubleshooting and Diagnostics Service Manual KeyboarD Motherboard Y-adapter PS/2 device Motherboard Repair Center: Comments HP...mouse with soft cloth or replace as needed , uninstall PC Friendly and restart notebook. Try reinserting ribbon cable in connector on number lock. Avoid touching touch pad while booting or resuming. Symptom Region Code error System Error: Unable...

Maintenance and Service Guide
Page 107
Make sure touch pad is installed from \hp\drivers\TouchPad.) Top case Motherboard Top case Motherboard Top case Motherboard Make sure C drive has adequate free space. Avoid touching touch pad while booting or resuming. Service Manual Troubleshooting and Diagnostics 3-15 Not all third-party memory cards have... Touch pad General problems Special touch pad features not working Select button does not work Memory Out of memory error Notebook does not boot after adding SDRAM Audio No sound audible Sound does not record Call Center: Suggestions Repair Center: Likely Causes Reset...
Make sure touch pad is installed from \hp\drivers\TouchPad.) Top case Motherboard Top case Motherboard Top case Motherboard Make sure C drive has adequate free space. Avoid touching touch pad while booting or resuming. Service Manual Troubleshooting and Diagnostics 3-15 Not all third-party memory cards have... Touch pad General problems Special touch pad features not working Select button does not work Memory Out of memory error Notebook does not boot after adding SDRAM Audio No sound audible Sound does not record Call Center: Suggestions Repair Center: Likely Causes Reset...

Maintenance and Service Guide
Page 113
...To add information about your support agent, select e-Mail. e-Diagtools for repair and/or follow-up actions. In e-Diagtools for Windows. 13. Boot from the Recovery CD or DVD. The basic hardware test shows a recommended replacement part. Press F3 and then any key to display the Support ...Ticket. 14. In Windows, select Start > All Programs (or Programs) > Hewlett-Packard > Notebook > HP e-Diagtools > e-Diagtools for Windows, use the e-Diagtools menu. To save or print the Support Ticket, select Save As or Print. If you have trouble...
...To add information about your support agent, select e-Mail. e-Diagtools for repair and/or follow-up actions. In e-Diagtools for Windows. 13. Boot from the Recovery CD or DVD. The basic hardware test shows a recommended replacement part. Press F3 and then any key to display the Support ...Ticket. 14. In Windows, select Start > All Programs (or Programs) > Hewlett-Packard > Notebook > HP e-Diagtools > e-Diagtools for Windows, use the e-Diagtools menu. To save or print the Support Ticket, select Save As or Print. If you have trouble...

Maintenance and Service Guide
Page 114
... BIOS Setup (the default setting), press esc during boot to a known state. 4. The BIOS will not boot the notebook's operating system if the system memory, CPU, DMA, or interrupt controller fails the POST diagnostic tests. Note that not all accessories, including SDRAM modules, port replicator, PC cards, printer, external monitor, pointing device, and keyboard...
... BIOS Setup (the default setting), press esc during boot to a known state. 4. The BIOS will not boot the notebook's operating system if the system memory, CPU, DMA, or interrupt controller fails the POST diagnostic tests. Note that not all accessories, including SDRAM modules, port replicator, PC cards, printer, external monitor, pointing device, and keyboard...

Maintenance and Service Guide
Page 115
... Shadow system BIOS ROM Auto size cache Advanced configuration of chipset registers Load alternate registers with initial POST values Restore CPU control word during warm boot Initialize PCI Bus Mastering devices Initialize keyboard controller BIOS ROM checksum Initialize cache before system BIOS shadow RAM failure on motherboard) Set ES segment register...
... Shadow system BIOS ROM Auto size cache Advanced configuration of chipset registers Load alternate registers with initial POST values Restore CPU control word during warm boot Initialize PCI Bus Mastering devices Initialize keyboard controller BIOS ROM checksum Initialize cache before system BIOS shadow RAM failure on motherboard) Set ES segment register...

Maintenance and Service Guide
Page 117
... Initialize hard-disk controllers Initialize local-bus hard-disk controllers Jump to UserPatch2 Build MPTABLE for multi-processor boards Install CD-ROM for boot Clear huge ES segment register Fix up Multi Processor table Check for SMART Drive (optional) Shadow option ROMs Set up Power Management ... F2 prompt Scan for F2 keystroke Enter SETUP Clear Boot flag Check for errors Inform ROMPilot about the end of POST POST done-prepare to boot OS Terminate QuietBoot (optional) Check password (optional) Initialize ACPI BIOS Prepare Boot Initialize SMBIOS Initialize PnP Option ROMs Clear parity checkers ...
... Initialize hard-disk controllers Initialize local-bus hard-disk controllers Jump to UserPatch2 Build MPTABLE for multi-processor boards Install CD-ROM for boot Clear huge ES segment register Fix up Multi Processor table Check for SMART Drive (optional) Shadow option ROMs Set up Power Management ... F2 prompt Scan for F2 keystroke Enter SETUP Clear Boot flag Check for errors Inform ROMPilot about the end of POST POST done-prepare to boot OS Terminate QuietBoot (optional) Check password (optional) Initialize ACPI BIOS Prepare Boot Initialize SMBIOS Initialize PnP Option ROMs Clear parity checkers ...


