
User's Guide q1859, q2009, q2159 LCD Display
Page 5
... Contents Notational Conventions...iii Notes, Cautions, and Warnings...iii Product Features 1-1 Compaq LCD Monitors...1-1 Features ...1-1 Safety and Maintenance Guidelines 2-1 Important Safety Information ...2-1 Safety Precautions ...2-1 Maintenance Guidelines...2-2 Cleaning the Monitor ...2-2 Setting Up the Monitor 3-1 Unpacking the Monitor...3-1 Installing the Monitor ...3-1 Preparing the monitor for desktop use 3-1 Preparing the monitor for wall-mounting 3-2 Connecting the VGA (Analog) Cable 3-5 To connect the...
... Contents Notational Conventions...iii Notes, Cautions, and Warnings...iii Product Features 1-1 Compaq LCD Monitors...1-1 Features ...1-1 Safety and Maintenance Guidelines 2-1 Important Safety Information ...2-1 Safety Precautions ...2-1 Maintenance Guidelines...2-2 Cleaning the Monitor ...2-2 Setting Up the Monitor 3-1 Unpacking the Monitor...3-1 Installing the Monitor ...3-1 Preparing the monitor for desktop use 3-1 Preparing the monitor for wall-mounting 3-2 Connecting the VGA (Analog) Cable 3-5 To connect the...

User's Guide q1859, q2009, q2159 LCD Display
Page 6
Table of Contents Technical Specifications B-1 Compaq LCD Monitors...B-1 Preset Video Modes ...B-3 LCD Monitor Quality and Pixel Policy...B-4 Power Cord Set Requirements ...B-4 Agency Regulatory Notices C-1 Federal Communications Commission Notice C-1 Modifications...C-1 Cables ...C-1 Declaration of Conformity for Products Marked with... in Private Households in the European Union C-3 Japanese Notice...C-3 Japanese Power Cord Notice...C-3 Japanese Material Content Declaration C-3 Korean Notice ...C-3 EPA ENERGY STAR Compliance ...C-4 HP Recycling Program...C-4 Index ...D-1 vi User's Guide
Table of Contents Technical Specifications B-1 Compaq LCD Monitors...B-1 Preset Video Modes ...B-3 LCD Monitor Quality and Pixel Policy...B-4 Power Cord Set Requirements ...B-4 Agency Regulatory Notices C-1 Federal Communications Commission Notice C-1 Modifications...C-1 Cables ...C-1 Declaration of Conformity for Products Marked with... in Private Households in the European Union C-3 Japanese Notice...C-3 Japanese Power Cord Notice...C-3 Japanese Material Content Declaration C-3 Korean Notice ...C-3 EPA ENERGY STAR Compliance ...C-4 HP Recycling Program...C-4 Index ...D-1 vi User's Guide

User's Guide q1859, q2009, q2159 LCD Display
Page 7
This guide discusses the following models: ■ Q1859 LCD monitor ■ Q2009 LCD monitor ■ Q2159 LCD monitor Features ■ Large diagonal display ■ Maximum graphics resolution: ❏ Q1859: 1366 x 768 @ 60Hz ❏ Q2009: 1600 x 900 @ 60Hz ❏ Q2159: 1920 x 1080 @ 60Hz Plus full-screen support for lower resolutions &#...9632; Power Saver to reduce energy consumption ■ Quick View settings display User's Guide 1-1 1 Product Features Compaq LCD Monitors The Compaq LCD (liquid crystal display) monitors have an active matrix, thin-film transistor (TFT) screen.
This guide discusses the following models: ■ Q1859 LCD monitor ■ Q2009 LCD monitor ■ Q2159 LCD monitor Features ■ Large diagonal display ■ Maximum graphics resolution: ❏ Q1859: 1366 x 768 @ 60Hz ❏ Q2009: 1600 x 900 @ 60Hz ❏ Q2159: 1920 x 1080 @ 60Hz Plus full-screen support for lower resolutions &#...9632; Power Saver to reduce energy consumption ■ Quick View settings display User's Guide 1-1 1 Product Features Compaq LCD Monitors The Compaq LCD (liquid crystal display) monitors have an active matrix, thin-film transistor (TFT) screen.

User's Guide q1859, q2009, q2159 LCD Display
Page 9
... to the power cord does not exceed the rating of electric shock or damage to your computer and its peripheral devices (such as a monitor, printer, or scanner) to a surge protection device such as your computer, connect all power strips provide surge protection; The grounding plug ...is an important safety feature. CAUTION: To protect your monitor, as well as a power strip with surge protection or uninterruptible power supply (UPS). Safety Precautions ■ Use only a power source and ...
... to the power cord does not exceed the rating of electric shock or damage to your computer and its peripheral devices (such as a monitor, printer, or scanner) to a surge protection device such as your computer, connect all power strips provide surge protection; The grounding plug ...is an important safety feature. CAUTION: To protect your monitor, as well as a power strip with surge protection or uninterruptible power supply (UPS). Safety Precautions ■ Use only a power source and ...

User's Guide q1859, q2009, q2159 LCD Display
Page 10
... dampened with a dry, soft, clean cloth. Turn on a soft area to prevent it on an unstable surface. ■ When removing the monitor base, you must not be blocked or covered. Wipe the screen with isopropyl alcohol. 5. If the screen requires additional cleaning, use liquid or ...aerosol cleaners. Use a damp cloth to clean an LCD screen. 3. Safety and Maintenance Guidelines Maintenance Guidelines To enhance the performance and extend the life of your monitor: ■ Do not open your monitor in a well-ventilated area, away from the power outlet before cleaning....
... dampened with a dry, soft, clean cloth. Turn on a soft area to prevent it on an unstable surface. ■ When removing the monitor base, you must not be blocked or covered. Wipe the screen with isopropyl alcohol. 5. If the screen requires additional cleaning, use liquid or ...aerosol cleaners. Use a damp cloth to clean an LCD screen. 3. Safety and Maintenance Guidelines Maintenance Guidelines To enhance the performance and extend the life of your monitor: ■ Do not open your monitor in a well-ventilated area, away from the power outlet before cleaning....

User's Guide q1859, q2009, q2159 LCD Display
Page 11
... onto the bottom of the support column until it . Installing the monitor base User's Guide 3-1 Store the packing box. 2. Prepare a flat area to the LCD screen; See "Installing the Monitor" in a convenient, well-ventilated location near your computer. doing so can install the monitor on a flat, soft, protected table or desk surface with the...
... onto the bottom of the support column until it . Installing the monitor base User's Guide 3-1 Store the packing box. 2. Prepare a flat area to the LCD screen; See "Installing the Monitor" in a convenient, well-ventilated location near your computer. doing so can install the monitor on a flat, soft, protected table or desk surface with the...

User's Guide q1859, q2009, q2159 LCD Display
Page 12
...the wall-mounting fixture is capable of supporting the monitor. 1. Release the base from the monitor. 2. Pull the base away from the column as you do so. Place the monitor face down on a flat, stable surface. Lift the monitor to the equipment, check that it is adequately installed... and secured before attaching the monitor. Monitor in upright position Preparing the monitor for wall-mounting WARNING: To reduce the risk ...
...the wall-mounting fixture is capable of supporting the monitor. 1. Release the base from the monitor. 2. Pull the base away from the column as you do so. Place the monitor face down on a flat, stable surface. Lift the monitor to the equipment, check that it is adequately installed... and secured before attaching the monitor. Monitor in upright position Preparing the monitor for wall-mounting WARNING: To reduce the risk ...

User's Guide q1859, q2009, q2159 LCD Display
Page 13
Snapping the bottom portion of the column from the top portion of the support column until it snaps away from the top 6. User's Guide 3-3 Setting Up the Monitor Remove the screws inside the support column as indicated. Removing the top portion of the column up to expose the mounting bracket. 4. Slide the top portion of the column 7. Remove the four screws that secure the column mounting bracket. Remove the screws inside the support column 5. Rock the bottom of the column, which covers the support column mounting bracket.
Snapping the bottom portion of the column from the top portion of the support column until it snaps away from the top 6. User's Guide 3-3 Setting Up the Monitor Remove the screws inside the support column as indicated. Removing the top portion of the column up to expose the mounting bracket. 4. Slide the top portion of the column 7. Remove the four screws that secure the column mounting bracket. Remove the screws inside the support column 5. Rock the bottom of the column, which covers the support column mounting bracket.

User's Guide q1859, q2009, q2159 LCD Display
Page 14
... bracket away from the monitor 9. The four threaded holes that the monitor is held in place by rubber cement. Setting Up the Monitor 8. Sliding the column mounting bracket from the bottom of the panel are compliant with screws (not supplied). 10. Remove the Compaq logo from the back of... a small, flat blade screwdriver under the logo to attach the swing arm or other mounting fixture. 3-4 User's Guide Place the tip of the monitor Use the four holes (A), (B), (C), and (D) to pry...
... bracket away from the monitor 9. The four threaded holes that the monitor is held in place by rubber cement. Setting Up the Monitor 8. Sliding the column mounting bracket from the bottom of the panel are compliant with screws (not supplied). 10. Remove the Compaq logo from the back of... a small, flat blade screwdriver under the logo to attach the swing arm or other mounting fixture. 3-4 User's Guide Place the tip of the monitor Use the four holes (A), (B), (C), and (D) to pry...
User's Guide q1859, q2009, q2159 LCD Display
Page 15
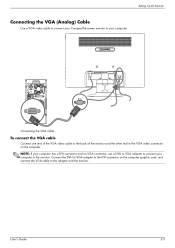
... the VGA (Analog) Cable Use a VGA video cable to connect your Compaq flat-screen monitor to your computer has a DVI connector and no VGA connector, use a DVI-I to VGA adapter to the DVI connector on the computer. Connecting the VGA ...cable To connect the VGA cable Connect one end of the VGA video cable to the back of the monitor and the other end to the monitor. Connect the DVI-I to VGA adapter to connect your computer to the VGA video connector on the computer graphic card, and connect...
... the VGA (Analog) Cable Use a VGA video cable to connect your Compaq flat-screen monitor to your computer has a DVI connector and no VGA connector, use a DVI-I to VGA adapter to the DVI connector on the computer. Connecting the VGA ...cable To connect the VGA cable Connect one end of the VGA video cable to the back of the monitor and the other end to the monitor. Connect the DVI-I to VGA adapter to connect your computer to the VGA video connector on the computer graphic card, and connect...
User's Guide q1859, q2009, q2159 LCD Display
Page 16
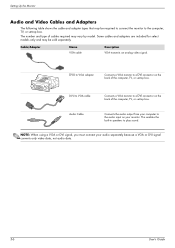
...and type of the computer, TV, or set -top box. NOTE: When using a VGA or DVI signal, you must connect your monitor. DVI-I to VGA adapter Connects a VGA monitor to a DVI connector on your audio separately because a VGA or DVI signal converts only video data, not audio data. 3-6 User's ...Guide Setting Up the Monitor Audio and Video Cables and Adapters The following table shows the cable and adapter types that may be sold separately. Cable/Adapter Name VGA cable...
...and type of the computer, TV, or set -top box. NOTE: When using a VGA or DVI signal, you must connect your monitor. DVI-I to VGA adapter Connects a VGA monitor to a DVI connector on your audio separately because a VGA or DVI signal converts only video data, not audio data. 3-6 User's ...Guide Setting Up the Monitor Audio and Video Cables and Adapters The following table shows the cable and adapter types that may be sold separately. Cable/Adapter Name VGA cable...

User's Guide q1859, q2009, q2159 LCD Display
Page 17
Setting Up the Monitor Connecting the Audio Cable Connect the built-in monitor speakers to the computer by using the audio cable, as shown in the following illustration. Connecting the audio cables-connector locations may vary User's Guide 3-7
Setting Up the Monitor Connecting the Audio Cable Connect the built-in monitor speakers to the computer by using the audio cable, as shown in the following illustration. Connecting the audio cables-connector locations may vary User's Guide 3-7

User's Guide q1859, q2009, q2159 LCD Display
Page 18
... grounded power outlet you should be walked on power cords or cables. A power cord should do one end of the power cable to the monitor and the other end to your equipment: ■ Do not disable the power cord grounding plug. See "Technical Specifications" (Appendix B) for...provides proper grounding. (2) You should use an electrical outlet adapter that no one may accidentally step on a cord or cable. Setting Up the Monitor Connecting the Power Cable 1. Arrange them . Read the warning below. WARNING: To reduce the risk of the following if a properly grounded electrical...
... grounded power outlet you should be walked on power cords or cables. A power cord should do one end of the power cable to the monitor and the other end to your equipment: ■ Do not disable the power cord grounding plug. See "Technical Specifications" (Appendix B) for...provides proper grounding. (2) You should use an electrical outlet adapter that no one may accidentally step on a cord or cable. Setting Up the Monitor Connecting the Power Cable 1. Arrange them . Read the warning below. WARNING: To reduce the risk of the following if a properly grounded electrical...

User's Guide q1859, q2009, q2159 LCD Display
Page 19
Routing cables through the hollow section of the support column User's Guide 3-9 Setting Up the Monitor Cable Management Your Compaq LCD monitor provides cable management. Cables can be easily routed through the rear of the support column and are hidden when the monitor is viewed from the front.
Routing cables through the hollow section of the support column User's Guide 3-9 Setting Up the Monitor Cable Management Your Compaq LCD monitor provides cable management. Cables can be easily routed through the rear of the support column and are hidden when the monitor is viewed from the front.

User's Guide q1859, q2009, q2159 LCD Display
Page 20
Tilt adjustment 3-10 User's Guide Setting Up the Monitor Adjusting the Tilt For optimal viewing, adjust the screen tilt to your own preference, as follows: 1. Face the front of the monitor either toward or away from you do not topple the monitor while changing the tilt. 2. Adjust the tilt by moving the top edge of the monitor and hold the base so that you , without touching the screen.
Tilt adjustment 3-10 User's Guide Setting Up the Monitor Adjusting the Tilt For optimal viewing, adjust the screen tilt to your own preference, as follows: 1. Face the front of the monitor either toward or away from you do not topple the monitor while changing the tilt. 2. Adjust the tilt by moving the top edge of the monitor and hold the base so that you , without touching the screen.
User's Guide q1859, q2009, q2159 LCD Display
Page 21
...: 1. Refer to the "Driver Software Readme" file on the CD for instructions (in case of your monitor are displayed. 5. Installing the monitor driver software from the CD To install the monitor driver software from the HP Support site: 1. NOTE: You might need to update the drivers, you can install the... monitor driver INF and ICM files from the CD, or download them from the CD, in English only). User's Guide 4-1 Ensure that...
...: 1. Refer to the "Driver Software Readme" file on the CD for instructions (in case of your monitor are displayed. 5. Installing the monitor driver software from the CD To install the monitor driver software from the HP Support site: 1. NOTE: You might need to update the drivers, you can install the... monitor driver INF and ICM files from the CD, or download them from the CD, in English only). User's Guide 4-1 Ensure that...

User's Guide q1859, q2009, q2159 LCD Display
Page 22
...the Auto/OK button on the monitor side panel. ❏ You can also press the Menu button, and then select Image Control, followed by using a DVI or HDMI input. The CD menu displays. 4. Image retention is not in image damage on all LCD screens. Select Open Auto Adjustment ...Software. 6. To avoid burn-in use this procedure if your monitor screen, you should always activate a screen saver application or turn off the...
...the Auto/OK button on the monitor side panel. ❏ You can also press the Menu button, and then select Image Control, followed by using a DVI or HDMI input. The CD menu displays. 4. Image retention is not in image damage on all LCD screens. Select Open Auto Adjustment ...Software. 6. To avoid burn-in use this procedure if your monitor screen, you should always activate a screen saver application or turn off the...

User's Guide q1859, q2009, q2159 LCD Display
Page 23
...-panel control buttons No. User's Guide 4-3 Side-Panel Controls Control buttons are located on the right side of the monitor. 2 Auto/OK Auto-adjusts the display to the ideal setting when the OSD is not active. / Enters the selected option. 3 /+ Hot key to link to ...
...-panel control buttons No. User's Guide 4-3 Side-Panel Controls Control buttons are located on the right side of the monitor. 2 Auto/OK Auto-adjusts the display to the ideal setting when the OSD is not active. / Enters the selected option. 3 /+ Hot key to link to ...

User's Guide q1859, q2009, q2159 LCD Display
Page 24
... Position Vertical Position Clock Clock Phase Adjusts the screen image. To navigate through the Main or sub-menu, press the + (Plus) button on the monitor's side panel to scroll up, or the - (Minus) button to the bottom if you scroll up at the bottom of the selections. button. ... Menu screen. to change the horizontal screen image (VGA input only). Adjusts the focus of a selected item, press the + or - If the monitor is displayed, if the buttons are untouched for 30 seconds (factory default), adjustments and settings are saved and the menu closes. Also enables or disables...
... Position Vertical Position Clock Clock Phase Adjusts the screen image. To navigate through the Main or sub-menu, press the + (Plus) button on the monitor's side panel to scroll up, or the - (Minus) button to the bottom if you scroll up at the bottom of the selections. button. ... Menu screen. to change the horizontal screen image (VGA input only). Adjusts the focus of a selected item, press the + or - If the monitor is displayed, if the buttons are untouched for 30 seconds (factory default), adjustments and settings are saved and the menu closes. Also enables or disables...
User's Guide q1859, q2009, q2159 LCD Display
Page 25
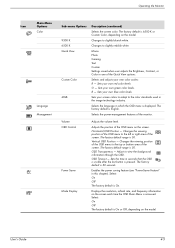
...OSD is visible after the last button is 50. Select: On Off The factory default is On or Off, depending on the screen. Operating the Monitor Icon Main Menu Options Color Language Management Sub-menu Options 9300 K 6500 K Quick View Custom Color sRGB Description (continued) Selects the screen color. ... Sets your screen colors to adapt to the top or bottom area of the OSD menu to the color standards used in one of the monitor. Changes the viewing position of the screen. The factory default is 50. Changes the viewing position of the screen. Enables the power saving ...
...OSD is visible after the last button is 50. Select: On Off The factory default is On or Off, depending on the screen. Operating the Monitor Icon Main Menu Options Color Language Management Sub-menu Options 9300 K 6500 K Quick View Custom Color sRGB Description (continued) Selects the screen color. ... Sets your screen colors to adapt to the top or bottom area of the OSD menu to the color standards used in one of the monitor. Changes the viewing position of the screen. The factory default is 50. Changes the viewing position of the screen. Enables the power saving ...


