

HP 3 Phase UPS User Guide
Page 69
... Config Signal Inputs Serial Port Config Available settings Default setting Relay: [Alarm-1][X-Slot 1-1/2/3/4] or [X-Slot 2-1/2/3/4] Alarm 1: empty X-Slots (1 or 2) Setup: [On Battery][Summary Alarm][On Bypass][UPS OK][custom][empty] #1: UPS OK #2: On Bypass #3: Summary Alarm #4: On Battery [empty][Logic]...setting is USER. Power Strategy [High Efficiency][Standard] High Efficiency For more information, see "Normal mode (on page 64) HP logo User Password [Enabled][Disabled] If enabled is selected, the password is not available for six-unit Redundant Mode systems (Redundant...
... Config Signal Inputs Serial Port Config Available settings Default setting Relay: [Alarm-1][X-Slot 1-1/2/3/4] or [X-Slot 2-1/2/3/4] Alarm 1: empty X-Slots (1 or 2) Setup: [On Battery][Summary Alarm][On Bypass][UPS OK][custom][empty] #1: UPS OK #2: On Bypass #3: Summary Alarm #4: On Battery [empty][Logic]...setting is USER. Power Strategy [High Efficiency][Standard] High Efficiency For more information, see "Normal mode (on page 64) HP logo User Password [Enabled][Disabled] If enabled is selected, the password is not available for six-unit Redundant Mode systems (Redundant...
HP 3 Phase UPS User Guide
Page 70
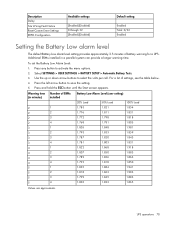
Use the up or down arrow buttons to activate the menu options. 2. Warning time Number of battery warning for a UPS. Select SETTINGS > USER SETTINGS > BATTERY SETUP > Automatic Battery Tests. 3. Press and hold the ESC button until the Start screen appears. UPS operations 70 Press any button to select the volts per ...
Use the up or down arrow buttons to activate the menu options. 2. Warning time Number of battery warning for a UPS. Select SETTINGS > USER SETTINGS > BATTERY SETUP > Automatic Battery Tests. 3. Press and hold the ESC button until the Start screen appears. UPS operations 70 Press any button to select the volts per ...

HP 3 Phase UPS User Guide
Page 71
..., the UPS determines when it is appropriate to disable battery testing if their source is not capable of being backfed. Select SETTINGS > USER SETTINGS > BATTERY SETUP > Battery Low Alarm. 3. Press the left arrow button to activate the menu options. 2. Press any button to save the setting. 5. UPS operations 71 If a source...
..., the UPS determines when it is appropriate to disable battery testing if their source is not capable of being backfed. Select SETTINGS > USER SETTINGS > BATTERY SETUP > Battery Low Alarm. 3. Press the left arrow button to activate the menu options. 2. Press any button to save the setting. 5. UPS operations 71 If a source...
UPS R12000 XR Models Installation Instructions
Page 5
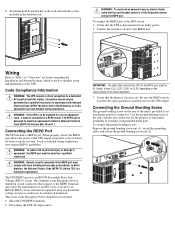
... electrician. Connect the switch or circuit to the EPO circuit: 1. In North America, the National Electric Code (NFPA 70, Article 725) is designed to simplify setup and installation of the unit is in "Overview" for details regarding the Installation and Startup Package, which is used to meet the requirements of an...
... electrician. Connect the switch or circuit to the EPO circuit: 1. In North America, the National Electric Code (NFPA 70, Article 725) is designed to simplify setup and installation of the unit is in "Overview" for details regarding the Installation and Startup Package, which is used to meet the requirements of an...
UPS R6000 Models User Guide
Page 4
......3-3 Top Level Main Menu...3-3 Menu Map...3-4 Status...3-5 Meters ...3-6 Active Alarms...3-7 Battery Data ...3-8 Firmware Version ...3-8 Load Control...3-9 Display Test ...3-9 System Setup ...3-10 Chapter 4 Battery Maintenance Precautions ...4-1 Charging Batteries...4-1 Determining When to Replace Batteries 4-2 Obtaining New Batteries ...4-2 Replacing the Batteries...4-2 Removing the Battery ... 5 Troubleshooting Responding to Audible Alarms ...5-1 Trouble Indicators ...5-4 LED Alarm Configurations ...5-4 Repairing the UPS...5-5 iv HP Uninterruptible Power System R6000 Models User Guide
......3-3 Top Level Main Menu...3-3 Menu Map...3-4 Status...3-5 Meters ...3-6 Active Alarms...3-7 Battery Data ...3-8 Firmware Version ...3-8 Load Control...3-9 Display Test ...3-9 System Setup ...3-10 Chapter 4 Battery Maintenance Precautions ...4-1 Charging Batteries...4-1 Determining When to Replace Batteries 4-2 Obtaining New Batteries ...4-2 Replacing the Batteries...4-2 Removing the Battery ... 5 Troubleshooting Responding to Audible Alarms ...5-1 Trouble Indicators ...5-4 LED Alarm Configurations ...5-4 Repairing the UPS...5-5 iv HP Uninterruptible Power System R6000 Models User Guide
UPS R6000 Models User Guide
Page 21
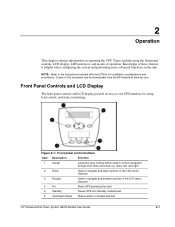
...NOTE: Refer to navigate and deselect options in the LCD menu structure 3 Escape Used to the instructions included with the UPS kit for setup, load control, and status monitoring. Copies of operation. Figure 2-1: Front panel control buttons Item Description Function 1 Center Large four-way ...On Starts UPS powering the load 5 Standby Places UPS into Standby mode/Reset 6 Test/Alarm Reset Resets alarm or initiates self-test HP Uninterruptible Power System R6000 Models User Guide 2-1 Topics include using the front panel controls, LCD display, LED indicators, and modes of this...
...NOTE: Refer to navigate and deselect options in the LCD menu structure 3 Escape Used to the instructions included with the UPS kit for setup, load control, and status monitoring. Copies of operation. Figure 2-1: Front panel control buttons Item Description Function 1 Center Large four-way ...On Starts UPS powering the load 5 Standby Places UPS into Standby mode/Reset 6 Test/Alarm Reset Resets alarm or initiates self-test HP Uninterruptible Power System R6000 Models User Guide 2-1 Topics include using the front panel controls, LCD display, LED indicators, and modes of this...
UPS R6000 Models User Guide
Page 30
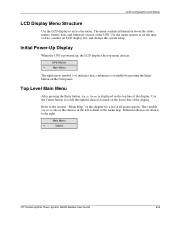
...powered up, the LCD displays the top menu choices. Refer to set the time or date, conduct an LCD display test, and change the system setup. Use the menu options to the section, "Menu Map," in the left column of the display. Top Level Main Menu After pressing the Enter button...located on the lower line of the display. The variable xxxxxx is displayed on the top line of the menu map. Main Menu → xxxxxx HP Uninterruptible Power System R6000 Models User Guide 3-3 Use the Center button to access the menu. The menu contains information about the status, meters, battery ...
...powered up, the LCD displays the top menu choices. Refer to set the time or date, conduct an LCD display test, and change the system setup. Use the menu options to the section, "Menu Map," in the left column of the display. Top Level Main Menu After pressing the Enter button...located on the lower line of the display. The variable xxxxxx is displayed on the top line of the menu map. Main Menu → xxxxxx HP Uninterruptible Power System R6000 Models User Guide 3-3 Use the Center button to access the menu. The menu contains information about the status, meters, battery ...
UPS R6000 Models User Guide
Page 31
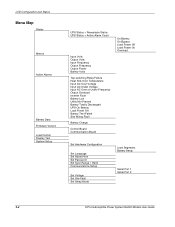
LCD Configuration and Status Menu Map Status Meters Active Alarms Battery Data Firmware Version Load Control Display Test System Setup UPS Status + Receptacle Status UPS Status + Active Alarm Count Input Volts Output Volts Input Frequency Output Frequency Output Power Battery Volts Tap-... Power Off Load Power On Overload Set Hardware Configuration Set Language Set Alarm Horn Set Password Set Sync Range ± Hertz Communications Setup Set Voltage Set Site Fault Set Sleep Mode Load Segments Battery Setup Serial Port 1 Serial Port 2 3-4 HP Uninterruptible Power System R6000 Models User Guide
LCD Configuration and Status Menu Map Status Meters Active Alarms Battery Data Firmware Version Load Control Display Test System Setup UPS Status + Receptacle Status UPS Status + Active Alarm Count Input Volts Output Volts Input Frequency Output Frequency Output Power Battery Volts Tap-... Power Off Load Power On Overload Set Hardware Configuration Set Language Set Alarm Horn Set Password Set Sync Range ± Hertz Communications Setup Set Voltage Set Site Fault Set Sleep Mode Load Segments Battery Setup Serial Port 1 Serial Port 2 3-4 HP Uninterruptible Power System R6000 Models User Guide

UPS R6000 Models User Guide
Page 37
...Set HW Config → Battery Amp-Hr Battery Amp-Hr Internal 0-25 Explanation Accesses the Load Segments option. LCD Configuration and Status System Setup Select System Setup from the Main Menu to change a digit, use the left arrow key on the Center button to go back. 4. NOTE: The ...password has been entered, press the Enter button. Choose the first digit using the Center and Enter buttons. 3-10 HP Uninterruptible Power System R6000 Models User Guide System Setup → Set HW Config Table 3-5 lists the options under the Set HW Config menu. Allows specification of the ...
...Set HW Config → Battery Amp-Hr Battery Amp-Hr Internal 0-25 Explanation Accesses the Load Segments option. LCD Configuration and Status System Setup Select System Setup from the Main Menu to change a digit, use the left arrow key on the Center button to go back. 4. NOTE: The ...password has been entered, press the Enter button. Choose the first digit using the Center and Enter buttons. 3-10 HP Uninterruptible Power System R6000 Models User Guide System Setup → Set HW Config Table 3-5 lists the options under the Set HW Config menu. Allows specification of the ...

UPS R6000 Models User Guide
Page 38
...the more critical UPS operations. IMPORTANT: Be sure to record your password, contact an HP authorized service provider. Set Language ∗ English Set Alarm Horn Select Set Alarm Horn from the System Setup menu to specify the language for the menu display. Options include Danish, Dutch, English... lose your password. Set Alarm Horn ∗ Enable Set Password Select Set Password from the System Setup menu to set a password to protect access to the next digit. 3. HP Uninterruptible Power System R6000 Models User Guide 3-11 Select the first digit using the up and down...
...the more critical UPS operations. IMPORTANT: Be sure to record your password, contact an HP authorized service provider. Set Language ∗ English Set Alarm Horn Select Set Alarm Horn from the System Setup menu to specify the language for the menu display. Options include Danish, Dutch, English... lose your password. Set Alarm Horn ∗ Enable Set Password Select Set Password from the System Setup menu to set a password to protect access to the next digit. 3. HP Uninterruptible Power System R6000 Models User Guide 3-11 Select the first digit using the up and down...
UPS R6000 Models User Guide
Page 39
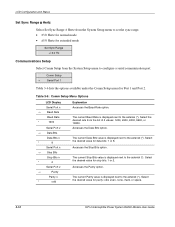
Accesses the Data Bits option. Select the desired value for parity: odd, even, none, mark, or space. 3-12 HP Uninterruptible Power System R6000 Models User Guide Select the desired rate from the list of 5 values: 1200, 2400, 4800, 9600, or 19200.... next to the asterisk (*). Accesses the Stop Bits option. Select the desired value for extended mode Set Sync Range +/-3.0 Hz Communications Setup Select Comm Setup from the System Setup menu to configure a serial communication port. LCD Configuration and Status Set Sync Range ± Hertz Select Set Sync Range ± ...
Accesses the Data Bits option. Select the desired value for parity: odd, even, none, mark, or space. 3-12 HP Uninterruptible Power System R6000 Models User Guide Select the desired rate from the list of 5 values: 1200, 2400, 4800, 9600, or 19200.... next to the asterisk (*). Accesses the Stop Bits option. Select the desired value for extended mode Set Sync Range +/-3.0 Hz Communications Setup Select Comm Setup from the System Setup menu to configure a serial communication port. LCD Configuration and Status Set Sync Range ± Hertz Select Set Sync Range ± ...
UPS R6000 Models User Guide
Page 40
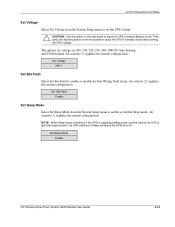
...is less than eight percent, the UPS switches to set the UPS voltage. LCD Configuration and Status Set Voltage Select Set Voltage from the System Setup menu to place the UPS in manual Bypass mode. Then, press the Standby button on the rear panel to enable or disable the Site Wiring... Fault alarm. Set Sleep Mode * Enable HP Uninterruptible Power System R6000 Models User Guide 3-13 Set Site Fault * Enable Set Sleep Mode Select Set Sleep Mode from the System...
...is less than eight percent, the UPS switches to set the UPS voltage. LCD Configuration and Status Set Voltage Select Set Voltage from the System Setup menu to place the UPS in manual Bypass mode. Then, press the Standby button on the rear panel to enable or disable the Site Wiring... Fault alarm. Set Sleep Mode * Enable HP Uninterruptible Power System R6000 Models User Guide 3-13 Set Site Fault * Enable Set Sleep Mode Select Set Sleep Mode from the System...

UPS R6000 Models User Guide
Page 65
...G grounding methods B-1 guarantee See warranties H hardware options 1-5 hazardous energy circuits symbol vii heel straps, using B-1 height C-1 help additional sources ix HP authorized resellers, telephone numbers x HP website ix related documents ix technical support telephone numbers ix High to Low Voltage Transformer (250V) 1-5 horn, alarm 3-11... 3-3 overview 2-2 testing 3-9 LCD menus Active Alarms 3-7 Battery Data 3-8 Display Test 3-9 Firmware Version 3-8 Load Control 3-9 Main 3-3 map 3-4 Meters 3-6 Status 3-5 System Setup 3-10 Index-2 HP Uninterruptible Power System R6000 Models User Guide
...G grounding methods B-1 guarantee See warranties H hardware options 1-5 hazardous energy circuits symbol vii heel straps, using B-1 height C-1 help additional sources ix HP authorized resellers, telephone numbers x HP website ix related documents ix technical support telephone numbers ix High to Low Voltage Transformer (250V) 1-5 horn, alarm 3-11... 3-3 overview 2-2 testing 3-9 LCD menus Active Alarms 3-7 Battery Data 3-8 Display Test 3-9 Firmware Version 3-8 Load Control 3-9 Main 3-3 map 3-4 Meters 3-6 Status 3-5 System Setup 3-10 Index-2 HP Uninterruptible Power System R6000 Models User Guide

UPS R6000 Models User Guide
Page 66
...with UPS configuration 3-2 matrix, option cards 1-6 menus Active Alarms 3-7 Battery Data 3-8 Display Test 3-9 Firmware Version 3-8 Load Control 3-9 main 3-3 map 3-4 Meters 3-6 Status 3-5 System Setup 3-10 using 3-3 Meters menu 3-6 MIB 1-9 models 1-2 modes of operation 2-3 Multi-Server UPS Card overview 1-7 part number 1-5 N navigating menus 3-4 noise filtering C-3 noise, audible ... software 1-5 Power MIB 1-9 power, viewing 3-6 power-up display 3-3 Pre-Failure Battery Warranty 4-8 preventing electrostatic discarge B-1 Index HP Uninterruptible Power System R6000 Models User Guide Index-3
...with UPS configuration 3-2 matrix, option cards 1-6 menus Active Alarms 3-7 Battery Data 3-8 Display Test 3-9 Firmware Version 3-8 Load Control 3-9 main 3-3 map 3-4 Meters 3-6 Status 3-5 System Setup 3-10 using 3-3 Meters menu 3-6 MIB 1-9 models 1-2 modes of operation 2-3 Multi-Server UPS Card overview 1-7 part number 1-5 N navigating menus 3-4 noise filtering C-3 noise, audible ... software 1-5 Power MIB 1-9 power, viewing 3-6 power-up display 3-3 Pre-Failure Battery Warranty 4-8 preventing electrostatic discarge B-1 Index HP Uninterruptible Power System R6000 Models User Guide Index-3
UPS R6000 Models User Guide
Page 67
... suppression C-3 switching to Bypass mode 2-4 symbols electric shock vii in text viii on equipment vii weight vii sync range, setting 3-12 system configuration 3-1 shutdown 2-7 System Setup menu 3-10 T technical support ix telephone numbers x temperature, operating C-4 Test/Alarm Reset button 2-1, 2-6, 2-7 testing batteries 4-6 LCD display 3-9 UPS 2-6 text conventions viii U UPS battery maintenance 4-1 configuring...
... suppression C-3 switching to Bypass mode 2-4 symbols electric shock vii in text viii on equipment vii weight vii sync range, setting 3-12 system configuration 3-1 shutdown 2-7 System Setup menu 3-10 T technical support ix telephone numbers x temperature, operating C-4 Test/Alarm Reset button 2-1, 2-6, 2-7 testing batteries 4-6 LCD display 3-9 UPS 2-6 text conventions viii U UPS battery maintenance 4-1 configuring...
HP Power Protector User Guide
Page 4
Contents Overview ...7 Introduction ...7 Overview ...7 Architecture ...8 HPPP Administrator ...9 HPPP Client...10 Supported hardware configurations 11 Setup overview ...17 Installation ...18 System requirements ...18 Installation overview ...18 Installing HPPP on Windows operating systems 19 Installing ...systems 26 Installing HPPP using the silent installation method on Linux systems 30 Uninstalling HPPP from Linux systems 32 Installing HPPP on HP-UX operating systems 33 Installing HPPP locally using the Generic Package method 33 Installing HPPP locally using the SAM method 35 Installing...
Contents Overview ...7 Introduction ...7 Overview ...7 Architecture ...8 HPPP Administrator ...9 HPPP Client...10 Supported hardware configurations 11 Setup overview ...17 Installation ...18 System requirements ...18 Installation overview ...18 Installing HPPP on Windows operating systems 19 Installing ...systems 26 Installing HPPP using the silent installation method on Linux systems 30 Uninstalling HPPP from Linux systems 32 Installing HPPP on HP-UX operating systems 33 Installing HPPP locally using the Generic Package method 33 Installing HPPP locally using the SAM method 35 Installing...
HP Power Protector User Guide
Page 17
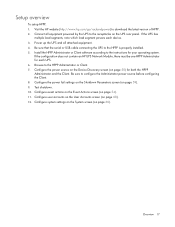
... UPS rear panel. Be sure to the receptacles on page 50) for your operating system. Test shutdown. 10. If the configuration does not contain an HP UPS Network Module, there must be one HPPP Administrator for each device. 3. Configure event actions on the Event Actions screen (on page 59). 9. If... page 68). 12. Connect all attached equipment. 4. Install the HPPP Administrator or Client software according to download the latest version of HPPP. 2. Visit the HP website (http://www.hp.com/go/rackandpower) to the instructions for both the HPPP Administrator and the Client...
... UPS rear panel. Be sure to the receptacles on page 50) for your operating system. Test shutdown. 10. If the configuration does not contain an HP UPS Network Module, there must be one HPPP Administrator for each device. 3. Configure event actions on the Event Actions screen (on page 59). 9. If... page 68). 12. Connect all attached equipment. 4. Install the HPPP Administrator or Client software according to download the latest version of HPPP. 2. Visit the HP website (http://www.hp.com/go/rackandpower) to the instructions for both the HPPP Administrator and the Client...
HP Power Protector User Guide
Page 63
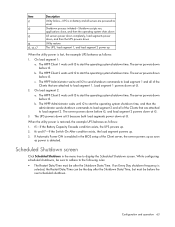
... detected. t6 and t7-If the Switch On After condition exists, the load segment powers up . 2. Scheduled Shutdown screen Click Scheduled Shutdown in the BIOS setup of the Clients that are powered as usual Shutdown process initiated-Shutdown scripts run, applications close, and then the operating system shuts down All servers...
... detected. t6 and t7-If the Switch On After condition exists, the load segment powers up . 2. Scheduled Shutdown screen Click Scheduled Shutdown in the BIOS setup of the Clients that are powered as usual Shutdown process initiated-Shutdown scripts run, applications close, and then the operating system shuts down All servers...
HP Power Protector User Guide
Page 132
Acronyms and abbreviations AC alternating current DC domain controller DNS domain name system HPPP HP Power Protector HTTPS hypertext transfer protocol secure sockets IRQ interrupt request KVM kernel-based virtual machine MAC Media Access Control MMC Microsoft Management Console RBSU ROM-Based Setup Utility RHEL Red Hat Enterprise Linux SAM system administration manager Acronyms and abbreviations 132
Acronyms and abbreviations AC alternating current DC domain controller DNS domain name system HPPP HP Power Protector HTTPS hypertext transfer protocol secure sockets IRQ interrupt request KVM kernel-based virtual machine MAC Media Access Control MMC Microsoft Management Console RBSU ROM-Based Setup Utility RHEL Red Hat Enterprise Linux SAM system administration manager Acronyms and abbreviations 132

HP Power Protector User Guide
Page 136
...requirements, system 18 S SAM installation, HP-UX 35 SAM installation, remote 39 Schedule Shutdown screen 63 secure sessions, Firefox 47 secure sessions, Internet Explorer 46 secure sessions, Mozilla 47 security considerations 98 Settings menu 50 setup, overview 17 Shutdown Parameters screen 59 ...shutdown parameters, configuring 61 signing in 48 silent installation, HP-UX 41 silent installation, Linux 30 silent installation, Windows 23 software access 44...
...requirements, system 18 S SAM installation, HP-UX 35 SAM installation, remote 39 Schedule Shutdown screen 63 secure sessions, Firefox 47 secure sessions, Internet Explorer 46 secure sessions, Mozilla 47 security considerations 98 Settings menu 50 setup, overview 17 Shutdown Parameters screen 59 ...shutdown parameters, configuring 61 signing in 48 silent installation, HP-UX 41 silent installation, Linux 30 silent installation, Windows 23 software access 44...