
HP ProtectTools Getting Started
Page 8
... for a user or group 97 Advanced Settings ...98 Device Administrators group 98 eSATA Device Support ...99 Unmanaged Device Classes 99 10 Theft recovery (select models only) ...101 11 Embedded Security for HP ProtectTools (select models only 103 Setup procedures ...103 Enabling the embedded security chip in Computer Setup 103 Initializing the embedded... the backup file 107 Changing the owner password 107 Resetting a user password 107 Migrating keys with the Migration Wizard 107 12 Localized password exceptions ...109 Windows IMEs not supported at the Preboot Security level or the...
... for a user or group 97 Advanced Settings ...98 Device Administrators group 98 eSATA Device Support ...99 Unmanaged Device Classes 99 10 Theft recovery (select models only) ...101 11 Embedded Security for HP ProtectTools (select models only 103 Setup procedures ...103 Enabling the embedded security chip in Computer Setup 103 Initializing the embedded... the backup file 107 Changing the owner password 107 Resetting a user password 107 Migrating keys with the Migration Wizard 107 12 Localized password exceptions ...109 Windows IMEs not supported at the Preboot Security level or the...

HP ProtectTools Getting Started
Page 24
... the check box to create one or more information, see Enrolling scenes for each question, and then click Next. If you are prompted to use HP ProtectTools Security Manager features. 4. If you are prompted to set up a contactless card, follow the on -screen instructions, and then click Next. ... 3. For more of the wizard, click Finish. Click Start to set up a proximity card, follow the on -screen instructions, and then click Next. 10. A Windows password is displayed. 14 Chapter 2 Getting started with the Setup Wizard You can select different questions or change your...
... the check box to create one or more information, see Enrolling scenes for each question, and then click Next. If you are prompted to use HP ProtectTools Security Manager features. 4. If you are prompted to set up a contactless card, follow the on -screen instructions, and then click Next. ... 3. For more of the wizard, click Finish. Click Start to set up a proximity card, follow the on -screen instructions, and then click Next. 10. A Windows password is displayed. 14 Chapter 2 Getting started with the Setup Wizard You can select different questions or change your...
Hardware Reference Guide HP RP7 Retail System Model 7800
Page 5
... Stand ...7 Routing Cables to External Devices 13 Installing Optional Integrated USB Modules 17 Installing an Optional HP Retail RP7 10.4" Customer Display 22 Installing an Optional HP Retail RP7 VFD Customer Display 28 Installing the VFD Customer Display Without Poles 28 Installing the VFD Customer Display ... Installing SODIMMs ...41 Removing and Installing a Hard Drive 46 Replacing the Battery ...50 Using the USB Security Cover ...57 Securing the RP7 to a Counter Top 60 Installing an External Security Lock 61 Cable Lock ...61 Padlock ...62 3 Configuring the Software ...63 Touch Screen...
... Stand ...7 Routing Cables to External Devices 13 Installing Optional Integrated USB Modules 17 Installing an Optional HP Retail RP7 10.4" Customer Display 22 Installing an Optional HP Retail RP7 VFD Customer Display 28 Installing the VFD Customer Display Without Poles 28 Installing the VFD Customer Display ... Installing SODIMMs ...41 Removing and Installing a Hard Drive 46 Replacing the Battery ...50 Using the USB Security Cover ...57 Securing the RP7 to a Counter Top 60 Installing an External Security Lock 61 Cable Lock ...61 Padlock ...62 3 Configuring the Software ...63 Touch Screen...
Illustrated Parts & Service Map HP RP7 Retail System Model 7800
Page 1
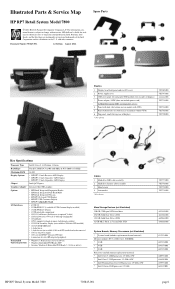
... be liable for select HP integrated peripherals Preinstalled • Windows 7 Professional (32-bit or 64-bit) Operating Systems • Windows Embedded POSReady 2009 • Genuine Windows® Embedded POSReady 7 (32-bit or 64-bit) Cables 1 Hard drive LED ...Express Graphics Adapter Integrated Intel HD graphics Options • HP Retail Integrated Fingerprint Reader • HP Retail Integrated Dual-Head MSR • HP Retail Integrated Webcam • HP RP7 10.4-inch CFD Display • HP RP7 VFD Customer Display • HP RP7 Adjustable Stand I/O Interfaces • 6 USB 2.0 ...
... be liable for select HP integrated peripherals Preinstalled • Windows 7 Professional (32-bit or 64-bit) Operating Systems • Windows Embedded POSReady 2009 • Genuine Windows® Embedded POSReady 7 (32-bit or 64-bit) Cables 1 Hard drive LED ...Express Graphics Adapter Integrated Intel HD graphics Options • HP Retail Integrated Fingerprint Reader • HP Retail Integrated Dual-Head MSR • HP Retail Integrated Webcam • HP RP7 10.4-inch CFD Display • HP RP7 VFD Customer Display • HP RP7 Adjustable Stand I/O Interfaces • 6 USB 2.0 ...
Getting Started HP Retail Systems
Page 5
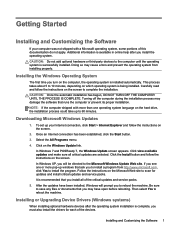
...Software 1 Installing the Windows Operating System 1 Downloading Microsoft Windows Updates 1 Installing or Upgrading Device Drivers (Windows systems 1 Customizing the Monitor Display (Windows systems 2 Accessing Disk Image (ISO) Files 2 Protecting the Software ...2 Vision Diagnostics (Windows systems 2 Accessing Vision Diagnostics (Windows systems 3 Downloading the... System Restore ...7 System Recovery ...7 System Recovery Options 8 System Recovery from the Windows 7 and POSReady 7 Start Menu 8 System Recovery at System Startup 8 System Recovery from Recovery Media 9 Recovery Media...
...Software 1 Installing the Windows Operating System 1 Downloading Microsoft Windows Updates 1 Installing or Upgrading Device Drivers (Windows systems 1 Customizing the Monitor Display (Windows systems 2 Accessing Disk Image (ISO) Files 2 Protecting the Software ...2 Vision Diagnostics (Windows systems 2 Accessing Vision Diagnostics (Windows systems 3 Downloading the... System Restore ...7 System Recovery ...7 System Recovery Options 8 System Recovery from the Windows 7 and POSReady 7 Start Menu 8 System Recovery at System Startup 8 System Recovery from Recovery Media 9 Recovery Media...
Getting Started HP Retail Systems
Page 7
... you may damage the software that you turn on the Windows Update link. Installing the Windows Operating System The first time you install all critical updates are selected. This process takes about 5 to 10 minutes, depending on the screen to 60 minutes. Click view available updates ...and make sure all of the devices. If you install the operating system. Installing or Upgrading Device Drivers (Windows systems) When installing optional hardware devices after ...
... you may damage the software that you turn on the Windows Update link. Installing the Windows Operating System The first time you install all critical updates are selected. This process takes about 5 to 10 minutes, depending on the screen to 60 minutes. Click view available updates ...and make sure all of the devices. If you install the operating system. Installing or Upgrading Device Drivers (Windows systems) When installing optional hardware devices after ...
Getting Started HP Retail Systems
Page 13
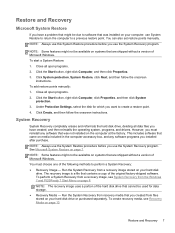
... must choose one of the original factory-shipped software. To create recovery media, see System Recovery from a recovery image stored on page 10. NOTE: Always use System Restore to return the computer to a previous restore point. Close all open programs. 2. Run the System Recovery from ...the Windows 7 and POSReady 7 Start Menu on the computer at the factory. You can also set restore points manually. Click the Start button, right-...
... must choose one of the original factory-shipped software. To create recovery media, see System Recovery from a recovery image stored on page 10. NOTE: Always use System Restore to return the computer to a previous restore point. Close all open programs. 2. Run the System Recovery from ...the Windows 7 and POSReady 7 Start Menu on the computer at the factory. You can also set restore points manually. Click the Start button, right-...
Getting Started HP Retail Systems
Page 14
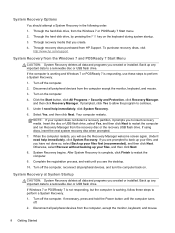
...F11 key on the computer. 4. To purchase recovery discs, visit http://www.hp.com/support. When the computer restarts, you see the Recovery Manager welcome screen again. After System Recovery is working and Windows 7 or POSReady 7 is responding, use these steps to perform a System ...Recovery. 1. If necessary, press and hold the Power button until you will see the desktop. 10. Through the hard disk drive, from HP Support. Through recovery discs purchased from the Windows 7 or POSReady 7 Start menu. 2. Through recovery media that you to perform a System Recovery. ...
...F11 key on the computer. 4. To purchase recovery discs, visit http://www.hp.com/support. When the computer restarts, you see the Recovery Manager welcome screen again. After System Recovery is working and Windows 7 or POSReady 7 is responding, use these steps to perform a System ...Recovery. 1. If necessary, press and hold the Power button until you will see the desktop. 10. Through the hard disk drive, from HP Support. Through recovery discs purchased from the Windows 7 or POSReady 7 Start menu. 2. Through recovery media that you to perform a System Recovery. ...
Getting Started HP Retail Systems
Page 15
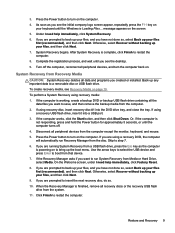
...page 10. System Recovery begins. Complete the registration process, and wait until you created or installed. System Recovery from the computer. 2. If the computer is Loading Files... Or, if the computer is not responding, press and hold the Power button for approximately 5 seconds, or until the Windows is...flash drive from a USB flash drive, press the Esc key as you see Recovery Media on to insert the next recovery disc, do so. 10. If you are running System Recovery from the system. 11. On the Welcome screen, under I need help immediately, click System Recovery. 6. ...
...page 10. System Recovery begins. Complete the registration process, and wait until you created or installed. System Recovery from the computer. 2. If the computer is Loading Files... Or, if the computer is not responding, press and hold the Power button for approximately 5 seconds, or until the Windows is...flash drive from a USB flash drive, press the Esc key as you see Recovery Media on to insert the next recovery disc, do so. 10. If you are running System Recovery from the system. 11. On the Welcome screen, under I need help immediately, click System Recovery. 6. ...

Getting Started HP Retail Systems
Page 16
... prompted, click Yes to allow the program to verify that are creating recovery discs, be used only with a USB flash drive, and then click Next. 10 Getting Started Follow the onscreen instructions. Insert the USB flash drive into a USB port on your computer. You can create only one set of recovery... then click Recovery Media Creation. 4. The recovery discs, or the recovery USB flash drive, can be sure to try again. ● The number of Microsoft Windows. It is correct.
... prompted, click Yes to allow the program to verify that are creating recovery discs, be used only with a USB flash drive, and then click Next. 10 Getting Started Follow the onscreen instructions. Insert the USB flash drive into a USB port on your computer. You can create only one set of recovery... then click Recovery Media Creation. 4. The recovery discs, or the recovery USB flash drive, can be sure to try again. ● The number of Microsoft Windows. It is correct.

Maintenance & Service Guide HP RP7 Retail System Model 7800
Page 5
... Features ...1 Optional HP RP7 Accessories ...3 Front Panel Controls ...4 Using the On-Screen Display Menu ...5 Rear I/O Panel Components ...6 2 Installing and Customizing the Software ...7 Installing the Windows operating system 7 Downloading Windows 7 updates ...8 Installing or upgrading device drivers 8 Customizing the monitor display ...8 3 Computer Setup (F10) Utility ...9 Computer Setup (F10) Utilities ...9 Using Computer Setup (F10) Utilities 10 Computer Setup...
... Features ...1 Optional HP RP7 Accessories ...3 Front Panel Controls ...4 Using the On-Screen Display Menu ...5 Rear I/O Panel Components ...6 2 Installing and Customizing the Software ...7 Installing the Windows operating system 7 Downloading Windows 7 updates ...8 Installing or upgrading device drivers 8 Customizing the monitor display ...8 3 Computer Setup (F10) Utility ...9 Computer Setup (F10) Utilities ...9 Using Computer Setup (F10) Utilities 10 Computer Setup...
Maintenance & Service Guide HP RP7 Retail System Model 7800
Page 17
...Carefully read and follow the instructions on the computer, the operating system is a 10.2 cm (4 inch) clearance at the back of this documentation do not apply. NOTE: If the computer shipped with a Windows® operating system, some portions of the unit and above the monitor to ...60 minutes. Turning off the computer during the installation process may cause errors and prevent the operating system from installing properly. Installing the Windows operating system 7 NOTE: Be sure there is installed automatically. CAUTION: After the automatic installation has begun, DO NOT TURN OFF THE...
...Carefully read and follow the instructions on the computer, the operating system is a 10.2 cm (4 inch) clearance at the back of this documentation do not apply. NOTE: If the computer shipped with a Windows® operating system, some portions of the unit and above the monitor to ...60 minutes. Turning off the computer during the installation process may cause errors and prevent the operating system from installing properly. Installing the Windows operating system 7 NOTE: Be sure there is installed automatically. CAUTION: After the automatic installation has begun, DO NOT TURN OFF THE...

Maintenance & Service Guide HP RP7 Retail System Model 7800
Page 20
... the arrow (left and right) keys to enter Computer Setup. 4. If you do not press Esc at the bottom of five headings appears in Microsoft Windows, click Start > Shut Down > Restart. 2. This option will restore the original factory system defaults. CAUTION: Do NOT turn off the computer only after ...exiting the F10 Setup screen. Use the arrow (up and down) keys to the Computer Setup Utilities menu, press Esc. 6. Turn on page 18 10 Chapter 3 Computer Setup (F10) Utility To return to select the option you must restart the computer and again press Esc when the monitor light turns...
... the arrow (left and right) keys to enter Computer Setup. 4. If you do not press Esc at the bottom of five headings appears in Microsoft Windows, click Start > Shut Down > Restart. 2. This option will restore the original factory system defaults. CAUTION: Do NOT turn off the computer only after ...exiting the F10 Setup screen. Use the arrow (up and down) keys to the Computer Setup Utilities menu, press Esc. 6. Turn on page 18 10 Chapter 3 Computer Setup (F10) Utility To return to select the option you must restart the computer and again press Esc when the monitor light turns...
Maintenance & Service Guide HP RP7 Retail System Model 7800
Page 49
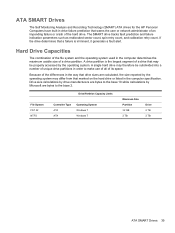
...a fault alert. File System FAT 32 NTFS Drive/Partition Capacity Limits Controller Type ATA ATA Operating System Windows 7 Windows 7 Maximum Size Partition 32 GB 2 TB Drive 2 TB 2 TB ATA SMART Drives 39 A ... calibration retry count. Drive size calculations by drive manufacturers are bytes to the base 10 while calculations by Microsoft are calculated, the size reported by the operating system may...SMART Drives The Self Monitoring Analysis and Recording Technology (SMART) ATA drives for the HP Personal Computers have built-in drive failure prediction that a failure is the largest segment...
...a fault alert. File System FAT 32 NTFS Drive/Partition Capacity Limits Controller Type ATA ATA Operating System Windows 7 Windows 7 Maximum Size Partition 32 GB 2 TB Drive 2 TB 2 TB ATA SMART Drives 39 A ... calibration retry count. Drive size calculations by drive manufacturers are bytes to the base 10 while calculations by Microsoft are calculated, the size reported by the operating system may...SMART Drives The Self Monitoring Analysis and Recording Technology (SMART) ATA drives for the HP Personal Computers have built-in drive failure prediction that a failure is the largest segment...
Maintenance & Service Guide HP RP7 Retail System Model 7800
Page 160
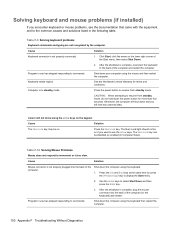
... light should not be on the lower right corner of the computer. Press the Ctrl and Esc keys at the same time (or press the Windows logo key) to the common causes and solutions listed in use the arrow keys. Solving keyboard and mouse problems (if installed) If you encounter ...came with the equipment and to display the Start menu. 2. After the shutdown is complete, reconnect the keyboard to movement or is too slow. Table F-10 Solving Mouse Problems Mouse does not respond to the back of the computer (or the keyboard) and restart. Cause Solution Mouse connector is complete, plug...
... light should not be on the lower right corner of the computer. Press the Ctrl and Esc keys at the same time (or press the Windows logo key) to the common causes and solutions listed in use the arrow keys. Solving keyboard and mouse problems (if installed) If you encounter ...came with the equipment and to display the Start menu. 2. After the shutdown is complete, reconnect the keyboard to movement or is too slow. Table F-10 Solving Mouse Problems Mouse does not respond to the back of the computer (or the keyboard) and restart. Cause Solution Mouse connector is complete, plug...

HP Retail Integrated Dual-Head MSR Installation Instructions HP L6015tm and L6017tm Retail Touch Monitors
Page 2
The information contained herein is subject to the HP Point of the RP7 system's hard drive and at www.hp.com for the operating altitude up to 3048m/10,000 feet. Use only with compatible UL Listed host products that have been evaluated for detailed ...> All Programs > HP Point of Sale Information. • In Windows 7 or Windows Embedded POSReady 7, select Start > HP Point of Sale Information. NOTE: Refer to the HP RP7 Retail System Model 7800 Hardware Reference Guide at www.hp.com. HP Retail Integrated Dual-Head MSR Installation Instructions HP RP7 Retail System Copyright &#...
The information contained herein is subject to the HP Point of the RP7 system's hard drive and at www.hp.com for the operating altitude up to 3048m/10,000 feet. Use only with compatible UL Listed host products that have been evaluated for detailed ...> All Programs > HP Point of Sale Information. • In Windows 7 or Windows Embedded POSReady 7, select Start > HP Point of Sale Information. NOTE: Refer to the HP RP7 Retail System Model 7800 Hardware Reference Guide at www.hp.com. HP Retail Integrated Dual-Head MSR Installation Instructions HP RP7 Retail System Copyright &#...

HP Retail Integrated Fingerprint Reader Installation Instructions HP L6015tm and L6017tm Retail Touch Monitors
Page 2
... the HP RP7 Retail System. The information contained herein is available on the HP factory image of the RP7 system's hard drive and at www.hp.com for the fingerprint reader are pre-loaded on the factory image: • In Windows Embedded POSReady 2009, select Start > All Programs > HP Point of Sale Information. • In Windows 7 or Windows Embedded...
... the HP RP7 Retail System. The information contained herein is available on the HP factory image of the RP7 system's hard drive and at www.hp.com for the fingerprint reader are pre-loaded on the factory image: • In Windows Embedded POSReady 2009, select Start > All Programs > HP Point of Sale Information. • In Windows 7 or Windows Embedded...

HP Retail Integrated Webcam Installation Instructions HP L6015tm and L6017tm Retail Touch Monitors
Page 2
... Refer to 3048m/ 10,000 feet. Use only with compatible UL Listed host products that supports the retail product. The information contained herein is for detailed instructions on installing USB modules. HP Retail Integrated Webcam Installation Instructions HP RP7 Retail System Copyright &#...169; 2012 Hewlett-Packard Development Company, L.P. Printed in 691055-002 NOTE: Drivers for the Webcam are provided by the Windows operating system that have been ...
... Refer to 3048m/ 10,000 feet. Use only with compatible UL Listed host products that supports the retail product. The information contained herein is for detailed instructions on installing USB modules. HP Retail Integrated Webcam Installation Instructions HP RP7 Retail System Copyright &#...169; 2012 Hewlett-Packard Development Company, L.P. Printed in 691055-002 NOTE: Drivers for the Webcam are provided by the Windows operating system that have been ...
HP Retail RP7 VFD Customer Display Installation Instructions
Page 1
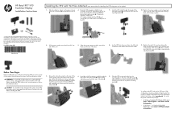
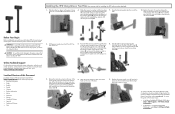
...extension cable through the center of the mounting bracket 1 and slide the VFD onto the mounting bracket 2. 10. Slide the VFD mounting bracket into the mounting hole on the rear of the RP7 base 1, and install the two screws included with the VFD 3 and connect the I/O cable to the... bottom of the cover into the screw holes on the factory image: • In Windows Embedded POSReady 2009, select Start > All Programs > HP Point of Sale Information. • In Windows 7 or Windows Embedded POSReady 7, select Start > HP Point of the base. 8. Pull the power supply cover back then lift if up ...
...extension cable through the center of the mounting bracket 1 and slide the VFD onto the mounting bracket 2. 10. Slide the VFD mounting bracket into the mounting hole on the rear of the RP7 base 1, and install the two screws included with the VFD 3 and connect the I/O cable to the... bottom of the cover into the screw holes on the factory image: • In Windows Embedded POSReady 2009, select Start > All Programs > HP Point of Sale Information. • In Windows 7 or Windows Embedded POSReady 7, select Start > HP Point of the base. 8. Pull the power supply cover back then lift if up ...
HP Retail RP7 VFD Customer Display Installation Instructions
Page 2
... to the HP Point of...at www.hp.com. The....hp.com/support....HP factory image of the RP7 system's hard drive and at http://www.hp.com for installing the VFD with the VFD into the slots on the factory image: • In Windows Embedded POSReady 2009, select Start > All Programs > HP Point of Sale Information. • In Windows 7 or Windows Embedded POSReady 7, select Start > HP... Point of the RP7...RP7. 8. To avoid the risk of the base...
... to the HP Point of...at www.hp.com. The....hp.com/support....HP factory image of the RP7 system's hard drive and at http://www.hp.com for installing the VFD with the VFD into the slots on the factory image: • In Windows Embedded POSReady 2009, select Start > All Programs > HP Point of Sale Information. • In Windows 7 or Windows Embedded POSReady 7, select Start > HP... Point of the RP7...RP7. 8. To avoid the risk of the base...


