
Watching and Recording TV
Page 13
... front of the cable over the remote infrared (IR) sensor (receiver) window on the end of the cable (B), and then press the end of the HP TouchSmart PC (E), not at the set-top box. USB 2.0 USB 2.0 USB 2.0 Gigabit Ethernet LAN SPDIF (output) 2.1 Audio (output) TV Signal Input (F-Type or PAL ... order to use the remote control properly. Using the Windows Media Center Remote Control 9 It enables the remote control that connects to the computer and covers the remote sensor on a set -top box with Windows Media Center: 1 Connect the IR emitter cable (A) to the IR Out connector (D) on...
... front of the cable over the remote infrared (IR) sensor (receiver) window on the end of the cable (B), and then press the end of the HP TouchSmart PC (E), not at the set-top box. USB 2.0 USB 2.0 USB 2.0 Gigabit Ethernet LAN SPDIF (output) 2.1 Audio (output) TV Signal Input (F-Type or PAL ... order to use the remote control properly. Using the Windows Media Center Remote Control 9 It enables the remote control that connects to the computer and covers the remote sensor on a set -top box with Windows Media Center: 1 Connect the IR emitter cable (A) to the IR Out connector (D) on...

Getting Started Guide
Page 3
Table of Contents Finding HP TouchSmart PC Information vi Getting to Know the HP TouchSmart PC 1 HP TouchSmart PC Features...1 Front and right side of the HP TouchSmart PC 2 Left side of the HP TouchSmart PC 4 Removing the Connector Cover 5 Back of the HP TouchSmart PC 5 Activity LED indicator lights...7 Connecting the power source ...8 Cable Management...8 Adjust the Angle of the Computer Stand 10 Using the Wireless Keyboard or Mouse...
Table of Contents Finding HP TouchSmart PC Information vi Getting to Know the HP TouchSmart PC 1 HP TouchSmart PC Features...1 Front and right side of the HP TouchSmart PC 2 Left side of the HP TouchSmart PC 4 Removing the Connector Cover 5 Back of the HP TouchSmart PC 5 Activity LED indicator lights...7 Connecting the power source ...8 Cable Management...8 Adjust the Angle of the Computer Stand 10 Using the Wireless Keyboard or Mouse...

Getting Started Guide
Page 11
... your finger under the gap on the bottom-left side of the cover, and pull gently. B Gigabit Ethernet LAN (10/100/1G) Connect to Know the HP TouchSmart PC 5 Replace the connector cover by aligning the hooks on the right edge of the HP TouchSmart PC Features and configurations vary by model A B I C D E J F G K H L M Connector Function A USB 2.0 ports (3) Connect USB...
... your finger under the gap on the bottom-left side of the cover, and pull gently. B Gigabit Ethernet LAN (10/100/1G) Connect to Know the HP TouchSmart PC 5 Replace the connector cover by aligning the hooks on the right edge of the HP TouchSmart PC Features and configurations vary by model A B I C D E J F G K H L M Connector Function A USB 2.0 ports (3) Connect USB...

Getting Started Guide
Page 14
Cable Management The HP TouchSmart PC includes a cable-management feature that is located behind the back connector cover. Connecting the power source Plug the power cord into the AC adapter (brick...notch in the computer stand, and then plug the power cord into the back of the cover, and pull gently. 8 Getting Started (Features may vary by model) To use the cable routing clip feature: 1 ...To remove the connector cover on the back of the computer, insert your finger under the gap on the bottom-left side of the...
Cable Management The HP TouchSmart PC includes a cable-management feature that is located behind the back connector cover. Connecting the power source Plug the power cord into the AC adapter (brick...notch in the computer stand, and then plug the power cord into the back of the cover, and pull gently. 8 Getting Started (Features may vary by model) To use the cable routing clip feature: 1 ...To remove the connector cover on the back of the computer, insert your finger under the gap on the bottom-left side of the...

Getting Started Guide
Page 15
B Getting to Know the HP TouchSmart PC 9 2 Route your cables through the notch (B) in the computer stand. Then, route the cables through the cable routing clip (A), and out of the back of the cover with the slots on the computer, and then pressing it until it snaps into place. A 3 Replace the connector cover by aligning the hooks on the right edge of the computer.
B Getting to Know the HP TouchSmart PC 9 2 Route your cables through the notch (B) in the computer stand. Then, route the cables through the cable routing clip (A), and out of the back of the cover with the slots on the computer, and then pressing it until it snaps into place. A 3 Replace the connector cover by aligning the hooks on the right edge of the computer.
Getting Started Guide
Page 21
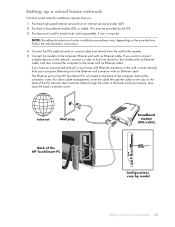
... cable). For clean cable management, route the cable through the cable router clip on the HP TouchSmart PC is required. The Ethernet port on the back of the computer, behind the connector cover. Internet Wall plug Back of the HP TouchSmart PC Broadband modem (DSL/cable) Configurations vary by the ISP. 3 Purchase and install a wired router (sold...
... cable). For clean cable management, route the cable through the cable router clip on the HP TouchSmart PC is required. The Ethernet port on the back of the computer, behind the connector cover. Internet Wall plug Back of the HP TouchSmart PC Broadband modem (DSL/cable) Configurations vary by the ISP. 3 Purchase and install a wired router (sold...
Getting Started Guide
Page 25
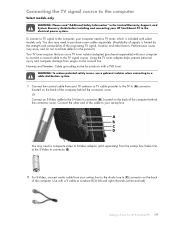
...issues may arise, and do not constitute defects in the Limited Warranty, Support, and System Recovery Guide before installing and connecting your HP TouchSmart PC to Know the HP TouchSmart PC 19 WARNING: To reduce potential safety issues, use a TV tuner isolator (adapter) (purchased separately) with a TVB tuner. Getting...top box to the S-Video In connector (B). . 2 For S-Video, connect audio cable from surges on the back of the computer behind the connector cover. A B C D You may need a composite video to S-Video adaptor (sold separately) from the set -top box. You also may need...
...issues may arise, and do not constitute defects in the Limited Warranty, Support, and System Recovery Guide before installing and connecting your HP TouchSmart PC to Know the HP TouchSmart PC 19 WARNING: To reduce potential safety issues, use a TV tuner isolator (adapter) (purchased separately) with a TVB tuner. Getting...top box to the S-Video In connector (B). . 2 For S-Video, connect audio cable from surges on the back of the computer behind the connector cover. A B C D You may need a composite video to S-Video adaptor (sold separately) from the set -top box. You also may need...

Getting Started Guide
Page 26
... the IR emitter connector (D) on the back of the cable over the remote IR sensor (receiver) window on the set-top box (C). Setting up the HP TouchSmart PC with a set-top box Select models only If your TV signal requires a cable TV set-top box, a satellite set-top box, or another set-top... models only. When you are included in the following illustration. TV tuners and remote controls are selecting TV channels in order to the computer and covers the remote sensor on a set -top box. To use the remote control. You must connect the IR emitter cable to use the remote control properly...
... the IR emitter connector (D) on the back of the cable over the remote IR sensor (receiver) window on the set-top box (C). Setting up the HP TouchSmart PC with a set-top box Select models only If your TV signal requires a cable TV set-top box, a satellite set-top box, or another set-top... models only. When you are included in the following illustration. TV tuners and remote controls are selecting TV channels in order to the computer and covers the remote sensor on a set -top box. To use the remote control. You must connect the IR emitter cable to use the remote control properly...

Getting Started Guide
Page 28
... speaker options: Built-in analog stereo speakers Analog 2.0 or 2.1 powered speakers Digital 3.1, 4.1, or 5.1 powered speakers Audio receiver NOTES: The HP TouchSmart PC supports powered speaker systems only. NOTE: When an Audio Line Out connector (such as headphones or external speakers) are connected the internal speakers are... affected: the output to the subwoofer. By default, the internal speakers are on the back of the computer behind the connector cover to the subwoofer, and then connect the left and right speakers to the internal speakers, the Audio Line Out connector, and the...
... speaker options: Built-in analog stereo speakers Analog 2.0 or 2.1 powered speakers Digital 3.1, 4.1, or 5.1 powered speakers Audio receiver NOTES: The HP TouchSmart PC supports powered speaker systems only. NOTE: When an Audio Line Out connector (such as headphones or external speakers) are connected the internal speakers are... affected: the output to the subwoofer. By default, the internal speakers are on the back of the computer behind the connector cover to the subwoofer, and then connect the left and right speakers to the internal speakers, the Audio Line Out connector, and the...

Getting Started Guide
Page 29
NOTE: When SPDIF is connected, you can switch to Know the HP TouchSmart PC 23 If necessary, refer to the instructions that came with the computer. 1 Tap the SoundMAX icon on the taskbar. 2 Tap the Volume button. 3 In the ... receiver Connect 3.1, 4.1, or 5.1 digital speakers or an audio receiver to the SPDIF Line Out (orange) connector on the back of the computer behind the connector cover, and then use the SoundMAX software that came with your preferences by using the SoundMAX Listening Experience, Recording Experience, and Advanced buttons.
NOTE: When SPDIF is connected, you can switch to Know the HP TouchSmart PC 23 If necessary, refer to the instructions that came with the computer. 1 Tap the SoundMAX icon on the taskbar. 2 Tap the Volume button. 3 In the ... receiver Connect 3.1, 4.1, or 5.1 digital speakers or an audio receiver to the SPDIF Line Out (orange) connector on the back of the computer behind the connector cover, and then use the SoundMAX software that came with your preferences by using the SoundMAX Listening Experience, Recording Experience, and Advanced buttons.

Getting Started Guide
Page 32
When moving the computer or opening the memory cover, you to secure your computer from theft and unwanted changes. To install a security lock: 1 Place the computer face-down a blanket, towel, or other soft cloth ... stationary object) and the other hand moves the lock latch on a soft flat surface (A). NOTE: The HP TouchSmart PC does not support printers that has a wire cable attached. Secure the security lock with one end of the HP TouchSmart PC, or you set down on the stand to the left until it with the key. You...
When moving the computer or opening the memory cover, you to secure your computer from theft and unwanted changes. To install a security lock: 1 Place the computer face-down a blanket, towel, or other soft cloth ... stationary object) and the other hand moves the lock latch on a soft flat surface (A). NOTE: The HP TouchSmart PC does not support printers that has a wire cable attached. Secure the security lock with one end of the HP TouchSmart PC, or you set down on the stand to the left until it with the key. You...

Upgrade and Service Guide
Page 6
... when opening and closing the HP TouchSmart PC, to make it easier to locate components of the HP TouchSmart PC. A B G C F D E A: Optical disc drive cover B: Back cover C: Computer stand D: Power adapter connector G: Connector cover E: Wireless keyboard and mouse receiver F: Memory cover 2 Upgrading and Servicing Guide WARNING: Always disconnect the HP TouchSmart PC from the power source before you open the HP TouchSmart PC or perform any procedures...
... when opening and closing the HP TouchSmart PC, to make it easier to locate components of the HP TouchSmart PC. A B G C F D E A: Optical disc drive cover B: Back cover C: Computer stand D: Power adapter connector G: Connector cover E: Wireless keyboard and mouse receiver F: Memory cover 2 Upgrading and Servicing Guide WARNING: Always disconnect the HP TouchSmart PC from the power source before you open the HP TouchSmart PC or perform any procedures...

Upgrade and Service Guide
Page 8
5 Remove the connector cover by inserting your finger under the gap on the bottom-left side of the HP TouchSmart PC. 4 Upgrading and Servicing Guide A 6 Disconnect all other attached cables from the back of the cover (A), and then pulling gently.
5 Remove the connector cover by inserting your finger under the gap on the bottom-left side of the HP TouchSmart PC. 4 Upgrading and Servicing Guide A 6 Disconnect all other attached cables from the back of the cover (A), and then pulling gently.

Upgrade and Service Guide
Page 17
...secure the back cover to break the cover by lifting the bottom edge with your finger or a screwdriver, and then rotating the cover out and away from the computer. There are located in place, so be careful not to the chassis. A Upgrading and Servicing Guide 13 See "Opening the HP TouchSmart PC" on the... sides of the back cover, two are located on page 3. Four of the screws are located along the bottom edge of the optical drive, and three ...
...secure the back cover to break the cover by lifting the bottom edge with your finger or a screwdriver, and then rotating the cover out and away from the computer. There are located in place, so be careful not to the chassis. A Upgrading and Servicing Guide 13 See "Opening the HP TouchSmart PC" on the... sides of the back cover, two are located on page 3. Four of the screws are located along the bottom edge of the optical drive, and three ...
Upgrade and Service Guide
Page 26
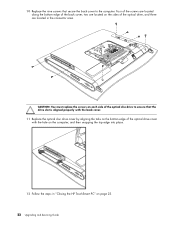
...located along the bottom edge of the back cover, two are located on the sides of the optical drive, and three are located in "Closing the HP TouchSmart PC" on page 23. 22 Upgrading and Servicing Guide 10 Replace the nine screws that secure the back cover to ensure that the drive slot is ...aligned properly with the back cover. 11 Replace the optical disc drive cover by aligning the tabs on the bottom edge...
...located along the bottom edge of the back cover, two are located on the sides of the optical drive, and three are located in "Closing the HP TouchSmart PC" on page 23. 22 Upgrading and Servicing Guide 10 Replace the nine screws that secure the back cover to ensure that the drive slot is ...aligned properly with the back cover. 11 Replace the optical disc drive cover by aligning the tabs on the bottom edge...

Upgrade and Service Guide
Page 27
... A Upgrading and Servicing Guide 23 Closing the HP TouchSmart PC To avoid injury and equipment damage, always complete the following steps in the middle of the computer, and then replace the four screws that secure the stand to make sure the entire cover is pushed all the way down on both ...over the two legs of the memory cover to snap it , replace the computer stand. Align the memory cover over the four holes on the back of the bottom edge to the computer. 2 Replace the memory cover. Push down . Push in order, after closing the HP TouchSmart PC: 1 If you removed it into place...
... A Upgrading and Servicing Guide 23 Closing the HP TouchSmart PC To avoid injury and equipment damage, always complete the following steps in the middle of the computer, and then replace the four screws that secure the stand to make sure the entire cover is pushed all the way down on both ...over the two legs of the memory cover to snap it , replace the computer stand. Align the memory cover over the four holes on the back of the bottom edge to the computer. 2 Replace the memory cover. Push down . Push in order, after closing the HP TouchSmart PC: 1 If you removed it into place...

Upgrade and Service Guide
Page 30
...not plug telecommunications or telephone cables into place. 9 Reconnect external devices. 10 Turn on the HP TouchSmart PC and all devices connected to the power source. 7 Attach the power adapter to the back of the cover with the holes on the computer, and then rotating inward to snap it into the network ...interface card (NIC) (labeled as LAN). 8 Reconnect all other cables, and then replace the connector cover by aligning the three tabs on the side edge of the computer and then reconnect the power cord to it. 26 Upgrading and Servicing Guide
...not plug telecommunications or telephone cables into place. 9 Reconnect external devices. 10 Turn on the HP TouchSmart PC and all devices connected to the power source. 7 Attach the power adapter to the back of the cover with the holes on the computer, and then rotating inward to snap it into the network ...interface card (NIC) (labeled as LAN). 8 Reconnect all other cables, and then replace the connector cover by aligning the three tabs on the side edge of the computer and then reconnect the power cord to it. 26 Upgrading and Servicing Guide

Upgrading and Servicing Guide
Page 8
... mouse receiver F: Memory cover 2 Upgrading and Servicing Guide It is recommended that you use a magnetic-tipped screwdriver when opening and closing the HP TouchSmart PC, to make it easier to remove and install the screws. Locating Components of the HP TouchSmart PC. WARNING: Always disconnect the HP TouchSmart PC from the power source before you open the HP TouchSmart PC or perform any...
... mouse receiver F: Memory cover 2 Upgrading and Servicing Guide It is recommended that you use a magnetic-tipped screwdriver when opening and closing the HP TouchSmart PC, to make it easier to remove and install the screws. Locating Components of the HP TouchSmart PC. WARNING: Always disconnect the HP TouchSmart PC from the power source before you open the HP TouchSmart PC or perform any...

Upgrading and Servicing Guide
Page 10
5 Remove the connector cover by inserting your finger under the gap on the bottom-left side of the HP TouchSmart PC. 4 Upgrading and Servicing Guide A 6 Disconnect all other attached cables from the back of the cover (A), and then pulling gently.
5 Remove the connector cover by inserting your finger under the gap on the bottom-left side of the HP TouchSmart PC. 4 Upgrading and Servicing Guide A 6 Disconnect all other attached cables from the back of the cover (A), and then pulling gently.

Upgrading and Servicing Guide
Page 19
...located along the bottom edge of the back cover, two are located on page 3. A Upgrading and Servicing Guide 13 See "Opening the HP TouchSmart PC" on the sides of the optical drive, and three are several tabs and two guide pins holding the cover in the connector area. 3 Remove the ...optical disc drive cover by applying too much force. 4 Make sure the wireless ...
...located along the bottom edge of the back cover, two are located on page 3. A Upgrading and Servicing Guide 13 See "Opening the HP TouchSmart PC" on the sides of the optical drive, and three are several tabs and two guide pins holding the cover in the connector area. 3 Remove the ...optical disc drive cover by applying too much force. 4 Make sure the wireless ...


