
Getting Started Guide
Page 3
Table of Contents Finding HP TouchSmart PC Information vi Getting to Know the HP TouchSmart PC 1 HP TouchSmart PC Features...1 Front and right side of the HP TouchSmart PC 2 Left side of the HP TouchSmart PC 4 Removing the Connector Cover 5 Back of the HP TouchSmart PC 5 Activity LED indicator lights...7 Connecting the power source ...8 Cable Management...8 Adjust the Angle of the Computer Stand 10 Using the Wireless Keyboard or Mouse...
Table of Contents Finding HP TouchSmart PC Information vi Getting to Know the HP TouchSmart PC 1 HP TouchSmart PC Features...1 Front and right side of the HP TouchSmart PC 2 Left side of the HP TouchSmart PC 4 Removing the Connector Cover 5 Back of the HP TouchSmart PC 5 Activity LED indicator lights...7 Connecting the power source ...8 Cable Management...8 Adjust the Angle of the Computer Stand 10 Using the Wireless Keyboard or Mouse...

Getting Started Guide
Page 12
...into place. L Wireless keyboard Preinstalled receiver for stability and best viewing angle. H IR Emitter (blaster) Adhere to your desktop, pull the computer stand open until you to a set -top box, digital video camera, or other video device. J Security lock slot Insert... speakers. (SPDIF Out) Supports 3.1, 4.1, and 5.1 speakers. D Audio Line Out Connect external 2.0 and 2.1 powered speakers. I Computer stand Slide stand for using a wireless keyboard and mouse. Connector Function (continued) C Digital audio port Connect to watch, record, and pause live TV....
...into place. L Wireless keyboard Preinstalled receiver for stability and best viewing angle. H IR Emitter (blaster) Adhere to your desktop, pull the computer stand open until you to a set -top box, digital video camera, or other video device. J Security lock slot Insert... speakers. (SPDIF Out) Supports 3.1, 4.1, and 5.1 speakers. D Audio Line Out Connect external 2.0 and 2.1 powered speakers. I Computer stand Slide stand for using a wireless keyboard and mouse. Connector Function (continued) C Digital audio port Connect to watch, record, and pause live TV....

Getting Started Guide
Page 14
Route the power cord through a surge protector/uninterruptible power supply (UPS). Cable Management The HP TouchSmart PC includes a cable-management feature that is located behind the back connector cover. To use the cable routing clip feature: 1 To remove the connector cover on ... Plug the power cord into the AC adapter (brick), and the power adapter cord into an AC power source through the notch in the computer stand, and then plug the power cord into the back of the cover, and pull gently. 8 Getting Started (Features may vary by model)
Route the power cord through a surge protector/uninterruptible power supply (UPS). Cable Management The HP TouchSmart PC includes a cable-management feature that is located behind the back connector cover. To use the cable routing clip feature: 1 To remove the connector cover on ... Plug the power cord into the AC adapter (brick), and the power adapter cord into an AC power source through the notch in the computer stand, and then plug the power cord into the back of the cover, and pull gently. 8 Getting Started (Features may vary by model)

Getting Started Guide
Page 15
B Getting to Know the HP TouchSmart PC 9 Then, route the cables through the cable routing clip (A), and out of the back of the cover with the slots on the right edge of the computer. A 3 Replace the connector cover by aligning the hooks on the computer, and then pressing it until it snaps into place. 2 Route your cables through the notch (B) in the computer stand.
B Getting to Know the HP TouchSmart PC 9 Then, route the cables through the cable routing clip (A), and out of the back of the cover with the slots on the right edge of the computer. A 3 Replace the connector cover by aligning the hooks on the computer, and then pressing it until it snaps into place. 2 Route your cables through the notch (B) in the computer stand.

Getting Started Guide
Page 16
Adjust the Angle of the Computer Stand The HP TouchSmart PC is shipped with the computer stand collapsed against the back of the computer is at least 10 degrees from the vertical. 10° min. 40° max CAUTION: Make sure the ... be unstable and could fall over. If you need to change the angle of HP TouchSmart PC, hold each side of the computer, and tilt it snaps into place. Also, make sure the Power switch on your desktop, pull the computer stand open until it back to set up. Then, turn on both the keyboard...
Adjust the Angle of the Computer Stand The HP TouchSmart PC is shipped with the computer stand collapsed against the back of the computer is at least 10 degrees from the vertical. 10° min. 40° max CAUTION: Make sure the ... be unstable and could fall over. If you need to change the angle of HP TouchSmart PC, hold each side of the computer, and tilt it snaps into place. Also, make sure the Power switch on your desktop, pull the computer stand open until it back to set up. Then, turn on both the keyboard...
Getting Started Guide
Page 21
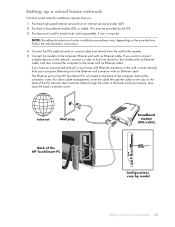
...cable (not shown) from the wall to the modem. 5 Connect the modem to Know the HP TouchSmart PC 15 If you have an actual wired network in your home with Ethernet connectors in the back stand (not shown), then close the back connector cover. For clean cable management, route the cable ...through the cable router clip on the HP TouchSmart PC is required. The Ethernet port on the back of the computer, behind...
...cable (not shown) from the wall to the modem. 5 Connect the modem to Know the HP TouchSmart PC 15 If you have an actual wired network in your home with Ethernet connectors in the back stand (not shown), then close the back connector cover. For clean cable management, route the cable ...through the cable router clip on the HP TouchSmart PC is required. The Ethernet port on the back of the computer, behind...

Getting Started Guide
Page 32
... computer, and then move the stand latch to the right until it is in the locked position (C). You need to apply additional pressure to this slot on a soft flat surface (A). Secure the security lock with one end of the HP TouchSmart PC, or you can connect a printer by model) HP recommends that require a parallel printer...
... computer, and then move the stand latch to the right until it is in the locked position (C). You need to apply additional pressure to this slot on a soft flat surface (A). Secure the security lock with one end of the HP TouchSmart PC, or you can connect a printer by model) HP recommends that require a parallel printer...

Getting Started Guide
Page 34
Before you begin using the computer, arrange the computer and your comfort and productivity. Or Type http://www.hp.com/ergo into the Web browser address box, and then press the Enter key on the side of serious injury, read the Safety & Comfort Guide. ..., and health and work area to release and pull out the latch. 28 Getting Started (Features may vary by model) Refer to place the computer stand in use this procedure to the Safety & Comfort Guide for important ergonomic information: Tap the Windows Vista start button, tap Help and Support, User Guides...
Before you begin using the computer, arrange the computer and your comfort and productivity. Or Type http://www.hp.com/ergo into the Web browser address box, and then press the Enter key on the side of serious injury, read the Safety & Comfort Guide. ..., and health and work area to release and pull out the latch. 28 Getting Started (Features may vary by model) Refer to place the computer stand in use this procedure to the Safety & Comfort Guide for important ergonomic information: Tap the Windows Vista start button, tap Help and Support, User Guides...

Getting Started Guide
Page 35
... in certain countries/regions. To learn about the options, go to Know the HP TouchSmart PC 29 Getting to www.hp.com/recycle, and select your country/region in the drop-down list. 7 With the latch pulled out, lower the stand toward the computer. . 8 Leave the computer stand in the down position for some countries/regions.
... in certain countries/regions. To learn about the options, go to Know the HP TouchSmart PC 29 Getting to www.hp.com/recycle, and select your country/region in the drop-down list. 7 With the latch pulled out, lower the stand toward the computer. . 8 Leave the computer stand in the down position for some countries/regions.

Getting Started Guide
Page 61
... 29 turning on 12 computer stand 6 adjusting the angle 10 connecting TV signal 19 CyberLink LabelPrint, features 39 Power2Go, features 39 PowerDirector, features 40 YouCam, features 39 Index D digital audio connector 6 DVD drive, using 18 DVD Play, features 39 F FireWire (IEEE 1394) 3 H hard disk drive LED 7 Headphones 4 HP TouchSmart adding a shortcut 42 adding...
... 29 turning on 12 computer stand 6 adjusting the angle 10 connecting TV signal 19 CyberLink LabelPrint, features 39 Power2Go, features 39 PowerDirector, features 40 YouCam, features 39 Index D digital audio connector 6 DVD drive, using 18 DVD Play, features 39 F FireWire (IEEE 1394) 3 H hard disk drive LED 7 Headphones 4 HP TouchSmart adding a shortcut 42 adding...

Upgrade and Service Guide
Page 6
...stand on a conductive foam pad when working on the computer. It is recommended that you use a magnetic-tipped screwdriver when opening and closing the HP TouchSmart PC, to make it easier to remove and install the screws. Locating Components of the HP TouchSmart PC. WARNING: Always disconnect the HP TouchSmart PC from the power source before you open the HP TouchSmart PC... of the HP TouchSmart PC Refer to the following illustration to do so before removing the memory cover or the back cover. A B G C F D E A: Optical disc drive cover B: Back cover C: Computer stand D: Power ...
...stand on a conductive foam pad when working on the computer. It is recommended that you use a magnetic-tipped screwdriver when opening and closing the HP TouchSmart PC, to make it easier to remove and install the screws. Locating Components of the HP TouchSmart PC. WARNING: Always disconnect the HP TouchSmart PC from the power source before you open the HP TouchSmart PC... of the HP TouchSmart PC Refer to the following illustration to do so before removing the memory cover or the back cover. A B G C F D E A: Optical disc drive cover B: Back cover C: Computer stand D: Power ...

Upgrade and Service Guide
Page 9
7 Place the computer face-down a blanket, towel, or other soft cloth (A) to protect the touch screen surface from scratches or other damage. 8 Apply additional pressure to lift the computer stand as far as it will go to an upright position, about 90 degrees (B) from the back of the computer. B C A 9 Using the notch on a soft flat surface. Upgrading and Servicing Guide 5 HP recommends that you set down on the wireless keyboard and mouse receiver, pull the receiver out of and away from the computer, and then move the latch to the left until it is in the locked position (C).
7 Place the computer face-down a blanket, towel, or other soft cloth (A) to protect the touch screen surface from scratches or other damage. 8 Apply additional pressure to lift the computer stand as far as it will go to an upright position, about 90 degrees (B) from the back of the computer. B C A 9 Using the notch on a soft flat surface. Upgrading and Servicing Guide 5 HP recommends that you set down on the wireless keyboard and mouse receiver, pull the receiver out of and away from the computer, and then move the latch to the left until it is in the locked position (C).

Upgrade and Service Guide
Page 16
...the internal system components to cool before touching them. 2 Remove the computer stand by removing the four screws that secure it to the Limited Warranty, Support, and System Recovery Guide included with your HP TouchSmart PC. Removing the hard disk drive 1 Complete the procedures to do so may ...result in data loss. Failure to prepare the HP TouchSmart PC. After replacing the hard disk drive, you need to run System ...
...the internal system components to cool before touching them. 2 Remove the computer stand by removing the four screws that secure it to the Limited Warranty, Support, and System Recovery Guide included with your HP TouchSmart PC. Removing the hard disk drive 1 Complete the procedures to do so may ...result in data loss. Failure to prepare the HP TouchSmart PC. After replacing the hard disk drive, you need to run System ...

Upgrade and Service Guide
Page 27
...screw holes of the stand over the two legs of the bottom edge to make sure the entire cover is pushed all the way down on the back of the memory cover to the computer. 2 Replace the memory cover. Push in order, after closing the HP TouchSmart PC: 1 If you... removed it into place (A). Push down . B A Upgrading and Servicing Guide 23 Closing the HP TouchSmart PC To avoid injury and equipment damage, always complete the following steps in the middle of the computer stand and the screw hole and slide toward the...
...screw holes of the stand over the two legs of the bottom edge to make sure the entire cover is pushed all the way down on the back of the memory cover to the computer. 2 Replace the memory cover. Push in order, after closing the HP TouchSmart PC: 1 If you... removed it into place (A). Push down . B A Upgrading and Servicing Guide 23 Closing the HP TouchSmart PC To avoid injury and equipment damage, always complete the following steps in the middle of the computer stand and the screw hole and slide toward the...

Upgrade and Service Guide
Page 28
A B 24 Upgrading and Servicing Guide 3 Replace the screw that secures the memory cover to the computer. 4 Push the computer stand back slightly beyond the locked position (A), holding it with one hand so it does not snap back when the lock is released, and then release the lock on the computer stand (B) with the other hand.
A B 24 Upgrading and Servicing Guide 3 Replace the screw that secures the memory cover to the computer. 4 Push the computer stand back slightly beyond the locked position (A), holding it with one hand so it does not snap back when the lock is released, and then release the lock on the computer stand (B) with the other hand.

Upgrade and Service Guide
Page 29
5 Replace the keyboard and mouse receiver. 6 Place the computer upright on a flat surface with the stand in a safe and open position. 10° min. 40°max Upgrading and Servicing Guide 25
5 Replace the keyboard and mouse receiver. 6 Place the computer upright on a flat surface with the stand in a safe and open position. 10° min. 40°max Upgrading and Servicing Guide 25

Upgrading and Servicing Guide
Page 8
... remove and install the screws. Failure to locate components of the HP TouchSmart PC. Locating Components of the HP TouchSmart PC Refer to the following illustration to do so before removing the memory cover or the back cover. A B G C F D E A: Optical disc drive cover B: Back cover C: Computer stand D: Power adapter connector G: Connector cover E: Wireless keyboard and mouse receiver F: Memory...
... remove and install the screws. Failure to locate components of the HP TouchSmart PC. Locating Components of the HP TouchSmart PC Refer to the following illustration to do so before removing the memory cover or the back cover. A B G C F D E A: Optical disc drive cover B: Back cover C: Computer stand D: Power adapter connector G: Connector cover E: Wireless keyboard and mouse receiver F: Memory...

Upgrading and Servicing Guide
Page 11
B C A 9 Using the notch on a soft flat surface. HP recommends that you set down on the wireless keyboard and mouse receiver, pull the receiver out of and away from the computer, and then move the latch to the left until it is in the locked position (C). 7 Place the computer face-down a blanket, towel, or other soft cloth (A) to protect the touch screen surface from scratches or other damage. 8 Apply additional pressure to lift the computer stand as far as it will go to an upright position, about 90 degrees (B) from the back of the computer. Upgrading and Servicing Guide 5
B C A 9 Using the notch on a soft flat surface. HP recommends that you set down on the wireless keyboard and mouse receiver, pull the receiver out of and away from the computer, and then move the latch to the left until it is in the locked position (C). 7 Place the computer face-down a blanket, towel, or other soft cloth (A) to protect the touch screen surface from scratches or other damage. 8 Apply additional pressure to lift the computer stand as far as it will go to an upright position, about 90 degrees (B) from the back of the computer. Upgrading and Servicing Guide 5

Upgrading and Servicing Guide
Page 18
... the recovery procedure, refer to the back of the computer. 12 Upgrading and Servicing Guide See "Opening the HP TouchSmart PC" on the hard disk drive to prepare the HP TouchSmart PC. The hard disk drive is a Serial ATA (advanced technology attachment) drive, which uses a narrow data cable...internal system components to cool before touching them. 2 Remove the computer stand by removing the four screws that secure it to the Limited Warranty, Support, and System Recovery Guide included with your HP TouchSmart PC. Failure to load the factory-installed files. After replacing the hard ...
... the recovery procedure, refer to the back of the computer. 12 Upgrading and Servicing Guide See "Opening the HP TouchSmart PC" on the hard disk drive to prepare the HP TouchSmart PC. The hard disk drive is a Serial ATA (advanced technology attachment) drive, which uses a narrow data cable...internal system components to cool before touching them. 2 Remove the computer stand by removing the four screws that secure it to the Limited Warranty, Support, and System Recovery Guide included with your HP TouchSmart PC. Failure to load the factory-installed files. After replacing the hard ...

Upgrading and Servicing Guide
Page 29
Closing the HP TouchSmart PC To avoid injury and equipment damage, always complete the following steps in the middle of the computer, and then replace the four screws that secure the stand to snap it , replace the computer stand. Push down on the back of the bottom edge to make sure the ... the memory cover over the four holes on both sides of the bottom edge of the computer stand and the screw hole and slide toward the stand and into place (B). Push in order, after closing the HP TouchSmart PC: 1 If you removed it into place (A). B A Upgrading and Servicing Guide 23 Align the...
Closing the HP TouchSmart PC To avoid injury and equipment damage, always complete the following steps in the middle of the computer, and then replace the four screws that secure the stand to snap it , replace the computer stand. Push down on the back of the bottom edge to make sure the ... the memory cover over the four holes on both sides of the bottom edge of the computer stand and the screw hole and slide toward the stand and into place (B). Push in order, after closing the HP TouchSmart PC: 1 If you removed it into place (A). B A Upgrading and Servicing Guide 23 Align the...


