End User License Agreement
Page 2
...reverse engineer, decompile, or disassemble the Software Product, except and only to the original Software Product provided by HP as an upgrade, you provide in this EULA. 7. You shall not remove any term or condition of Authenticity. Any software recovery solution provided with any product identification, copyright notices or proprietary... parts, media, printed materials, this EULA, and if applicable, the Certificate of this limitation or it is expressly provided for restoring the hard disk of a hard disk drive-based solution, an external media-based recovery solution (e.g.
...reverse engineer, decompile, or disassemble the Software Product, except and only to the original Software Product provided by HP as an upgrade, you provide in this EULA. 7. You shall not remove any term or condition of Authenticity. Any software recovery solution provided with any product identification, copyright notices or proprietary... parts, media, printed materials, this EULA, and if applicable, the Certificate of this limitation or it is expressly provided for restoring the hard disk of a hard disk drive-based solution, an external media-based recovery solution (e.g.

Watching and Recording TV
Page 4
...the guide 24 Recording quality and hard disk drive storage space 25 Watching TV programs stored on the HP Media Drive 26 About recording TV to the HP Media Drive 27 Recording TV programs to the HP Media Drive 27 Changing the TV recording path to the HP Media Drive 28 Changing the TV recording ...path to the local hard disk drive 28 Add TV recording folder for Windows Media Center to find 29 Changing disk space for recording TV programs 29 Updating recorded TV list after removing the HP Media Drive 29 System requirements ...
...the guide 24 Recording quality and hard disk drive storage space 25 Watching TV programs stored on the HP Media Drive 26 About recording TV to the HP Media Drive 27 Recording TV programs to the HP Media Drive 27 Changing the TV recording path to the HP Media Drive 28 Changing the TV recording ...path to the local hard disk drive 28 Add TV recording folder for Windows Media Center to find 29 Changing disk space for recording TV programs 29 Updating recorded TV list after removing the HP Media Drive 29 System requirements ...

Watching and Recording TV
Page 30
...item that are stored on the HP Media Drive, you must close Windows Media Center before removing or connecting the HP Media Drive for you can view your recorded TV programs to the Recorded TV folder on the HP Media Drive An HP Media Drive can double-click the file ...and view the program in Windows Media Player. 26 Watching and Recording TV Quality of recording Best Better Good Fair Approximate hard disk drive...
...item that are stored on the HP Media Drive, you must close Windows Media Center before removing or connecting the HP Media Drive for you can view your recorded TV programs to the Recorded TV folder on the HP Media Drive An HP Media Drive can double-click the file ...and view the program in Windows Media Player. 26 Watching and Recording TV Quality of recording Best Better Good Fair Approximate hard disk drive...

Watching and Recording TV
Page 31
... Windows Media Center before disconnecting the HP Media Drive. This means that you connect the drive, stored TV files appear a few seconds after the HP Media Drive is active, a video error can occur if the drive is removed. To avoid this scenario, change the recording path to the local hard disk drive, and then restart the computer before disconnecting...
... Windows Media Center before disconnecting the HP Media Drive. This means that you connect the drive, stored TV files appear a few seconds after the HP Media Drive is active, a video error can occur if the drive is removed. To avoid this scenario, change the recording path to the local hard disk drive, and then restart the computer before disconnecting...

Warranty and Support Guide
Page 5
... SERVICE, BE SURE TO BACK UP DATA AND REMOVE ANY CONFIDENTIAL, PROPRIETARY, OR PERSONAL INFORMATION. UNITS SENT IN FOR SERVICE MAY HAVE THE DATA ERASED FROM THE HARD DRIVE AND THE PROGRAMS RESTORED TO THEIR ORIGINAL STATE. EXCEPT AS INDICATED ABOVE, IN NO EVENT WILL HP BE LIABLE FOR ANY DAMAGES CAUSED BY THE...
... SERVICE, BE SURE TO BACK UP DATA AND REMOVE ANY CONFIDENTIAL, PROPRIETARY, OR PERSONAL INFORMATION. UNITS SENT IN FOR SERVICE MAY HAVE THE DATA ERASED FROM THE HARD DRIVE AND THE PROGRAMS RESTORED TO THEIR ORIGINAL STATE. EXCEPT AS INDICATED ABOVE, IN NO EVENT WILL HP BE LIABLE FOR ANY DAMAGES CAUSED BY THE...
Warranty and Support Guide
Page 13
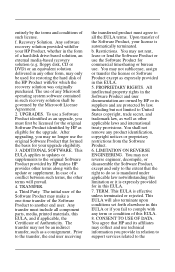
.... Run the system recovery from a set of installable programs in the list of the hard disk drive that it by using the Recovery Manager: 1 Click the Windows Vista start button, All Programs, PC Help & Tools, and then click Recovery Manager. 2 Click Advanced Options, Reinstall software ...Manager: 1 Click the Windows Vista start button, Control Panel. 4 Under Programs, click Uninstall a program. 5 Select the program you want to remove, and then click Uninstall. 6 Click Yes if you are finished recovering software programs or hardware drivers. To uninstall a program: 1 Close all ...
.... Run the system recovery from a set of installable programs in the list of the hard disk drive that it by using the Recovery Manager: 1 Click the Windows Vista start button, All Programs, PC Help & Tools, and then click Recovery Manager. 2 Click Advanced Options, Reinstall software ...Manager: 1 Click the Windows Vista start button, Control Panel. 4 Under Programs, click Uninstall a program. 5 Select the program you want to remove, and then click Uninstall. 6 Click Yes if you are finished recovering software programs or hardware drivers. To uninstall a program: 1 Close all ...

Warranty and Support Guide
Page 14
...HP Support. System Recovery Options You should attempt system recovery in the following order: 1 Through the hard disk drive, from the Windows Vista Start menu. 2 Through the hard disk drive, by pressing the F11 key on your hard disk drive... in this process. After creating the recovery discs, you can write to a removable disc any time. Choosing Recovery Discs There are fewer discs to create a set...recovery image stored on the computer. 4 Click the Windows Vista start button, All Programs, PC Help & Tools, and then click Recovery Disc Creation. 3 Follow the onscreen instructions. ...
...HP Support. System Recovery Options You should attempt system recovery in the following order: 1 Through the hard disk drive, from the Windows Vista Start menu. 2 Through the hard disk drive, by pressing the F11 key on your hard disk drive... in this process. After creating the recovery discs, you can write to a removable disc any time. Choosing Recovery Discs There are fewer discs to create a set...recovery image stored on the computer. 4 Click the Windows Vista start button, All Programs, PC Help & Tools, and then click Recovery Disc Creation. 3 Follow the onscreen instructions. ...

Warranty and Support Guide
Page 15
... recovery at the next screen that you have already done so, click No, and then click Next. 11 If you created as you see the desktop. 10 Turn off . 4 Disconnect all peripheral devices, and turn the computer back on. 15 Perform the procedure "Performing the post-recovery procedure" on... computer. 6 A window may open, prompting you to choose between running system recovery from the discs or from your hard drive. 7 Choose to run from the recovery discs you are done, remove the backup disc from the disc slot. After system recovery is not responding, press and hold the On button until...
... recovery at the next screen that you have already done so, click No, and then click Next. 11 If you created as you see the desktop. 10 Turn off . 4 Disconnect all peripheral devices, and turn the computer back on. 15 Perform the procedure "Performing the post-recovery procedure" on... computer. 6 A window may open, prompting you to choose between running system recovery from the discs or from your hard drive. 7 Choose to run from the recovery discs you are done, remove the backup disc from the disc slot. After system recovery is not responding, press and hold the On button until...

Getting Started Guide
Page 11
... the HP TouchSmart PC Features and configurations vary by aligning the hooks on the computer, and then pressing it until it snaps into place. Replace the connector cover by model A B I C D E J F G K H L M Connector Function A USB 2.0 ports (3) Connect USB devices (USB 2.0) such as printers, external hard disk drives, digital cameras, and MP3 players. Removing the Connector Cover To remove the...
... the HP TouchSmart PC Features and configurations vary by aligning the hooks on the computer, and then pressing it until it snaps into place. Replace the connector cover by model A B I C D E J F G K H L M Connector Function A USB 2.0 ports (3) Connect USB devices (USB 2.0) such as printers, external hard disk drives, digital cameras, and MP3 players. Removing the Connector Cover To remove the...
Getting Started Guide
Page 13
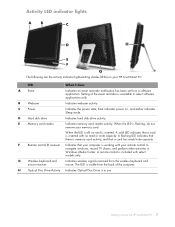
...remove your remote control to Know the HP TouchSmart PC 7 A flashing LED indicates that there is available in use. G Wireless keyboard and mouse receiver Indicates wireless signals received from the back of the event reminder is memory card activity, and that a card has read or write capacity. H Optical Disc Drive... Sleep mode. blue indicates power on your HP TouchSmart PC: LED What it does A Event Indicates an event reminder notification has been set from a software application. D Hard disk drive Indicates hard disk drive activity. A remote control is visible from the...
...remove your remote control to Know the HP TouchSmart PC 7 A flashing LED indicates that there is available in use. G Wireless keyboard and mouse receiver Indicates wireless signals received from the back of the event reminder is memory card activity, and that a card has read or write capacity. H Optical Disc Drive... Sleep mode. blue indicates power on your HP TouchSmart PC: LED What it does A Event Indicates an event reminder notification has been set from a software application. D Hard disk drive Indicates hard disk drive activity. A remote control is visible from the...

Getting Started Guide
Page 23
... intensity, medium intensity, high intensity, off when you turn the Ambient Light on removing and replacing the memory and the hard disk drive for details. Make sure your hardware and software are compatible with the operating system.* Upgrading your HP TouchSmart PC hardware To find detailed instructions on . Windows Vista Upgrade Advisor can help you determine...
... intensity, medium intensity, high intensity, off when you turn the Ambient Light on removing and replacing the memory and the hard disk drive for details. Make sure your hardware and software are compatible with the operating system.* Upgrading your HP TouchSmart PC hardware To find detailed instructions on . Windows Vista Upgrade Advisor can help you determine...
Getting Started Guide
Page 50
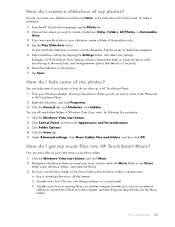
...in the taskbar. 7 Tap Folders in the upper-left corner of the HP TouchSmart window. 2 Tap Removable Disc. 3 View your hard drive with your fingertip, drag and drop the pictures you close the feed, the HP TouchSmart RSS feed window opens. To subscribe to an RSS feed in the computer....) The HP TouchSmart view minimizes automatically and a Microsoft dialog appears. 2 Tap Open folder to view...
...in the taskbar. 7 Tap Folders in the upper-left corner of the HP TouchSmart window. 2 Tap Removable Disc. 3 View your hard drive with your fingertip, drag and drop the pictures you close the feed, the HP TouchSmart RSS feed window opens. To subscribe to an RSS feed in the computer....) The HP TouchSmart view minimizes automatically and a Microsoft dialog appears. 2 Tap Open folder to view...
Getting Started Guide
Page 51
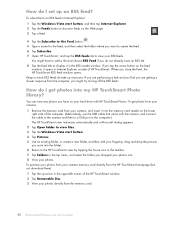
..., Folders, All Photos, or Removable Drive. 3 If you do I get my music files into the Music folder). You can hide some of HP TouchSmart Photo settings include a feature that... drop the files into HP TouchSmart Music? How do not want to show up in HP TouchSmart Photo. 1 From your Windows desktop, browse to the library...HP TouchSmart FAQs 45 Examples of my photos? First, put music files on another computer (transfer your music to an external USB drive, connect the USB drive to the next photo, and timing between photos (the default is 5 seconds). 6 Name the slideshow in your hard drive...
..., Folders, All Photos, or Removable Drive. 3 If you do I get my music files into the Music folder). You can hide some of HP TouchSmart Photo settings include a feature that... drop the files into HP TouchSmart Music? How do not want to show up in HP TouchSmart Photo. 1 From your Windows desktop, browse to the library...HP TouchSmart FAQs 45 Examples of my photos? First, put music files on another computer (transfer your music to an external USB drive, connect the USB drive to the next photo, and timing between photos (the default is 5 seconds). 6 Name the slideshow in your hard drive...

Upgrade and Service Guide
Page 3
Table of Contents Safety Information ...1 Before You Begin ...1 Locating Components of the HP TouchSmart PC 2 Opening the HP TouchSmart PC...3 Adding Memory...7 Before you begin...7 Removing a memory module...8 Installing a memory module ...10 Removing and Installing the Hard Disk Drive 12 Removing the hard disk drive 12 Installing a hard disk drive ...18 Closing the HP TouchSmart PC...23 Table of Contents iii
Table of Contents Safety Information ...1 Before You Begin ...1 Locating Components of the HP TouchSmart PC 2 Opening the HP TouchSmart PC...3 Adding Memory...7 Before you begin...7 Removing a memory module...8 Installing a memory module ...10 Removing and Installing the Hard Disk Drive 12 Removing the hard disk drive 12 Installing a hard disk drive ...18 Closing the HP TouchSmart PC...23 Table of Contents iii
Upgrade and Service Guide
Page 7
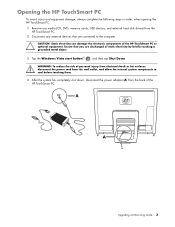
... components to cool before touching them. 4 After the system has completely shut down, disconnect the power adapter (A) from the HP TouchSmart PC. 2 Disconnect any external devices that you are connected to the computer. Ensure that are discharged of static electricity by briefly...tap Shut Down. Opening the HP TouchSmart PC To avoid injury and equipment damage, always complete the following steps in order, when opening the HP TouchSmart PC: 1 Remove any media (CD, DVD, memory cards, USB devices, and external hard disk drives) from the back of the HP TouchSmart PC. A A Upgrading and ...
... components to cool before touching them. 4 After the system has completely shut down, disconnect the power adapter (A) from the HP TouchSmart PC. 2 Disconnect any external devices that you are connected to the computer. Ensure that are discharged of static electricity by briefly...tap Shut Down. Opening the HP TouchSmart PC To avoid injury and equipment damage, always complete the following steps in order, when opening the HP TouchSmart PC: 1 Remove any media (CD, DVD, memory cards, USB devices, and external hard disk drives) from the back of the HP TouchSmart PC. A A Upgrading and ...

Upgrade and Service Guide
Page 10
To upgrade your hard disk drive, see "Removing and Installing the Hard Disk Drive" on the bottom edge to the back of sharp edges inside the chassis. B C WARNING: Beware of the computer. 10 Remove the screw (A) that secures the memory cover to release it (B), then, gently slide the cover down toward the bottom of the computer (C), and then remove it. A 11 Pull up the memory cover slightly on page 12. 6 Upgrading and Servicing Guide
To upgrade your hard disk drive, see "Removing and Installing the Hard Disk Drive" on the bottom edge to the back of sharp edges inside the chassis. B C WARNING: Beware of the computer. 10 Remove the screw (A) that secures the memory cover to release it (B), then, gently slide the cover down toward the bottom of the computer (C), and then remove it. A 11 Pull up the memory cover slightly on page 12. 6 Upgrading and Servicing Guide

Upgrade and Service Guide
Page 16
... the internal system components to cool before touching them. 2 Remove the computer stand by removing the four screws that secure it to the Limited Warranty, Support, and System Recovery Guide included with your HP TouchSmart PC. See "Opening the HP TouchSmart PC" on the hard disk drive to prepare the HP TouchSmart PC. Failure to load the factory-installed files. After replacing the...
... the internal system components to cool before touching them. 2 Remove the computer stand by removing the four screws that secure it to the Limited Warranty, Support, and System Recovery Guide included with your HP TouchSmart PC. See "Opening the HP TouchSmart PC" on the hard disk drive to prepare the HP TouchSmart PC. Failure to load the factory-installed files. After replacing the...

Upgrade and Service Guide
Page 19
Upgrading and Servicing Guide 15 You do not need to remove the optical drive cables. 8 Remove the screw that secures the optical disc drive to the chassis, and then slide the drive toward the center of the way. 7 Remove the screw that secures the hard disk drive cage to move it out of the computer to the chassis.
Upgrading and Servicing Guide 15 You do not need to remove the optical drive cables. 8 Remove the screw that secures the optical disc drive to the chassis, and then slide the drive toward the center of the way. 7 Remove the screw that secures the hard disk drive cage to move it out of the computer to the chassis.

Limited Warranty, Support, and System Recovery Guide
Page 7
... from which the serial number has been removed or that has been damaged or rendered defective (a) as a result of a replacement. UNITS SENT IN FOR SERVICE MAY HAVE THE DATA ERASED FROM THE HARD DRIVE AND THE PROGRAMS RESTORED TO THEIR ORIGINAL STATE. HP IS NOT RESPONSIBLE FOR DAMAGE TO OR ...LOSS OF ANY PROGRAMS, DATA, OR REMOVABLE STORAGE MEDIA. Limited Warranty Period The Limited Warranty Period for your HP Hardware Product in performance or (b) to...
... from which the serial number has been removed or that has been damaged or rendered defective (a) as a result of a replacement. UNITS SENT IN FOR SERVICE MAY HAVE THE DATA ERASED FROM THE HARD DRIVE AND THE PROGRAMS RESTORED TO THEIR ORIGINAL STATE. HP IS NOT RESPONSIBLE FOR DAMAGE TO OR ...LOSS OF ANY PROGRAMS, DATA, OR REMOVABLE STORAGE MEDIA. Limited Warranty Period The Limited Warranty Period for your HP Hardware Product in performance or (b) to...

Limited Warranty, Support, and System Recovery Guide
Page 16
...wait until you see the desktop. 10 Turn off the computer, reconnect all peripheral devices from the computer, except the monitor, keyboard, and mouse. 3 Press the On button to turn on the computer. 4 As soon as described in "Creating Recovery Discs" on the hard disk drive will prompt you to insert ... opens. 5 Click Advanced options. 6 Click Recover your computer to its original factory condition, and then click Next. 7 If you are done, remove the backup disc from the recovery discs you created as you created or installed after purchase. Or If the computer is working , use these steps...
...wait until you see the desktop. 10 Turn off the computer, reconnect all peripheral devices from the computer, except the monitor, keyboard, and mouse. 3 Press the On button to turn on the computer. 4 As soon as described in "Creating Recovery Discs" on the hard disk drive will prompt you to insert ... opens. 5 Click Advanced options. 6 Click Recover your computer to its original factory condition, and then click Next. 7 If you are done, remove the backup disc from the recovery discs you created as you created or installed after purchase. Or If the computer is working , use these steps...


