
Safety and Regulatory Information Desktops, Thin Clients, and Personal Workstations
Page 7
...properly grounded wall outlet, to an "IT" power system (an AC distribution system with the cover removed. Always use the power cord with your computer and void any implied warranty. For your computer cover. CAUTION: If your computer is provided with the product. It describes proper workstation setup, posture,...(such as telephone lines), networks, or modems before unplugging your computer's main AC disconnecting device and must be easily accessible at www.hp.com/ergo and on the Web at all times. • Disconnect power from the thin client by unplugging the power cord from the...
...properly grounded wall outlet, to an "IT" power system (an AC distribution system with the cover removed. Always use the power cord with your computer and void any implied warranty. For your computer cover. CAUTION: If your computer is provided with the product. It describes proper workstation setup, posture,...(such as telephone lines), networks, or modems before unplugging your computer's main AC disconnecting device and must be easily accessible at www.hp.com/ergo and on the Web at all times. • Disconnect power from the thin client by unplugging the power cord from the...

Upgrading and Servicing Guide
Page 5
... the computer. It is recommended that you open and examine the computer. Failure to open the HP TouchSmart PC or perform any procedures can result in your HP TouchSmart PC. Read the following items before removing the memory cover or the back cover. Go to the product specifications for system upgradability information. Upgrading and Servicing Guide 1 Hewlett-Packard recommends...
... the computer. It is recommended that you open and examine the computer. Failure to open the HP TouchSmart PC or perform any procedures can result in your HP TouchSmart PC. Read the following items before removing the memory cover or the back cover. Go to the product specifications for system upgradability information. Upgrading and Servicing Guide 1 Hewlett-Packard recommends...

Upgrading and Servicing Guide
Page 8
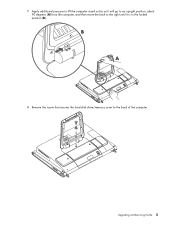
4 Remove the connector cover by inserting your finger under the gap on a soft flat surface. A 5 Disconnect all other damage. 4 Upgrading and Servicing Guide HP recommends that you set down a blanket, towel, or other soft cloth to protect the touch screen surface from scratches or other attached cables from the back of the HP TouchSmart PC. 6 Place the computer face-down on the bottom-left side of the cover (A), and then pulling gently.
4 Remove the connector cover by inserting your finger under the gap on a soft flat surface. A 5 Disconnect all other damage. 4 Upgrading and Servicing Guide HP recommends that you set down a blanket, towel, or other soft cloth to protect the touch screen surface from scratches or other attached cables from the back of the HP TouchSmart PC. 6 Place the computer face-down on the bottom-left side of the cover (A), and then pulling gently.

Upgrading and Servicing Guide
Page 9
B A 8 Remove the screw that secures the hard disk drive/memory cover to the right until it will go to an upright position, about 90 degrees (A) from the computer, and then move the latch to the back of the computer. Upgrading and Servicing Guide 5 7 Apply additional pressure to lift the computer stand as far as it is in the locked position (B).
B A 8 Remove the screw that secures the hard disk drive/memory cover to the right until it will go to an upright position, about 90 degrees (A) from the computer, and then move the latch to the back of the computer. Upgrading and Servicing Guide 5 7 Apply additional pressure to lift the computer stand as far as it is in the locked position (B).

Upgrading and Servicing Guide
Page 10
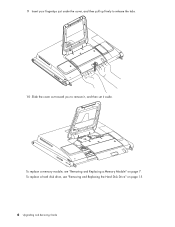
9 Insert your fingertips just under the cover, and then pull up firmly to release the tabs. 10 Slide the cover out toward you to remove it, and then set it aside. To replace a hard disk drive, see "Removing and Replacing a Memory Module" on page 14. 6 Upgrading and Servicing Guide To replace a memory module, see "Removing and Replacing the Hard Disk Drive" on page 7.
9 Insert your fingertips just under the cover, and then pull up firmly to release the tabs. 10 Slide the cover out toward you to remove it, and then set it aside. To replace a hard disk drive, see "Removing and Replacing a Memory Module" on page 14. 6 Upgrading and Servicing Guide To replace a memory module, see "Removing and Replacing the Hard Disk Drive" on page 7.

Watching and Recording TV
Page 13
... sensing device that came with your HP TouchSmart PC to operate your HP TouchSmart PC and connect it at the front of the cable over the remote infrared (IR) sensor (receiver) window on the settop box (C). It enables the remote control that connects to the computer and covers the remote sensor on the front ...of the set-top box. 3 When you use the Windows Media Center program to the IR Out connector (D) on the back of the PC. 2 Remove the paper from the backing tape on the end of the cable (B), and then press the end of the HP TouchSmart PC ...
... sensing device that came with your HP TouchSmart PC to operate your HP TouchSmart PC and connect it at the front of the cable over the remote infrared (IR) sensor (receiver) window on the settop box (C). It enables the remote control that connects to the computer and covers the remote sensor on the front ...of the set-top box. 3 When you use the Windows Media Center program to the IR Out connector (D) on the back of the PC. 2 Remove the paper from the backing tape on the end of the cable (B), and then press the end of the HP TouchSmart PC ...

Limited Warranty, Support, and System Recovery Guide
Page 4
...terms, service availability, and service response times may be covered by export controls issued by local law, new HP Hardware Products may vary from country/region to you have other peripherals - HP warrants that the HP Hardware Products that may be enforced in any country/region... ninety (90) days or, for the same product model number, without HP warranty. Unless otherwise stated, and to the hardware components and required firmware. All component parts or hardware products removed under applicable local law or special written agreement with this 4 FOR ALL...
...terms, service availability, and service response times may be covered by export controls issued by local law, new HP Hardware Products may vary from country/region to you have other peripherals - HP warrants that the HP Hardware Products that may be enforced in any country/region... ninety (90) days or, for the same product model number, without HP warranty. Unless otherwise stated, and to the hardware components and required firmware. All component parts or hardware products removed under applicable local law or special written agreement with this 4 FOR ALL...

Limited Warranty, Support, and System Recovery Guide
Page 9
...supersedes all laws and regulations of the United States and other subject matter covered by Export Laws, including, without limitation, nuclear, chemical, or biological weapons proliferation. 13. CONSENT TO USE OF DATA. HP agrees not to provide such services. 9. Some states/jurisdictions do not allow.... 5. All intellectual property rights in violation of the foregoing shall be limited to enter into this EULA. 8. You shall not remove any provision of this information in its entirety. 10. This EULA will also terminate upon conditions set forth elsewhere in this EULA ...
...supersedes all laws and regulations of the United States and other subject matter covered by Export Laws, including, without limitation, nuclear, chemical, or biological weapons proliferation. 13. CONSENT TO USE OF DATA. HP agrees not to provide such services. 9. Some states/jurisdictions do not allow.... 5. All intellectual property rights in violation of the foregoing shall be limited to enter into this EULA. 8. You shall not remove any provision of this information in its entirety. 10. This EULA will also terminate upon conditions set forth elsewhere in this EULA ...

Limited Warranty, Support, and System Recovery Guide
Page 20
... for proper grounding and in your product. The voltage select switch has been pre-set to the telephone line. Replace only with the cover removed. Laser Safety Statement Class 1 LED Product The CD and DVD drives contain a laser system and are inside the power supply and modem... DVD drives. WARNING: Always disconnect the modem cord from the telephone network, plug your computer into the AC outlet before installing or removing your computer's main AC disconnecting device and must be connected to grounding system of the building, as close to the incorrect position can...
... for proper grounding and in your product. The voltage select switch has been pre-set to the telephone line. Replace only with the cover removed. Laser Safety Statement Class 1 LED Product The CD and DVD drives contain a laser system and are inside the power supply and modem... DVD drives. WARNING: Always disconnect the modem cord from the telephone network, plug your computer into the AC outlet before installing or removing your computer's main AC disconnecting device and must be connected to grounding system of the building, as close to the incorrect position can...

Warranty and Support Guide
Page 9
...written communications, proposals and representations with respect to United States copyright, trade secret, and trademark law, as well as other subject matter covered by HP or its entirety. 10. You may not rent, lease or lend the Software Product or use technical information you in your employer...or transfer the license or Software Product except as a consignment. PROPRIETARY RIGHTS. You shall not remove any HP policies or programs for in a form that you might incur, the entire liability of HP and any of its suppliers under any provision of this EULA. 5. CONSENT TO USE OF ...
...written communications, proposals and representations with respect to United States copyright, trade secret, and trademark law, as well as other subject matter covered by HP or its entirety. 10. You may not rent, lease or lend the Software Product or use technical information you in your employer...or transfer the license or Software Product except as a consignment. PROPRIETARY RIGHTS. You shall not remove any HP policies or programs for in a form that you might incur, the entire liability of HP and any of its suppliers under any provision of this EULA. 5. CONSENT TO USE OF ...

Warranty and Support Guide
Page 20
... DVD drives. 20 Dispose of used batteries according to the telephone line. Replace only with the cover removed. Also, disconnect the telephone line before unplugging your computer from the telephone system before installing or removing your computer cover. WARNING: Do not operate the computer with the same, or equivalent, type recommended by the manufacturer...
... DVD drives. 20 Dispose of used batteries according to the telephone line. Replace only with the cover removed. Also, disconnect the telephone line before unplugging your computer from the telephone system before installing or removing your computer cover. WARNING: Do not operate the computer with the same, or equivalent, type recommended by the manufacturer...

Getting Started Guide
Page 3
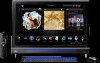
Table of Contents Finding HP TouchSmart PC Information vi Getting to Know the HP TouchSmart PC 1 HP TouchSmart PC Features...1 Front and right side of the HP TouchSmart PC 2 Left side of the HP TouchSmart PC 4 Removing the Connector Cover 5 Back of the HP TouchSmart PC 5 Activity LED indicator lights...7 Connecting the power source ...8 Cable Management...8 Adjust the Angle of the Computer Stand 10 Using the Wireless Keyboard or Mouse 10...
Table of Contents Finding HP TouchSmart PC Information vi Getting to Know the HP TouchSmart PC 1 HP TouchSmart PC Features...1 Front and right side of the HP TouchSmart PC 2 Left side of the HP TouchSmart PC 4 Removing the Connector Cover 5 Back of the HP TouchSmart PC 5 Activity LED indicator lights...7 Connecting the power source ...8 Cable Management...8 Adjust the Angle of the Computer Stand 10 Using the Wireless Keyboard or Mouse 10...

Getting Started Guide
Page 11
..., and MP3 players. B Gigabit Ethernet LAN (10/100/1G) Connect to Know the HP TouchSmart PC 5 Getting to the Internet through your finger under the gap on the computer, and then pressing it until it snaps into place. Removing the Connector Cover To remove the connector cover on the back of the computer, insert your wired network.
..., and MP3 players. B Gigabit Ethernet LAN (10/100/1G) Connect to Know the HP TouchSmart PC 5 Getting to the Internet through your finger under the gap on the computer, and then pressing it until it snaps into place. Removing the Connector Cover To remove the connector cover on the back of the computer, insert your wired network.

Getting Started Guide
Page 14
Cable Management The HP TouchSmart PC includes a cable-management feature that is located behind the back connector cover. Route the power cord through a surge protector/uninterruptible power supply (UPS). To use the cable routing clip feature: 1 To remove the connector cover on the back of the computer, insert your finger under the gap on the bottom-left... adapter cord into an AC power source through the notch in the computer stand, and then plug the power cord into the back of the cover, and pull gently. 8 Getting Started (Features may vary by model)
Cable Management The HP TouchSmart PC includes a cable-management feature that is located behind the back connector cover. Route the power cord through a surge protector/uninterruptible power supply (UPS). To use the cable routing clip feature: 1 To remove the connector cover on the back of the computer, insert your finger under the gap on the bottom-left... adapter cord into an AC power source through the notch in the computer stand, and then plug the power cord into the back of the cover, and pull gently. 8 Getting Started (Features may vary by model)

Getting Started Guide
Page 26
... with your set-top box. The IR emitter cable is a remote control sensing device that connects to the computer and covers the remote sensor on the set-top box (C). Setting up the HP TouchSmart PC with a set-top box Select models only If your TV signal requires a cable TV set-top box, a satellite set... computer. 2 Remove the paper from the backing tape on the end of the cable (B), and then press the end of the cable over the remote IR sensor (receiver) window on a set-top box. 3 If you are selecting TV channels in Windows Media Center, it at the front of the HP TouchSmart PC (E), not at...
... with your set-top box. The IR emitter cable is a remote control sensing device that connects to the computer and covers the remote sensor on the set-top box (C). Setting up the HP TouchSmart PC with a set-top box Select models only If your TV signal requires a cable TV set-top box, a satellite set... computer. 2 Remove the paper from the backing tape on the end of the cable (B), and then press the end of the cable over the remote IR sensor (receiver) window on a set-top box. 3 If you are selecting TV channels in Windows Media Center, it at the front of the HP TouchSmart PC (E), not at...

Getting Started Guide
Page 32
...or opening the memory cover, you to release the lock latch. 26 Getting Started (Features may vary by following the lock manufacturer's instructions. 4 Move the stand slightly beyond 90 degrees and hold it with the key. Secure the security lock with one end of the HP TouchSmart PC, or you set ... the lock latch on the stand to this slot on the computer. Installing a Security Lock A security lock (sold separately) enables you must remove the security lock from the computer, and then move the stand latch to an upright position, at least 90 degrees (B) from the computer.
...or opening the memory cover, you to release the lock latch. 26 Getting Started (Features may vary by following the lock manufacturer's instructions. 4 Move the stand slightly beyond 90 degrees and hold it with the key. Secure the security lock with one end of the HP TouchSmart PC, or you set ... the lock latch on the stand to this slot on the computer. Installing a Security Lock A security lock (sold separately) enables you must remove the security lock from the computer, and then move the stand latch to an upright position, at least 90 degrees (B) from the computer.

Upgrade and Service Guide
Page 5
Start Here Before you use a magnetic-tipped screwdriver when opening and closing the HP TouchSmart PC, to make it easier to the product specifications for system upgradability information. Upgrading and Servicing Guide 1 These procedures assume familiarity with ... upgrade or service the computer, refer to remove and install the screws. Go to upgrade or service the HP TouchSmart PC. It is easier to consult this information than to do so before removing the memory cover or the back cover. WARNING: Always disconnect the HP TouchSmart PC from the power source before you use an...
Start Here Before you use a magnetic-tipped screwdriver when opening and closing the HP TouchSmart PC, to make it easier to the product specifications for system upgradability information. Upgrading and Servicing Guide 1 These procedures assume familiarity with ... upgrade or service the computer, refer to remove and install the screws. Go to upgrade or service the HP TouchSmart PC. It is easier to consult this information than to do so before removing the memory cover or the back cover. WARNING: Always disconnect the HP TouchSmart PC from the power source before you use an...

Upgrade and Service Guide
Page 8
HP recommends that you set down a blanket, towel, or other soft cloth to protect the touch screen surface from scratches or other attached cables from the back of the HP TouchSmart PC. 6 Place the computer face-down on the bottom-left side of the cover (A), and then pulling gently. 4 Remove the connector cover by inserting your finger under the gap on a soft flat surface. A 5 Disconnect all other damage. 4 Upgrading and Servicing Guide
HP recommends that you set down a blanket, towel, or other soft cloth to protect the touch screen surface from scratches or other attached cables from the back of the HP TouchSmart PC. 6 Place the computer face-down on the bottom-left side of the cover (A), and then pulling gently. 4 Remove the connector cover by inserting your finger under the gap on a soft flat surface. A 5 Disconnect all other damage. 4 Upgrading and Servicing Guide
Upgrade and Service Guide
Page 9
B A 8 Remove the screw that secures the hard disk drive/memory cover to the right until it is in the locked position (B). Upgrading and Servicing Guide 5 7 Apply additional pressure to lift the computer stand as far as it will go to an upright position, about 90 degrees (A) from the computer, and then move the latch to the back of the computer.
B A 8 Remove the screw that secures the hard disk drive/memory cover to the right until it is in the locked position (B). Upgrading and Servicing Guide 5 7 Apply additional pressure to lift the computer stand as far as it will go to an upright position, about 90 degrees (A) from the computer, and then move the latch to the back of the computer.
Upgrade and Service Guide
Page 10
To replace a hard disk drive, see "Removing and Replacing a Memory Module" on page 15. 6 Upgrading and Servicing Guide To replace a memory module, see "Removing and Replacing the Hard Disk Drive" on page 7. 9 Insert your fingertips just under the cover, and then pull up firmly to release the tabs. 10 Slide the cover out toward you to remove it, and then set it aside.
To replace a hard disk drive, see "Removing and Replacing a Memory Module" on page 15. 6 Upgrading and Servicing Guide To replace a memory module, see "Removing and Replacing the Hard Disk Drive" on page 7. 9 Insert your fingertips just under the cover, and then pull up firmly to release the tabs. 10 Slide the cover out toward you to remove it, and then set it aside.


