

HP V142 Rack User Guide
Page 6
...component placement guidelines WARNING: To reduce the risk of the rack and then move up the rack. WARNING: To reduce the risk of personal injury or damage to the equipment, always load the heaviest item first on your local HP authorized reseller to obtain any time cabling is routed: ...plenum cable • 149364-B21-40-foot plenum cable • Rack baying option kits-The number of baying kits needed to heat. • Power-If a UPS is installed, do not need a stabilizer installed. When you are using a rack-mountable flat-panel monitor. • Server console switch-If a console switch is ...
...component placement guidelines WARNING: To reduce the risk of the rack and then move up the rack. WARNING: To reduce the risk of personal injury or damage to the equipment, always load the heaviest item first on your local HP authorized reseller to obtain any time cabling is routed: ...plenum cable • 149364-B21-40-foot plenum cable • Rack baying option kits-The number of baying kits needed to heat. • Power-If a UPS is installed, do not need a stabilizer installed. When you are using a rack-mountable flat-panel monitor. • Server console switch-If a console switch is ...

HP V142 Rack User Guide
Page 14
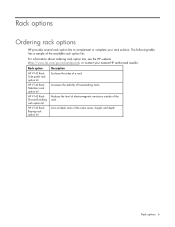
...), or contact your rack solution. Rack option HP V142 Rack Side panel rack option kit HP V142 Rack Stabilizer rack option kit HP V142 Rack Ground bonding rack option kit HP V142 Rack Baying rack option kit Description Encloses the sides of a rack Increases the stability of free-standing racks Reduces the level of electromagnetic emissions outside of the rack Joins multiple racks of the available rack option kits. Rack options Ordering rack options HP provides several rack option kits to complement or complete...
...), or contact your rack solution. Rack option HP V142 Rack Side panel rack option kit HP V142 Rack Stabilizer rack option kit HP V142 Rack Ground bonding rack option kit HP V142 Rack Baying rack option kit Description Encloses the sides of a rack Increases the stability of free-standing racks Reduces the level of electromagnetic emissions outside of the rack Joins multiple racks of the available rack option kits. Rack options Ordering rack options HP provides several rack option kits to complement or complete...

HP V142 Rack Options Installation Guide
Page 3
... safety information ...4 Additional rack considerations ...4 Rack options ...6 Ordering rack options ...6 Baying kit ...7 About this device ...7 Kit contents ...7 Required tools ...7 Installing the baying kit ...7 Ground Bonding kit...9 About this device ...9 Kit contents ...9 Required tools ...9 Installing the Ground Bonding rack option kit on HP V142 Racks 9 HP V142 Rack Stabilizer kit ...14 About this device ...14 Kit contents ...14 Required tools ...14 Installing the stabilizer ...14 Side Panel kit ...16 About this...
... safety information ...4 Additional rack considerations ...4 Rack options ...6 Ordering rack options ...6 Baying kit ...7 About this device ...7 Kit contents ...7 Required tools ...7 Installing the baying kit ...7 Ground Bonding kit...9 About this device ...9 Kit contents ...9 Required tools ...9 Installing the Ground Bonding rack option kit on HP V142 Racks 9 HP V142 Rack Stabilizer kit ...14 About this device ...14 Kit contents ...14 Required tools ...14 Installing the stabilizer ...14 Side Panel kit ...16 About this...

HP V142 Rack Options Installation Guide
Page 5
...8226; Side panels-Only one set of side panels is required for your installation site. • Keyboard-The rack keyboard requires installation of a 1U keyboard drawer rack option kit. • Monitor-The monitor requires installation of a monitor/utility shelf rack option kit unless you are using a rack-mountable flat-panel monitor. &#...together racks do not need a stabilizer installed. The standard distance between the console switch and the keyboard, monitor, and mouse can vary by 3-, 7-, 12-, 20-, and 40-ft lengths. Each baying kit supplies parts to bay two cabinets on your local HP ...
...8226; Side panels-Only one set of side panels is required for your installation site. • Keyboard-The rack keyboard requires installation of a 1U keyboard drawer rack option kit. • Monitor-The monitor requires installation of a monitor/utility shelf rack option kit unless you are using a rack-mountable flat-panel monitor. &#...together racks do not need a stabilizer installed. The standard distance between the console switch and the keyboard, monitor, and mouse can vary by 3-, 7-, 12-, 20-, and 40-ft lengths. Each baying kit supplies parts to bay two cabinets on your local HP ...
HP V142 Rack Options Installation Guide
Page 6
Rack option HP V142 Rack Side panel rack option kit HP V142 Rack Stabilizer rack option kit HP V142 Rack Ground bonding rack option kit HP V142 Rack Baying rack option kit Description Encloses the sides of a rack Increases the stability of free-standing racks Reduces the level of electromagnetic emissions outside of the rack Joins multiple racks of the available rack option kits. For information about ordering rack option kits, see the HP website (http://www.hp.com/go/rackandpower), or contact...
Rack option HP V142 Rack Side panel rack option kit HP V142 Rack Stabilizer rack option kit HP V142 Rack Ground bonding rack option kit HP V142 Rack Baying rack option kit Description Encloses the sides of a rack Increases the stability of free-standing racks Reduces the level of electromagnetic emissions outside of the rack Joins multiple racks of the available rack option kits. For information about ordering rack option kits, see the HP website (http://www.hp.com/go/rackandpower), or contact...

HP V142 Rack Options Installation Guide
Page 7
... this device The HP V142 Rack Baying kit enables you to connect multiple racks of the racks are on the model of personal injury or damage to the rack and equipment, the racks must be included for your convenience. Kit contents Item 24-inch baying brackets 600-mm baying brackets M5 self tapping ... openings). Remove the side panels (if present between the racks). 2. Position the racks side by side, ensuring that the feet of the same series, height, and depth. Required tools • T-25 Torx driver Installing the baying kit WARNING: To reduce the risk of the rack purchased. 1. Failure to...
... this device The HP V142 Rack Baying kit enables you to connect multiple racks of the racks are on the model of personal injury or damage to the rack and equipment, the racks must be included for your convenience. Kit contents Item 24-inch baying brackets 600-mm baying brackets M5 self tapping ... openings). Remove the side panels (if present between the racks). 2. Position the racks side by side, ensuring that the feet of the same series, height, and depth. Required tools • T-25 Torx driver Installing the baying kit WARNING: To reduce the risk of the rack purchased. 1. Failure to...

HP V142 Rack Options Installation Guide
Page 8
Attach two baying brackets (either 24-inch or 600-mm depending on the floor layout) to each bracket. 4. 3. Installation is complete. Baying kit 8 Attach side panels to the front and rear of each rack set using two screws in each end of the bayed racks. Bay any additional racks. 5.
Attach two baying brackets (either 24-inch or 600-mm depending on the floor layout) to each bracket. 4. 3. Installation is complete. Baying kit 8 Attach side panels to the front and rear of each rack set using two screws in each end of the bayed racks. Bay any additional racks. 5.

HP V142 Rack Options Installation Guide
Page 12
...washer and an M6 ground nut over the grounding lug on the top side panel. 4. Repeat steps 1 through 4 for the other end of the same grounding strap over the grounding lug on the rack frame. 2. Ground Bonding kit 12 Place one end of the grounding strap over the grounding lug on ...the rack frame. From the rack frame to the top side panel, if installed: 1. Place one end of the grounding strap over the...
...washer and an M6 ground nut over the grounding lug on the top side panel. 4. Repeat steps 1 through 4 for the other end of the same grounding strap over the grounding lug on the rack frame. 2. Ground Bonding kit 12 Place one end of the grounding strap over the grounding lug on ...the rack frame. From the rack frame to the top side panel, if installed: 1. Place one end of the grounding strap over the...

HP V142 Rack Options Installation Guide
Page 13
Repeat steps 1 through 4 for the other end of the same grounding strap over the grounding lug on the bottom side panel. 4. Place an M6 ground washer and an M6 ground nut over the grounding lug on the bottom side panel, and then tighten then ground nut. 5. Place an M6 ground washer and an M6 ground nut over the grounding lug on the rack frame, and then tighten the ground nut. 3. 2. Place the other bottom side panel. Ground Bonding kit 13
Repeat steps 1 through 4 for the other end of the same grounding strap over the grounding lug on the bottom side panel. 4. Place an M6 ground washer and an M6 ground nut over the grounding lug on the bottom side panel, and then tighten then ground nut. 5. Place an M6 ground washer and an M6 ground nut over the grounding lug on the rack frame, and then tighten the ground nut. 3. 2. Place the other bottom side panel. Ground Bonding kit 13

HP V142 Rack Options Installation Guide
Page 16
Press the side panel latches and slide the bottom side panel into the rack. Installing the side panels 1. Side Panel kit About this procedure. Required tools No tools are required for your convenience. Side Panel kit 16 Kit contents Item Top side panel Bottom side panel Key Quantity 2 2 2 This kit might contain extra hardware for this device The HP V142 Rack Side Panel kit enables you to attach side panels to HP V142 Racks.
Press the side panel latches and slide the bottom side panel into the rack. Installing the side panels 1. Side Panel kit About this procedure. Required tools No tools are required for your convenience. Side Panel kit 16 Kit contents Item Top side panel Bottom side panel Key Quantity 2 2 2 This kit might contain extra hardware for this device The HP V142 Rack Side Panel kit enables you to attach side panels to HP V142 Racks.

HP V142 Rack Options Installation Guide
Page 17
Side Panel kit 17 Install the top side panel by locking the side panel lock, securing it to the rack. 3. Repeat steps 1 and 2 for the other side of the rack. 2. Installation is complete.
Side Panel kit 17 Install the top side panel by locking the side panel lock, securing it to the rack. 3. Repeat steps 1 and 2 for the other side of the rack. 2. Installation is complete.