

User Guide
Page 3
CAUTION: Text set off in this manner indicates that failure to follow directions could result in damage to follow directions could result in bodily harm or loss of information. ii NOTE: Text set off in this manner provides important supplemental information. About This Guide This guide provides information on monitor features, setting up the monitor, using the software and technical specifications. Text set off in this manner indicates that failure to equipment or loss of life. WARNING!
CAUTION: Text set off in this manner indicates that failure to follow directions could result in damage to follow directions could result in bodily harm or loss of information. ii NOTE: Text set off in this manner provides important supplemental information. About This Guide This guide provides information on monitor features, setting up the monitor, using the software and technical specifications. Text set off in this manner indicates that failure to equipment or loss of life. WARNING!
User Guide
Page 4
...Monitor Downloading the monitor driver from hp.com 18 Preparing to Call Technical Support 18 Locating the Rating Label 18 B. Technical Specifications 18.5 in/47 cm Models 19 19.5 in/49.4 cm Models 20 20.7 in / 52.6 cm and 21.5 in / 54.6 cm Models 21 Preset Video Modes 22 LCD Monitor... Quality and Pixel Policy 24 ENWW 1 Product Features 2. Setting Up the Monitor Unpacking the Monitor 4 Installing the Monitor 4 Connecting Monitor Cables 7 High-Bandwidth Digital Content Protection (HDCP 7 Connecting the Power Cable 8...
...Monitor Downloading the monitor driver from hp.com 18 Preparing to Call Technical Support 18 Locating the Rating Label 18 B. Technical Specifications 18.5 in/47 cm Models 19 19.5 in/49.4 cm Models 20 20.7 in / 52.6 cm and 21.5 in / 54.6 cm Models 21 Preset Video Modes 22 LCD Monitor... Quality and Pixel Policy 24 ENWW 1 Product Features 2. Setting Up the Monitor Unpacking the Monitor 4 Installing the Monitor 4 Connecting Monitor Cables 7 High-Bandwidth Digital Content Protection (HDCP 7 Connecting the Power Cable 8...
User Guide
Page 5
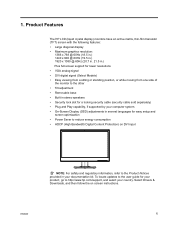
...Power Saver to reduce energy consumption • HDCP (High Bandwidth Digital Content Protection) on screen instructions. ENWW 1 Product Features The HP LCD (liquid crystal display) monitors have an active matrix, thin-film transistor (TFT) screen with the following features: • Large diagonal display • Maximum... DVI digital signal (Select Models) • Easy viewing from a sitting or standing position, or while moving from one side of the monitor to the other • Tilt adjustment • Removable base • Built in stereo speakers • Security lock slot for a locking ...
...Power Saver to reduce energy consumption • HDCP (High Bandwidth Digital Content Protection) on screen instructions. ENWW 1 Product Features The HP LCD (liquid crystal display) monitors have an active matrix, thin-film transistor (TFT) screen with the following features: • Large diagonal display • Maximum... DVI digital signal (Select Models) • Easy viewing from a sitting or standing position, or while moving from one side of the monitor to the other • Tilt adjustment • Removable base • Built in stereo speakers • Security lock slot for a locking ...

User Guide
Page 6
...not pull on power cords or cables. This guide is easily accessible at http://www.hp.com/ergo. Use a power strip whose manufacturer offers a Damage Replacement Policy so you can easily reach. WARNING: LCD monitors that is located on dressers, book cases, shelves, desks, speakers, chests, or ...pulled, grabbed, or tripped over them so that no one is an important safety feature. • Plug the power cord in your HP LCD monitor. Care should be taken to route all power cords for computer users, and provides important electrical and mechanical safety information. WARNING! CAUTION:...
...not pull on power cords or cables. This guide is easily accessible at http://www.hp.com/ergo. Use a power strip whose manufacturer offers a Damage Replacement Policy so you can easily reach. WARNING: LCD monitors that is located on dressers, book cases, shelves, desks, speakers, chests, or ...pulled, grabbed, or tripped over them so that no one is an important safety feature. • Plug the power cord in your HP LCD monitor. Care should be taken to route all power cords for computer users, and provides important electrical and mechanical safety information. WARNING! CAUTION:...

User Guide
Page 7
...; Do not open the monitor cabinet or attempt to service this monitor, as the screen. Maintenance Guidelines To enhance the performance and extend the life of the cord. If the monitor is not operating properly or has been dropped or damaged, contact an authorized HP dealer, reseller, or service... provider. • Use only a power source and connection appropriate for ventilation. Never disconnect the monitor by pulling the cord. • Turn the monitor off when not in use benzene, thinner, ammonia, ...
...; Do not open the monitor cabinet or attempt to service this monitor, as the screen. Maintenance Guidelines To enhance the performance and extend the life of the cord. If the monitor is not operating properly or has been dropped or damaged, contact an authorized HP dealer, reseller, or service... provider. • Use only a power source and connection appropriate for ventilation. Never disconnect the monitor by pulling the cord. • Turn the monitor off when not in use benzene, thinner, ammonia, ...
User Guide
Page 8
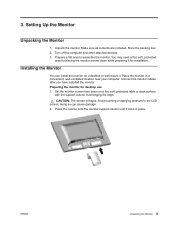
... preparing it locks in a convenient, well-ventilated location near your computer. doing so can install the monitor on a flat, soft, protected table or desk surface with the support column overhanging the edge. Setting Up the Monitor Unpacking the Monitor 1. Unpack the monitor. Store the packing box. 2. Make sure all contents are included. Installing the...
... preparing it locks in a convenient, well-ventilated location near your computer. doing so can install the monitor on a flat, soft, protected table or desk surface with the support column overhanging the edge. Setting Up the Monitor Unpacking the Monitor 1. Unpack the monitor. Store the packing box. 2. Make sure all contents are included. Installing the...
User Guide
Page 9
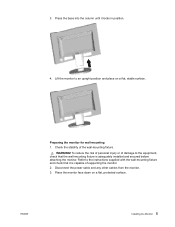
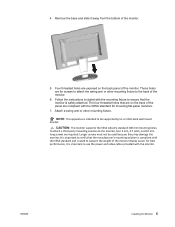
... column until it is adequately installed and secured before attaching the monitor. Place the monitor face down on a flat, stable surface. Disconnect the power cable and any other cables from the monitor. 3. ENWW Installing the Monitor 5 To reduce the risk of personal injury or of the... in position. 4. WARNING! Refer to an upright position and place on a flat, protected surface. Preparing the monitor for wall-mounting 1. 3. Lift the monitor to the instructions supplied with the wall-mounting fixture and check that the wall-mounting fixture is capable of supporting ...
... column until it is adequately installed and secured before attaching the monitor. Place the monitor face down on a flat, stable surface. Disconnect the power cable and any other cables from the monitor. 3. ENWW Installing the Monitor 5 To reduce the risk of personal injury or of the... in position. 4. WARNING! Refer to an upright position and place on a flat, protected surface. Preparing the monitor for wall-mounting 1. 3. Lift the monitor to the instructions supplied with the wall-mounting fixture and check that the wall-mounting fixture is capable of supporting ...
User Guide
Page 10
...that the manufacturer's mounting solution is compliant with the VESA standard and is intended to be used because they may damage the monitor. ENWW Installing the Monitor 6 Attach a swing arm or other mounting fixture to ensure that are on the back panel of the panel are for mounting... flat-panel monitors. 7. CAUTION: This monitor supports the VESA industry standard 100 mm mounting holes. The four threaded holes that the monitor is important to support the weight of the monitor display panel. NOTE: This apparatus is rated to use ...
...that the manufacturer's mounting solution is compliant with the VESA standard and is intended to be used because they may damage the monitor. ENWW Installing the Monitor 6 Attach a swing arm or other mounting fixture to ensure that are on the back panel of the panel are for mounting... flat-panel monitors. 7. CAUTION: This monitor supports the VESA industry standard 100 mm mounting holes. The four threaded holes that the monitor is important to support the weight of the monitor display panel. NOTE: This apparatus is rated to use ...
User Guide
Page 11
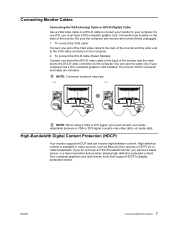
...video connector on the computer. 2. NOTE: Connector locations may vary. You can receive high-definition content. Your computer graphics card and monitor must connect your computer. Connectors are located on the computer. High-definition content is available in many sources, such as Blue-ray ...: When using a VGA or DVI signal, you do not have a DVI-compliant graphic card. ENWW Connecting Monitor Cables 7 If you must both support HDCP to display protected content. Connecting Monitor Cables Connecting the VGA (Analog) Cable or DVI-D (Digital) Cable Use a VGA video cable or a ...
...video connector on the computer. 2. NOTE: Connector locations may vary. You can receive high-definition content. Your computer graphics card and monitor must connect your computer. Connectors are located on the computer. High-definition content is available in many sources, such as Blue-ray ...: When using a VGA or DVI signal, you do not have a DVI-compliant graphic card. ENWW Connecting Monitor Cables 7 If you must both support HDCP to display protected content. Connecting Monitor Cables Connecting the VGA (Analog) Cable or DVI-D (Digital) Cable Use a VGA video cable or a ...

User Guide
Page 12
... the operator and located as close to a grounded electrical outlet. ENWW Connecting the Power Cable 8 To reduce the risk of the power cable to the monitor and the other end to the equipment as possible. Connecting the Power Cable 1. To prevent injury from electrical shock, you plug the power cord into...
... the operator and located as close to a grounded electrical outlet. ENWW Connecting the Power Cable 8 To reduce the risk of the power cable to the monitor and the other end to the equipment as possible. Connecting the Power Cable 1. To prevent injury from electrical shock, you plug the power cord into...

User Guide
Page 13
Adjust the tilt by moving the top edge of the monitor and hold the base so that you , without touching the screen. Face the front of the monitor either toward or away from you do not topple the monitor while changing the tilt. 2. Adjusting the Tilt For optimal viewing, adjust the screen tilt to your own preference, as follows: 1. ENWW Adjusting the Tilt 9
Adjust the tilt by moving the top edge of the monitor and hold the base so that you , without touching the screen. Face the front of the monitor either toward or away from you do not topple the monitor while changing the tilt. 2. Adjusting the Tilt For optimal viewing, adjust the screen tilt to your own preference, as follows: 1. ENWW Adjusting the Tilt 9
User Guide
Page 14
... search field, and click Go. 3. Click the System Requirements tab, and then verify that you need to : http://www.hp.com/support. 2. Downloading the monitor driver from the Internet To download the latest version of drivers. 6. If necessary, select your system meets the program minimum requirements...& Downloads, type your operating system, and then click Next. 5. Click Driver - Operating the Monitor NOTE: You might need to update the drivers, you determine that your monitor from the HP Support site: 1. Click on -screen instructions to open the list of drivers and software files from...
... search field, and click Go. 3. Click the System Requirements tab, and then verify that you need to : http://www.hp.com/support. 2. Downloading the monitor driver from the Internet To download the latest version of drivers. 6. If necessary, select your system meets the program minimum requirements...& Downloads, type your operating system, and then click Next. 5. Click Driver - Operating the Monitor NOTE: You might need to update the drivers, you determine that your monitor from the HP Support site: 1. Click on -screen instructions to open the list of drivers and software files from...

User Guide
Page 15
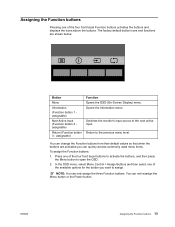
Turns the monitor on the indicators next to the buttons that are located on the bottom of the buttons so that the button labels appear on the screen. ... activate the Menu button and the Function buttons, press any of the front panel 1 23 No. ENWW Front-Panel Controls 11 Front-Panel Controls The monitor buttons are activated while the OSD menu is open. 3 Power button NOTE: You can reconfigure the Function buttons in the OSD menu to quickly select...
Turns the monitor on the indicators next to the buttons that are located on the bottom of the buttons so that the button labels appear on the screen. ... activate the Menu button and the Function buttons, press any of the front panel 1 23 No. ENWW Front-Panel Controls 11 Front-Panel Controls The monitor buttons are activated while the OSD menu is open. 3 Power button NOTE: You can reconfigure the Function buttons in the OSD menu to quickly select...
User Guide
Page 16
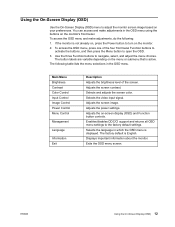
..., press one of the screen. The following : 1. Selects the video input signal. The factory default is active. Displays important information about the monitor. Exits the OSD menu screen. The button labels are variable depending on the menu or submenu that is English. Enables/disables DDC/CI support and...ENWW Using the On-Screen Display (OSD) 12 To access the OSD menu and make adjustments in the OSD menu. Adjusts the on the monitor's front bezel. Adjusts the screen image. You can access and make adjustments, do the following table lists the menu selections in the OSD ...
..., press one of the screen. The following : 1. Selects the video input signal. The factory default is active. Displays important information about the monitor. Exits the OSD menu screen. The button labels are variable depending on the menu or submenu that is English. Enables/disables DDC/CI support and...ENWW Using the On-Screen Display (OSD) 12 To access the OSD menu and make adjustments in the OSD menu. Adjusts the on the monitor's front bezel. Adjusts the screen image. You can access and make adjustments, do the following table lists the menu selections in the OSD ...
User Guide
Page 17
Switches the monitor's input source to the previous menu level. assignable) Function Opens the OSD (On-Screen Display) menu. In the OSD menu, select Menu Control > Assign Buttons ...
Switches the monitor's input source to the previous menu level. assignable) Function Opens the OSD (On-Screen Display) menu. In the OSD menu, select Menu Control > Assign Buttons ...
User Guide
Page 18
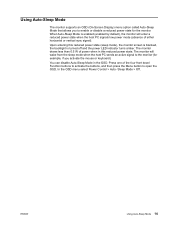
...OSD (On-Screen Display) menu option called Auto-Sleep Mode that allows you activate the mouse or keyboard). Upon entering this reduced power state. The monitor draws less than 0.5 W of either horizontal or vertical sync signal). You can disable Auto-Sleep Mode in this reduced power state (sleep mode), the... wake from the sleep mode when the host PC sends an active signal to the monitor (for the monitor. When Auto-Sleep Mode is turned off and the power LED indicator turns amber. The monitor will enter a reduced power state when the host PC signals low power mode (absence of power when...
...OSD (On-Screen Display) menu option called Auto-Sleep Mode that allows you activate the mouse or keyboard). Upon entering this reduced power state. The monitor draws less than 0.5 W of either horizontal or vertical sync signal). You can disable Auto-Sleep Mode in this reduced power state (sleep mode), the... wake from the sleep mode when the host PC sends an active signal to the monitor (for the monitor. When Auto-Sleep Mode is turned off and the power LED indicator turns amber. The monitor will enter a reduced power state when the host PC signals low power mode (absence of power when...

User Guide
Page 19
...that Dynamic Contrast Ratio has been turned on the front panel for five seconds. This occurs if Dynamic Contrast Ratio is locked. Identifying Monitor Conditions 15 Indicates the monitor is unlocked, press and hold the power button for 10 seconds to Sleep - If the OSD is locked, the warning message ...the auto-adjustment function is off . The OSD can connect the VGA cable or the DVI-D cable, or both cables are set higher than the monitor supports. • No Source Signal - If the power button is locked, the warning message Power Button Lockout displays. • If the power button...
...that Dynamic Contrast Ratio has been turned on the front panel for five seconds. This occurs if Dynamic Contrast Ratio is locked. Identifying Monitor Conditions 15 Indicates the monitor is unlocked, press and hold the power button for 10 seconds to Sleep - If the OSD is locked, the warning message ...the auto-adjustment function is off . The OSD can connect the VGA cable or the DVI-D cable, or both cables are set higher than the monitor supports. • No Source Signal - If the power button is locked, the warning message Power Button Lockout displays. • If the power button...

User Guide
Page 20
...Specification" (Appendix B). To obtain the best results: 1. Access the OSD menu, then select Image Setup. 3. Power-Saver Feature When the monitor is in the OSD menu can be activated on setting energy-saver features (sometimes called power-management features). The power-saver feature must be ... to your computer documentation for instructions on your product support site at www.hp.com/support. ENWW Adjusting Screen Quality (VGA only) 16 NOTE: The energy-saver feature works only when the monitor is displayed. Two controls in normal operating mode, the Power light is controlled...
...Specification" (Appendix B). To obtain the best results: 1. Access the OSD menu, then select Image Setup. 3. Power-Saver Feature When the monitor is in the OSD menu can be activated on setting energy-saver features (sometimes called power-management features). The power-saver feature must be ... to your computer documentation for instructions on your product support site at www.hp.com/support. ENWW Adjusting Screen Quality (VGA only) 16 NOTE: The energy-saver feature works only when the monitor is displayed. Two controls in normal operating mode, the Power light is controlled...
User Guide
Page 21
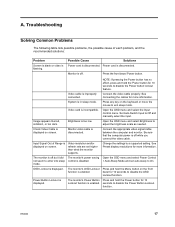
...the possible cause of Range is displayed. Video cable is disconnected. Press any key on the front function is enabled. Monitor video cable is improperly connected. Change the settings to adjust the brightness scale as needed. Brightness is displayed. Connect the ... cord is disconnected. Power cord is disconnected. Check Video Cable is incompatible. See Preset display resolutions for more information. The monitor's OSD Lockout Press and hold the Power button for more information. Connect the video cable properly. Video card is displayed on...
...the possible cause of Range is displayed. Video cable is disconnected. Press any key on the front function is enabled. Monitor video cable is improperly connected. Change the settings to adjust the brightness scale as needed. Brightness is displayed. Connect the ... cord is disconnected. Power cord is disconnected. Check Video Cable is incompatible. See Preset display resolutions for more information. The monitor's OSD Lockout Press and hold the Power button for more information. Connect the video cable properly. Video card is displayed on...
User Guide
Page 22
... display in the Informationmenu) • Purchase date on the monitor provides the product number and serial number. You may need these numbers when contacting HP about your monitor. Getting Support from hp.com Before you contact customer service, refer to HP Technical Support at: http://www.hp.com/support Select your country/region, and then follow...
... display in the Informationmenu) • Purchase date on the monitor provides the product number and serial number. You may need these numbers when contacting HP about your monitor. Getting Support from hp.com Before you contact customer service, refer to HP Technical Support at: http://www.hp.com/support Select your country/region, and then follow...


