
User Manual
Page 2
Contents Preface 5 About this Manual 5 Copyright 5 Declaration of Conformity 6 Trademark Recognition 6 Safety and Handling Precautions 6 Camcorder & Battery Recycle Notice 8 Photography Terms and Definitions 9 1 0BIntroduction 11 1.1 1BAccessories 11 1.2 Exterior Views 12 1.3 13BAdjusting LCD Display 13 2 1BGetting Started 14 2.1 14BInserting SD Card 14 2.2 ...
Contents Preface 5 About this Manual 5 Copyright 5 Declaration of Conformity 6 Trademark Recognition 6 Safety and Handling Precautions 6 Camcorder & Battery Recycle Notice 8 Photography Terms and Definitions 9 1 0BIntroduction 11 1.1 1BAccessories 11 1.2 Exterior Views 12 1.3 13BAdjusting LCD Display 13 2 1BGetting Started 14 2.1 14BInserting SD Card 14 2.2 ...
User Manual
Page 3
3 2BLCD Display Information 24 3.1 21BVideo Mode 24 3.2 Photo Mode 26 3.3 2BAudio Mode 28 4 3BUsing the Camcorder 29 4.1 24BVideo Recording 29 4.2 Shooting / Playback Photos 32 4.2.1 4BTaking a Picture 32 4.2.2 45BPhoto Playback 33 4.3 26BAudio Recording 35 4.4 27BVideo / Audio Clip Playback 36 5 4BLCD Display Information ...
3 2BLCD Display Information 24 3.1 21BVideo Mode 24 3.2 Photo Mode 26 3.3 2BAudio Mode 28 4 3BUsing the Camcorder 29 4.1 24BVideo Recording 29 4.2 Shooting / Playback Photos 32 4.2.1 4BTaking a Picture 32 4.2.2 45BPhoto Playback 33 4.3 26BAudio Recording 35 4.4 27BVideo / Audio Clip Playback 36 5 4BLCD Display Information ...
User Manual
Page 6
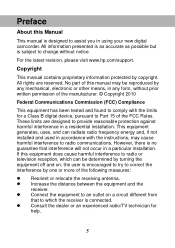
... by copyright. This equipment generates, uses, and can be reproduced by any mechanical, electronic or other means, in using your new digital camcorder. Connect the equipment to an outlet on , the user is designed to change without prior written permission of the manufacturer. © Copyright... to try to Part 15 of the following measures: Reorient or relocate the receiving antenna. For the latest revision, please visit www.hp.com/support. All information presented is as accurate as possible but is no guarantee that to provide reasonable protection against harmful interference in...
... by copyright. This equipment generates, uses, and can be reproduced by any mechanical, electronic or other means, in using your new digital camcorder. Connect the equipment to an outlet on , the user is designed to change without prior written permission of the manufacturer. © Copyright... to try to Part 15 of the following measures: Reorient or relocate the receiving antenna. For the latest revision, please visit www.hp.com/support. All information presented is as accurate as possible but is no guarantee that to provide reasonable protection against harmful interference in...
User Manual
Page 7
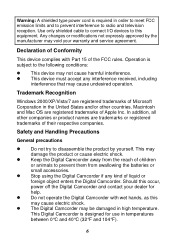
...United States and/or other companies or product names are registered trademarks of their respective companies. Do not operate the Digital Camcorder with Part 15 of children or animals to radio and television reception. Trademark Recognition Windows 2000/XP/Vista/7 are registered ...trademarks of liquid or foreign object enters the Digital Camcorder. This device must accept any kind of Microsoft Corporation in temperatures between 0°C and 40°C (32°F and 104°...
...United States and/or other companies or product names are registered trademarks of their respective companies. Do not operate the Digital Camcorder with Part 15 of children or animals to radio and television reception. Trademark Recognition Windows 2000/XP/Vista/7 are registered ...trademarks of liquid or foreign object enters the Digital Camcorder. This device must accept any kind of Microsoft Corporation in temperatures between 0°C and 40°C (32°F and 104°...
User Manual
Page 8
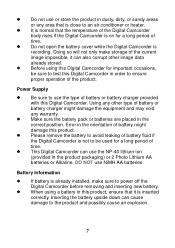
... area that is inserted correctly. Make sure the battery pack or batteries are placed in the orientation of time. When using this Digital Camcorder for important occasions, be used for a long period of battery might damage the equipment and may void any other image data already stored.... Do not open the battery cover while the Digital Camcorder is already installed, make storage of time. Using any warranty. Inserting the battery upside down can use NiMH AA batteries. Before using a...
... area that is inserted correctly. Make sure the battery pack or batteries are placed in the orientation of time. When using this Digital Camcorder for important occasions, be used for a long period of battery might damage the equipment and may void any other image data already stored.... Do not open the battery cover while the Digital Camcorder is already installed, make storage of time. Using any warranty. Inserting the battery upside down can use NiMH AA batteries. Before using a...
User Manual
Page 9
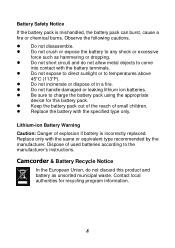
... this product and battery as hammering or dropping. Dispose of explosion if battery is mishandled, the battery pack can burst, cause a fire or chemical burns. Camcorder & Battery Recycle Notice In the European Union, do not allow metal objects to temperatures above 45*C (113*F). Replace only with the specified type only. Battery...
... this product and battery as hammering or dropping. Dispose of explosion if battery is mishandled, the battery pack can burst, cause a fire or chemical burns. Camcorder & Battery Recycle Notice In the European Union, do not allow metal objects to temperatures above 45*C (113*F). Replace only with the specified type only. Battery...

User Manual
Page 10
... printed. Joint Photographic Experts Group. A compressed file format for that of the scene illumination source is near or far from the camcorder. The adjustment of electronic still picture color channel gains or image processing so that radiation with the image files that indicate how many... (AF) White Balance Auto White Balance (AWB) Digital Print Order Format (DPOF) Exif/JPEG JPEG Definitions Auto focus refers to a camcorder lens' ability to adjust its configuration in order to focus properly on removable media along with relative spectral power distribution equal to that color...
... printed. Joint Photographic Experts Group. A compressed file format for that of the scene illumination source is near or far from the camcorder. The adjustment of electronic still picture color channel gains or image processing so that radiation with the image files that indicate how many... (AF) White Balance Auto White Balance (AWB) Digital Print Order Format (DPOF) Exif/JPEG JPEG Definitions Auto focus refers to a camcorder lens' ability to adjust its configuration in order to focus properly on removable media along with relative spectral power distribution equal to that color...
User Manual
Page 11
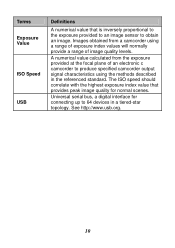
A numerical value calculated from a camcorder using the methods described in a tiered-star topology. Universal serial bus, a digital interface for normal scenes. Terms Exposure Value ISO Speed USB Definitions A numerical value ... to an image sensor to 64 devices in the referenced standard. Images obtained from the exposure provided at the focal plane of an electronic c camcorder to produce specified camcorder output signal characteristics using a range of exposure index values will normally provide a range of image quality levels. See http://www.usb.org. 10...
A numerical value calculated from a camcorder using the methods described in a tiered-star topology. Universal serial bus, a digital interface for normal scenes. Terms Exposure Value ISO Speed USB Definitions A numerical value ... to an image sensor to 64 devices in the referenced standard. Images obtained from the exposure provided at the focal plane of an electronic c camcorder to produce specified camcorder output signal characteristics using a range of exposure index values will normally provide a range of image quality levels. See http://www.usb.org. 10...
User Manual
Page 12
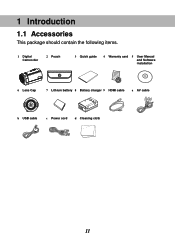
1 Introduction 0B 1.1 Accessories 1B This package should contain the following items. 1 Digital Camcorder 2 Pouch 3 Quick guide 4 Warranty card 5 User Manual and Software installation 6 Lens Cap 7 Lithium battery 8 Battery charger 9 HDMI cable a AV cable b USB cable c Power cord d Cleaning cloth 11
1 Introduction 0B 1.1 Accessories 1B This package should contain the following items. 1 Digital Camcorder 2 Pouch 3 Quick guide 4 Warranty card 5 User Manual and Software installation 6 Lens Cap 7 Lithium battery 8 Battery charger 9 HDMI cable a AV cable b USB cable c Power cord d Cleaning cloth 11
User Manual
Page 15
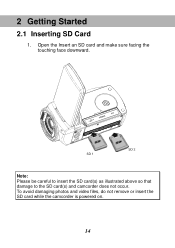
To avoid damaging photos and video files, do not remove or insert the SD card while the camcorder is powered on. 14 Note: Please be careful to insert the SD card(s) as illustrated above so that damage to the SD card(s) and camcorder does not occur. 2 Getting Started 1B 2.1 Inserting SD Card 14B 1. Open the Insert an SD card and make sure facing the touching face downward.
To avoid damaging photos and video files, do not remove or insert the SD card while the camcorder is powered on. 14 Note: Please be careful to insert the SD card(s) as illustrated above so that damage to the SD card(s) and camcorder does not occur. 2 Getting Started 1B 2.1 Inserting SD Card 14B 1. Open the Insert an SD card and make sure facing the touching face downward.

User Manual
Page 18
The electrode is inside of the camcorder. * DO NOT use NiMH AA batteries. 3. Close the battery cover. 1616BB 1616BB 17 2. Insert the battery according to the illustration.
The electrode is inside of the camcorder. * DO NOT use NiMH AA batteries. 3. Close the battery cover. 1616BB 1616BB 17 2. Insert the battery according to the illustration.
User Manual
Page 19
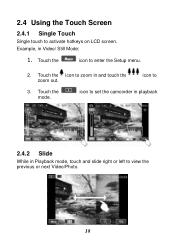
Touch the mode. Example, in and touch the zoom out. Touch the icon to 3. icon to enter the Setup menu. 2. Touch the icon to zoom in Video/ Still Mode: 1. icon to set the camcorder in playback 2.4.2 Slide 41B While in Playback mode, touch and slide right or left to activate hotkeys on LCD screen. 2.4 Using the Touch Screen 17B 2.4.1 Single Touch 40B Single touch to view the previous or next Video/Photo. 18
Touch the mode. Example, in and touch the zoom out. Touch the icon to 3. icon to enter the Setup menu. 2. Touch the icon to zoom in Video/ Still Mode: 1. icon to set the camcorder in playback 2.4.2 Slide 41B While in Playback mode, touch and slide right or left to activate hotkeys on LCD screen. 2.4 Using the Touch Screen 17B 2.4.1 Single Touch 40B Single touch to view the previous or next Video/Photo. 18
User Manual
Page 21
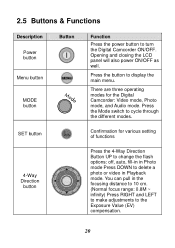
You can pull in Playback mode. Press the Mode switch to display the main menu. SET button Confirmation for the Digital Camcorder: Video mode, Photo mode, and Audio mode. Press the button to cycle through the different modes. Opening and closing the LCD panel ...video in the focusing distance to 10 cm. (Normal focus range: 0.8M ~ infinity) Press RIGHT and LEFT to make adjustments to turn the Digital Camcorder ON/OFF. 2.5 Buttons & Functions 18B Description Power button Menu button MODE button Button Function Press the power button to the Exposure Value (EV) compensation....
You can pull in Playback mode. Press the Mode switch to display the main menu. SET button Confirmation for the Digital Camcorder: Video mode, Photo mode, and Audio mode. Press the button to cycle through the different modes. Opening and closing the LCD panel ...video in the focusing distance to 10 cm. (Normal focus range: 0.8M ~ infinity) Press RIGHT and LEFT to make adjustments to turn the Digital Camcorder ON/OFF. 2.5 Buttons & Functions 18B Description Power button Menu button MODE button Button Function Press the power button to the Exposure Value (EV) compensation....

User Manual
Page 22
Description Zoom toggle Shutter button Recording button Playback button Macro mode selector Button Function This Digital Camcorder has 4X Digital zoom (in , or move to the left ( ) to zoom out. Press the Playback button to record a video in Video mode and activate ... mode and playback the last file recorded. Rotate the lens ring to select Macro mode ( ) to focus on objects about 20 cm (8 inches) from the camcorder.The icon " " will be displayed on objects more than 1.2 m (4 feet) away. 21 Press the button to focus on the LCD screen when the Macro mode...
Description Zoom toggle Shutter button Recording button Playback button Macro mode selector Button Function This Digital Camcorder has 4X Digital zoom (in , or move to the left ( ) to zoom out. Press the Playback button to record a video in Video mode and activate ... mode and playback the last file recorded. Rotate the lens ring to select Macro mode ( ) to focus on objects about 20 cm (8 inches) from the camcorder.The icon " " will be displayed on objects more than 1.2 m (4 feet) away. 21 Press the button to focus on the LCD screen when the Macro mode...
User Manual
Page 23
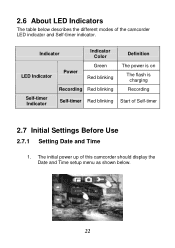
2.6 About LED Indicators 19B The table below . 22 Indicator LED Indicator Power Indicator Color Green Red blinking Self-timer Indicator Recording Red blinking Self-timer Red blinking Definition The power is on The flash is charging Recording Start of the camcorder LED indicator and Self-timer indicator. The initial power up of this camcorder should display the Date and Time setup menu as shown below describes the different modes of Self-timer 2.7 Initial Settings Before Use 20B 2.7.1 Setting Date and Time 43B 1.
2.6 About LED Indicators 19B The table below . 22 Indicator LED Indicator Power Indicator Color Green Red blinking Self-timer Indicator Recording Red blinking Self-timer Red blinking Definition The power is on The flash is charging Recording Start of the camcorder LED indicator and Self-timer indicator. The initial power up of this camcorder should display the Date and Time setup menu as shown below describes the different modes of Self-timer 2.7 Initial Settings Before Use 20B 2.7.1 Setting Date and Time 43B 1.
User Manual
Page 25
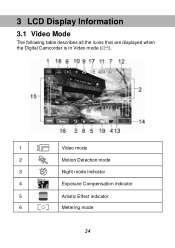
3 LCD Display Information 2B 3.1 Video Mode 21B The following table describes all the icons that are displayed when the Digital Camcorder is in Video mode ( ). 1 Video mode 2 Motion Detection mode 3 Night mode indicator 4 1.0 Exposure Compensation indicator 5 Artistic Effect indicator 6 Metering mode 24
3 LCD Display Information 2B 3.1 Video Mode 21B The following table describes all the icons that are displayed when the Digital Camcorder is in Video mode ( ). 1 Video mode 2 Motion Detection mode 3 Night mode indicator 4 1.0 Exposure Compensation indicator 5 Artistic Effect indicator 6 Metering mode 24
User Manual
Page 26
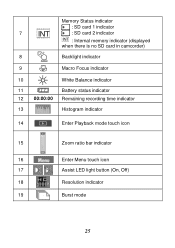
Memory Status indicator : SD card 1 indicator 7 INT : SD card 2 indicator INT : Internal memory indicator (displayed when there is no SD card in camcorder) 8 Backlight indicator 9 Macro Focus indicator 10 White Balance indicator 11 Battery status indicator 12 00:00:00 Remaining recording time indicator 13 Histogram indicator 14 Enter Playback mode touch icon 15 Zoom ratio bar indicator 16 Enter Menu touch icon 17 Assist LED light button (On, Off) 18 Resolution indicator 19 Burst mode 25
Memory Status indicator : SD card 1 indicator 7 INT : SD card 2 indicator INT : Internal memory indicator (displayed when there is no SD card in camcorder) 8 Backlight indicator 9 Macro Focus indicator 10 White Balance indicator 11 Battery status indicator 12 00:00:00 Remaining recording time indicator 13 Histogram indicator 14 Enter Playback mode touch icon 15 Zoom ratio bar indicator 16 Enter Menu touch icon 17 Assist LED light button (On, Off) 18 Resolution indicator 19 Burst mode 25
User Manual
Page 27
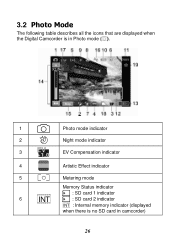
3.2 Photo Mode The following table describes all the icons that are displayed when the Digital Camcorder is in Photo mode ( ). 1 Photo mode indicator 2 Night mode indicator 3 1.0 EV Compensation indicator 4 Artistic Effect indicator 5 Metering mode Memory Status indicator : SD card 1 indicator 6 INT : SD card 2 indicator INT : Internal memory indicator (displayed when there is no SD card in camcorder) 26
3.2 Photo Mode The following table describes all the icons that are displayed when the Digital Camcorder is in Photo mode ( ). 1 Photo mode indicator 2 Night mode indicator 3 1.0 EV Compensation indicator 4 Artistic Effect indicator 5 Metering mode Memory Status indicator : SD card 1 indicator 6 INT : SD card 2 indicator INT : Internal memory indicator (displayed when there is no SD card in camcorder) 26
User Manual
Page 29
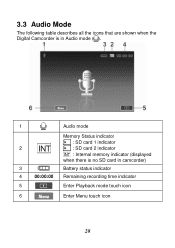
3.3 Audio Mode 2B The following table describes all the icons that are shown when the Digital Camcorder is in Audio mode ( ). 1 Audio mode Memory Status indicator 2 INT : SD card 1 indicator : SD card 2 indicator INT : Internal memory indicator (displayed when there is no SD card in camcorder) 3 Battery status indicator 4 00:00:00 Remaining recording time indicator 5 Enter Playback mode touch icon 6 Enter Menu touch icon 2323BB 2323BB 28
3.3 Audio Mode 2B The following table describes all the icons that are shown when the Digital Camcorder is in Audio mode ( ). 1 Audio mode Memory Status indicator 2 INT : SD card 1 indicator : SD card 2 indicator INT : Internal memory indicator (displayed when there is no SD card in camcorder) 3 Battery status indicator 4 00:00:00 Remaining recording time indicator 5 Enter Playback mode touch icon 6 Enter Menu touch icon 2323BB 2323BB 28
User Manual
Page 30
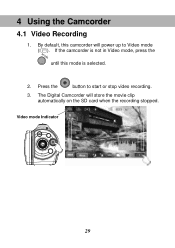
Press the button to Video mode ( ). If the camcorder is not in Video mode, press the until this camcorder will store the movie clip automatically on the SD card when the recording stopped. Video mode Indicator 29 By default, this mode is selected. 2. The Digital Camcorder will power up to start or stop video recording. 3. 4 Using the Camcorder 3B 4.1 Video Recording 24B 1.
Press the button to Video mode ( ). If the camcorder is not in Video mode, press the until this camcorder will store the movie clip automatically on the SD card when the recording stopped. Video mode Indicator 29 By default, this mode is selected. 2. The Digital Camcorder will power up to start or stop video recording. 3. 4 Using the Camcorder 3B 4.1 Video Recording 24B 1.

