
HP USB Digital Drive
Page 3
If the SD memory card does not slide in properly, gently pull it out and reinsert it. 2 User Guide Insert the SD memory card into the SD slot 2 with the notched corner positioned on the lower left as shown. Installing the SD Memory Card 1. Remove the cap 1 of the Digital Drive. 2.
If the SD memory card does not slide in properly, gently pull it out and reinsert it. 2 User Guide Insert the SD memory card into the SD slot 2 with the notched corner positioned on the lower left as shown. Installing the SD Memory Card 1. Remove the cap 1 of the Digital Drive. 2.

Hardware and Software Guide
Page 7
Contents Adding and Upgrading Memory Modules 5-20 Adding a Memory Module to the Expansion Memory Module Slot 5-21 Upgrading the Memory Module in the Primary Memory Module Slot 5-26 Effects of Increasing Memory 5-34 Connecting a Modem Cable 5-35 Using a Modem Cable 5-36 Using a Country-...Optional External MultiBay and External MultiBay II 5-45 Mobile Printing for Notebooks 5-45 6 Wireless Wireless Local Area Network (Select Models Only) . . . 6-4 Connecting Your Wireless Notebook to a Corporate WLAN 6-5 Connecting Your Wireless Notebook to a Public WLAN 6-5 Setting Up a WLAN in Your ...
Contents Adding and Upgrading Memory Modules 5-20 Adding a Memory Module to the Expansion Memory Module Slot 5-21 Upgrading the Memory Module in the Primary Memory Module Slot 5-26 Effects of Increasing Memory 5-34 Connecting a Modem Cable 5-35 Using a Modem Cable 5-36 Using a Country-...Optional External MultiBay and External MultiBay II 5-45 Mobile Printing for Notebooks 5-45 6 Wireless Wireless Local Area Network (Select Models Only) . . . 6-4 Connecting Your Wireless Notebook to a Corporate WLAN 6-5 Connecting Your Wireless Notebook to a Public WLAN 6-5 Setting Up a WLAN in Your ...

Hardware and Software Guide
Page 23
... Software Guide 1-13 Produce notebook sound. 3 6-in-1 Digital Media Slot (select models only) Supports 6 optional digital memory card formats: SD (Secure Digital) Memory Card, MultiMediaCard, Memory Stick, Memory Stick Pro, SmartMedia, and xD-Picture Card. 4 6-in-1 Digital Media Slot light On: Slot is accessing a digital (select models only) memory card. 5 Display release latch Opens the notebook. Notebook Features Front Components ✎...
... Software Guide 1-13 Produce notebook sound. 3 6-in-1 Digital Media Slot (select models only) Supports 6 optional digital memory card formats: SD (Secure Digital) Memory Card, MultiMediaCard, Memory Stick, Memory Stick Pro, SmartMedia, and xD-Picture Card. 4 6-in-1 Digital Media Slot light On: Slot is accessing a digital (select models only) memory card. 5 Display release latch Opens the notebook. Notebook Features Front Components ✎...

Hardware and Software Guide
Page 33
Connect an optional travel battery. Component 1 Primary battery bay 2 Primary battery release latches (2) 3 Travel battery connector 4 Expansion memory module compartment Description Holds the primary battery pack. Notebook Features Bottom Components ✎ Refer to the illustration that most closely matches your notebook. Contains the expansion memory module slot. (Continued) Hardware and Software Guide 1-23 Releases the primary battery pack from the battery bay. The primary battery locking latches must be in the unlocked position.
Connect an optional travel battery. Component 1 Primary battery bay 2 Primary battery release latches (2) 3 Travel battery connector 4 Expansion memory module compartment Description Holds the primary battery pack. Notebook Features Bottom Components ✎ Refer to the illustration that most closely matches your notebook. Contains the expansion memory module slot. (Continued) Hardware and Software Guide 1-23 Releases the primary battery pack from the battery bay. The primary battery locking latches must be in the unlocked position.

Hardware and Software Guide
Page 35
Contains the expansion memory module slot. Enable airflow to cool internal components. Ä To prevent overheating, do not obstruct vents. Hardware and Software Guide 1-25 Holds the hard drive. Using the notebook on a soft surface, such as a pillow, blanket, rug, or ... locking latches must be in the unlocked position. Connects an optional travel battery. Notebook Features Component 1 Primary battery bay 2 Primary battery release latches (2) 3 Travel battery connector 4 Expansion memory module compartment 5 Hard drive bay 6 Vents (4) Description Holds the primary battery ...
Contains the expansion memory module slot. Enable airflow to cool internal components. Ä To prevent overheating, do not obstruct vents. Hardware and Software Guide 1-25 Holds the hard drive. Using the notebook on a soft surface, such as a pillow, blanket, rug, or ... locking latches must be in the unlocked position. Connects an optional travel battery. Notebook Features Component 1 Primary battery bay 2 Primary battery release latches (2) 3 Travel battery connector 4 Expansion memory module compartment 5 Hard drive bay 6 Vents (4) Description Holds the primary battery ...
Hardware and Software Guide
Page 43
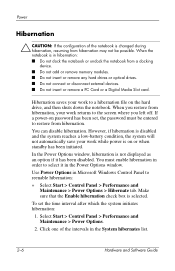
...hibernation may not be entered to restore from hibernation, your work returns to a hibernation file on the hard drive, and then shuts down the notebook. When you left off. In the Power Options window, hibernation is not displayed as an option if it in the Power Options window. ... docking device. ■ Do not add or remove memory modules. ■ Do not insert or remove any hard drives or optical drives. ■ Do not connect or disconnect external devices. ■ Do not insert or remove a PC Card or a Digital Media Slot card. Hibernation saves your work to the screen where ...
...hibernation may not be entered to restore from hibernation, your work returns to a hibernation file on the hard drive, and then shuts down the notebook. When you left off. In the Power Options window, hibernation is not displayed as an option if it in the Power Options window. ... docking device. ■ Do not add or remove memory modules. ■ Do not insert or remove any hard drives or optical drives. ■ Do not connect or disconnect external devices. ■ Do not insert or remove a PC Card or a Digital Media Slot card. Hibernation saves your work to the screen where ...
Hardware and Software Guide
Page 125
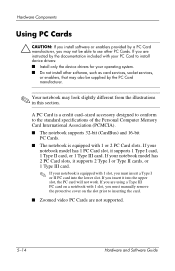
... upper slot, the PC card will not work. If your notebook model has 1 PC Card slot, it supports 1 Type I card, 1 Type II card, or 1 Type III card. A PC Card is equipped with 1 slot, you may not be supplied by the PC Card manufacturer. ✎ Your notebook may also be able to the standard specifications of the Personal Computer Memory Card...
... upper slot, the PC card will not work. If your notebook model has 1 PC Card slot, it supports 1 Type I card, 1 Type II card, or 1 Type III card. A PC Card is equipped with 1 slot, you may not be supplied by the PC Card manufacturer. ✎ Your notebook may also be able to the standard specifications of the Personal Computer Memory Card...

Hardware and Software Guide
Page 128
... of adapter into your Digital Media Slot can damage the media card. The optional 6-in-1 Digital Media Slot supports the following digital memory card formats: ■ Secure Digital (SD) Memory Card ■ MultiMediaCard ■ Memory Stick ■ Memory Stick Pro ■ SmartMedia Card ■ xD-Picture Card Ä CAUTION: This notebook does not support adapters in the...
... of adapter into your Digital Media Slot can damage the media card. The optional 6-in-1 Digital Media Slot supports the following digital memory card formats: ■ Secure Digital (SD) Memory Card ■ MultiMediaCard ■ Memory Stick ■ Memory Stick Pro ■ SmartMedia Card ■ xD-Picture Card Ä CAUTION: This notebook does not support adapters in the...

Hardware and Software Guide
Page 129
To insert a digital memory card: 1. Hold the digital memory card label-side up with the connectors facing the notebook. 2. Slide the memory card into a Digital Media Slot. Hardware Components Inserting an Optional Digital Memory Card Ä CAUTION: To prevent damage to the connectors to the digital memory card connectors, use minimal pressure when inserting a digital memory card into the Digital Media Slot until the card is seated. 5-18 Hardware and Software Guide
To insert a digital memory card: 1. Hold the digital memory card label-side up with the connectors facing the notebook. 2. Slide the memory card into a Digital Media Slot. Hardware Components Inserting an Optional Digital Memory Card Ä CAUTION: To prevent damage to the connectors to the digital memory card connectors, use minimal pressure when inserting a digital memory card into the Digital Media Slot until the card is seated. 5-18 Hardware and Software Guide

Hardware and Software Guide
Page 130
Close all files and applications using the digital memory card. (To stop the digital memory card before removing it. Hardware and Software Guide 5-19 Pull the digital memory card out of work or system lockup, stop a data transfer, select the cancel button in the operating system Copying window.) 2. To remove a digital memory card: 1. Hardware Components Removing an Optional Digital Memory Card Ä CAUTION: To prevent loss of the slot.
Close all files and applications using the digital memory card. (To stop the digital memory card before removing it. Hardware and Software Guide 5-19 Pull the digital memory card out of work or system lockup, stop a data transfer, select the cancel button in the operating system Copying window.) 2. To remove a digital memory card: 1. Hardware Components Removing an Optional Digital Memory Card Ä CAUTION: To prevent loss of the slot.

Hardware and Software Guide
Page 131
... compartment is located on the notebook. For more information, refer to Regulatory, Safety and Environmental Notices located in the primary memory slot. Å WARNING: The memory module compartments are discharged of electric shock and damage to the expansion slot or by touching a grounded metal object. Before beginning any procedure, ensure that you are the only...
... compartment is located on the notebook. For more information, refer to Regulatory, Safety and Environmental Notices located in the primary memory slot. Å WARNING: The memory module compartments are discharged of electric shock and damage to the expansion slot or by touching a grounded metal object. Before beginning any procedure, ensure that you are the only...

Hardware and Software Guide
Page 132
... connected to the Expansion Memory Module Slot To add or replace a memory module in hibernation, turn the notebook on by pressing the power/standby button. Turn the notebook upside down the notebook. (If you are not sure whether the notebook is off or in the expansion memory module slot: 1. Disconnect the power cord. 4. Lift the memory module cover 2 away from...
... connected to the Expansion Memory Module Slot To add or replace a memory module in hibernation, turn the notebook on by pressing the power/standby button. Turn the notebook upside down the notebook. (If you are not sure whether the notebook is off or in the expansion memory module slot: 1. Disconnect the power cord. 4. Lift the memory module cover 2 away from...

Hardware and Software Guide
Page 133
Grasp the edges of the memory module and gently pull the module out of the memory module 1. (The memory module tilts upward.) b. Pull away the retention clips on each side of the memory slot 2. To protect a memory module after removal, place it : a. Hardware Components 8. If there is a memory module in the expansion memory module slot, remove it in an electrostatic-safe container. 5-22 Hardware and Software Guide
Grasp the edges of the memory module and gently pull the module out of the memory module 1. (The memory module tilts upward.) b. Pull away the retention clips on each side of the memory slot 2. To protect a memory module after removal, place it : a. Hardware Components 8. If there is a memory module in the expansion memory module slot, remove it in an electrostatic-safe container. 5-22 Hardware and Software Guide

Hardware and Software Guide
Page 134
Insert the new memory module: a. b. With the memory module at a 45-degree angle from the surface of the memory module with the tabbed area in the memory slot. Align the keyed (notched) edge 1 of the memory module compartment, press the module into the memory slot until it is seated 2. Hardware and Software Guide 5-23 Hardware Components 9.
Insert the new memory module: a. b. With the memory module at a 45-degree angle from the surface of the memory module with the tabbed area in the memory slot. Align the keyed (notched) edge 1 of the memory module compartment, press the module into the memory slot until it is seated 2. Hardware and Software Guide 5-23 Hardware Components 9.

Hardware and Software Guide
Page 137
... external devices connected to the primary memory module slot: 1. Loosen the memory module cover screw 1. 7. Then shut down the notebook. (If you are not sure whether the notebook is off or in this section. Turn the notebook upside down. 6. Hardware Components Upgrading the Memory Module in the Primary Memory Module Slot ✎ Your notebook may look slightly different from the...
... external devices connected to the primary memory module slot: 1. Loosen the memory module cover screw 1. 7. Then shut down the notebook. (If you are not sure whether the notebook is off or in this section. Turn the notebook upside down. 6. Hardware Components Upgrading the Memory Module in the Primary Memory Module Slot ✎ Your notebook may look slightly different from the...

Hardware and Software Guide
Page 140
Pull the retention clips 1 away from each side of the memory module 2 and gently remove it in an electrostatic-safe container. The memory module tilts upward when released. Hardware and Software Guide 5-29 To protect a memory module after it has been removed, place it from the memory module slot: a. Remove the memory module from the slot. b. Hardware Components 12. Lift the edge of the memory module.
Pull the retention clips 1 away from each side of the memory module 2 and gently remove it in an electrostatic-safe container. The memory module tilts upward when released. Hardware and Software Guide 5-29 To protect a memory module after it has been removed, place it from the memory module slot: a. Remove the memory module from the slot. b. Hardware Components 12. Lift the edge of the memory module.

Hardware and Software Guide
Page 141
With the memory module at a 45-degree angle from the surface of the memory module 1 with the keyed area in the memory module slot. Align the keyed (notched) edge of the memory module compartment, press the module into the memory module slot: a. Insert the new memory module into the memory slot until it is seated 2. 5-30 Hardware and Software Guide b. Hardware Components 13.
With the memory module at a 45-degree angle from the surface of the memory module 1 with the keyed area in the memory module slot. Align the keyed (notched) edge of the memory module compartment, press the module into the memory module slot: a. Insert the new memory module into the memory slot until it is seated 2. 5-30 Hardware and Software Guide b. Hardware Components 13.

Hardware and Software Guide
Page 238
Index Client Management Solutions 10-1 Client Manager software 10-3 compartments expansion memory module 1-23, 1-25, 5-21 primary memory module 5-20, 5-26 components bottom 1-23 front 1-13 left-side 1-20 rear 1-16 right-side 1-18 top 1-2 composite video 3-9 ...2-27 Critical Security Updates for Windows XP 7-23 D data, safeguarding 11-8 default boot sequence 8-2 device disabling 7-18 device security 7-18 digital memory cards 6-in-1 Digital Media Slot 5-17 inserting 5-18 removing 5-19 disabling num lock 3-14 display release latch 1-13, 1-14 display switch, identifying 1-9, 1-11, 2-3 docking...
Index Client Management Solutions 10-1 Client Manager software 10-3 compartments expansion memory module 1-23, 1-25, 5-21 primary memory module 5-20, 5-26 components bottom 1-23 front 1-13 left-side 1-20 rear 1-16 right-side 1-18 top 1-2 composite video 3-9 ...2-27 Critical Security Updates for Windows XP 7-23 D data, safeguarding 11-8 default boot sequence 8-2 device disabling 7-18 device security 7-18 digital memory cards 6-in-1 Digital Media Slot 5-17 inserting 5-18 removing 5-19 disabling num lock 3-14 display release latch 1-13, 1-14 display switch, identifying 1-9, 1-11, 2-3 docking...

Hardware and Software Guide
Page 241
... language, changing in Computer Setup 9-6 latches battery pack release 1-23, 1-25 display release 1-13, 1-14 keyboard 5-27 lights 6-in-1 Digital Media Slot 1-13 battery 1-3, 1-5 caps lock 1-3, 1-5 IDE drive 1-3, 1-5, 5-4 mute 1-3 num lock 1-3, 1-5, 3-12 power/standby 1-3, 1-4, 2-2, 2-3 ... Player, Windows 4-9 memory displaying amount of 5-34 increasing 5-34 memory module compartment, expansion 1-23, 1-25, 5-20, 5-21 memory module compartment, primary 5-20, 5-26 memory module, removing or inserting 5-21, 5-26 Memory Stick 1-13, 5-17 Memory Stick Pro 1-13, 5-17 memory, digital 5-17 microphone...
... language, changing in Computer Setup 9-6 latches battery pack release 1-23, 1-25 display release 1-13, 1-14 keyboard 5-27 lights 6-in-1 Digital Media Slot 1-13 battery 1-3, 1-5 caps lock 1-3, 1-5 IDE drive 1-3, 1-5, 5-4 mute 1-3 num lock 1-3, 1-5, 3-12 power/standby 1-3, 1-4, 2-2, 2-3 ... Player, Windows 4-9 memory displaying amount of 5-34 increasing 5-34 memory module compartment, expansion 1-23, 1-25, 5-20, 5-21 memory module compartment, primary 5-20, 5-26 memory module, removing or inserting 5-21, 5-26 Memory Stick 1-13, 5-17 Memory Stick Pro 1-13, 5-17 memory, digital 5-17 microphone...

HP Compaq nx6110, nc6110, nx6120 and nc6120 Notebook PCs - Maintenance and Service Guide
Page 27
... wireless LAN device. Ä To prevent an unresponsive system and the display of preinstalled memory modules varies by the governmental agency that support replaceable memory modules. Maintenance and Service Guide 1-21 Primary battery release latch Releases the primary battery pack.... Then contact Customer Care. Product Description Item 4 5 6 7 8 Table 1-8 Bottom Components (Continued) Component Function Memory module compartment Mini PCI compartment Contains 2 memory slots that regulates wireless devices in your country. Hard drive bay Holds the primary hard drive.
... wireless LAN device. Ä To prevent an unresponsive system and the display of preinstalled memory modules varies by the governmental agency that support replaceable memory modules. Maintenance and Service Guide 1-21 Primary battery release latch Releases the primary battery pack.... Then contact Customer Care. Product Description Item 4 5 6 7 8 Table 1-8 Bottom Components (Continued) Component Function Memory module compartment Mini PCI compartment Contains 2 memory slots that regulates wireless devices in your country. Hard drive bay Holds the primary hard drive.


