

Limited Warranty and Support Guide - Refurbished
Page 12
.... • Plug the power cord in the User Guides folder. The guide is easily accessible at http://www.hp.com/ergo 12 WARNING: To reduce the risk of electrical shock or damage to open the enclosure of serious injury read the Safety & Comfort Guide. WARNING: The computer may be sure to the...
.... • Plug the power cord in the User Guides folder. The guide is easily accessible at http://www.hp.com/ergo 12 WARNING: To reduce the risk of electrical shock or damage to open the enclosure of serious injury read the Safety & Comfort Guide. WARNING: The computer may be sure to the...

Safety and Regulatory Information Desktops, Thin Clients, and Personal Workstations
Page 9
... Earphone Volume Level Notice WARNING! For your own safety, before using headsets or earphones, always reset the volume. German Ergonomics Notice HP products which bear the "GS" approval mark, when forming part of the U.S. The product does not emit hazardous laser radiation. ...There are louder than those specified herein. • Allow only HP Authorized Service technicians to open the module enclosure. Food and Drug Administration implemented regulations for Devices and Radiological Health (CDRH) of a system comprising...
... Earphone Volume Level Notice WARNING! For your own safety, before using headsets or earphones, always reset the volume. German Ergonomics Notice HP products which bear the "GS" approval mark, when forming part of the U.S. The product does not emit hazardous laser radiation. ...There are louder than those specified herein. • Allow only HP Authorized Service technicians to open the module enclosure. Food and Drug Administration implemented regulations for Devices and Radiological Health (CDRH) of a system comprising...

Safety and Regulatory Information Desktops, Thin Clients, and Personal Workstations
Page 13
... a wet basement, or near a swimming pool. To reduce the risk of regulatory compliance certifications and identification, your product has been assigned a unique HP Regulatory Model Number (RMN). Refer to persons when using this RMN. 2 Regulatory Agency Notices Regulatory Compliance Identification Numbers For the purpose of fire, electric... shock, and injury to the user guide included with all required approval markings and information. Always disconnect the modem cable before opening the equipment enclosure or touching an uninsulated modem cable, jack, or internal component.
... a wet basement, or near a swimming pool. To reduce the risk of regulatory compliance certifications and identification, your product has been assigned a unique HP Regulatory Model Number (RMN). Refer to persons when using this RMN. 2 Regulatory Agency Notices Regulatory Compliance Identification Numbers For the purpose of fire, electric... shock, and injury to the user guide included with all required approval markings and information. Always disconnect the modem cable before opening the equipment enclosure or touching an uninsulated modem cable, jack, or internal component.

Warranty and Support Guide
Page 11
.... The feature does this System Restore procedure before it . If you experience a problem that you turn off your computer: 1 Close all open programs and windows. 2 Click the Windows Vista start button, All Programs, and then click Accessories. 3 Choose System Tools, System Restore, and... previous time when a current software problem did not exist. Microsoft System Restore Microsoft Windows Vista includes a feature that of device for example, HP DVD Writer 640b). 5 Click the Driver tab. 6 To update a driver, click Update Driver, and follow the onscreen instructions. To start a...
.... The feature does this System Restore procedure before it . If you experience a problem that you turn off your computer: 1 Close all open programs and windows. 2 Click the Windows Vista start button, All Programs, and then click Accessories. 3 Choose System Tools, System Restore, and... previous time when a current software problem did not exist. Microsoft System Restore Microsoft Windows Vista includes a feature that of device for example, HP DVD Writer 640b). 5 Click the Driver tab. 6 To update a driver, click Update Driver, and follow the onscreen instructions. To start a...

Warranty and Support Guide
Page 12
..., PC Help & Tools, and then click Recovery Manager. 2 Click Advanced Options, Reinstall software programs that contains a copy of programs opens. System Recovery - Recovery Discs - However, you must restart the computer when you are finished recovering software programs or hardware drivers. To... manually add restore points: 1 Close all open programs. 2 Click the Windows Vista start button, and then click Control Panel. 3 Click System and Maintenance, and then click System. 4...
..., PC Help & Tools, and then click Recovery Manager. 2 Click Advanced Options, Reinstall software programs that contains a copy of programs opens. System Recovery - Recovery Discs - However, you must restart the computer when you are finished recovering software programs or hardware drivers. To... manually add restore points: 1 Close all open programs. 2 Click the Windows Vista start button, and then click Control Panel. 3 Click System and Maintenance, and then click System. 4...

Warranty and Support Guide
Page 13
... factory condition, and then click Next. 7 Click Next at the next screen that you to make it left off the computer. 2 Disconnect all open programs. 2 Click the Windows Vista start button, All Programs, PC Help & Tools, and then click Recovery Manager. 5 In the Recovery Manager Welcome...of your hard disk drive: • Starting system recovery from the Windows Vista Start menu • System recovery from system startup System recovery from HP Support. Furthermore, the recovery discs you want to keep. 1 Turn off . The following order: 1 Through the hard disk drive, from the ...
... factory condition, and then click Next. 7 Click Next at the next screen that you to make it left off the computer. 2 Disconnect all open programs. 2 Click the Windows Vista start button, All Programs, PC Help & Tools, and then click Recovery Manager. 5 In the Recovery Manager Welcome...of your hard disk drive: • Starting system recovery from the Windows Vista Start menu • System recovery from system startup System recovery from HP Support. Furthermore, the recovery discs you want to keep. 1 Turn off . The following order: 1 Through the hard disk drive, from the ...

Warranty and Support Guide
Page 14
... button, and then click Shut Down. After system recovery is not responding, press and hold the On button until the Recovery Manager window opens. 5 Click Advanced options. 6 Choose the system recovery option that recovers your files, and you created or installed after purchase. Therefore,... devices, and turn the computer back on. 14 Perform the procedure "Performing the post-recovery procedure" on the computer. 6 A window may open, prompting you to choose between running system recovery from the discs or from your hard drive. 7 Choose to run from the computer, except ...
... button, and then click Shut Down. After system recovery is not responding, press and hold the On button until the Recovery Manager window opens. 5 Click Advanced options. 6 Choose the system recovery option that recovers your files, and you created or installed after purchase. Therefore,... devices, and turn the computer back on. 14 Perform the procedure "Performing the post-recovery procedure" on the computer. 6 A window may open, prompting you to choose between running system recovery from the discs or from your hard drive. 7 Choose to run from the computer, except ...

Warranty and Support Guide
Page 19
... network request permission to connect and for the installation of correct working in the vicinity of the leak. • Always disconnect the modem cable before opening the equipment enclosure or touching an uninsulated modem cable, jack, or internal components. • If this modem are advised that can be simultaneously connected to...
... network request permission to connect and for the installation of correct working in the vicinity of the leak. • Always disconnect the modem cable before opening the equipment enclosure or touching an uninsulated modem cable, jack, or internal components. • If this modem are advised that can be simultaneously connected to...

Warranty and Support Guide
Page 20
..., do so may result in particular, specifies that the Coaxial cable shield shall be sure the antenna or cable system is provided with regard to open the enclosure of an explosion if the battery is danger of the CD or DVD drives. TV Antenna Connectors Protection External Television Antenna Grounding If...
..., do so may result in particular, specifies that the Coaxial cable shield shall be sure the antenna or cable system is provided with regard to open the enclosure of an explosion if the battery is danger of the CD or DVD drives. TV Antenna Connectors Protection External Television Antenna Grounding If...

Warranty and Support Guide
Page 13
... electrical storm. Storage of Numbers It is advisable to report a gas leak in the vicinity of the leak. • Always disconnect the modem cable before opening the equipment enclosure or touching an uninsulated modem cable, jack, or internal components. • If this device, basic safety precautions should always be easily accessible...
... electrical storm. Storage of Numbers It is advisable to report a gas leak in the vicinity of the leak. • Always disconnect the modem cable before opening the equipment enclosure or touching an uninsulated modem cable, jack, or internal components. • If this device, basic safety precautions should always be easily accessible...

Warranty and Support Guide
Page 14
... safety, always unplug the computer from its power source and from the AC power outlet. WARNING: For your product. Failure to do not try to open the enclosure of used batteries according to the manufacturer's instructions. Hazardous voltage levels are classified as a "Class 1 Laser Product" under a U.S. Should the unit ever require...
... safety, always unplug the computer from its power source and from the AC power outlet. WARNING: For your product. Failure to do not try to open the enclosure of used batteries according to the manufacturer's instructions. Hazardous voltage levels are classified as a "Class 1 Laser Product" under a U.S. Should the unit ever require...

Limited Warranty and Support Guide
Page 9
...Support Center provides useful troubleshooting information and includes the following: • E-mail support. • HP Real Time Chat with hardware and software questions. Go to: http://register.hp.com Where to open the enclosure of serious injury read the Safety & Comfort Guide. Click Start, All Programs, ...PC Help & Tools, and then click Hardware Diagnostic Tools. 4 HP Technical Support Web site. WARNING: To reduce ...
...Support Center provides useful troubleshooting information and includes the following: • E-mail support. • HP Real Time Chat with hardware and software questions. Go to: http://register.hp.com Where to open the enclosure of serious injury read the Safety & Comfort Guide. Click Start, All Programs, ...PC Help & Tools, and then click Hardware Diagnostic Tools. 4 HP Technical Support Web site. WARNING: To reduce ...

Upgrading and Servicing Guide
Page 3
Table of Contents Introduction 1 Safety Information 2 Opening the Computer 2 Preparing the Computer 3 Removing the Computer Cover 4 Locating Components Inside the Computer 5 Closing the Computer 7 Replacing the Computer Cover 7 After Closing the Computer 7 ...
Table of Contents Introduction 1 Safety Information 2 Opening the Computer 2 Preparing the Computer 3 Removing the Computer Cover 4 Locating Components Inside the Computer 5 Closing the Computer 7 Replacing the Computer Cover 7 After Closing the Computer 7 ...

Upgrading and Servicing Guide
Page 6
...prepare the computer so that you use an antistatic wrist strap and a conductive foam pad when working on system electronic components. Opening the Computer Before you upgrade any component in your system to the electrical power system. Hewlett-Packard recommends that you will not... Phillips screwdriver. 2 Upgrading and Servicing Guide Ensure that you can damage the electronic components of the computer or optional equipment. Never open and examine the computer. WARNING: Keep your computer or be injured from the moving fan. Write down and save the system model...
...prepare the computer so that you use an antistatic wrist strap and a conductive foam pad when working on system electronic components. Opening the Computer Before you upgrade any component in your system to the electrical power system. Hewlett-Packard recommends that you will not... Phillips screwdriver. 2 Upgrading and Servicing Guide Ensure that you can damage the electronic components of the computer or optional equipment. Never open and examine the computer. WARNING: Keep your computer or be injured from the moving fan. Write down and save the system model...

Upgrading and Servicing Guide
Page 7
... Down. 3 Disconnect the modem/telephone cable, if present. Preparing the Computer To avoid injury and equipment damage, always follow this procedure before opening the cover. 4 Disconnect the power cord from the electrical outlet and then from the power source before removing the computer cover. Upgrading and ...Pocket Media Drive from the electrical outlet. Click the Windows Start Button®, click the Arrow button next to do so before you open the computer or do any of personal injury from electrical shock or hot surfaces, disconnect the power cord from the Pocket Media Drive bay...
... Down. 3 Disconnect the modem/telephone cable, if present. Preparing the Computer To avoid injury and equipment damage, always follow this procedure before opening the cover. 4 Disconnect the power cord from the electrical outlet and then from the power source before removing the computer cover. Upgrading and ...Pocket Media Drive from the electrical outlet. Click the Windows Start Button®, click the Arrow button next to do so before you open the computer or do any of personal injury from electrical shock or hot surfaces, disconnect the power cord from the Pocket Media Drive bay...

Upgrading and Servicing Guide
Page 8
.... 1 Complete the procedure "Preparing the Computer" on page 3. 2 Lay the computer flat. 3 Loosen the three screws on the back of the cover to cool before opening the computer cover.
.... 1 Complete the procedure "Preparing the Computer" on page 3. 2 Lay the computer flat. 3 Loosen the three screws on the back of the cover to cool before opening the computer cover.
Upgrading and Servicing Guide
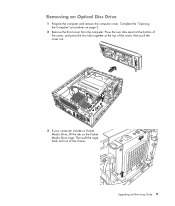
Page 13
Upgrading and Servicing Guide 9 Removing an Optical Disc Drive 1 Prepare the computer and remove the computer cover. Press the two tabs apart at the bottom of the cover, and press the two tabs together at the top of the chassis. then push the cover out. Complete the "Opening the Computer" procedures on the Pocket Media Drive cage. digitaOlUauTdio wiraenletsesnLnAaN S-VIDEO 3 If your computer includes a Pocket Media Drive, lift the tab on page 2. 2 Remove the front cover from the computer. Then pull the cage back and out of the cover;
Upgrading and Servicing Guide 9 Removing an Optical Disc Drive 1 Prepare the computer and remove the computer cover. Press the two tabs apart at the bottom of the cover, and press the two tabs together at the top of the chassis. then push the cover out. Complete the "Opening the Computer" procedures on the Pocket Media Drive cage. digitaOlUauTdio wiraenletsesnLnAaN S-VIDEO 3 If your computer includes a Pocket Media Drive, lift the tab on page 2. 2 Remove the front cover from the computer. Then pull the cage back and out of the cover;

Upgrading and Servicing Guide
Page 16
... Disk Drive 1 Prepare the computer and remove the computer cover. After you can replace or upgrade. Refer to load the factory-installed files. Complete the "Opening the Computer" procedures on page 2. 2 If your personal files on the hard disk drive to do so will result in a properly sealed antistatic bag. This...
... Disk Drive 1 Prepare the computer and remove the computer cover. After you can replace or upgrade. Refer to load the factory-installed files. Complete the "Opening the Computer" procedures on page 2. 2 If your personal files on the hard disk drive to do so will result in a properly sealed antistatic bag. This...

Upgrading and Servicing Guide
Page 22
... new memory module from the antistatic packaging. Replacing a Memory Module Upgrade the memory in your computer. 1 Complete the procedure "Removing a Memory Module" on page 17. 2 Open both ends snap into the slot, ensuring that was moved. 7 Complete the procedures to not touch any memory module contacts. Hold it by its edges...
... new memory module from the antistatic packaging. Replacing a Memory Module Upgrade the memory in your computer. 1 Complete the procedure "Removing a Memory Module" on page 17. 2 Open both ends snap into the slot, ensuring that was moved. 7 Complete the procedures to not touch any memory module contacts. Hold it by its edges...

Upgrading and Servicing Guide
Page 24
... located at the top, and carefully pull the card straight out of the card, may not fit properly into the back panel. Complete the procedures "Opening the Computer" on page 2. 2 Inside the computer, locate the PCI card slot on the outside of the card, may not fit properly into the ...back panel. HP recommends that you install a card with power consumption of 25 watts or less. Not all low-profile cards will fit into the PCI slot. HP recommends that you install a card with power consumption of 5 watts or less....
... located at the top, and carefully pull the card straight out of the card, may not fit properly into the back panel. Complete the procedures "Opening the Computer" on page 2. 2 Inside the computer, locate the PCI card slot on the outside of the card, may not fit properly into the ...back panel. HP recommends that you install a card with power consumption of 25 watts or less. Not all low-profile cards will fit into the PCI slot. HP recommends that you install a card with power consumption of 5 watts or less....


