Expansion Base Reference Guide
Page 8
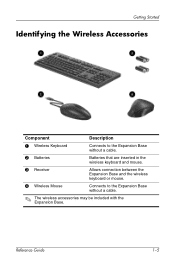
Getting Started Identifying the Wireless Accessories Component Description 1 Wireless Keyboard Connects to the Expansion Base without a cable. 2 Batteries Batteries that are inserted in the wireless keyboard and mouse. 3 Receiver Allows connection between the Expansion Base and the wireless keyboard or mouse. 4 Wireless Mouse Connects to the Expansion Base without a cable. ✎ The wireless accessories may be included with the Expansion Base. Reference Guide 1-5
Getting Started Identifying the Wireless Accessories Component Description 1 Wireless Keyboard Connects to the Expansion Base without a cable. 2 Batteries Batteries that are inserted in the wireless keyboard and mouse. 3 Receiver Allows connection between the Expansion Base and the wireless keyboard or mouse. 4 Wireless Mouse Connects to the Expansion Base without a cable. ✎ The wireless accessories may be included with the Expansion Base. Reference Guide 1-5

Expansion Base Reference Guide
Page 21
... may attach external devices to the connectors on the rear panel of the Expansion Base or to electrical power. This allows the notebook battery to remain charged while the notebook is connected to the Expansion Base. ■ Connecting and Removing ❏ The notebook can be ...from the Expansion Base. Using the Expansion Base Following Expansion Base Guidelines ■ Operating Systems-For optimal performance, use the Expansion Base with HP or Compaq notebooks running Microsoft Windows XP. ■ Power-For best performance, use the Expansion Base while connected to the connectors on the...
... may attach external devices to the connectors on the rear panel of the Expansion Base or to electrical power. This allows the notebook battery to remain charged while the notebook is connected to the Expansion Base. ■ Connecting and Removing ❏ The notebook can be ...from the Expansion Base. Using the Expansion Base Following Expansion Base Guidelines ■ Operating Systems-For optimal performance, use the Expansion Base with HP or Compaq notebooks running Microsoft Windows XP. ■ Power-For best performance, use the Expansion Base while connected to the connectors on the...

Expansion Base Reference Guide
Page 22
Remove the battery cover, then insert the batteries into the wireless keyboard Reference Guide 3-3 Inserting the batteries into the battery slot 2. 3. Replace the battery cover 3. Using the Expansion Base Using the Wireless Keyboard and Mouse ✎ For more information, refer to locate the battery cover 1. 2. Turn the wireless keyboard upside down to the HP Wireless Keyboard and Mouse Quick Setup poster. 1.
Remove the battery cover, then insert the batteries into the wireless keyboard Reference Guide 3-3 Inserting the batteries into the battery slot 2. 3. Replace the battery cover 3. Using the Expansion Base Using the Wireless Keyboard and Mouse ✎ For more information, refer to locate the battery cover 1. 2. Turn the wireless keyboard upside down to the HP Wireless Keyboard and Mouse Quick Setup poster. 1.

Expansion Base Reference Guide
Page 23
Replace the battery cover 2. Inserting the batteries into the mouse 1. 6. Remove the battery cover, then insert the batteries into the wireless mouse 3-4 Reference Guide Using the Expansion Base 4. Turn the mouse upside down to locate the battery cover. 5.
Replace the battery cover 2. Inserting the batteries into the mouse 1. 6. Remove the battery cover, then insert the batteries into the wireless mouse 3-4 Reference Guide Using the Expansion Base 4. Turn the mouse upside down to locate the battery cover. 5.

Expansion Base Reference Guide
Page 33
...Synchronize the devices by pressing the appropriate buttons. Refer to the expansion connector. suspend or hibernate mode. USB port. Make sure that the batteries are muted or the volume is not powered on the notebook. into a USB port. The expansion cable on the Expansion Base is in ...the keyboard or mouse and that batteries are inserted correctly in Remove the notebook from suspend/hibernate mode. The notebook is not connected to the expansion connector on the notebook. ...
...Synchronize the devices by pressing the appropriate buttons. Refer to the expansion connector. suspend or hibernate mode. USB port. Make sure that the batteries are muted or the volume is not powered on the notebook. into a USB port. The expansion cable on the Expansion Base is in ...the keyboard or mouse and that batteries are inserted correctly in Remove the notebook from suspend/hibernate mode. The notebook is not connected to the expansion connector on the notebook. ...

Startup and Reference Guide
Page 4
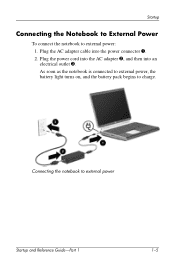
Insert the battery pack into the notebook, so that the battery can begin to charge as soon as the notebook is connected to external power. (Refer to the next section for the first time, you need the notebook, the power cord 1, the AC adapter 2, and the battery pack 3. Startup Setting Up the Hardware To set up the notebook for details.) Identifying the AC adapter, the power cord, and the battery pack (Power cords vary by region and country.) 1-2 Startup and Reference Guide-Part 1
Insert the battery pack into the notebook, so that the battery can begin to charge as soon as the notebook is connected to external power. (Refer to the next section for the first time, you need the notebook, the power cord 1, the AC adapter 2, and the battery pack 3. Startup Setting Up the Hardware To set up the notebook for details.) Identifying the AC adapter, the power cord, and the battery pack (Power cords vary by region and country.) 1-2 Startup and Reference Guide-Part 1

Startup and Reference Guide
Page 5
Inserting a battery pack Ä CAUTION: To ensure that the correct drivers load and to prevent file corruption or damage to external power. Turn the notebook upside down on the notebook. 3. Tilt the battery pack downward until the notebook has been connected to components, do not remove the battery pack until it snaps into place. Startup Inserting a Battery Pack To insert the battery pack into the alignment slot on a flat surface. 2. Insert the alignment tab on the battery pack into the battery bay: 1. Startup and Reference Guide-Part 1 1-3
Inserting a battery pack Ä CAUTION: To ensure that the correct drivers load and to prevent file corruption or damage to external power. Turn the notebook upside down on the notebook. 3. Tilt the battery pack downward until the notebook has been connected to components, do not remove the battery pack until it snaps into place. Startup Inserting a Battery Pack To insert the battery pack into the alignment slot on a flat surface. 2. Insert the alignment tab on the battery pack into the battery bay: 1. Startup and Reference Guide-Part 1 1-3
Startup and Reference Guide
Page 7
Connecting the notebook to charge. As soon as the notebook is connected to external power, the battery light turns on, and the battery pack begins to external power Startup and Reference Guide-Part 1 1-5 Plug the power cord into the AC adapter 2, and then into the power connector 1. 2. Plug the AC adapter cable into an electrical outlet 3. Startup Connecting the Notebook to External Power To connect the notebook to external power: 1.
Connecting the notebook to charge. As soon as the notebook is connected to external power, the battery light turns on, and the battery pack begins to external power Startup and Reference Guide-Part 1 1-5 Plug the power cord into the AC adapter 2, and then into the power connector 1. 2. Plug the AC adapter cable into an electrical outlet 3. Startup Connecting the Notebook to External Power To connect the notebook to external power: 1.

Startup and Reference Guide
Page 8
... battery light is on while the battery pack is indicated by the battery light. HP recommends that you leave the notebook connected to external power until the new battery pack has been fully charged. Identifying the battery light 1-6 Startup and Reference Guide-Part 1 Charge status is charging. A partially charged new battery pack can run the notebook, but battery...
... battery light is on while the battery pack is indicated by the battery light. HP recommends that you leave the notebook connected to external power until the new battery pack has been fully charged. Identifying the battery light 1-6 Startup and Reference Guide-Part 1 Charge status is charging. A partially charged new battery pack can run the notebook, but battery...
Startup and Reference Guide
Page 9
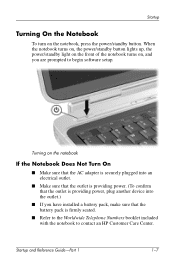
... notebook turns on, the power/standby button lights up, the power/standby light on the front of the notebook turns on, and you have installed a battery pack, make sure that the battery pack is providing power, plug another device into the outlet.) ■ If you are prompted to contact an... HP Customer Care Center. Turning on the notebook, press the power/standby button. Startup Turning On the Notebook To turn on the notebook If the Notebook ...
... notebook turns on, the power/standby button lights up, the power/standby light on the front of the notebook turns on, and you have installed a battery pack, make sure that the battery pack is providing power, plug another device into the outlet.) ■ If you are prompted to contact an... HP Customer Care Center. Turning on the notebook, press the power/standby button. Startup Turning On the Notebook To turn on the notebook If the Notebook ...

Startup and Reference Guide
Page 12
...Chapter 4. Protecting Your Notebook When you use your notebook to access a network or the Internet, you expose the notebook to "Replacing a Battery Pack" in the form of these occurrences. 1-10 Startup and Reference Guide-Part 1 If the notebook does not respond, try the ... Press and hold down the power/standby button for at least 4 seconds. ■ Unplug the notebook from external power and remove the battery pack. Using a combination of software and hardware security measures can potentially disable the notebook operating system, software applications, and personal files. Startup...
...Chapter 4. Protecting Your Notebook When you use your notebook to access a network or the Internet, you expose the notebook to "Replacing a Battery Pack" in the form of these occurrences. 1-10 Startup and Reference Guide-Part 1 If the notebook does not respond, try the ... Press and hold down the power/standby button for at least 4 seconds. ■ Unplug the notebook from external power and remove the battery pack. Using a combination of software and hardware security measures can potentially disable the notebook operating system, software applications, and personal files. Startup...

Startup and Reference Guide
Page 14
... surges that may be caused by unplugging the power cord from most computer or electronics retailers. ■ During an electrical storm, run the notebook on battery power or shut down the notebook and disconnect the power cord. The grounding pin is easily accessible at all times. ■ Disconnect power from the...
... surges that may be caused by unplugging the power cord from most computer or electronics retailers. ■ During an electrical storm, run the notebook on battery power or shut down the notebook and disconnect the power cord. The grounding pin is easily accessible at all times. ■ Disconnect power from the...
Startup and Reference Guide
Page 19
2 System Components Contents Top 2-2 TouchPad 2-2 Keys 2-3 Power Controls 2-4 Lights 2-5 Audio Buttons 2-6 Front 2-7 Rear 2-8 Connectors and Jacks 2-8 Vents 2-9 Left Side 2-10 Connectors and Jacks 2-10 Vents 2-11 Right Side 2-12 Bottom 2-13 Bays and Memory Compartment 2-13 Vents 2-14 Labels 2-15 Additional Standard Components 2-16 Cables and Cord 2-16 Adapters and Battery Pack 2-17 Restoration and Documentation CDs 2-18 Startup and Reference Guide-Part 2 2-1
2 System Components Contents Top 2-2 TouchPad 2-2 Keys 2-3 Power Controls 2-4 Lights 2-5 Audio Buttons 2-6 Front 2-7 Rear 2-8 Connectors and Jacks 2-8 Vents 2-9 Left Side 2-10 Connectors and Jacks 2-10 Vents 2-11 Right Side 2-12 Bottom 2-13 Bays and Memory Compartment 2-13 Vents 2-14 Labels 2-15 Additional Standard Components 2-16 Cables and Cord 2-16 Adapters and Battery Pack 2-17 Restoration and Documentation CDs 2-18 Startup and Reference Guide-Part 2 2-1

Startup and Reference Guide
Page 25
Produce stereo sound. On: The internal hard drive is in Standby. Blinking: Notebook is being accessed. Front System Components Component 1 Display release latch 2 Stereo speakers (2) 3 Power/standby light 4 Battery light 5 AC power light 6 Hard drive activity light Description Opens the notebook. On: The notebook is turned on. Startup and Reference Guide-Part 2 2-7 On: Notebook is receiving battery power. Blinking: A battery pack is receiving AC power. On: The notebook is malfunctioning and may need to be replaced.
Produce stereo sound. On: The internal hard drive is in Standby. Blinking: Notebook is being accessed. Front System Components Component 1 Display release latch 2 Stereo speakers (2) 3 Power/standby light 4 Battery light 5 AC power light 6 Hard drive activity light Description Opens the notebook. On: The notebook is turned on. Startup and Reference Guide-Part 2 2-7 On: Notebook is receiving battery power. Blinking: A battery pack is receiving AC power. On: The notebook is malfunctioning and may need to be replaced.

Startup and Reference Guide
Page 31
System Components Bottom Bays and Memory Compartment Component 1 Battery pack release latch 2 Memory compartment 3 Hard drive bay 4 Battery bay Description Releases a battery pack from the battery bay. Depending on the model, when the notebook is shipped either one or both memory slots may be filled with a replaceable memory module. Contains 2 memory slots. Holds the internal hard drive. Startup and Reference Guide-Part 2 2-13 Holds a battery pack.
System Components Bottom Bays and Memory Compartment Component 1 Battery pack release latch 2 Memory compartment 3 Hard drive bay 4 Battery bay Description Releases a battery pack from the battery bay. Depending on the model, when the notebook is shipped either one or both memory slots may be filled with a replaceable memory module. Contains 2 memory slots. Holds the internal hard drive. Startup and Reference Guide-Part 2 2-13 Holds a battery pack.

Startup and Reference Guide
Page 35
Adapters and Battery Pack System Components Component Description 1 AC adapter Converts AC power to DC power. 2 Country-specific modem adapter (included by region as required) Adapts the modem cable to a non-RJ-11 telephone jack. 3 Japan-specific outlet adapter Connects the AC adapter to a 2-prong (Japan only) electrical outlet. 4 Battery pack Runs the notebook when the notebook is not connected to external power. Startup and Reference Guide-Part 2 2-17
Adapters and Battery Pack System Components Component Description 1 AC adapter Converts AC power to DC power. 2 Country-specific modem adapter (included by region as required) Adapts the modem cable to a non-RJ-11 telephone jack. 3 Japan-specific outlet adapter Connects the AC adapter to a 2-prong (Japan only) electrical outlet. 4 Battery pack Runs the notebook when the notebook is not connected to external power. Startup and Reference Guide-Part 2 2-17
Startup and Reference Guide
Page 49
... Identifying the Power Lights 4-16 Switching Between Battery and External Power. . . 4-17 Charging a Battery Pack 4-17 Monitoring the Charge in a Battery Pack 4-18 Managing Low-Battery Conditions 4-18 Resolving Low-Battery Conditions 4-19 Calibrating a Battery Pack 4-20 Storing a Battery Pack 4-23 Battery Conservation Settings 4-24 Replacing a Battery Pack 4-25 Disposing of a Used Battery Pack 4-26 Startup and Reference Guide-Part...
... Identifying the Power Lights 4-16 Switching Between Battery and External Power. . . 4-17 Charging a Battery Pack 4-17 Monitoring the Charge in a Battery Pack 4-18 Managing Low-Battery Conditions 4-18 Resolving Low-Battery Conditions 4-19 Calibrating a Battery Pack 4-20 Storing a Battery Pack 4-23 Battery Conservation Settings 4-24 Replacing a Battery Pack 4-25 Disposing of a Used Battery Pack 4-26 Startup and Reference Guide-Part...

Startup and Reference Guide
Page 50
... ■ AC adapter ■ Optional HP Notebook Expansion Base External power supplied through the following table describes the best power source for the notebook to feel warm or hot when used continuously. Recommended Power Source ■ Charged battery pack in the notebook ■ External ...power supplied through : ■ AC adapter ■ Optional HP Notebook Expansion Base Å WARNING: This notebook is normal for general tasks. The ...
... ■ AC adapter ■ Optional HP Notebook Expansion Base External power supplied through the following table describes the best power source for the notebook to feel warm or hot when used continuously. Recommended Power Source ■ Charged battery pack in the notebook ■ External ...power supplied through : ■ AC adapter ■ Optional HP Notebook Expansion Base Å WARNING: This notebook is normal for general tasks. The ...

Startup and Reference Guide
Page 51
... unused for extended periods. Connect to an external power source if your notebook will be initiated by you left off. Ä CAUTION: To avoid a complete battery discharge, do not leave your work returns to implement them. Power About Standby, Hibernation and Shutdown This section describes Standby, Hibernation, and shutdown and explains...
... unused for extended periods. Connect to an external power source if your notebook will be initiated by you left off. Ä CAUTION: To avoid a complete battery discharge, do not leave your work returns to implement them. Power About Standby, Hibernation and Shutdown This section describes Standby, Hibernation, and shutdown and explains...

Startup and Reference Guide
Page 52
... initiating Hibernation to delete the restoration data and proceed with system boot. To reduce the risk of power loss during a low battery condition, disable Hibernation only during Hibernation, it may not be prompted to prevent loss of data. Power Hibernation Hibernation takes a ...lost. Do not change the notebook configuration during Hibernation. Ä CAUTION: If the configuration of the notebook system is changed during a battery pack calibration. Ä CAUTION: If Hibernation is enabled by default but can be disabled. When you left it to restore from Hibernation....
... initiating Hibernation to delete the restoration data and proceed with system boot. To reduce the risk of power loss during a low battery condition, disable Hibernation only during Hibernation, it may not be prompted to prevent loss of data. Power Hibernation Hibernation takes a ...lost. Do not change the notebook configuration during Hibernation. Ä CAUTION: If the configuration of the notebook system is changed during a battery pack calibration. Ä CAUTION: If Hibernation is enabled by default but can be disabled. When you left it to restore from Hibernation....


