
Owners Guide
Page 10
... channels, adjusting volume, etc. ቩ FRONT INPUT JACKS (for VIDEO: 5) Use these audio/video jacks for the complete system, and must be turned ON/OFF manually or by mode (lights red) when not in use. If you wish to listen to instantly view your head-phones. Indicating Lamp Power Status Off... there is no sync. Turn off or in the top right corner of the display monitor. 10 Check the Power Light to be heard. Your HITACHI Plasma TV will illuminate (lower left audio jack. ቪ PHONES JACK Use this jack for 50"). Display monitor MAIN POWER is ON and AVC Center...
... channels, adjusting volume, etc. ቩ FRONT INPUT JACKS (for VIDEO: 5) Use these audio/video jacks for the complete system, and must be turned ON/OFF manually or by mode (lights red) when not in use. If you wish to listen to instantly view your head-phones. Indicating Lamp Power Status Off... there is no sync. Turn off or in the top right corner of the display monitor. 10 Check the Power Light to be heard. Your HITACHI Plasma TV will illuminate (lower left audio jack. ቪ PHONES JACK Use this jack for 50"). Display monitor MAIN POWER is ON and AVC Center...

Owners Guide
Page 14
..., Inc. Connect an external source to the INPUT terminal, then press the VID1~VID5 button as necessary to the previous channel. Check the owner's manual of each component. INPUT MODE SELECTION ORDER (ANTENNA) (INPUT) 3:32 PM Ant A 32 Stereo VID1 3:32 PM YPBPR:1 VID1 Stereo 1080i Format... laserdisc player. TO MONITOR INPUT 1 R R AUDIO OUT RGB AC IN TruBass SRS and symbol are offered as suggestions. However, you use HITACHI specified cable. Before Operating External Video Source The input mode is changed when the VID1~VID5 button is dependent on the AVC Center below . ...
..., Inc. Connect an external source to the INPUT terminal, then press the VID1~VID5 button as necessary to the previous channel. Check the owner's manual of each component. INPUT MODE SELECTION ORDER (ANTENNA) (INPUT) 3:32 PM Ant A 32 Stereo VID1 3:32 PM YPBPR:1 VID1 Stereo 1080i Format... laserdisc player. TO MONITOR INPUT 1 R R AUDIO OUT RGB AC IN TruBass SRS and symbol are offered as suggestions. However, you use HITACHI specified cable. Before Operating External Video Source The input mode is changed when the VID1~VID5 button is dependent on the AVC Center below . ...

Owners Guide
Page 27
... PIP VID 3 CH GUIDE/TV VID 4 SWAPPIP ACCESS FREEZE VIDEO SCHD VID 5 REC CLU-5723TSI ቯ AV NET button Press this wizard to manually learn or modify your Audio/Video equipment list and soft keys by selecting the "Custom" icon and following window will pop up or down. Use...CH 0 INFO Device Setting CH ̆ 3 6 9 MENU INFO GUIDE THUMB STICK Cable Box Set Top Box Custom SETUP Move INFO Device Setting THUMB STICK HITACHI AV NET WIZARD (Learning) Use this button to control the cursor of a specific equipment (Ex. Then THUMBSTICK and EXIT button of the Plasma TV remote...
... PIP VID 3 CH GUIDE/TV VID 4 SWAPPIP ACCESS FREEZE VIDEO SCHD VID 5 REC CLU-5723TSI ቯ AV NET button Press this wizard to manually learn or modify your Audio/Video equipment list and soft keys by selecting the "Custom" icon and following window will pop up or down. Use...CH 0 INFO Device Setting CH ̆ 3 6 9 MENU INFO GUIDE THUMB STICK Cable Box Set Top Box Custom SETUP Move INFO Device Setting THUMB STICK HITACHI AV NET WIZARD (Learning) Use this button to control the cursor of a specific equipment (Ex. Then THUMBSTICK and EXIT button of the Plasma TV remote...

Owners Guide
Page 28
... control. Select soft key to learn ? TV Softkeys POWER MENU Done Move Continue SEL Select SELECT EXIT No Done THUMB STICK SELECT HITACHI AV NET WIZARD (Learning) DVD2 (Custom) Video Input Audio Input No Connection No Connection Transmission Test POWER PLAY CH UP BACK Move... ( ) VCR2 BACK ( ) PVR2 ( ) CBL2 ( ) STB2 BACK Move NEXT SEL Next Step THUMB STICK Next SELECT BACK HITACHI AV NET WIZARD (Learning) Select the DVD2 softkey to manually learn a new device AV Net will BACK replace the current device. In order to follow the steps below. THE REMOTE CONTROL...
... control. Select soft key to learn ? TV Softkeys POWER MENU Done Move Continue SEL Select SELECT EXIT No Done THUMB STICK SELECT HITACHI AV NET WIZARD (Learning) DVD2 (Custom) Video Input Audio Input No Connection No Connection Transmission Test POWER PLAY CH UP BACK Move... ( ) VCR2 BACK ( ) PVR2 ( ) CBL2 ( ) STB2 BACK Move NEXT SEL Next Step THUMB STICK Next SELECT BACK HITACHI AV NET WIZARD (Learning) Select the DVD2 softkey to manually learn a new device AV Net will BACK replace the current device. In order to follow the steps below. THE REMOTE CONTROL...

Owners Guide
Page 35
... PIP MODE LAST CH PIP VID 3 CH GUIDE/TV VID 4 SWAPPIP ACCESS FREEZE VIDEO SCHD VID 5 REC CLU-5723TSI Operating the precoded function for HITACHI VCRs. 5. The remote will now control your VCR. When this occurs, the remote control is programmed for pre-codes). 1. In the unlikely event ...coded mode. 4. The remote control will act as stated above procedures, your VCR if the correct two digit preset code is designed to instruction manual of the VCR for operation of VCRs. The remote will turn off your VCR's code has not been precoded into the remote. 2. If your...
... PIP MODE LAST CH PIP VID 3 CH GUIDE/TV VID 4 SWAPPIP ACCESS FREEZE VIDEO SCHD VID 5 REC CLU-5723TSI Operating the precoded function for HITACHI VCRs. 5. The remote will now control your VCR. When this occurs, the remote control is programmed for pre-codes). 1. In the unlikely event ...coded mode. 4. The remote control will act as stated above procedures, your VCR if the correct two digit preset code is designed to instruction manual of the VCR for operation of VCRs. The remote will turn off your VCR's code has not been precoded into the remote. 2. If your...

Owners Guide
Page 36
... two digit preset code is entered. This remote is programmed for your cable box. 2. Press and release the Cable (CBL) button to switch to instruction manual of the Cable Box for operation of your cable box by setting it to CABLE mode. ባ PRECODED CABLE BOX buttons These buttons transmit the...
... two digit preset code is entered. This remote is programmed for your cable box. 2. Press and release the Cable (CBL) button to switch to instruction manual of the Cable Box for operation of your cable box by setting it to CABLE mode. ባ PRECODED CABLE BOX buttons These buttons transmit the...

Owners Guide
Page 37
... VID 3 SURF VID 5 VID 4 FREEZE PIP MODE PIP ACCESS SWAP DAY/NIGHT ባ ቤ REC MY SATELLITE RECEIVER/STB CODE IS: NOTE: Refer to instruction manual of the set-top-box/satellite receiver for operation of the buttons exclusively for the set -top-box/satellite receiver operating guide. 3. After replacing the...
... VID 3 SURF VID 5 VID 4 FREEZE PIP MODE PIP ACCESS SWAP DAY/NIGHT ባ ቤ REC MY SATELLITE RECEIVER/STB CODE IS: NOTE: Refer to instruction manual of the set-top-box/satellite receiver for operation of the buttons exclusively for the set -top-box/satellite receiver operating guide. 3. After replacing the...
Owners Guide
Page 38
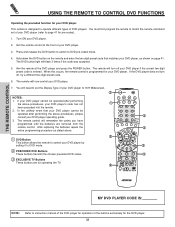
... to match the remote command set the Display Type of your DVD player. 7. The DVD button light will now control your DVD player to instruction manual of the DVD player for operation of DVD players. You will need to set of your DVD player operating guide. 3. Turn ON your DVD player...
... to match the remote command set the Display Type of your DVD player. 7. The DVD button light will now control your DVD player to instruction manual of the DVD player for operation of DVD players. You will need to set of your DVD player operating guide. 3. Turn ON your DVD player...

Owners Guide
Page 39
... the remote control at the Audio component and press the POWER button. Press and release the CD, PVR, or AMP button to switch to instruction manual of the Audio equipment for operation of your Audio component. The remote control will now control your Audio component, as stated above procedures, please consult...
... the remote control at the Audio component and press the POWER button. Press and release the CD, PVR, or AMP button to switch to instruction manual of the Audio equipment for operation of your Audio component. The remote control will now control your Audio component, as stated above procedures, please consult...
Owners Guide
Page 74
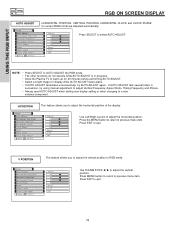
... Select HORIZONTAL POSITION, VERTICAL POSITION, HORIZONTAL CLOCK and CLOCK PHASE for display while AUTO ADJUST takes place. • If AUTO ADJUST terminates unsuccessfully, try using manual adjustment to adjust Vertical Frequency, Aspect Ratio, Timing Frequency and Picture. • Always reset AUTO ADJUST when setting new display setting or when changing to...
... Select HORIZONTAL POSITION, VERTICAL POSITION, HORIZONTAL CLOCK and CLOCK PHASE for display while AUTO ADJUST takes place. • If AUTO ADJUST terminates unsuccessfully, try using manual adjustment to adjust Vertical Frequency, Aspect Ratio, Timing Frequency and Picture. • Always reset AUTO ADJUST when setting new display setting or when changing to...


