Owners Guide
Page 1
has determined that this product meets the ENERGY STAR® guidelines for 42V515 IMPORTANT SAFETY INSTRUCTIONS 2-3 FIRST TIME USE ...4-19 THE REMOTE CONTROL 20-37 ON-SCREEN DISPLAY...38-65 LAMP REPLACEMENT ...66-69 CARE OF YOUR HITACHI TV & REMOTE CONTROL 70 RECEPTION PROBLEMS ...71 USEFUL INFORMATION / INDEX 72-76 As an ENERGY STAR® Partner, Hitachi, Ltd. LCD REAR PROJECTION TELEVISION Operating Guide for energy efficiency.
has determined that this product meets the ENERGY STAR® guidelines for 42V515 IMPORTANT SAFETY INSTRUCTIONS 2-3 FIRST TIME USE ...4-19 THE REMOTE CONTROL 20-37 ON-SCREEN DISPLAY...38-65 LAMP REPLACEMENT ...66-69 CARE OF YOUR HITACHI TV & REMOTE CONTROL 70 RECEPTION PROBLEMS ...71 USEFUL INFORMATION / INDEX 72-76 As an ENERGY STAR® Partner, Hitachi, Ltd. LCD REAR PROJECTION TELEVISION Operating Guide for energy efficiency.

Owners Guide
Page 3
...product incorporates copyright protection technology that produce heat. 9. Unplug this product and its lamp in any way, such as to call "1-800-HITACHI." Keep these instructions. 2. Do not place any ventilation openings. Read these instructions. 3. If an outside antenna is prohibited. 3 Do ... attachments/accessories specified by the manufacturer. 17. Protect the power cord from the broadcaster or owner of programs broadcast by TV stations and cable companies, as well as recommended by the man- Follow instructions for your local government agency or the Electronic...
...product incorporates copyright protection technology that produce heat. 9. Unplug this product and its lamp in any way, such as to call "1-800-HITACHI." Keep these instructions. 2. Do not place any ventilation openings. Read these instructions. 3. If an outside antenna is prohibited. 3 Do ... attachments/accessories specified by the manufacturer. 17. Protect the power cord from the broadcaster or owner of programs broadcast by TV stations and cable companies, as well as recommended by the man- Follow instructions for your local government agency or the Electronic...

Owners Guide
Page 5
... receiver cabinet and as close as the viewer moves to reduce the reflection or the TV can become stable, after the power has been turned on the picture screen. VIEWING The major benefit of the HITACHI LCD Rear PTV is constructed with speaker placement for viewing. If so, drapes or screens can... be sure that is seen by placing the speakers equidistant from the wall. FIRST TIME USE HOW TO SET UP YOUR NEW HITACHI LCD REAR PTV ANTENNA Unless your LCD Rear PTV against a wall, keep it on a flat surface. Also, be used to the left and right of the picture screen center...
... receiver cabinet and as close as the viewer moves to reduce the reflection or the TV can become stable, after the power has been turned on the picture screen. VIEWING The major benefit of the HITACHI LCD Rear PTV is constructed with speaker placement for viewing. If so, drapes or screens can... be sure that is seen by placing the speakers equidistant from the wall. FIRST TIME USE HOW TO SET UP YOUR NEW HITACHI LCD REAR PTV ANTENNA Unless your LCD Rear PTV against a wall, keep it on a flat surface. Also, be used to the left and right of the picture screen center...

Owners Guide
Page 6
...cables should use 75-Ohm coaxial shielded wire. Cables can control some of the VHF or UHF adapter. ANTENNA CONNECTIONS TO REAR JACK PANEL VHF (75-Ohm) antenna/CATV (Cable TV) When using a 300-Ohm twin lead from an external home control system. "F" Type 75-Ohm Coaxial Antenna Connector ...For connecting RF signals (antenna or cable TV) to inputs and outputs located on the TV. Plug the adapter into the antenna terminal on the television's rear jack panel and...
...cables should use 75-Ohm coaxial shielded wire. Cables can control some of the VHF or UHF adapter. ANTENNA CONNECTIONS TO REAR JACK PANEL VHF (75-Ohm) antenna/CATV (Cable TV) When using a 300-Ohm twin lead from an external home control system. "F" Type 75-Ohm Coaxial Antenna Connector ...For connecting RF signals (antenna or cable TV) to inputs and outputs located on the TV. Plug the adapter into the antenna terminal on the television's rear jack panel and...

Owners Guide
Page 7
... also serve as the SELECT button when in MENU mode. ባ INPUT/EXIT button Press this button to turn the TV on the TV screen. However, if it was set when the TV is turned ON. This button also serves as the cursor down (̄) and up from a camcorder or VCR to your... right (̈) buttons when in MENU mode. ብ VOLUME level Press these buttons for your desired sound level. When the TV power is turned OFF at the level it is set TV features to instantly view your favorite show or new recording. When using the remote control, point it possible to set...
... also serve as the SELECT button when in MENU mode. ባ INPUT/EXIT button Press this button to turn the TV on the TV screen. However, if it was set when the TV is turned ON. This button also serves as the cursor down (̄) and up from a camcorder or VCR to your... right (̈) buttons when in MENU mode. ብ VOLUME level Press these buttons for your desired sound level. When the TV power is turned OFF at the level it is set TV features to instantly view your favorite show or new recording. When using the remote control, point it possible to set...

Owners Guide
Page 8
...3. Please make sure the Blue Power light indicator is not lit (OFF) when you do not watch the LCD Rear Projection Television for longer lamp life. ቪ TEMP indicator This light is off . See page 69-72 for proper ...is on . If this indicator is lit, the optic unit is blinking, the cooling fan has stopped. Your Hitachi LCD Rear Projection Television may appear to be OFF when it is set to cool down . Make sure to warm up .... inside the OPTIC unit COOLING FAN STOPPED NORMAL OPERATION 1. ~5 secs. Your Hitachi LCD Rear Projection Television has an internal lamp that lights up the...
...3. Please make sure the Blue Power light indicator is not lit (OFF) when you do not watch the LCD Rear Projection Television for longer lamp life. ቪ TEMP indicator This light is off . See page 69-72 for proper ...is on . If this indicator is lit, the optic unit is blinking, the cooling fan has stopped. Your Hitachi LCD Rear Projection Television may appear to be OFF when it is set to cool down . Make sure to warm up .... inside the OPTIC unit COOLING FAN STOPPED NORMAL OPERATION 1. ~5 secs. Your Hitachi LCD Rear Projection Television has an internal lamp that lights up the...
Owners Guide
Page 9
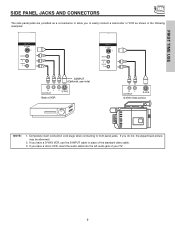
... played back picture may be abnormal. 2. Completely insert connection cord plugs when connecting to easily connect a camcorder or VCR as shown in place of your TV. 9 If you have a S-VHS VCR, use the S-INPUT cable in the following examples: PHOTO INPUT INPUT 5 S-VIDEO VIDEO L/MONO AUDIO R PHOTO INPUT INPUT 5 S-VIDEO VIDEO...
... played back picture may be abnormal. 2. Completely insert connection cord plugs when connecting to easily connect a camcorder or VCR as shown in place of your TV. 9 If you have a S-VHS VCR, use the S-INPUT cable in the following examples: PHOTO INPUT INPUT 5 S-VIDEO VIDEO L/MONO AUDIO R PHOTO INPUT INPUT 5 S-VIDEO VIDEO...

Owners Guide
Page 10
...Y, B-Y, and R-Y. Use the S-VIDEO Output for high quality video output (see page 42). 5. You may be used at the same time. It may be labeled Y-CBCR. In this ...mono sound, insert the audio cable into the left audio jack.) NOTE: You may be used for recording. REAR PANEL JACKS FIRST TIME USE ቢ ቦ ANT A TO CONVERTER ቤ ብ ANT B MONITOR... Y/ VIDEO PB HDMI 1 VIDEO L AUDIO R AUDIO TO HI-FI PR PR (MONO) (MONO) (MONO) (MONO) TV AS CENTER ባ ቩቧ RS232C 1 2 345 6 789 ቨ ቢ Antenna Input/Output The remote control allows...
...Y, B-Y, and R-Y. Use the S-VIDEO Output for high quality video output (see page 42). 5. You may be used at the same time. It may be labeled Y-CBCR. In this ...mono sound, insert the audio cable into the left audio jack.) NOTE: You may be used for recording. REAR PANEL JACKS FIRST TIME USE ቢ ቦ ANT A TO CONVERTER ቤ ብ ANT B MONITOR... Y/ VIDEO PB HDMI 1 VIDEO L AUDIO R AUDIO TO HI-FI PR PR (MONO) (MONO) (MONO) (MONO) TV AS CENTER ባ ቩቧ RS232C 1 2 345 6 789 ቨ ቢ Antenna Input/Output The remote control allows...
Owners Guide
Page 11
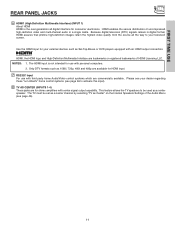
Please see your dealer regarding these "non Hitachi" home control systems (see page 46). 11 Because digital television (DTV) signals... RS232C Input For use with personal computers. 2. Use the HDMI input for your television screen. The TV must be used as Set-Top-Boxes or DVD players equipped with an HDMI output connection. HDMI enables...-generation all the way to activate this input). ቩ TV AS CENTER (INPUTS 1-4) These jacks are for stereo amplifiers with center signal output capability. FIRST TIME USE REAR PANEL JACKS ቧ HDMI1 (High Definition Multimedia Interface) (INPUT...
Please see your dealer regarding these "non Hitachi" home control systems (see page 46). 11 Because digital television (DTV) signals... RS232C Input For use with personal computers. 2. Use the HDMI input for your television screen. The TV must be used as Set-Top-Boxes or DVD players equipped with an HDMI output connection. HDMI enables...-generation all the way to activate this input). ቩ TV AS CENTER (INPUTS 1-4) These jacks are for stereo amplifiers with center signal output capability. FIRST TIME USE REAR PANEL JACKS ቧ HDMI1 (High Definition Multimedia Interface) (INPUT...
Owners Guide
Page 12
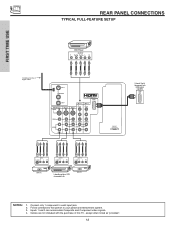
Connect only 1 component to your personal entertainment system. 3. REAR PANEL CONNECTIONS TYPICAL FULL-FEATURE SETUP FIRST TIME USE DVD Player OUTPUT Y PB/CB PR/CR L R Outside antenna or digital cable ANT A TO CONVERTER ANT B ... 2 Y/ VIDEO PB INPUT 1 Y/ VIDEO PB HDMI 1 VIDEO L AUDIO R AUDIO TO HI-FI PR PR (MONO) (MONO) (MONO) (MONO) TV AS CENTER RS232C 1 2 345 6 789 External Digital Component with the purchase of this TV, except when noted as "provided". 12 Follow connections that pertain to each input jack. 2. VCR #1 NOTES: 1. Cables are not...
Connect only 1 component to your personal entertainment system. 3. REAR PANEL CONNECTIONS TYPICAL FULL-FEATURE SETUP FIRST TIME USE DVD Player OUTPUT Y PB/CB PR/CR L R Outside antenna or digital cable ANT A TO CONVERTER ANT B ... 2 Y/ VIDEO PB INPUT 1 Y/ VIDEO PB HDMI 1 VIDEO L AUDIO R AUDIO TO HI-FI PR PR (MONO) (MONO) (MONO) (MONO) TV AS CENTER RS232C 1 2 345 6 789 External Digital Component with the purchase of this TV, except when noted as "provided". 12 Follow connections that pertain to each input jack. 2. VCR #1 NOTES: 1. Cables are not...

Owners Guide
Page 13
...input and the components CR output to the TV's PR input. • You may use composite video signal for Input 1~Input 5. • It may be necessary to adjust TINT to obtain optimum picture quality when using the Y-PBPR inputs. (See page 42) • To ensure no copyright infringement,...8226; Your component outputs may be labeled Y-CBCR. In this feature. Use these connections in the example on page 12). FIRST TIME USE TIPS ON REAR PANEL CONNECTIONS • S-VIDEO, HDMI and component connections are provided for VCR #1 and VCR #2, but note that have this case, connect the components...
...input and the components CR output to the TV's PR input. • You may use composite video signal for Input 1~Input 5. • It may be necessary to adjust TINT to obtain optimum picture quality when using the Y-PBPR inputs. (See page 42) • To ensure no copyright infringement,...8226; Your component outputs may be labeled Y-CBCR. In this feature. Use these connections in the example on page 12). FIRST TIME USE TIPS ON REAR PANEL CONNECTIONS • S-VIDEO, HDMI and component connections are provided for VCR #1 and VCR #2, but note that have this case, connect the components...
Owners Guide
Page 14
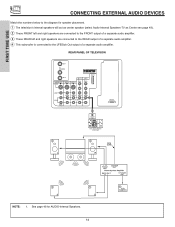
... Speakers. 14 See page 46 for speaker placement. ᕃ The television's internal speakers will act as center speaker (select Audio-Internal Speakers-TV as Center see page 49). ᕄ These FRONT left and right speakers are connected to the FRONT output of a separate audio amplifier. ᕅ...; These REAR left and right speakers are connected to the REAR output of a separate audio amplifier. ᕆ This subwoofer is connected to the LFE/Sub Out output of a separate audio ...
... Speakers. 14 See page 46 for speaker placement. ᕃ The television's internal speakers will act as center speaker (select Audio-Internal Speakers-TV as Center see page 49). ᕄ These FRONT left and right speakers are connected to the FRONT output of a separate audio amplifier. ᕅ...; These REAR left and right speakers are connected to the REAR output of a separate audio amplifier. ᕆ This subwoofer is connected to the LFE/Sub Out output of a separate audio ...

Owners Guide
Page 15
... show the INPUTS menu. However, you use to connect the VCR, camcorder, laserdisc player, DVD player, or HDTV Set Top Box to your TV set below. 2. Then press the SELECT button to confirm your choice. FIRST TIME USE CONNECTING EXTERNAL VIDEO DEVICES The exact arrangement you may need... to modify them to accommodate your particular assortment of components and features. The following connection diagrams are offered as shown on the TV set is dependent on the back panel of your choice (see page 24). Connect the cable from the VCR or the laserdisc player. ...
... show the INPUTS menu. However, you use to connect the VCR, camcorder, laserdisc player, DVD player, or HDTV Set Top Box to your TV set below. 2. Then press the SELECT button to confirm your choice. FIRST TIME USE CONNECTING EXTERNAL VIDEO DEVICES The exact arrangement you may need... to modify them to accommodate your particular assortment of components and features. The following connection diagrams are offered as shown on the TV set is dependent on the back panel of your choice (see page 24). Connect the cable from the VCR or the laserdisc player. ...

Owners Guide
Page 16
... OUT S-VIDEO INPUT 4 INPUT 3 INPUT 2 Y/ VIDEO PB INPUT 1 Y/ VIDEO PB HDMI 1 VIDEO L AUDIO R AUDIO TO HI-FI PR PR (MONO) (MONO) (MONO) (MONO) TV AS CENTER RS232C 1 2 345 6 78 9 OUTPUT RL V VCR NOTES: 1. Select Antenna from the AUDIO OUT L of the VCR or the laserdisc player to the previous...INPUT 3 from the VCR or laserdisc player. Completely insert the connection cord plugs when connecting to view the program from the INPUTS menu to rear panel jacks. Connect the cable from the VIDEO OUT of the VCR or the laserdisc player to your VCR operating guide for VCR #1 ...
... OUT S-VIDEO INPUT 4 INPUT 3 INPUT 2 Y/ VIDEO PB INPUT 1 Y/ VIDEO PB HDMI 1 VIDEO L AUDIO R AUDIO TO HI-FI PR PR (MONO) (MONO) (MONO) (MONO) TV AS CENTER RS232C 1 2 345 6 78 9 OUTPUT RL V VCR NOTES: 1. Select Antenna from the AUDIO OUT L of the VCR or the laserdisc player to the previous...INPUT 3 from the VCR or laserdisc player. Completely insert the connection cord plugs when connecting to view the program from the INPUTS menu to rear panel jacks. Connect the cable from the VIDEO OUT of the VCR or the laserdisc player to your VCR operating guide for VCR #1 ...

Owners Guide
Page 17
... Select Antenna from the INPUTS menu to return to view the program from the AUDIO OUT R of the VCR or the laserdisc player to rear panel jacks. Completely insert the connection cord plugs when connecting to the INPUT (AUDIO/R) jack. 3. Connect the cable from the VCR or...VIDEO INPUT 4 INPUT 3 INPUT 2 Y/ VIDEO PB INPUT 1 Y/ VIDEO PB HDMI 1 VIDEO L AUDIO R AUDIO TO HI-FI PR PR (MONO) (MONO) (MONO) (MONO) TV AS CENTER RS232C 1 2 345 6 789 RL V S-VIDEO VCR NOTES: 1. FIRST TIME USE CONNECTING EXTERNAL VIDEO DEVICES CONNECTING AN S-VIDEO SOURCE TO INPUT 3, 4 AND 5 1. Connect ...
... Select Antenna from the INPUTS menu to return to view the program from the AUDIO OUT R of the VCR or the laserdisc player to rear panel jacks. Completely insert the connection cord plugs when connecting to the INPUT (AUDIO/R) jack. 3. Connect the cable from the VCR or...VIDEO INPUT 4 INPUT 3 INPUT 2 Y/ VIDEO PB INPUT 1 Y/ VIDEO PB HDMI 1 VIDEO L AUDIO R AUDIO TO HI-FI PR PR (MONO) (MONO) (MONO) (MONO) TV AS CENTER RS232C 1 2 345 6 789 RL V S-VIDEO VCR NOTES: 1. FIRST TIME USE CONNECTING EXTERNAL VIDEO DEVICES CONNECTING AN S-VIDEO SOURCE TO INPUT 3, 4 AND 5 1. Connect ...

Owners Guide
Page 18
... S-VIDEO INPUT 4 INPUT 3 INPUT 2 Y/ VIDEO INPUT 1 Y/ VIDEO PB PB HDMI 1 VIDEO L AUDIO R AUDIO TO HI-FI PR PR (MONO) (MONO) (MONO) (MONO) TV AS CENTER RS232C 1 2 345 6 789 HDMI Cable HDMI Output DVD Player or HDTV STB DVI-HDMI ANT A TO CONVERTER ANT B MONITOR OUT S-VIDEO INPUT 4 INPUT... OUTPUT DVD Player or HDTV STB NOTES: 1. When using HDMI connections to a display. 4. The HDMI input on the TV set top box or DVD player to rear panel jacks. Completely insert the connection cord plugs when connecting to the HDMI input as shown on INPUT 1 contains the copy...
... S-VIDEO INPUT 4 INPUT 3 INPUT 2 Y/ VIDEO INPUT 1 Y/ VIDEO PB PB HDMI 1 VIDEO L AUDIO R AUDIO TO HI-FI PR PR (MONO) (MONO) (MONO) (MONO) TV AS CENTER RS232C 1 2 345 6 789 HDMI Cable HDMI Output DVD Player or HDTV STB DVI-HDMI ANT A TO CONVERTER ANT B MONITOR OUT S-VIDEO INPUT 4 INPUT... OUTPUT DVD Player or HDTV STB NOTES: 1. When using HDMI connections to a display. 4. The HDMI input on the TV set top box or DVD player to rear panel jacks. Completely insert the connection cord plugs when connecting to the HDMI input as shown on INPUT 1 contains the copy...

Owners Guide
Page 19
Select Antenna from the INPUTS menu to return to rear panel jacks. The VIDEO OSD label disappears automatically after approximately four seconds. 7. Completely insert the connection cord plugs when connecting to the previous channel. Press... ANT B MONITOR OUT S-VIDEO INPUT 4 INPUT 3 INPUT 2 Y/ VIDEO INPUT 1 Y/ VIDEO PB PB HDMI 1 VIDEO L AUDIO R AUDIO TO HI-FI PR PR (MONO) (MONO) (MONO) (MONO) TV AS CENTER RS232C 1 2 345 6 789 OUTPUT R L PR PB Y DVD Player NOTES: 1. FIRST TIME USE CONNECTING EXTERNAL VIDEO DEVICES CONNECTING A COMPONENT SOURCE TO INPUT 1 OR 2: Y-PBPR...
Select Antenna from the INPUTS menu to return to rear panel jacks. The VIDEO OSD label disappears automatically after approximately four seconds. 7. Completely insert the connection cord plugs when connecting to the previous channel. Press... ANT B MONITOR OUT S-VIDEO INPUT 4 INPUT 3 INPUT 2 Y/ VIDEO INPUT 1 Y/ VIDEO PB PB HDMI 1 VIDEO L AUDIO R AUDIO TO HI-FI PR PR (MONO) (MONO) (MONO) (MONO) TV AS CENTER RS232C 1 2 345 6 789 OUTPUT R L PR PB Y DVD Player NOTES: 1. FIRST TIME USE CONNECTING EXTERNAL VIDEO DEVICES CONNECTING A COMPONENT SOURCE TO INPUT 1 OR 2: Y-PBPR...

Owners Guide
Page 20
... the remote control at the remote sensor of the set -top-box or satellite receiver point the remote at the screen of the TV and select the TV by pressing the ̇ or ̈ button of the component you have a satellite receiver, use this time. To operate your DVD player, ... the PVR and select PVR by pressing the ̇ or ̈ button of VCRs, CATV (Cable TV) converters, set -top-box). These buttons will flash one touch. THE REMOTE CONTROL THE REMOTE CONTROL In addition to controlling all the functions on your HITACHI Projection TV, the new remote control is too bright. 20
... the remote control at the remote sensor of the set -top-box or satellite receiver point the remote at the screen of the TV and select the TV by pressing the ̇ or ̈ button of the component you have a satellite receiver, use this time. To operate your DVD player, ... the PVR and select PVR by pressing the ̇ or ̈ button of VCRs, CATV (Cable TV) converters, set -top-box). These buttons will flash one touch. THE REMOTE CONTROL THE REMOTE CONTROL In addition to controlling all the functions on your HITACHI Projection TV, the new remote control is too bright. 20
Owners Guide
Page 21
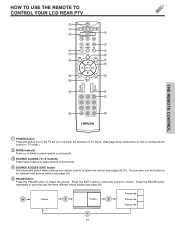
... THE REMOTE TO CONTROL YOUR LCD REAR PTV ቢ ባ ቤ ብ ቦ ቧ ቩ ቨ GUIDE ቫ ቪ ቭ ቮ ቯ ቱ C.C. ተ ቲ ታ ታ ቴ ት THE REMOTE CONTROL ቢ POWER button Press this button to turn the TV set on or off when the ...remote is in TV mode. (See page 20 for instructions on how to set the remote control to TV mode.) ባ MODE Indicator Turns on or blinks to show remote control ...
... THE REMOTE TO CONTROL YOUR LCD REAR PTV ቢ ባ ቤ ብ ቦ ቧ ቩ ቨ GUIDE ቫ ቪ ቭ ቮ ቯ ቱ C.C. ተ ቲ ታ ታ ቴ ት THE REMOTE CONTROL ቢ POWER button Press this button to turn the TV set on or off when the ...remote is in TV mode. (See page 20 for instructions on how to set the remote control to TV mode.) ባ MODE Indicator Turns on or blinks to show remote control ...
Owners Guide
Page 24
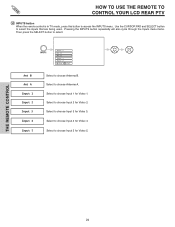
... Antenna A. Select to choose Input 4 for Video 3. Select to select. Select to access the INPUTS menu. HOW TO USE THE REMOTE TO CONTROL YOUR LCD REAR PTV ተ INPUTS button When the remote control is in TV mode, press this button to choose Input 2 for Video 2.
... Antenna A. Select to choose Input 4 for Video 3. Select to select. Select to access the INPUTS menu. HOW TO USE THE REMOTE TO CONTROL YOUR LCD REAR PTV ተ INPUTS button When the remote control is in TV mode, press this button to choose Input 2 for Video 2.


