
Owners Guide
Page 2
... SPECIFICATIONS ...80 2 TABLE OF CONTENTS TABLE OF CONTENTS TABLE OF CONTENTS ...2 IMPORTANT...3 SAFETY TIPS...5 PICTURE CAUTIONS ...10 ACCESSORIES ...11 REMOTE CONTROL BATTERY INSTALLATION AND REPLACEMENT 11 HOW TO SET UP YOUR NEW HITACHI PROJECTION TV 12 HOOK-UP CABLES AND CONNECTORS 14 ANTENNA CONNECTIONS TO REAR JACK PANEL 14 FRONT PANEL CONTROLS...
... SPECIFICATIONS ...80 2 TABLE OF CONTENTS TABLE OF CONTENTS TABLE OF CONTENTS ...2 IMPORTANT...3 SAFETY TIPS...5 PICTURE CAUTIONS ...10 ACCESSORIES ...11 REMOTE CONTROL BATTERY INSTALLATION AND REPLACEMENT 11 HOW TO SET UP YOUR NEW HITACHI PROJECTION TV 12 HOOK-UP CABLES AND CONNECTORS 14 ANTENNA CONNECTIONS TO REAR JACK PANEL 14 FRONT PANEL CONTROLS...
Owners Guide
Page 11
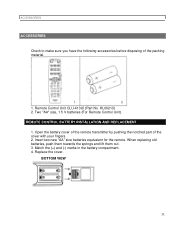
... Unit CLU-413UI (Part No. Insert two new "AA" size batteries equivalent for the remote. Replace the cover. REMOTE CONTROL BATTERY INSTALLATION AND REPLACEMENT 1. Open the battery cover of the remote transmitter by pushing the notched part of the packing material. 1. Match the (+) and (-) marks in the battery compartment. 4. When replacing old batteries...
... Unit CLU-413UI (Part No. Insert two new "AA" size batteries equivalent for the remote. Replace the cover. REMOTE CONTROL BATTERY INSTALLATION AND REPLACEMENT 1. Open the battery cover of the remote transmitter by pushing the notched part of the packing material. 1. Match the (+) and (-) marks in the battery compartment. 4. When replacing old batteries...
Owners Guide
Page 16
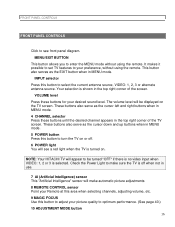
...when not in MENU mode. 5 POWER button Press this button to enter the MENU mode without using the remote. Check the Power Light to make automatic picture adjustments 8 REMOTE CONTROL sensor Point your Remote at this area when selecting channels, adjusting volume, etc. 9 MAGIC FOCUS Use this button to adjust ... see front panel diagram. VOLUME level Press these buttons until the desired channel appears in the top right corner of the TV screen. NOTE: Your HITACHI TV will be turned "OFF" if there is no video input when VIDEO: 1, 2 or 3 is turned on. This button also serves as ...
...when not in MENU mode. 5 POWER button Press this button to enter the MENU mode without using the remote. Check the Power Light to make automatic picture adjustments 8 REMOTE CONTROL sensor Point your Remote at this area when selecting channels, adjusting volume, etc. 9 MAGIC FOCUS Use this button to adjust ... see front panel diagram. VOLUME level Press these buttons until the desired channel appears in the top right corner of the TV screen. NOTE: Your HITACHI TV will be turned "OFF" if there is no video input when VIDEO: 1, 2 or 3 is turned on. This button also serves as ...
Owners Guide
Page 19
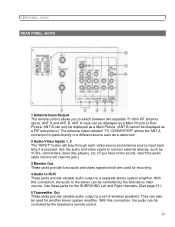
Use the audio and video inputs to the stereo can be controlled by the televisions remote control. 19 With this connection, the audio to connect external devices, such as a Main Picture or SubPicture. Use these jacks for recording. 4 Audio to Hi-... audio output to switch between two separate 75-Ohm RF antenna inputs, ANT A and ANT B. REAR PANEL JACKS REAR PANEL JACKS 1 Antenna Input/Output The remote control allows you have mono sound, insert the audio cable into the left channel jack.) 3 Monitor Out These jacks provide fixed audio and video signals...
Use the audio and video inputs to the stereo can be controlled by the televisions remote control. 19 With this connection, the audio to connect external devices, such as a Main Picture or SubPicture. Use these jacks for recording. 4 Audio to Hi-... audio output to switch between two separate 75-Ohm RF antenna inputs, ANT A and ANT B. REAR PANEL JACKS REAR PANEL JACKS 1 Antenna Input/Output The remote control allows you have mono sound, insert the audio cable into the left channel jack.) 3 Monitor Out These jacks provide fixed audio and video signals...
Owners Guide
Page 20
The volume level is controlled by the remote control main volume buttons and also by an independent rear volume feature found in the HOME THEATERSURROUND menu. Use speakers with 8 Ohm impedance only. 7 S-Video Input 1 provides S-Video (Super Video) jacks for the surround sound feature. REAR PANEL JACKS 6 Rear Speaker Terminals These terminals are used for connecting equipment with S-Video output capability. 8 Sub Woofer This jack provides variable output to connect external speakers, which are used to a sub-woofer accessory. 20
The volume level is controlled by the remote control main volume buttons and also by an independent rear volume feature found in the HOME THEATERSURROUND menu. Use speakers with 8 Ohm impedance only. 7 S-Video Input 1 provides S-Video (Super Video) jacks for the surround sound feature. REAR PANEL JACKS 6 Rear Speaker Terminals These terminals are used for connecting equipment with S-Video output capability. 8 Sub Woofer This jack provides variable output to connect external speakers, which are used to a sub-woofer accessory. 20
Owners Guide
Page 25
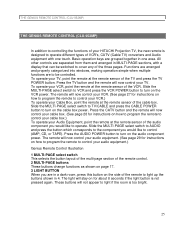
...'s, CATV (Cable TV) converters and Audio equipment with a display that can be controlled. THE GENIUS REMOTE CONTROL (CLU-952MP) THE GENIUS REMOTE CONTROL (CLU-952MP) In addition to controlling the functions of your HITACHI Projection TV, the new remote is designed to turn on the audio component power. Basic operation keys are separated from...
...'s, CATV (Cable TV) converters and Audio equipment with a display that can be controlled. THE GENIUS REMOTE CONTROL (CLU-952MP) THE GENIUS REMOTE CONTROL (CLU-952MP) In addition to controlling the functions of your HITACHI Projection TV, the new remote is designed to turn on the audio component power. Basic operation keys are separated from...
Owners Guide
Page 27
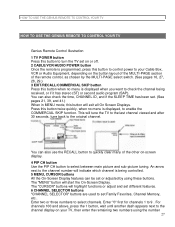
... Equipment, depending on the button layout of the MULTI-PAGE section of the other on or off. 2 CABLE/VCR/AUDIO POWER button Once the remote is programmed, press this button to control power to your TV, then enter the remaining two numbers using these buttons. Press this button twice quickly...channels 1 to select channels. The "CURSOR" buttons will exit all On Screen Displays. HOW TO USE THE GENIUS REMOTE TO CONTROL YOUR TV HOW TO USE THE GENIUS REMOTE TO CONTROL YOUR TV Genius Remote Control Illustration 1 TV POWER button Press this button to turn the TV set on -screen display. 4 PIP ...
... Equipment, depending on the button layout of the MULTI-PAGE section of the other on or off. 2 CABLE/VCR/AUDIO POWER button Once the remote is programmed, press this button to control power to your TV, then enter the remaining two numbers using these buttons. Press this button twice quickly...channels 1 to select channels. The "CURSOR" buttons will exit all On Screen Displays. HOW TO USE THE GENIUS REMOTE TO CONTROL YOUR TV HOW TO USE THE GENIUS REMOTE TO CONTROL YOUR TV Genius Remote Control Illustration 1 TV POWER button Press this button to turn the TV set on -screen display. 4 PIP ...

Owners Guide
Page 28
HOW TO USE THE GENIUS REMOTE TO CONTROL YOUR TV buttons. If the Picture-in-Picture is on, the INPUT button will select between the three sets of the screen is ...
HOW TO USE THE GENIUS REMOTE TO CONTROL YOUR TV buttons. If the Picture-in-Picture is on, the INPUT button will select between the three sets of the screen is ...
Owners Guide
Page 29
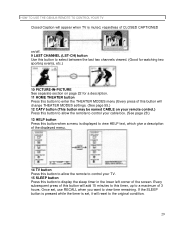
HOW TO USE THE GENIUS REMOTE TO CONTROL YOUR TV Closed Caption will appear when TV is muted, regardless of CLOSED CAPTIONED on/off... THEATER MODES settings. (See page 55.) 12 CATV button (This button may be named CABLE on your remote control.) Press this button to allow the remote to control your cable box. (See page 28.) 13 HELP button Press this button when a menu is... to view HELP text, which give a description of the displayed menu. 14 TV button Press this button to allow the remote to control your TV. 15 SLEEP button Press this button to display the sleep timer in the lower left corner of 3...
HOW TO USE THE GENIUS REMOTE TO CONTROL YOUR TV Closed Caption will appear when TV is muted, regardless of CLOSED CAPTIONED on/off... THEATER MODES settings. (See page 55.) 12 CATV button (This button may be named CABLE on your remote control.) Press this button to allow the remote to control your cable box. (See page 28.) 13 HELP button Press this button when a menu is... to view HELP text, which give a description of the displayed menu. 14 TV button Press this button to allow the remote to control your TV. 15 SLEEP button Press this button to display the sleep timer in the lower left corner of 3...
Owners Guide
Page 30
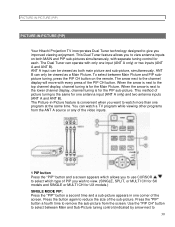
... and sub-picture, simultaneously. This Dual Tuner feature allows you to give you want to 30 PICTURE-IN-PICTURE (PIP) PICTURE-IN-PICTURE (PIP) Your Hitachi Projection TV incorporates Dual Tuner technology designed to view antenna inputs on the...
... and sub-picture, simultaneously. This Dual Tuner feature allows you to give you want to 30 PICTURE-IN-PICTURE (PIP) PICTURE-IN-PICTURE (PIP) Your Hitachi Projection TV incorporates Dual Tuner technology designed to view antenna inputs on the...
Owners Guide
Page 32
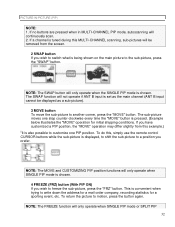
... function will only operate when the SINGLE PIP mode is set as the main channel (ANT B input cannot be removed from this , simply use the remote control CURSOR buttons while the sub-picture is convenient when trying to customize one step counter-clockwise every time the "MOVE" button is chosen. 4 FREEZE...
... function will only operate when the SINGLE PIP mode is set as the main channel (ANT B input cannot be removed from this , simply use the remote control CURSOR buttons while the sub-picture is convenient when trying to customize one step counter-clockwise every time the "MOVE" button is chosen. 4 FREEZE...
Owners Guide
Page 35
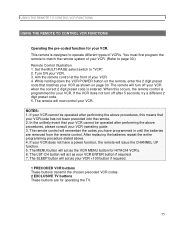
... above . 4. In the unlikely event that your VCR. If your VCR cannot be operated after performing the above procedures, this occurs, the remote control is programmed for your VCR cannot be operated after 5 seconds, try a different 2 digit preset code. 5. The SLEEP button will now... REMOTE TO CONTROL VCR FUNCTIONS USING THE REMOTE TO CONTROL VCR FUNCTIONS Operating the pre-coded function for your VCR ENTER button if required. 7. The remote control will remember the codes you have a power function, the remote will turn off your VCR as the VCR MENU button for HITACHI VCR...
... above . 4. In the unlikely event that your VCR. If your VCR cannot be operated after performing the above procedures, this occurs, the remote control is programmed for your VCR cannot be operated after 5 seconds, try a different 2 digit preset code. 5. The SLEEP button will now... REMOTE TO CONTROL VCR FUNCTIONS USING THE REMOTE TO CONTROL VCR FUNCTIONS Operating the pre-coded function for your VCR ENTER button if required. 7. The remote control will remember the codes you have a power function, the remote will turn off your VCR as the VCR MENU button for HITACHI VCR...
Owners Guide
Page 36
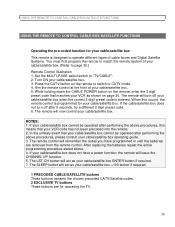
...be operated after performing the above . 4. The SLEEP button will issue the CHANNEL UP function. 5. USING THE REMOTE TO CONTROL CABLE BOX/SATELLITE FUNCTIONS USING THE REMOTE TO CONTROL CABLE BOX/SATELLITE FUNCTIONS Operating the pre-coded function for your cable/satellite box. 5. Press the ... operate different types of cable boxes and Digital Satellite Systems. You must first program the remote to page 30.) Remote Control Illustration 1. While holding down the CABLE POWER button on the remote, enter the 2 digit preset code that your cable/satellite box. After replacing the batteries...
...be operated after performing the above . 4. The SLEEP button will issue the CHANNEL UP function. 5. USING THE REMOTE TO CONTROL CABLE BOX/SATELLITE FUNCTIONS USING THE REMOTE TO CONTROL CABLE BOX/SATELLITE FUNCTIONS Operating the pre-coded function for your cable/satellite box. 5. Press the ... operate different types of cable boxes and Digital Satellite Systems. You must first program the remote to page 30.) Remote Control Illustration 1. While holding down the CABLE POWER button on the remote, enter the 2 digit preset code that your cable/satellite box. After replacing the batteries...
Owners Guide
Page 37
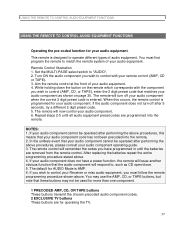
... the entire programming procedure stated above procedures, please consult your audio component code has not been precoded into the remote. If the audio component does not turn off after performing the above . 4. Repeat steps 2-5 until the batteries are programmed into the...audio component. 6. NOTES: 1. While holding down the button on page 30. This remote is designed to match the remote system of audio equipment. USING THE REMOTE TO CONTROL AUDIO EQUIPMENT FUNCTIONS USING THE REMOTE TO CONTROL AUDIO EQUIPMENT FUNCTIONS Operating the pre-coded function for AUDIO Mode is AMP....
... the entire programming procedure stated above procedures, please consult your audio component code has not been precoded into the remote. If the audio component does not turn off after performing the above . 4. Repeat steps 2-5 until the batteries are programmed into the...audio component. 6. NOTES: 1. While holding down the button on page 30. This remote is designed to match the remote system of audio equipment. USING THE REMOTE TO CONTROL AUDIO EQUIPMENT FUNCTIONS USING THE REMOTE TO CONTROL AUDIO EQUIPMENT FUNCTIONS Operating the pre-coded function for AUDIO Mode is AMP....
Owners Guide
Page 46
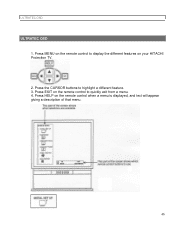
Press HELP on the remote control to quickly exit from a menu. 4. Press the CURSOR buttons to display the different features on your HITACHI Projection TV. 2. Press EXIT on the remote control when a menu is displayed, and text will appear giving a description of that menu. 46 Press MENU on the remote control to highlight a different feature. 3. ULTRATEC OSD ULTRATEC OSD 1.
Press HELP on the remote control to quickly exit from a menu. 4. Press the CURSOR buttons to display the different features on your HITACHI Projection TV. 2. Press EXIT on the remote control when a menu is displayed, and text will appear giving a description of that menu. 46 Press MENU on the remote control to highlight a different feature. 3. ULTRATEC OSD ULTRATEC OSD 1.
Owners Guide
Page 49
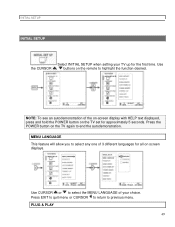
INITIAL SETUP INITIAL SETUP Select INITIAL SETUP when setting your choice. Press the POWER button on the remote to highlight the function desired. MENU LANGUAGE This feature will allow you to select the MENU LANGUAGE of 3 different languages for all on the TV ...
INITIAL SETUP INITIAL SETUP Select INITIAL SETUP when setting your choice. Press the POWER button on the remote to highlight the function desired. MENU LANGUAGE This feature will allow you to select the MENU LANGUAGE of 3 different languages for all on the TV ...

Owners Guide
Page 52
If the EXIT button is pressed while the AUTO CHANNEL SET function is engaged, programming will stop. INITIAL SETUP DOWN ( ) buttons. If two antennas are connected, switch antenna inputs with the INPUT button and repeat AUTO CHANNEL SET for the second antenna input. See CHANNEL MEMORY to the remote control CHANNEL or buttons. 52 CHANNEL MEMORY Use this function after AUTO CHANNEL SET to add or erase additional channels to add or erase additional channels. Remember to select the correct SIGNAL SOURCE mode before using AUTO CHANNEL SET for the second antenna input.
If the EXIT button is pressed while the AUTO CHANNEL SET function is engaged, programming will stop. INITIAL SETUP DOWN ( ) buttons. If two antennas are connected, switch antenna inputs with the INPUT button and repeat AUTO CHANNEL SET for the second antenna input. See CHANNEL MEMORY to the remote control CHANNEL or buttons. 52 CHANNEL MEMORY Use this function after AUTO CHANNEL SET to add or erase additional channels to add or erase additional channels. Remember to select the correct SIGNAL SOURCE mode before using AUTO CHANNEL SET for the second antenna input.
Owners Guide
Page 60
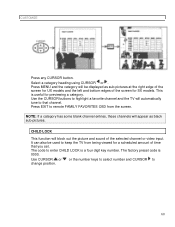
.... Select a category heading using CURSOR or . Press EXIT to enter CHILD LOCK is a four digit key number. CUSTOMIZE Press any CURSOR button. The code to remote FAMILY FAVORITES OSD from being viewed for SX models.
.... Select a category heading using CURSOR or . Press EXIT to enter CHILD LOCK is a four digit key number. CUSTOMIZE Press any CURSOR button. The code to remote FAMILY FAVORITES OSD from being viewed for SX models.
Owners Guide
Page 62
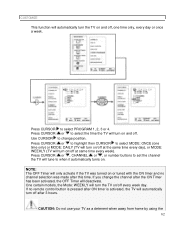
NOTE: The OFF Timer will only activate if the TV was turned on or tuned with the ON timer and no remote control button is pressed after ON timer is activated, the TV will automatically turn off every week day. If you change position. Press CURSOR or ...
NOTE: The OFF Timer will only activate if the TV was turned on or tuned with the ON timer and no remote control button is pressed after ON timer is activated, the TV will automatically turn off every week day. If you change position. Press CURSOR or ...
Owners Guide
Page 63
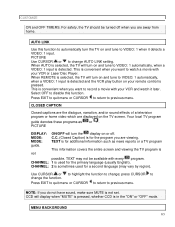
...or "OFF" mode. AUTO LINK Use this function. not ON/OFF will turn the display on or off when you are displayed on your remote control is used for the primary language (usually English). press CURSOR to previous menu. This is convenient when you want to previous menu. ...Use CURSOR or to highlight the function to change ; When REMOTE is selected, the TV will turn on and tune to VIDEO: 1 when it later. CHANNEL: 1 is pressed. MENU BACKGROUND 63 TEXT is ...
...or "OFF" mode. AUTO LINK Use this function. not ON/OFF will turn the display on or off when you are displayed on your remote control is used for the primary language (usually English). press CURSOR to previous menu. This is convenient when you want to previous menu. ...Use CURSOR or to highlight the function to change ; When REMOTE is selected, the TV will turn on and tune to VIDEO: 1 when it later. CHANNEL: 1 is pressed. MENU BACKGROUND 63 TEXT is ...


