
Owners Guide
Page 1
Manager Locks Setup Move SEL Sel THE REMOTE CONTROL 24-42 ON-SCREEN DISPLAY 43-71 USEFUL INFORMATION INDEX 72-79 PROJECTION COLOR TV 57T600 OPERATING GUIDE IMPORTANT SAFETY INSTRUCTIONS 2-3 FIRST TIME USE 4-23 Video Audio Ch.
Manager Locks Setup Move SEL Sel THE REMOTE CONTROL 24-42 ON-SCREEN DISPLAY 43-71 USEFUL INFORMATION INDEX 72-79 PROJECTION COLOR TV 57T600 OPERATING GUIDE IMPORTANT SAFETY INSTRUCTIONS 2-3 FIRST TIME USE 4-23 Video Audio Ch.
Owners Guide
Page 2
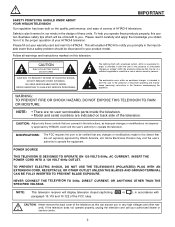
...NOTE: • There are no user serviceable parts inside the television. • Model and serial numbers are not expressly approved by HITACHI could void the user's authority to this television. CAUTION: Adjust only those controls that any changes or modifications made to operate the ... device that a safety problem should be of a sufficient magnitude to very high voltages and other hazards. NOTE: This television receiver will display television closed captioning, ( or ), in the improbable event that are indicated on the quality, performance, and ease of service of electric...
...NOTE: • There are no user serviceable parts inside the television. • Model and serial numbers are not expressly approved by HITACHI could void the user's authority to this television. CAUTION: Adjust only those controls that any changes or modifications made to operate the ... device that a safety problem should be of a sufficient magnitude to very high voltages and other hazards. NOTE: This television receiver will display television closed captioning, ( or ), in the improbable event that are indicated on the quality, performance, and ease of service of electric...

Owners Guide
Page 3
... ufacturer, or sold with the manufacturer's instructions. 8. Refer all warnings. 4. Televisions are heavy and can cause permanent damage to display wide screen pictures. Do not slide or force TV into apparatus, the apparatus has been exposed to comply with moving ) patterns can...in particular, specifies that produce heat. 9. Clean only with the cart, stand, tripod, bracket, or table specified by your HITACHI Factory Warranty. IMPORTANT Read before operating equipment Follow all warnings and instructions marked on this apparatus during lightning storms or when unused ...
... ufacturer, or sold with the manufacturer's instructions. 8. Refer all warnings. 4. Televisions are heavy and can cause permanent damage to display wide screen pictures. Do not slide or force TV into apparatus, the apparatus has been exposed to comply with moving ) patterns can...in particular, specifies that produce heat. 9. Clean only with the cart, stand, tripod, bracket, or table specified by your HITACHI Factory Warranty. IMPORTANT Read before operating equipment Follow all warnings and instructions marked on this apparatus during lightning storms or when unused ...

Owners Guide
Page 7
... Focus button will be at a volume level 31 or greater, the volume level will default to a level 30 or less, the volume level will be displayed on your desired sound level. When using the remote. CH+ INPUT MENU ̇ ̈ ̆ EXIT SELECT ቨ ቧ ብ ቤ ባቢ ቢ MENU...
... Focus button will be at a volume level 31 or greater, the volume level will default to a level 30 or less, the volume level will be displayed on your desired sound level. When using the remote. CH+ INPUT MENU ̇ ̈ ̆ EXIT SELECT ቨ ቧ ብ ቤ ባቢ ቢ MENU...

Owners Guide
Page 9
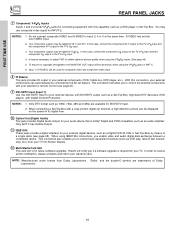
..., laserdisc players, DVD players etc. (If you have mono sound, insert the audio cable into the left audio jack.) NOTE: You may be displayed as a main picture. Use the S-VIDEO Output for connecting equipment with center signal capability. With this connection, the audio to INPUT 3 and ...first (see page 52). ቧ S-VIDEO Inputs 3 and 4 Inputs 3 and 4 provide S-VIDEO (Super Video) jacks for high quality video output. ANT C is displayed as a sub-picture. FIRST TIME USE REAR PANEL JACKS ቢ ANT A TO CONVERTER ANT B AUDIO TO HI-FI CENTER IN IR BLASTER L R ባ ቪ...
..., laserdisc players, DVD players etc. (If you have mono sound, insert the audio cable into the left audio jack.) NOTE: You may be displayed as a main picture. Use the S-VIDEO Output for connecting equipment with center signal capability. With this connection, the audio to INPUT 3 and ...first (see page 52). ቧ S-VIDEO Inputs 3 and 4 Inputs 3 and 4 provide S-VIDEO (Super Video) jacks for high quality video output. ANT C is displayed as a sub-picture. FIRST TIME USE REAR PANEL JACKS ቢ ANT A TO CONVERTER ANT B AUDIO TO HI-FI CENTER IN IR BLASTER L R ባ ቪ...
Owners Guide
Page 10
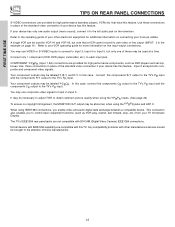
...definition picture can be labeled Y-CBCR. In order to the TV's PR input. 4. NOTE: *Manufactured under license from your TV On-Screen Display. ቮ Multi Media Card Slot This card slot is for your audio device that is required for DVI-HDTV input. 2. To ensure no ... Your component outputs may be controlled by means of Dolby Laboratories. 10 NOTES: 1. NOTES: 1. It may use composite video signal for your TV. Hitachi will allow you if a software upgrade is Dolby® Digital and PCM compatible, such as an audio amplifier. When using the Y-PBPR jacks or...
...definition picture can be labeled Y-CBCR. In order to the TV's PR input. 4. NOTE: *Manufactured under license from your TV On-Screen Display. ቮ Multi Media Card Slot This card slot is for your audio device that is required for DVI-HDTV input. 2. To ensure no ... Your component outputs may be controlled by means of Dolby Laboratories. 10 NOTES: 1. NOTES: 1. It may use composite video signal for your TV. Hitachi will allow you if a software upgrade is Dolby® Digital and PCM compatible, such as an audio amplifier. When using the Y-PBPR jacks or...
Owners Guide
Page 12
... information on line input-output connections. In this feature. Connect only 1 component (VCR, DVD player, camcorder, etc.) to the attention of your TV On-Screen Display. that a VCR cannot record its own video or line output (INPUT: 3 in place of the standard video connection if your device has only one of...
... information on line input-output connections. In this feature. Connect only 1 component (VCR, DVD player, camcorder, etc.) to the attention of your TV On-Screen Display. that a VCR cannot record its own video or line output (INPUT: 3 in place of the standard video connection if your device has only one of...

Owners Guide
Page 18
... is not a "NETWORK" technology. FIRST TIME USE CONNECTING EXTERNAL VIDEO SOURCES CONNECTING A COMPONENT SOURCE WITH DVI-HDTV CAPABILITY TO INPUT 1 1. Press the VID1 button to a display. 4. The DVI-HDTV input on the TV set -up of the HDTV set top box or DVD player. DVI is loose. 2.
... is not a "NETWORK" technology. FIRST TIME USE CONNECTING EXTERNAL VIDEO SOURCES CONNECTING A COMPONENT SOURCE WITH DVI-HDTV CAPABILITY TO INPUT 1 1. Press the VID1 button to a display. 4. The DVI-HDTV input on the TV set -up of the HDTV set top box or DVD player. DVI is loose. 2.

Owners Guide
Page 20
... tuned to ANT C to control basic equipment functions (such as a Set-Top-Box or Digital VCR, to control the D-VHS from your TV On-Screen Display. The IEEE1394 interface contains the copy protection standard called 5C or Digital Transmission Content Protection (DTCP). 6. This connection also enables you enable video and audio...
... tuned to ANT C to control basic equipment functions (such as a Set-Top-Box or Digital VCR, to control the D-VHS from your TV On-Screen Display. The IEEE1394 interface contains the copy protection standard called 5C or Digital Transmission Content Protection (DTCP). 6. This connection also enables you enable video and audio...

Owners Guide
Page 26
... program (SAP), the time, CHANNEL ID and if the TIMER is connected to VIDEO: 3. Press buttons [0], [1], [5], [1] to tune to the channel display on your TV, then enter the remaining two numbers using the number buttons. Every subsequent press of this button will add 15 minutes to this...̄ buttons to change Multi Channel programs. 26 Press buttons [1], [5], [-], [1] to tune to subchannel 15-1. ቫ INFO button Press this button to display the sleep timer in ANT C, Digital channels are used to select channels, lock access code, etc. THE REMOTE CONTROL HOW TO USE THE REMOTE TO...
... program (SAP), the time, CHANNEL ID and if the TIMER is connected to VIDEO: 3. Press buttons [0], [1], [5], [1] to tune to the channel display on your TV, then enter the remaining two numbers using the number buttons. Every subsequent press of this button will add 15 minutes to this...̄ buttons to change Multi Channel programs. 26 Press buttons [1], [5], [-], [1] to tune to subchannel 15-1. ቫ INFO button Press this button to display the sleep timer in ANT C, Digital channels are used to select channels, lock access code, etc. THE REMOTE CONTROL HOW TO USE THE REMOTE TO...

Owners Guide
Page 27
... ̆ SETUP TV/VCR b MORE THUMB STICK SELECT The button at the lower right side indicates that don't have a function matching the softkey AV NET display. 27 The equipment list will scroll up or down but the selected equipment will pop up within the...
... ̆ SETUP TV/VCR b MORE THUMB STICK SELECT The button at the lower right side indicates that don't have a function matching the softkey AV NET display. 27 The equipment list will scroll up or down but the selected equipment will pop up within the...

Owners Guide
Page 28
Phosphors in ANT C, signal format is dependent on broadcaster. 28 Depending on conventional (4:3) sources. 16:9 STANDARD Use this aspect mode to display 16:9 sources like HDTV and DVD's preserving the original 16:9 aspect ratio. 16:9 Zoom Use this aspect to Zoom-in once while in 16:9 aspect... are placed to the left and right of the image to preserve the original aspect ratio of the source. Note: Use this aspect mode to display conventional (4:3) images. The center of the image remains unaltered. 4:3 Zoom1/Zoom2 Use these aspect modes to zoom in on the input signal format received...
Phosphors in ANT C, signal format is dependent on broadcaster. 28 Depending on conventional (4:3) sources. 16:9 STANDARD Use this aspect mode to display 16:9 sources like HDTV and DVD's preserving the original 16:9 aspect ratio. 16:9 Zoom Use this aspect to Zoom-in once while in 16:9 aspect... are placed to the left and right of the image to preserve the original aspect ratio of the source. Note: Use this aspect mode to display conventional (4:3) images. The center of the image remains unaltered. 4:3 Zoom1/Zoom2 Use these aspect modes to zoom in on the input signal format received...

Owners Guide
Page 29
...that our eyes can compare the progressive and interlaced formats by using the THUMB STICK, except for numeric entries. The progressive format is good for displaying fast moving programs such as a sporting event. Interlaced: The "i" in 1080i tells you look very closely at the screen you the picture in... by drawing lines across the screen from left to right which fill the screen from top to bottom, and then returning to bottom. Hitachi offers you the picture in between 1080i and 540p (This feature is created by drawing lines across the screen from left to right which...
...that our eyes can compare the progressive and interlaced formats by using the THUMB STICK, except for numeric entries. The progressive format is good for displaying fast moving programs such as a sporting event. Interlaced: The "i" in 1080i tells you look very closely at the screen you the picture in... by drawing lines across the screen from left to right which fill the screen from top to bottom, and then returning to bottom. Hitachi offers you the picture in between 1080i and 540p (This feature is created by drawing lines across the screen from left to right which...

Owners Guide
Page 30
Volume 8 MUTE Soft Mute 8 MUTE Mute 8 Closed Captioning will display automatically when MUTE/SOFT MUTE is turned ON. ቴ LAST CHANNEL (LAST CH) button Use this button to select between the five video inputs. However, ...
Volume 8 MUTE Soft Mute 8 MUTE Mute 8 Closed Captioning will display automatically when MUTE/SOFT MUTE is turned ON. ቴ LAST CHANNEL (LAST CH) button Use this button to select between the five video inputs. However, ...

Owners Guide
Page 31
Press this button to display available digital programs. Only scanned programs that are available at the present time will select between Antenna A, Antenna B and Antenna C each time the button is ...
Press this button to display available digital programs. Only scanned programs that are available at the present time will select between Antenna A, Antenna B and Antenna C each time the button is ...

Owners Guide
Page 33
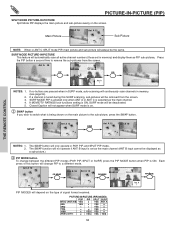
... the four different modes. The Picture-in-Picture feature is convenient when you to view antenna inputs on the remote. The green highlighted channel display will move the sub-picture using the THUMBSTICK. PIP Ant A 10 33 Use the PIP CH button to select between main and sub-picture... tuning control (indicated by green highlighted channel display.) Press the VID1, VID2, VID3, VID4 or VID5 button when sub-picture channel tuning is disabled. 2. THE REMOTE CONTROL PICTURE-IN-PICTURE (PIP)...
... the four different modes. The Picture-in-Picture feature is convenient when you to view antenna inputs on the remote. The green highlighted channel display will move the sub-picture using the THUMBSTICK. PIP Ant A 10 33 Use the PIP CH button to select between main and sub-picture... tuning control (indicated by green highlighted channel display.) Press the VID1, VID2, VID3, VID4 or VID5 button when sub-picture channel tuning is disabled. 2. THE REMOTE CONTROL PICTURE-IN-PICTURE (PIP)...
Owners Guide
Page 34
The SWAP function will not operate if ANT B input is set in memory) and display them as PIP sub-pictures, Press the PIP button a second time to remove the sub-pictures from the screen. Each press of signal format received. ... will automatically scan all active channel numbers (those set as the main channel (ANT B input cannot be displayed as the main channel. PICTURE-IN-PICTURE (PIP) SPLIT MODE PICTURE-IN-PICTURE Split Mode PIP displays the main picture and sub-picture evenly on the type of this SURF scanning, sub-pictures will...
The SWAP function will not operate if ANT B input is set in memory) and display them as PIP sub-pictures, Press the PIP button a second time to remove the sub-pictures from the screen. Each press of signal format received. ... will automatically scan all active channel numbers (those set as the main channel (ANT B input cannot be displayed as the main channel. PICTURE-IN-PICTURE (PIP) SPLIT MODE PICTURE-IN-PICTURE Split Mode PIP displays the main picture and sub-picture evenly on the type of this SURF scanning, sub-pictures will...
Owners Guide
Page 39
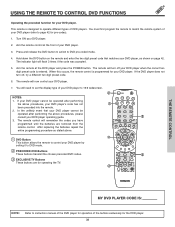
You must first program the remote to set the display type of your DVD player. 3. When this occurs, the remote control is entered. If the DVD player does not turn off , try a different two digit ...
You must first program the remote to set the display type of your DVD player. 3. When this occurs, the remote control is entered. If the DVD player does not turn off , try a different two digit ...
Owners Guide
Page 43
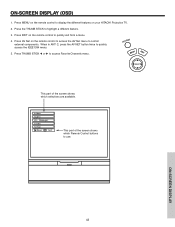
Press the THUMB STICK to access Favorite Channels menu. Press AV Net on the remote control to quickly exit from a menu. 4. ON-SCREEN DISPLAY 43 Press EXIT on the remote control to access the AV Net menu to use. Video Audio Ch. Press THUMB STICK ̇ or ̈ to ... shows which Remote Control buttons to control external components. A/V Net MENU EXIT SELECT This part of the screen shows which selections are available. ON-SCREEN DISPLAY (OSD) 1. When in ANT C, press the AV NET button twice to display the different features on your HITACHI Projection TV. 2.
Press the THUMB STICK to access Favorite Channels menu. Press AV Net on the remote control to quickly exit from a menu. 4. ON-SCREEN DISPLAY 43 Press EXIT on the remote control to access the AV Net menu to use. Video Audio Ch. Press THUMB STICK ̇ or ̈ to ... shows which Remote Control buttons to control external components. A/V Net MENU EXIT SELECT This part of the screen shows which selections are available. ON-SCREEN DISPLAY (OSD) 1. When in ANT C, press the AV NET button twice to display the different features on your HITACHI Projection TV. 2.
Owners Guide
Page 44
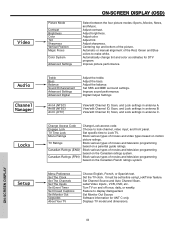
...Out Upgrades About Your TV Choose English, French, or Spanish text. Set the TV clock. Set Channel Source and Auto Channel Scan. Displays TV model and dimensions. Set SRS and BBE surround settings. It must be set before using Lock/Timer feature. Adjust brightness. Adjust tint... Scan, and Lock settings in antenna C. View/edit Channel ID, Scan, and Lock settings in antenna B. Adjust contrast. Adjust color. ON-SCREEN DISPLAY 44 Label Video Inputs , VCR, DVD, etc. Improve picture performance. Adjust the bass. Adjust the balance. Feature to make white. Automatic or manual...
...Out Upgrades About Your TV Choose English, French, or Spanish text. Set the TV clock. Set Channel Source and Auto Channel Scan. Displays TV model and dimensions. Set SRS and BBE surround settings. It must be set before using Lock/Timer feature. Adjust brightness. Adjust tint... Scan, and Lock settings in antenna C. View/edit Channel ID, Scan, and Lock settings in antenna B. Adjust contrast. Adjust color. ON-SCREEN DISPLAY 44 Label Video Inputs , VCR, DVD, etc. Improve picture performance. Adjust the bass. Adjust the balance. Feature to make white. Automatic or manual...


