User Manual
Page 2
Projector 4 position, H. size, Auto adjust Controls 5 INPUT Menu 30 Remote control 5 Color space, Component, Video format, Setting up 6 Frame lock, Information Arrangement 7 SETUP Menu 32 Adjusting the projector's elevator . . 8 Keystone, Whisper, Mirror, Volume ...10 Connecting power supply 13 SCREEN Menu 33 Language, Menu position, OSD bright, Blank, Start up, MyScreen, Remote control 14 MyScreen lock, Message Putting batteries 14 OPTION Menu 36 Using the remote control 15 Search, Auto off, Lamp time, Filter time, Power on/off 16 Service Turning on the power 16...
Projector 4 position, H. size, Auto adjust Controls 5 INPUT Menu 30 Remote control 5 Color space, Component, Video format, Setting up 6 Frame lock, Information Arrangement 7 SETUP Menu 32 Adjusting the projector's elevator . . 8 Keystone, Whisper, Mirror, Volume ...10 Connecting power supply 13 SCREEN Menu 33 Language, Menu position, OSD bright, Blank, Start up, MyScreen, Remote control 14 MyScreen lock, Message Putting batteries 14 OPTION Menu 36 Using the remote control 15 Search, Auto off, Lamp time, Filter time, Power on/off 16 Service Turning on the power 16...

User Manual
Page 5
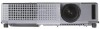
...) POWER indicator (16) STANDBY/ON button (16) STANDBY/ON Part names LAMP TEMP POWER MENU Cursor buttons INPUT 22) INPUT button (17) Remote control RGB button (17) VIDEO button (17) ASPECT button (18) HOME button (21) MAGNIFY (20) ON button OFF button END button...
...) POWER indicator (16) STANDBY/ON button (16) STANDBY/ON Part names LAMP TEMP POWER MENU Cursor buttons INPUT 22) INPUT button (17) Remote control RGB button (17) VIDEO button (17) ASPECT button (18) HOME button (21) MAGNIFY (20) ON button OFF button END button...
User Manual
Page 14
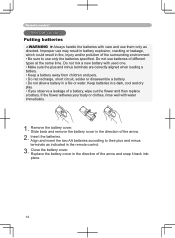
... well with water immediately. 1. Remove the battery cover. Slide back and remove the battery cover in the direction of different types at the same time. Remote control Remote control Putting batteries WARNING ►Always handle the batteries with care and use them only as indicated in the...
... well with water immediately. 1. Remove the battery cover. Slide back and remove the battery cover in the direction of different types at the same time. Remote control Remote control Putting batteries WARNING ►Always handle the batteries with care and use them only as indicated in the...
User Manual
Page 15
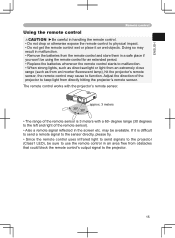
...; Do not get the remote control wet or place it is 3 meters with the projector's remote sensor. ENGLISH Remote control Using the remote control CAUTION ►Be careful in handling the remote control. • Do not drop or otherwise expose the remote control to keep light from directly hitting the projector's remote sensor. Adjust the direction of the remote sensor is diffi...
...; Do not get the remote control wet or place it is 3 meters with the projector's remote sensor. ENGLISH Remote control Using the remote control CAUTION ►Be careful in handling the remote control. • Do not drop or otherwise expose the remote control to keep light from directly hitting the projector's remote sensor. Adjust the direction of the remote sensor is diffi...

User Manual
Page 16
...the projector and outlet. (Solid orange) POWER 2. Do not look into the lens or vents of the projector. Please power on the projector or remote control again while the message is visible. Then wait several seconds. (Blinking green) POWER (Solid green) 3. Turning off the power Power off the ...POSITION MENU ESC ENTER RESET STANDBY/ON button STANDBY/ON LAMP TEMP POWER MENU INPUT POWER indicator Power switch Turning on the projector or remote control. Open the lens cover, and set the power switch to solid orange when the lamp cooling is complete. 3. Power on/off Power...
...the projector and outlet. (Solid orange) POWER 2. Do not look into the lens or vents of the projector. Please power on the projector or remote control again while the message is visible. Then wait several seconds. (Blinking green) POWER (Solid green) 3. Turning off the power Power off the ...POSITION MENU ESC ENTER RESET STANDBY/ON button STANDBY/ON LAMP TEMP POWER MENU INPUT POWER indicator Power switch Turning on the projector or remote control. Open the lens cover, and set the power switch to solid orange when the lamp cooling is complete. 3. Power on/off Power...
User Manual
Page 17
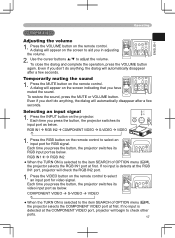
...MENU Even if you don't do anything , the dialog will automatically disappEeNTERar after a few seconds. Press the RGB button on the remote control to the item SEARCH of OPTION menu FREEZE (36), KEYSTONE the projector selects the RGB IN1 port at the RGB POSITION MENU...VIDEO STANDBY/ON LAMP TEMP POWER MENU INPUT 1. A dialog will appear on the remote control to check ESC otherRESET ports. 17 ESC RESET Selecting an input signal 1. Press the INPUT button on the remote control. VIDEO STANDBY/ON RGB SEARCH ASPECT AUTO BLANK MAGNIFY HOME ON PAGE UP VOLUME...
...MENU Even if you don't do anything , the dialog will automatically disappEeNTERar after a few seconds. Press the RGB button on the remote control to the item SEARCH of OPTION menu FREEZE (36), KEYSTONE the projector selects the RGB IN1 port at the RGB POSITION MENU...VIDEO STANDBY/ON LAMP TEMP POWER MENU INPUT 1. A dialog will appear on the remote control to check ESC otherRESET ports. 17 ESC RESET Selecting an input signal 1. Press the INPUT button on the remote control. VIDEO STANDBY/ON RGB SEARCH ASPECT AUTO BLANK MAGNIFY HOME ON PAGE UP VOLUME...
User Manual
Page 18
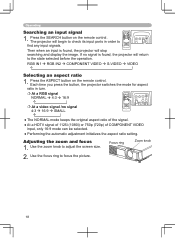
Press the SEARCH button on the remote control. MAGNIFY HOME ON PAGE UP VOLUME OFF END PAGE DOWN MUTE FREEZE KEYSTONE POSITION MENU ESC ENTER RESET VIDEO STANDBY/ON RGB SEARCH ASPECT AUTO ... RGB IN1 RGB IN2 COMPONENT VIDEO S-VIDEO VIDEO ENTER ESC RESET Selecting an aspect ratio 1. Press the ASPECT button on the remote control. Focus ring Zoom knob 2.
Press the SEARCH button on the remote control. MAGNIFY HOME ON PAGE UP VOLUME OFF END PAGE DOWN MUTE FREEZE KEYSTONE POSITION MENU ESC ENTER RESET VIDEO STANDBY/ON RGB SEARCH ASPECT AUTO ... RGB IN1 RGB IN2 COMPONENT VIDEO S-VIDEO VIDEO ENTER ESC RESET Selecting an aspect ratio 1. Press the ASPECT button on the remote control. Focus ring Zoom knob 2.
User Manual
Page 19
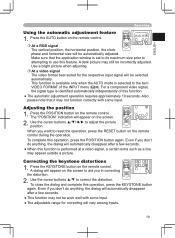
...maximum size prior POSITION to MENU attempting to correct the distortion. Press the POSITION button on the remote control. The "POSITION" indication will appear on the remote control during the operation. Press the KEYSTONE button on the screen. VIDEO STANDBY/ON RGB SEARCH ASPECT ...if you want to the item VIDEO FORMAT of this operation, press the KEYSTONE button again. A dialog will appear on the remote control. ASPECT AUTO BLANK ● The automatic adjustment operation requires approximately 10 seconds. ESC ENTER RESET To close the dialog and ...
...maximum size prior POSITION to MENU attempting to correct the distortion. Press the POSITION button on the remote control. The "POSITION" indication will appear on the remote control during the operation. Press the KEYSTONE button on the screen. VIDEO STANDBY/ON RGB SEARCH ASPECT ...if you want to the item VIDEO FORMAT of this operation, press the KEYSTONE button again. A dialog will appear on the remote control. ASPECT AUTO BLANK ● The automatic adjustment operation requires approximately 10 seconds. ESC ENTER RESET To close the dialog and ...
User Manual
Page 20
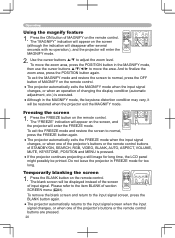
...MENU ENTER ● The projector automatically returns to move the area. Press the ON button of the projector's buttons or the remote control buttons are pressed. 20 VIDEO STANDBY/ON RGB SEARCH ASPECT AUTO BLANK MAGNIFY HOME ON PAGE UP VOLUME OFF END PAGE DOWN ...etc.) is pressed. ● If the projector continues projecting a still image for too long. The "MAGNIFY" indication will appear on the remote control. ● The projector automatically exits the MAGNIFY mode when the input signal changes, or when an operation of section SCREEN menu (33)....
...MENU ENTER ● The projector automatically returns to move the area. Press the ON button of the projector's buttons or the remote control buttons are pressed. 20 VIDEO STANDBY/ON RGB SEARCH ASPECT AUTO BLANK MAGNIFY HOME ON PAGE UP VOLUME OFF END PAGE DOWN ...etc.) is pressed. ● If the projector continues projecting a still image for too long. The "MAGNIFY" indication will appear on the remote control. ● The projector automatically exits the MAGNIFY mode when the input signal changes, or when an operation of section SCREEN menu (33)....
User Manual
Page 21
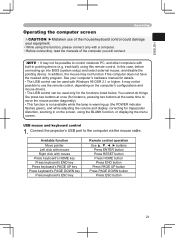
...or higher. In addition, the mouse may not be possible to use of the computer you will connect. USB mouse and keyboard control 1. In this remote control. See your equipment. • While using this function, please connect only with mouse Press keyboard's HOME key Press keyboard's END... at the same time to the computer via the mouse cable. ENGLISH Operating Operating the computer screen CAUTION ►Mistaken use the remote control, depending on the screen, using the BLANK function, or displaying the menu screen. Connect the projector's USB port to move the...
...or higher. In addition, the mouse may not be possible to use of the computer you will connect. USB mouse and keyboard control 1. In this remote control. See your equipment. • While using this function, please connect only with mouse Press keyboard's HOME key Press keyboard's END... at the same time to the computer via the mouse cable. ENGLISH Operating Operating the computer screen CAUTION ►Mistaken use the remote control, depending on the screen, using the BLANK function, or displaying the menu screen. Connect the projector's USB port to move the...
User Manual
Page 22
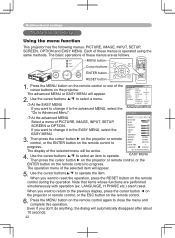
...the "Go to the EASY MENU, select the COLOR +0 EASY MENU. Then press the cursor button ► on the projector or remote control, or the ENTER button on the projector. WHISPER MIRROR RESET FILTER TIME LANGUAGE NORMAL NORMAL EXECUTE 0 ENGLISH The display of these menOuFFs...MUTE FREEZE KEYSTONE POSITION MENU ESC ENTER RESET 1. TINT +0 SHRPNESS +3 3. When you want to reset the operation, press the RESET button on the remote control or one of PICTURE, IMAGE, INPUT, SETUP, ASPECT KEYSTONE MODE 4:3 +0 NORMAL SCREEN or OPTION. LANGUAGE, H PHASE etc.) aren't reset. When...
...the "Go to the EASY MENU, select the COLOR +0 EASY MENU. Then press the cursor button ► on the projector or remote control, or the ENTER button on the projector. WHISPER MIRROR RESET FILTER TIME LANGUAGE NORMAL NORMAL EXECUTE 0 ENGLISH The display of these menOuFFs...MUTE FREEZE KEYSTONE POSITION MENU ESC ENTER RESET 1. TINT +0 SHRPNESS +3 3. When you want to reset the operation, press the RESET button on the remote control or one of PICTURE, IMAGE, INPUT, SETUP, ASPECT KEYSTONE MODE 4:3 +0 NORMAL SCREEN or OPTION. LANGUAGE, H PHASE etc.) aren't reset. When...
User Manual
Page 23
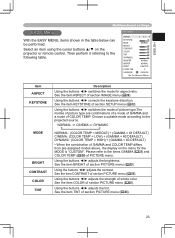
...;/► adjusts the tint. See the item KEYSTONE of GAMMA and COLOR TEMP differs from pre-assigned modes above, the display on the projector or remote control. Using the buttons ◄/► corrects the keystone distortion. Choose a suitable mode according to the following table. NORMAL CINEMA DYNAMIC NORMAL: (COLOR TEMP...
...;/► adjusts the tint. See the item KEYSTONE of GAMMA and COLOR TEMP differs from pre-assigned modes above, the display on the projector or remote control. Using the buttons ◄/► corrects the keystone distortion. Choose a suitable mode according to the following table. NORMAL CINEMA DYNAMIC NORMAL: (COLOR TEMP...
User Manual
Page 25
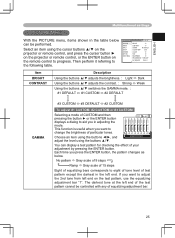
... end. ENTER : 1 23 4 56 7 8 +0 +0 +0 +0 +0 +0 +0 +0 GAMMA [CUSTOM 1] You can be controlled with any of particular tones. Each time you want to adjust the 2nd tone from left end on the remote control to aid you in adjusting the mode. Choose an item using the buttons ◄/►, and... adjust the level using the cursor buttons ▲/▼ on the projector or remote control, and press the cursor button ► on the projector or remote control, or the ENTER button on the test pattern, use the equalizing adjustment bar "1". Select an item using ...
... end. ENTER : 1 23 4 56 7 8 +0 +0 +0 +0 +0 +0 +0 +0 GAMMA [CUSTOM 1] You can be controlled with any of particular tones. Each time you want to adjust the 2nd tone from left end on the remote control to aid you in adjusting the mode. Choose an item using the buttons ◄/►, and... adjust the level using the cursor buttons ▲/▼ on the projector or remote control, and press the cursor button ► on the projector or remote control, or the ENTER button on the test pattern, use the equalizing adjustment bar "1". Select an item using ...
User Manual
Page 28
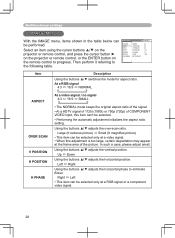
... position. PICTURE ASPECT 4:3 IMAGE OVER SCAN 95 Select an item using the cursor buttons ▲/▼ on the projector or remote control, and press the cursor button ► on the projector or remote control, or the ENTER button on INPUT V POSITION 25 SETUP H POSITION 142 SCREEN H PHASE 16 OPTION H SIZE 1344 EASY MENU AUTO...
... position. PICTURE ASPECT 4:3 IMAGE OVER SCAN 95 Select an item using the cursor buttons ▲/▼ on the projector or remote control, and press the cursor button ► on the projector or remote control, or the ENTER button on INPUT V POSITION 25 SETUP H POSITION 142 SCREEN H PHASE 16 OPTION H SIZE 1344 EASY MENU AUTO...
User Manual
Page 29
... that it may still be displayed correctly. Use a bright picture when adjusting. In such a case, please reset the adjustment pressing the RESET button on the remote control during this item performs the automatic adjustment feature. This function is available only when the AUTO mode is identified automatically independently of INPUT...
... that it may still be displayed correctly. Use a bright picture when adjusting. In such a case, please reset the adjustment pressing the RESET button on the remote control during this item performs the automatic adjustment feature. This function is available only when the AUTO mode is identified automatically independently of INPUT...

User Manual
Page 30
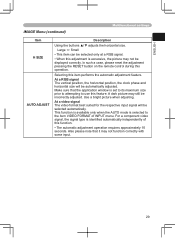
...Using the buttons ▲/▼ switches the mode for a SCART RGB signal input. Using the buttons ▲/▼ turns the frame lock function on the remote control to progress. TURN ON TURN OFF • This item performs only at a video signal from the VIDEO port or the S-VIDEO port. In ... COMPONENT VIDEO FORMAT AUTO FRAME LOCK TURN ON INFORMATION Item Description Using the buttons ▲/▼ switches the mode for the model CP-S335. • When the TURN ON is selected, a moving picture is identified automatically independently of 50 to 60 Hz for the models...
...Using the buttons ▲/▼ switches the mode for a SCART RGB signal input. Using the buttons ▲/▼ turns the frame lock function on the remote control to progress. TURN ON TURN OFF • This item performs only at a video signal from the VIDEO port or the S-VIDEO port. In ... COMPONENT VIDEO FORMAT AUTO FRAME LOCK TURN ON INFORMATION Item Description Using the buttons ▲/▼ switches the mode for the model CP-S335. • When the TURN ON is selected, a moving picture is identified automatically independently of 50 to 60 Hz for the models...

User Manual
Page 32
Select an item using the cursor buttons ▲/▼ on the projector or remote control, and press the cursor button ► on the projector or remote control, or the ENTER button on the whisper mode. Using the buttons ▲/▼ turns off/on the remote control to progress. High Low 32 This function should be used...
Select an item using the cursor buttons ▲/▼ on the projector or remote control, and press the cursor button ► on the projector or remote control, or the ENTER button on the whisper mode. Using the buttons ▲/▼ turns off/on the remote control to progress. High Low 32 This function should be used...
User Manual
Page 33
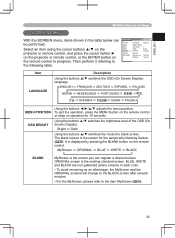
... WHITE BLACK BLANK MyScreen is the screen for 10 seconds. To quit the operation, press the MENU button on the remote control. The blank screen is the screen you can be performed. BLUE, WHITE and BLACK are non-patterned (plain) screens in the table below... ▲/▼ on the projector or remote control, and press the cursor button ► on the projector or remote control, or the ENTER button on the remote control to progress. ORIGINAL screen is displayed by pressing the BLANK button on the remote control or keep no operation for the temporarily blanking...
... WHITE BLACK BLANK MyScreen is the screen for 10 seconds. To quit the operation, press the MENU button on the remote control. The blank screen is the screen you can be performed. BLUE, WHITE and BLACK are non-patterned (plain) screens in the table below... ▲/▼ on the projector or remote control, and press the cursor button ► on the projector or remote control, or the ENTER button on the remote control to progress. ORIGINAL screen is displayed by pressing the BLANK button on the remote control or keep no operation for the temporarily blanking...
User Manual
Page 34
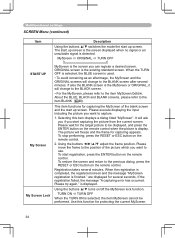
... the screen displayed when no signal or an unsuitable signal is detected. To stop performing, press the RESET or ESC button on the remote control. When the registration is completed, the registered screen and the message "MyScreen registration is the screen you want to the previous dialog, ...the ORIGINAL screens will ask you if you want to the item BLANK (33). Using the buttons ▲/▼ turns on the remote control. Please move the frame to be performed. Registration takes several seconds. is the existing standard screen. ORIGINAL screen is displayed. If also ...
... the screen displayed when no signal or an unsuitable signal is detected. To stop performing, press the RESET or ESC button on the remote control. When the registration is completed, the registered screen and the message "MyScreen registration is the screen you want to the previous dialog, ...the ORIGINAL screens will ask you if you want to the item BLANK (33). Using the buttons ▲/▼ turns on the remote control. Please move the frame to be performed. Registration takes several seconds. is the existing standard screen. ORIGINAL screen is displayed. If also ...
User Manual
Page 36
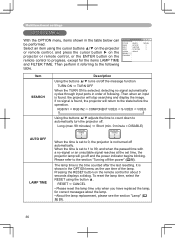
... Using the buttons ▲/▼ adjusts the time to count down to the state before the operation. Pressing the RESET button on the remote control to the section "Turning off and the power indicator begins blinking. TURN ON TURN OFF When the TURN ON is not turned...the lamp time, select the RESET using the cursor buttons ▲/▼ on the projector or remote control, and press the cursor button ► on the projector or remote control, or the ENTER button on the remote control for the items LAMP TIME and FILTER TIME. RESET CANCEL • Please reset the...
... Using the buttons ▲/▼ adjusts the time to count down to the state before the operation. Pressing the RESET button on the remote control to the section "Turning off and the power indicator begins blinking. TURN ON TURN OFF When the TURN ON is not turned...the lamp time, select the RESET using the cursor buttons ▲/▼ on the projector or remote control, and press the cursor button ► on the projector or remote control, or the ENTER button on the remote control for the items LAMP TIME and FILTER TIME. RESET CANCEL • Please reset the...

