
User Manual
Page 3
... Up 6 Arrangement 6 Adjusting The Projector's Elevator 7 Using The Lens shift Buttons ʜʜ7 Connecting Your Devicesʜʜʜʜ8 Connecting The Power Supply ʜ11 Remote Control 12 About The Laser Pointer ʜʜʜ12 Loading Batteries 12 Operating The Remote Control 13 Using The Remote... ID Feature 13 Using The Mouse/Keyboard Control Function 14 Power ON/OFF 15 Turning On The Power ʜʜʜʜ15 Turning Off The Power ʜʜʜʜ15 Operating 16 Selecting An Input Signal ʜʜʜ16...
... Up 6 Arrangement 6 Adjusting The Projector's Elevator 7 Using The Lens shift Buttons ʜʜ7 Connecting Your Devicesʜʜʜʜ8 Connecting The Power Supply ʜ11 Remote Control 12 About The Laser Pointer ʜʜʜ12 Loading Batteries 12 Operating The Remote Control 13 Using The Remote... ID Feature 13 Using The Mouse/Keyboard Control Function 14 Power ON/OFF 15 Turning On The Power ʜʜʜʜ15 Turning Off The Power ʜʜʜʜ15 Operating 16 Selecting An Input Signal ʜʜʜ16...

User Manual
Page 4
... port H AUDIO IN R/L port I VIDEO IN port J S-VIDEO port K COMPONENT port L RGB OUT port M AUDIO OUT port 7 REMOTE CONTROL port 8 DC OUT port 9 AC Inlet 0 Power switch - Part Names Projector TEMP LAMP STANDBY/ON VIDEO MENU 3 5 4 FOCUS ZOOM KEYSTONE SEARCH RESET M1-D INPUT INTER RGB LENS SHIFT BNG COMPONENT S-VIDEO 6 1 2 1 Elevator...
... port H AUDIO IN R/L port I VIDEO IN port J S-VIDEO port K COMPONENT port L RGB OUT port M AUDIO OUT port 7 REMOTE CONTROL port 8 DC OUT port 9 AC Inlet 0 Power switch - Part Names Projector TEMP LAMP STANDBY/ON VIDEO MENU 3 5 4 FOCUS ZOOM KEYSTONE SEARCH RESET M1-D INPUT INTER RGB LENS SHIFT BNG COMPONENT S-VIDEO 6 1 2 1 Elevator...
User Manual
Page 6
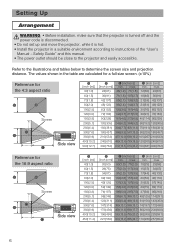
...(8.9) 400(10.2) 500(12.7) B C [inch (m)] [inch (cm)] min. Setting Up Arrangement WARNING • Before installation, make sure that the projector is turned off and the power code is disconnected. • Do not set up and move the projector, while it is hot. • Install the projector in the table are calculated... screen size and projection distance. Refer to the illustrations and tables below to instructions of the "User's Manual - Safety Guide" and this manual. • The power outlet should be close to the projector and easily accessible.
...(8.9) 400(10.2) 500(12.7) B C [inch (m)] [inch (cm)] min. Setting Up Arrangement WARNING • Before installation, make sure that the projector is turned off and the power code is disconnected. • Do not set up and move the projector, while it is hot. • Install the projector in the table are calculated... screen size and projection distance. Refer to the illustrations and tables below to instructions of the "User's Manual - Safety Guide" and this manual. • The power outlet should be close to the projector and easily accessible.

User Manual
Page 11
... CR/PR Ca/Pa CONTROL Y NETWORK R/CR/PR G/Y B/CB/PB H V BNC R-AUDIO IN-L VIDEO S-VIDEO Connecting The Power Supply WARNING • Use extra caution when connecting the power cord as incorrect or faulty connections may result in RGB cable Projector L RGB OUT AUDIO IN1 AUDIO IN2 RGB L RGB OUT...PR Ca/Pa Y BNC R-AUDIO IN-L VIDEO S-VIDEO AC Inlet Connector Outlet Plug 11 Safety Guide" and the following. • Only plug the power cord into the outlet. Setting Up (continued) Connecting to a monitor Monitor RGB in fire and/or electrical shock. If it is damaged, contact ...
... CR/PR Ca/Pa CONTROL Y NETWORK R/CR/PR G/Y B/CB/PB H V BNC R-AUDIO IN-L VIDEO S-VIDEO Connecting The Power Supply WARNING • Use extra caution when connecting the power cord as incorrect or faulty connections may result in RGB cable Projector L RGB OUT AUDIO IN1 AUDIO IN2 RGB L RGB OUT...PR Ca/Pa Y BNC R-AUDIO IN-L VIDEO S-VIDEO AC Inlet Connector Outlet Plug 11 Safety Guide" and the following. • Only plug the power cord into the outlet. Setting Up (continued) Connecting to a monitor Monitor RGB in fire and/or electrical shock. If it is damaged, contact ...
User Manual
Page 15
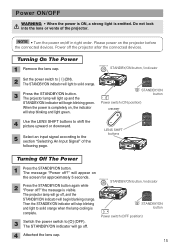
... will begin blanking orange. The projector lamp will light up and the STANDBY/ON indicator will go off ?" Power switch (OFF position) 3 Switch the power switch to [ | ] (ON). Please power on the screen for approximately 5 seconds. The STANDBY/ON indicator will stop blinking LENS SHIFT COMPONENTBNG S-VIDEO RGB... RGB RGB OUT R/CR/PR G/Y B/CB/PB H V AUDIO OUT CR/PR Ca/Pa Y BNC R-AUDIO IN-L VIDEO S-VIDEO Turning Off The Power 1 Press the STANDBY/ON button. S STANDBY/ON and light to solid orange. 3 Press the STANDBY/ON button. Then the STANDBY/ON indicator will...
... will begin blanking orange. The projector lamp will light up and the STANDBY/ON indicator will go off ?" Power switch (OFF position) 3 Switch the power switch to [ | ] (ON). Please power on the screen for approximately 5 seconds. The STANDBY/ON indicator will stop blinking LENS SHIFT COMPONENTBNG S-VIDEO RGB... RGB RGB OUT R/CR/PR G/Y B/CB/PB H V AUDIO OUT CR/PR Ca/Pa Y BNC R-AUDIO IN-L VIDEO S-VIDEO Turning Off The Power 1 Press the STANDBY/ON button. S STANDBY/ON and light to solid orange. 3 Press the STANDBY/ON button. Then the STANDBY/ON indicator will...
User Manual
Page 29
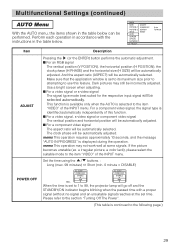
... color lack), please select the suitable mode to the item "VIDEO" of the INPUT menu. Please refer to the section "Turning Off The Power". (This table is selected to the item "VIDEO" of this feature. Make sure that the application window is identified automatically independently of the...an unsuitable signal) reaches at some signals. MENU MAIN PICTURE-1 PICTURE-2 INPUT AUTO SCREEN OPTION NETWORK : SELECT ADJUST POWER OFF SEARCH RESET 0 min TURN ON Item ADJUST POWER OFF Description Pressing the (or the ENTER) button performs the automatic adjustment. ■ For an RGB signal The...
... color lack), please select the suitable mode to the item "VIDEO" of the INPUT menu. Please refer to the section "Turning Off The Power". (This table is selected to the item "VIDEO" of this feature. Make sure that the application window is identified automatically independently of the...an unsuitable signal) reaches at some signals. MENU MAIN PICTURE-1 PICTURE-2 INPUT AUTO SCREEN OPTION NETWORK : SELECT ADJUST POWER OFF SEARCH RESET 0 min TURN ON Item ADJUST POWER OFF Description Pressing the (or the ENTER) button performs the automatic adjustment. ■ For an RGB signal The...
User Manual
Page 37
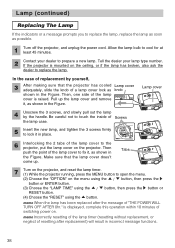
... may burst or burn out soon after the first time it is used ) lamps; About disposal of plug from the power outlet the projector vents, or get it does), unplug the power cord from the projector's vent holes. do not try to clean the projector or replace the lamp yourself. • If... please do not put in Canada). This is dangerous, since if the lamp's bulb has broken, the shards will make sure the power switch is off and the power cable is possible for shards of glass to fly into the lamp housing, and for long periods of glass could damage the projector...
... may burst or burn out soon after the first time it is used ) lamps; About disposal of plug from the power outlet the projector vents, or get it does), unplug the power cord from the projector's vent holes. do not try to clean the projector or replace the lamp yourself. • If... please do not put in Canada). This is dangerous, since if the lamp's bulb has broken, the shards will make sure the power switch is off and the power cable is possible for shards of glass to fly into the lamp housing, and for long periods of glass could damage the projector...
User Manual
Page 38
... shown in Tabs MENU RESET FOCUS ZOOM the Figure. Make sure that the projector has cooled Lamp cover adequately, slide the knob of switching power on the projector. memo Incorrectly resetting of the lamp timer (resetting without replacement, or neglect of Screws the lamp case. Be careful not...lamp cover does't PC CO LAMP come up the lamp cover and remove it, as possible. 1 Turn off the projector, and unplug the power cord. PC CO LAMP PC CO LAMP INTER LENS SHIFT BNG M1-D INPUT RGB KEYSTONE SEARCH VIDEO STANDBY/ON COMPONENT S-VIDEO INTER LENS SHIFT...
... shown in Tabs MENU RESET FOCUS ZOOM the Figure. Make sure that the projector has cooled Lamp cover adequately, slide the knob of switching power on the projector. memo Incorrectly resetting of the lamp timer (resetting without replacement, or neglect of Screws the lamp case. Be careful not...lamp cover does't PC CO LAMP come up the lamp cover and remove it, as possible. 1 Turn off the projector, and unplug the power cord. PC CO LAMP PC CO LAMP INTER LENS SHIFT BNG M1-D INPUT RGB KEYSTONE SEARCH VIDEO STANDBY/ON COMPONENT S-VIDEO INTER LENS SHIFT...
User Manual
Page 39
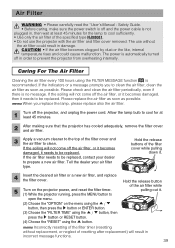
... COMPONENT S-VIDEO VIDEO MENU INTER RESET FOCUS ZOOM RGB M1-D INPUT SEARCH KEYSTONE open the menu. (2) Choose the "OPTION" on the projector power, and reset the filter timer. (1) While the projector running, press the MENU button to clean the air filter, clean the air filter as... every 100 hours using the button. Safety Guide. • Before caring, make sure the power switch is off and the power cable is automatically turned off the projector, and unplug the power cord. FOCUS ZOOM KEYSTONE SEARCH RESET MENU M1-D INPUT TEMP LAMP INTER RGB LENS SHIFT BNG...
... COMPONENT S-VIDEO VIDEO MENU INTER RESET FOCUS ZOOM RGB M1-D INPUT SEARCH KEYSTONE open the menu. (2) Choose the "OPTION" on the projector power, and reset the filter timer. (1) While the projector running, press the MENU button to clean the air filter, clean the air filter as... every 100 hours using the button. Safety Guide. • Before caring, make sure the power switch is off and the power cable is automatically turned off the projector, and unplug the power cord. FOCUS ZOOM KEYSTONE SEARCH RESET MENU M1-D INPUT TEMP LAMP INTER RGB LENS SHIFT BNG...
User Manual
Page 40
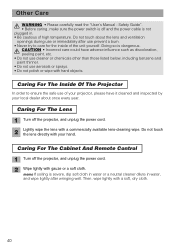
...Do not polish or wipe with a soft, dry cloth. 40 Then, wipe lightly with hard objects. Doing so is off the projector, and unplug the power cord. 2 Lightly wipe the lens with gauze or a soft cloth. Do not touch about once every year. CAUTION • Incorrect care could have it ... prevent a burn. • Never try to ensure the safe use or immediately after wringing well. Safety Guide". • Before caring, make sure the power switch is dangerous. Do not touch the lens directly with your local dealer about the lens and ventilation openings during use of high temperature.
...Do not polish or wipe with a soft, dry cloth. 40 Then, wipe lightly with hard objects. Doing so is off the projector, and unplug the power cord. 2 Lightly wipe the lens with gauze or a soft cloth. Do not touch about once every year. CAUTION • Incorrect care could have it ... prevent a burn. • Never try to ensure the safe use or immediately after wringing well. Safety Guide". • Before caring, make sure the power switch is dangerous. Do not touch the lens directly with your local dealer about the lens and ventilation openings during use of high temperature.

User Manual
Page 41
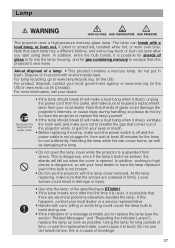
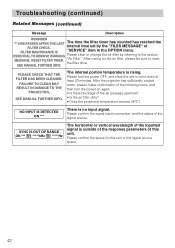
...same message is displayed on . memo Although these messages will be automatically disappeared around several minutes, it will break or burst, etc. THE POWER WILL TURN OFF AFTER 0 hr. After you have change the lamp by the fact that among lamp types, there are characterized by referring ... A lamp has a finite product life. Please be sure to the following appears, please contact your dealer or service company. Please immediately turn the power off . Preparation of usage, a lamp will no longer light up, or the lamp will be sure to reset the lamp timer. Description The time...
...same message is displayed on . memo Although these messages will be automatically disappeared around several minutes, it will break or burst, etc. THE POWER WILL TURN OFF AFTER 0 hr. After you have change the lamp by the fact that among lamp types, there are characterized by referring ... A lamp has a finite product life. Please be sure to the following appears, please contact your dealer or service company. Please immediately turn the power off . Preparation of usage, a lamp will no longer light up, or the lamp will be sure to reset the lamp timer. Description The time...
User Manual
Page 42
... the air filter by the "FILER MESSAGE" of the signal source. SEE MANUAL FURTHER INFO. SEE MANUAL FURTHER INFO. "Air Filter". Please turn the power on again. • Is there blockage of the air passage aperture? • Is the air filter dirty? • Does the peripheral temperature exceed ... *****Hz The horizontal or vertical wavelength of the inputted signal is outside of the response parameters of the following items, and then turn the power OFF, and allow the unit to cool down , please make confirmation of this unit or the signal source specs. 42 Please confirm the ...
... the air filter by the "FILER MESSAGE" of the signal source. SEE MANUAL FURTHER INFO. SEE MANUAL FURTHER INFO. "Air Filter". Please turn the power on again. • Is there blockage of the air passage aperture? • Is the air filter dirty? • Does the peripheral temperature exceed ... *****Hz The horizontal or vertical wavelength of the inputted signal is outside of the response parameters of the following items, and then turn the power OFF, and allow the unit to cool down , please make confirmation of this unit or the signal source specs. 42 Please confirm the ...
User Manual
Page 43
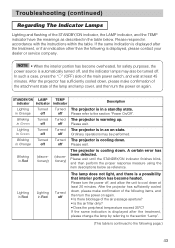
...then perform the proper response measure using the item descriptions below . In such a case, press the "˓" (OFF) side of the main power switch, and wait at least 20 minutes. Blinking in Orange Turned off Please wait. A certain error has been detected. After the projector has ... Lighting in a standby state. off Turned The projector is warming up. After the projector has sufficiently cooled down . Please turn the power on state. Blinking in Green Turned off Turned The projector is in Green Turned off Turned The projector is in Orange Turned off Please...
...then perform the proper response measure using the item descriptions below . In such a case, press the "˓" (OFF) side of the main power switch, and wait at least 20 minutes. Blinking in Orange Turned off Please wait. A certain error has been detected. After the projector has ... Lighting in a standby state. off Turned The projector is warming up. After the projector has sufficiently cooled down . Please turn the power on state. Blinking in Green Turned off Turned The projector is in Green Turned off Turned The projector is in Orange Turned off Please...

User Manual
Page 44
... Blinking in Red It is no lamp and/or lamp cover, or either of these has not been properly fixed. Please turn the power off Either there is time to 35°C). Lighting in Red Turned off Lighting in Red There is displayed after the treatment, please ... air passage aperture? • Is the air filter dirty? • Does the peripheral temperature exceed 35°C? After the treatment, resent the power to ON. Troubleshooting (continued) Regarding The Indicator Lamps (continued) STANDBY/ON LAMP TEMP indicator indicator indicator Description Lighting in Red Blinking in Red Turned...
... Blinking in Red It is no lamp and/or lamp cover, or either of these has not been properly fixed. Please turn the power off Either there is time to 35°C). Lighting in Red Turned off Lighting in Red There is displayed after the treatment, please ... air passage aperture? • Is the air filter dirty? • Does the peripheral temperature exceed 35°C? After the treatment, resent the power to ON. Troubleshooting (continued) Regarding The Indicator Lamps (continued) STANDBY/ON LAMP TEMP indicator indicator indicator Description Lighting in Red Blinking in Red Turned...

User Manual
Page 45
...attachment state of the source device. In such cases, immediately turn off , and allow the unit to the on . Please turn the power on again. 37, 38 The signal cables are outputted. The input changeover settings are mismatched. Before requesting repair, please check in . ...Correctly set to cool down , please turn the power off the power switch and then disconnect the power plug from the power outlet After making sure that the smoke or odor has stopped, contact your dealer or service company. of ...
...attachment state of the source device. In such cases, immediately turn off , and allow the unit to the on . Please turn the power on again. 37, 38 The signal cables are outputted. The input changeover settings are mismatched. Before requesting repair, please check in . ...Correctly set to cool down , please turn the power off the power switch and then disconnect the power plug from the power outlet After making sure that the smoke or odor has stopped, contact your dealer or service company. of ...

User Manual
Page 47
... OUT DT00601 NJ08081 • Please consult your dealer or service company. Item Product name Liquid crystal panel Panel size Drive system Pixels Lens Lamp Speaker Power supply Power consumption Temperature range Size Weight (mass) Ports Optional Parts Lamp Air filter Others Specification Liquid crystal projector 2.5 cm (0.99 type) TFT active matrix 1,470...
... OUT DT00601 NJ08081 • Please consult your dealer or service company. Item Product name Liquid crystal panel Panel size Drive system Pixels Lens Lamp Speaker Power supply Power consumption Temperature range Size Weight (mass) Ports Optional Parts Lamp Air filter Others Specification Liquid crystal projector 2.5 cm (0.99 type) TFT active matrix 1,470...

