User Manual
Page 2
... TIME, FILTER TIME, Power on/off 19 MY BUTTON, MY SOURCE, SERVICE Turning on the power 19 NETWORK menu 63 Turning off the power 19 WIRELESS SETUP, WIRELESS INFORMATION, Operating 20 WIRED SETUP, WIRED INFORMATION, Adjusting the volume 20 PROJECTOR NAME, MY IMAGE, Temporarily muting the sound. . . . . 20 AMX D.D., PRESENTATION, SERVICE Selecting...
... TIME, FILTER TIME, Power on/off 19 MY BUTTON, MY SOURCE, SERVICE Turning on the power 19 NETWORK menu 63 Turning off the power 19 WIRELESS SETUP, WIRELESS INFORMATION, Operating 20 WIRED SETUP, WIRED INFORMATION, Adjusting the volume 20 PROJECTOR NAME, MY IMAGE, Temporarily muting the sound. . . . . 20 AMX D.D., PRESENTATION, SERVICE Selecting...
User Manual
Page 3
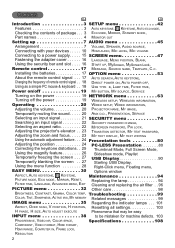
.... Be aware that supposedly cover for the lens. • The projector may make a rattling sound when tilted, moved or shaken, since a flap to establish wireless LAN connection. Your projector should come with the broad use by the following features. Take care not to use the designated USB... wireless adapter (optional) to control the air flow inside of your dealer immediately if any business scene. Be sure to put in the device. If ...
.... Be aware that supposedly cover for the lens. • The projector may make a rattling sound when tilted, moved or shaken, since a flap to establish wireless LAN connection. Your projector should come with the broad use by the following features. Take care not to use the designated USB... wireless adapter (optional) to control the air flow inside of your dealer immediately if any business scene. Be sure to put in the device. If ...
User Manual
Page 12
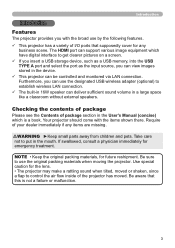
... a USB extension cable to connect the USB storage device. (continued on the thumbnail screen to secure your devices (continued) Computer External device Access point USB wireless adapter (optional) ( 63) USB storage device ( 80) ( 63) ( 54) ( 59) CAUTION ► Before connecting the projector to a network system be sure to ...cable and USB device to use a LAN cable that is sold as an option is visible. Before you insert or pull out the USB wireless adapter from the projector, turn off the power of the projector and pull out the power cord's plug from the port of them cannot...
... a USB extension cable to connect the USB storage device. (continued on the thumbnail screen to secure your devices (continued) Computer External device Access point USB wireless adapter (optional) ( 63) USB storage device ( 80) ( 63) ( 54) ( 59) CAUTION ► Before connecting the projector to a network system be sure to ...cable and USB device to use a LAN cable that is sold as an option is visible. Before you insert or pull out the USB wireless adapter from the projector, turn off the power of the projector and pull out the power cord's plug from the port of them cannot...
User Manual
Page 14
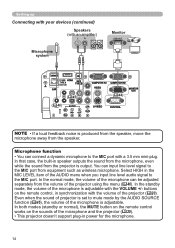
Even when the sound of projector is set to the MIC port from equipment such as wireless microphone. In both modes (standby or normal), the MUTE button on the remote control works on the remote control, in speaker outputs the sound from ...
Even when the sound of projector is set to the MIC port from equipment such as wireless microphone. In both modes (standby or normal), the MUTE button on the remote control works on the remote control, in speaker outputs the sound from ...
User Manual
Page 16
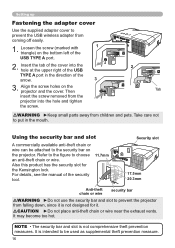
... the 1 USB TYPE A port. 2. CAUTION ►Do not place anti-theft chain or wire near the exhaust vents. It is intended to prevent the USB wireless adapter from the projector into the hole at the upper right of the USB TYPE A port in the mouth. Setting up Fastening the adapter cover...
... the 1 USB TYPE A port. 2. CAUTION ►Do not place anti-theft chain or wire near the exhaust vents. It is intended to prevent the USB wireless adapter from the projector into the hole at the upper right of the USB TYPE A port in the mouth. Setting up Fastening the adapter cover...
User Manual
Page 56
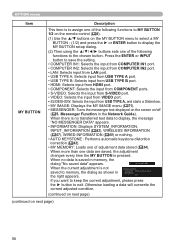
... as shown in the Network Guide). When no transferred text data to display, the message "NO MESSENGER DATA" appears. • INFORMATION: Displays SYSTEM_INFORMATION, INPUT_INFORMATION ( 62), WIRELESS INFORMATION ( 67), WIRED INFORMATION ( 69) or nothing. • AUTO KEYSTONE : Performs automatic keystone distortion correction ( 42). • MY MEMORY: Loads one of the following functions...
... as shown in the Network Guide). When no transferred text data to display, the message "NO MESSENGER DATA" appears. • INFORMATION: Displays SYSTEM_INFORMATION, INPUT_INFORMATION ( 62), WIRELESS INFORMATION ( 67), WIRED INFORMATION ( 69) or nothing. • AUTO KEYSTONE : Performs automatic keystone distortion correction ( 42). • MY MEMORY: Loads one of the following functions...
User Manual
Page 59
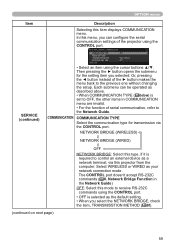
... communication type for the setting item you select the NETWORK BRIDGE, check the item, TRANSMISSTION METHOD ( 60). 59 Select WIRELESS or WIRED as the default setting. • When you selected. NETWORK BRIDGE (WIRELESS) NETWORK BRIDGE (WIRED) (continued on next page) OFF NETWORK BRIDGE: Select this type, if it is set to OFF...
... communication type for the setting item you select the NETWORK BRIDGE, check the item, TRANSMISSTION METHOD ( 60). 59 Select WIRELESS or WIRED as the default setting. • When you selected. NETWORK BRIDGE (WIRELESS) NETWORK BRIDGE (WIRED) (continued on next page) OFF NETWORK BRIDGE: Select this type, if it is set to OFF...
User Manual
Page 63
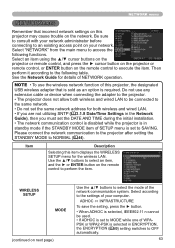
...65) setting switches to OFF automatically. 63 Select according to the settings of the network communication system. See the Network Guide for the wireless LAN. NETWORK menu NETWORK menu Remember that is sold as an option is set to SAVING. Please connect the network communication to the ...consult with your network administrator before connecting to the following functions. Then perform it according to an existing access point on the network. WIRELESS SETUP MODE (continued on the remote control to select the mode of your network. Select an item using the ▲/▼ ...
...65) setting switches to OFF automatically. 63 Select according to the settings of the network communication system. See the Network Guide for the wireless LAN. NETWORK menu NETWORK menu Remember that is sold as an option is set to SAVING. Please connect the network communication to the ...consult with your network administrator before connecting to the following functions. Then perform it according to an existing access point on the network. WIRELESS SETUP MODE (continued on the remote control to select the mode of your network. Select an item using the ▲/▼ ...
User Manual
Page 64
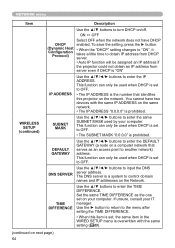
NETWORK menu Item WIRELESS SETUP (continued) Description Use the ▲/▼ buttons to turn DHCP on the same network. • The IP ADDRESS "0.0.0.0" is prohibited. You cannot have DHCP ...
NETWORK menu Item WIRELESS SETUP (continued) Description Use the ▲/▼ buttons to turn DHCP on the same network. • The IP ADDRESS "0.0.0.0" is prohibited. You cannot have DHCP ...
User Manual
Page 65
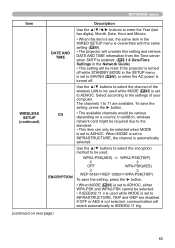
... ( 44), or when the AC power is turned off while STANDBY MODE in the SETUP menu is set to be used . NETWORK menu Item WIRELESS SETUP (continued) DATE AND TIME CH Description Use the buttons to enter the Year (last two digits), Month, Date, Hour and Minute. •... enabled. ( 3.1.8 Date/Time Settings in the Network Guide) • This setting will switch automatically to ADHOC. Select according to ADHOC. In addition, wireless network card might be required due to the standard. • This item can only be various depending on next page) 65 The channels 1 to INFRASTRUCTURE...
... ( 44), or when the AC power is turned off while STANDBY MODE in the SETUP menu is set to be used . NETWORK menu Item WIRELESS SETUP (continued) DATE AND TIME CH Description Use the buttons to enter the Year (last two digits), Month, Date, Hour and Minute. •... enabled. ( 3.1.8 Date/Time Settings in the Network Guide) • This setting will switch automatically to ADHOC. Select according to ADHOC. In addition, wireless network card might be required due to the standard. • This item can only be various depending on next page) 65 The channels 1 to INFRASTRUCTURE...
User Manual
Page 66
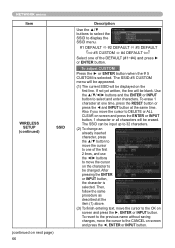
... and press the ◄, ENTER or INPUT button. To adjust CUSTOM Press the ► or ENTER button when the # 5 CUSTOM is selected. NETWORK menu Item WIRELESS SETUP (continued) SSID (continued on screen and press the ENTER or INPUT button, 1 character or all characters will be erased.
... and press the ◄, ENTER or INPUT button. To adjust CUSTOM Press the ► or ENTER button when the # 5 CUSTOM is selected. NETWORK menu Item WIRELESS SETUP (continued) SSID (continued on screen and press the ENTER or INPUT button, 1 character or all characters will be erased.
User Manual
Page 67
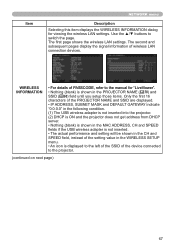
...characters of the PROJECTOR NAME and SSID are displayed. • IP ADDRESS, SUBNET MASK and DEFAULT GATEWAY indicate "0.0.0.0" in the following condition. (1) The USB wireless adapter is not inserted into the projector. (2) DHCP is ON and the projector does not get address from DHCP server. • Nothing (blank) is ...shown in the MAC ADDRESS, CH and SPEED fields if the USB wireless adapter is not inserted. • The actual performance and setting will be shown in the CH and SPEED field, instead of the setting ...
...characters of the PROJECTOR NAME and SSID are displayed. • IP ADDRESS, SUBNET MASK and DEFAULT GATEWAY indicate "0.0.0.0" in the following condition. (1) The USB wireless adapter is not inserted into the projector. (2) DHCP is ON and the projector does not get address from DHCP server. • Nothing (blank) is ...shown in the MAC ADDRESS, CH and SPEED fields if the USB wireless adapter is not inserted. • The actual performance and setting will be shown in the CH and SPEED field, instead of the setting ...
User Manual
Page 69
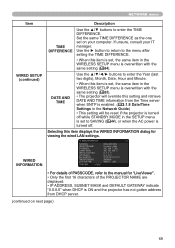
...SNTP is enabled. ( 3.1.8 Date/Time Settings in the Network Guide) • This setting will override this item is set, the same item in the WIRELESS SETUP menu is overwritten with the same setting ( 64). Use the buttons to enter the TIME DIFFERENCE. WIRED INFORMATION • For details of PASSCODE, ...refer to the menu after setting the TIME DIFFERENCE. • When this item is set, the same item in the WIRELESS SETUP menu is overwritten with the same setting ( 65). • The projector will be reset if the projector is turned off while STANDBY MODE in...
...SNTP is enabled. ( 3.1.8 Date/Time Settings in the Network Guide) • This setting will override this item is set, the same item in the WIRELESS SETUP menu is overwritten with the same setting ( 64). Use the buttons to enter the TIME DIFFERENCE. WIRED INFORMATION • For details of PASSCODE, ...refer to the menu after setting the TIME DIFFERENCE. • When this item is set, the same item in the WIRELESS SETUP menu is overwritten with the same setting ( 65). • The projector will be reset if the projector is turned off while STANDBY MODE in...
User Manual
Page 106
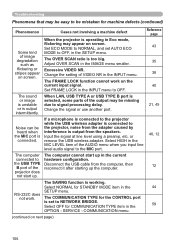
... screen. Adjust OVER SCAN in the INPUT menu. 38 The FRAME LOCK function cannot work . If a microphone is connected to the projector while the USB wireless adapter is connected to the projector, noise from the speakers. The COMMUNICATION TYPE for the CONTROL port is too big. Select OFF for STANDBY MODE... degradation such as The OVER SCAN ratio is set AUTO ECO 43 Some kind MODE to OFF, in the 59 OPTION - or remove the USB wireless adapter. Select NORMAL for COMMUNICATION TYPE item in the SETUP menu. stripes appear on next page) 106 RS-232C does not work on the current...
... screen. Adjust OVER SCAN in the INPUT menu. 38 The FRAME LOCK function cannot work . If a microphone is connected to the projector while the USB wireless adapter is connected to the projector, noise from the speakers. The COMMUNICATION TYPE for the CONTROL port is too big. Select OFF for STANDBY MODE... degradation such as The OVER SCAN ratio is set AUTO ECO 43 Some kind MODE to OFF, in the 59 OPTION - or remove the USB wireless adapter. Select NORMAL for COMMUNICATION TYPE item in the SETUP menu. stripes appear on next page) 106 RS-232C does not work on the current...
User Manual
Page 107
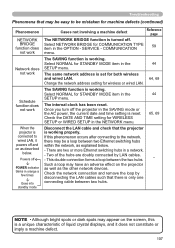
... turn off . Check the DATE AND TIME setting for wireless or wired LAN. Two of liquid crystal displays, and it powers off POWER indicator blinks in the SAVING mode or the AC power, the current date and time setting is set for both wireless and wired LAN. 64, 68 Change the network... address setting for WIRELESS SETUP or WIRED SETUP in the NETWORK menu. 65, 69 Disconnect the LAN cable and check that the projector...
... turn off . Check the DATE AND TIME setting for wireless or wired LAN. Two of liquid crystal displays, and it powers off POWER indicator blinks in the SAVING mode or the AC power, the current date and time setting is set for both wireless and wired LAN. 64, 68 Change the network... address setting for WIRELESS SETUP or WIRED SETUP in the NETWORK menu. 65, 69 Disconnect the LAN cable and check that the projector...