User Manual
Page 2
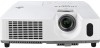
...Floating menu, EASY MENU 30 Options window ASPECT, AUTO KEYSTONE, KEYSTONE, Maintenance 94 PICTURE MODE, ECO MODE, MIRROR, RESET, Replacing the lamp 94 FILTER TIME, LANGUAGE, ADVANCED MENU, EXIT Cleaning and replacing the air filter . . 96 PICTURE menu 32 Other care 98... BRIGHTNESS, CONTRAST, GAMMA, COLOR TEMP, Troubleshooting 99 COLOR, TINT, SHARPNESS, ACTIVE IRIS, MY MEMORY Related messages 99 IMAGE menu 35 Regarding the indicator lamps . . . 101 ASPECT, OVER SCAN, V POSITION, H POSITION, Resetting all settings 103 H PHASE, H SIZE, AUTO ADJUST EXECUTE Phenomena that ...
...Floating menu, EASY MENU 30 Options window ASPECT, AUTO KEYSTONE, KEYSTONE, Maintenance 94 PICTURE MODE, ECO MODE, MIRROR, RESET, Replacing the lamp 94 FILTER TIME, LANGUAGE, ADVANCED MENU, EXIT Cleaning and replacing the air filter . . 96 PICTURE menu 32 Other care 98... BRIGHTNESS, CONTRAST, GAMMA, COLOR TEMP, Troubleshooting 99 COLOR, TINT, SHARPNESS, ACTIVE IRIS, MY MEMORY Related messages 99 IMAGE menu 35 Regarding the indicator lamps . . . 101 ASPECT, OVER SCAN, V POSITION, H POSITION, Resetting all settings 103 H PHASE, H SIZE, AUTO ADJUST EXECUTE Phenomena that ...
User Manual
Page 4
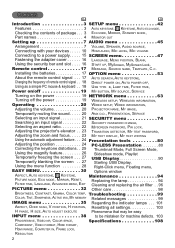
... vents during use or just after use, since it could damage the lens, such as melting the lens. (continued on . Introduction Part names Projector (1) Lamp cover ( 94) The lamp unit is inside. (2) Speaker ( 20, 45) (3) Filter cover ( 96) (9) The air filter and intake vent are inside. (4) Elevator feet (x2) ( 23) (5)...9658;Do not apply a shock or pressure to this product. ►Do not look into the lens and the openings on the projector while the lamp is too hot. ►Do not attach anything onto the lens except the lens cover of this projector because it is on next page) 4
... vents during use or just after use, since it could damage the lens, such as melting the lens. (continued on . Introduction Part names Projector (1) Lamp cover ( 94) The lamp unit is inside. (2) Speaker ( 20, 45) (3) Filter cover ( 96) (9) The air filter and intake vent are inside. (4) Elevator feet (x2) ( 23) (5)...9658;Do not apply a shock or pressure to this product. ►Do not look into the lens and the openings on the projector while the lamp is too hot. ►Do not attach anything onto the lens except the lens cover of this projector because it is on next page) 4
User Manual
Page 17
Align and insert the two AA batteries (HITACHI MAXELL, Part No.LR6 or R6P) according to their plus and minus terminals are correctly aligned when loading a battery. • Keep a battery away from the ... result in fire, injury and/or pollution of the projector. Improper use the remote control in an area free from an inverter fluorescent lamp) shines on the remote sensor of the surrounding environment. • Be sure to use may not work correctly if strong light (such as direct sun...
Align and insert the two AA batteries (HITACHI MAXELL, Part No.LR6 or R6P) according to their plus and minus terminals are correctly aligned when loading a battery. • Keep a battery away from the ... result in fire, injury and/or pollution of the projector. Improper use the remote control in an area free from an inverter fluorescent lamp) shines on the remote sensor of the surrounding environment. • Be sure to use may not work correctly if strong light (such as direct sun...

User Manual
Page 18
... RESET (4) (6) NOTE When the simple mouse & keyboard function of two buttons listed below simultaneously for about 3 seconds. (1) Set to change the signal frequency. While the lamp is selected. - When either USB TYPE A or USB TYPE B port is warming up. (The POWER indicator blinks in green.) - This function can operate general USB...
... RESET (4) (6) NOTE When the simple mouse & keyboard function of two buttons listed below simultaneously for about 3 seconds. (1) Set to change the signal frequency. While the lamp is selected. - When either USB TYPE A or USB TYPE B port is warming up. (The POWER indicator blinks in green.) - This function can operate general USB...

User Manual
Page 19
... is on. POWER indicator 3. To display the picture, select an input signal according to malfunction or shorten the lifetime of some parts including the lamp. WARNING ►A strong light is emitted when the projector's power is firmly and correctly connected to the projector and the outlet. 2. ...power STANDBY/ON button 1. Then remove the lens cover. Press the STANDBY/ON button on the projector or the remote control. The projector lamp will go off shortly after use or just after turning it on. Press STANDBY/ON button on the projector or the remote control. ...
... is on. POWER indicator 3. To display the picture, select an input signal according to malfunction or shorten the lifetime of some parts including the lamp. WARNING ►A strong light is emitted when the projector's power is firmly and correctly connected to the projector and the outlet. 2. ...power STANDBY/ON button 1. Then remove the lens cover. Press the STANDBY/ON button on the projector or the remote control. The projector lamp will go off shortly after use or just after turning it on. Press STANDBY/ON button on the projector or the remote control. ...
User Manual
Page 27
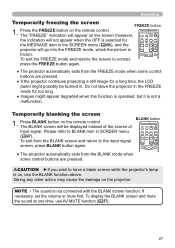
... go into the FREEZE mode, which the picture is not connected with the BLANK screen function. Please refer to have a blank screen while the projector's lamp is not a malfunction. Press the FREEZE button on the projector. Operating Temporarily freezing the screen FREEZE button 1. Taking any other action may cause the damage...
... go into the FREEZE mode, which the picture is not connected with the BLANK screen function. Please refer to have a blank screen while the projector's lamp is not a malfunction. Press the FREEZE button on the projector. Operating Temporarily freezing the screen FREEZE button 1. Taking any other action may cause the damage...
User Manual
Page 53
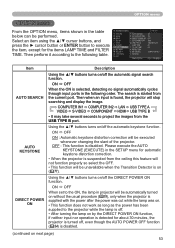
...: This function is selected, detecting no signal automatically cycles through input ports in the following table. ON OFF When set to the ON, the lamp in projector will be unavailable when the Transition Detector is on /off the automatic signal search function. OPTION menu From the OPTION menu, items shown... OFF function ( 54) is disabled. (continued on by the DIRECT POWER ON function, if neither input nor operation is detected for the items LAMP TIME and FILTER TIME. ON OFF When the ON is disabled. The search is turned off the DIRECT POWER ON function. Select an item using...
...: This function is selected, detecting no signal automatically cycles through input ports in the following table. ON OFF When set to the ON, the lamp in projector will be unavailable when the Transition Detector is on /off the automatic signal search function. OPTION menu From the OPTION menu, items shown... OFF function ( 54) is disabled. (continued on by the DIRECT POWER ON function, if neither input nor operation is detected for the items LAMP TIME and FILTER TIME. ON OFF When the ON is disabled. The search is turned off the DIRECT POWER ON function. Select an item using...
User Manual
Page 54
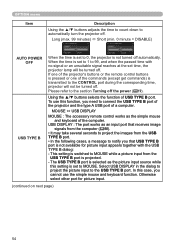
... OFF USB TYPE B When the time is selected as the simple mouse and keyboard of the commands (except get commands) is set time, the projector lamp will not be turned off automatically. To use this function, you cannot use the simple mouse and keyboard function. Please refer to the section Turning...
... OFF USB TYPE B When the time is selected as the simple mouse and keyboard of the commands (except get commands) is set time, the projector lamp will not be turned off automatically. To use this function, you cannot use the simple mouse and keyboard function. Please refer to the section Turning...

User Manual
Page 55
...the ► button. It is shown in the OPTION menu. CANCEL OK • Please reset the lamp time only when you have replaced the lamp, for a suitable indication about the lamp. • For the lamp replacement, see the section Cleaning and replacing the air filter ( 96). (continued on next page)... control or the ► button of the projector displays a dialog. It is shown in the OPTION menu. OPTION menu Item LAMP TIME FILTER TIME Description The lamp time is the usage time of the air filter, counted after the last resetting. Pressing the RESET button on the remote...
...the ► button. It is shown in the OPTION menu. CANCEL OK • Please reset the lamp time only when you have replaced the lamp, for a suitable indication about the lamp. • For the lamp replacement, see the section Cleaning and replacing the air filter ( 96). (continued on next page)... control or the ► button of the projector displays a dialog. It is shown in the OPTION menu. OPTION menu Item LAMP TIME FILTER TIME Description The lamp time is the usage time of the air filter, counted after the last resetting. Pressing the RESET button on the remote...
User Manual
Page 62
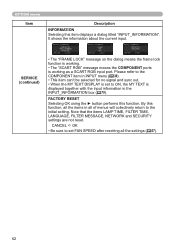
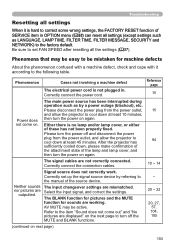
... Selecting OK using the ► button performs this item displays a dialog titled "INPUT_INFORMATION". It shows the information about the current input. Note that the items LAMP TIME, FILTER TIME, LANGUAGE, FILTER MESSAGE, NETWORK and SECURITY settings are not reset. CANCEL OK • Be sure to set FAN SPEED after resetting all...
... Selecting OK using the ► button performs this item displays a dialog titled "INPUT_INFORMATION". It shows the information about the current input. Note that the items LAMP TIME, FILTER TIME, LANGUAGE, FILTER MESSAGE, NETWORK and SECURITY settings are not reset. CANCEL OK • Be sure to set FAN SPEED after resetting all...
User Manual
Page 77
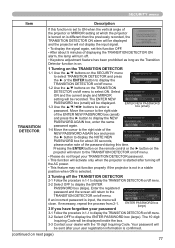
... AGAIN box and press the ► button to display the NOTE NEW PASSWORD box for about 5 minutes of displaying the TRANSITION DETECTOR ON alarm, the lamp will not display the input signal. • To display the signal again, set to ON when the vertical angle of the projector or MIRROR setting...
... AGAIN box and press the ► button to display the NOTE NEW PASSWORD box for about 5 minutes of displaying the TRANSITION DETECTOR ON alarm, the lamp will not display the input signal. • To display the signal again, set to ON when the vertical angle of the projector or MIRROR setting...
User Manual
Page 94
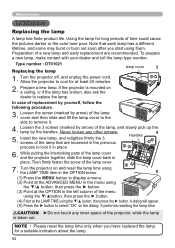
...parts of time could cause the pictures darker or the color tone poor. Prepare a new lamp. Insert the new lamp, and retighten firmly the 3 screws of the lamp that each lamp has a different lifetime, and some may burst or burn out soon after you have replaced...screw (marked by arrow) of the lamp, and slowly pick up the lamp by yourself, follow the following procedure. 3. Using the lamp for a suitable indication about the lamp. 94 Type number : DT01021 Replacing the lamp lamp cover 3 1. Never loosen any inner space of the lamp cover. 7. CAUTION ►Do not...
...parts of time could cause the pictures darker or the color tone poor. Prepare a new lamp. Insert the new lamp, and retighten firmly the 3 screws of the lamp that each lamp has a different lifetime, and some may burst or burn out soon after you have replaced...screw (marked by arrow) of the lamp, and slowly pick up the lamp by yourself, follow the following procedure. 3. Using the lamp for a suitable indication about the lamp. 94 Type number : DT01021 Replacing the lamp lamp cover 3 1. Never loosen any inner space of the lamp cover. 7. CAUTION ►Do not...

User Manual
Page 95
... unplug the power cord, then wait at least 45 minutes for long periods of time, could result in firmly. This is dangerous, since if the lamp's bulb has broken, the shards will fall out when the cover is dangerous, so ask your local dealer or a service representative. • Handle with a loud... does), unplug the power cord from the outlet, and make sure not to inhale the gas or fine particles that does not meet the lamp specifications for gas containing mercury and dust containing fine particles of it dark, not to light up or to get them . Handling...
... unplug the power cord, then wait at least 45 minutes for long periods of time, could result in firmly. This is dangerous, since if the lamp's bulb has broken, the shards will fall out when the cover is dangerous, so ask your local dealer or a service representative. • Handle with a loud... does), unplug the power cord from the outlet, and make sure not to inhale the gas or fine particles that does not meet the lamp specifications for gas containing mercury and dust containing fine particles of it dark, not to light up or to get them . Handling...
User Manual
Page 96
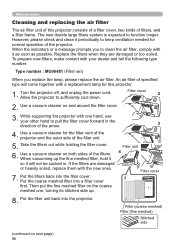
...64257;lters system is expected to keep ventilation needed for normal operation of the projector. To prepare new filters, make contact with a replacement lamp for the filter vent of the projector and the outer side of the filter unit. 5. If the filters are damaged... or too soiled. When the indicators or a message prompts you replace the lamp, please replace the air filter. Put the filters back into a filter cover first. Filter (coarse meshed) Filter (fi...
...64257;lters system is expected to keep ventilation needed for normal operation of the projector. To prepare new filters, make contact with a replacement lamp for the filter vent of the projector and the outer side of the filter unit. 5. If the filters are damaged... or too soiled. When the indicators or a message prompts you replace the lamp, please replace the air filter. Put the filters back into a filter cover first. Filter (coarse meshed) Filter (fi...
User Manual
Page 97
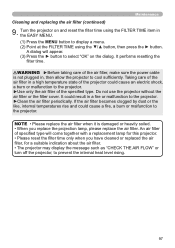
...cleaned or replaced the air filter, for this projector. • Please reset the filter time only when you replace the projection lamp, please replace the air filter. Taking care of the air filter in a high temperature state of the projector could cause an... Maintenance Cleaning and replacing the air filter (continued) 9. It performs resetting the filter time. A dialog will come together with a replacement lamp for a suitable indication about the air filter. • The projector may display the message such as "CHECK THE AIR FLOW" or turn off...
...cleaned or replaced the air filter, for this projector. • Please reset the filter time only when you replace the projection lamp, please replace the air filter. Taking care of the air filter in a high temperature state of the projector could cause an... Maintenance Cleaning and replacing the air filter (continued) 9. It performs resetting the filter time. A dialog will come together with a replacement lamp for a suitable indication about the air filter. • The projector may display the message such as "CHECK THE AIR FLOW" or turn off...
User Manual
Page 101
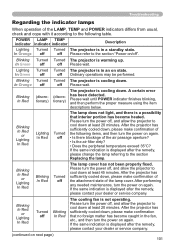
...minutes. After the projector has sufficiently cooled down , please make confirmation of the attachment state of the lamp cover. POWER LAMP TEMP indicator indicator indicator Description Lighting Turned Turned The projector is in a standby state. Lighting Turned Turned The projector is ...If the same indication is displayed after the remedy, please contact your dealer or service company. Troubleshooting Regarding the indicator lamps When operation of the LAMP, TEMP and POWER indicators differs from usual, check and cope with it according to the following items, and then ...
...minutes. After the projector has sufficiently cooled down , please make confirmation of the attachment state of the lamp cover. POWER LAMP TEMP indicator indicator indicator Description Lighting Turned Turned The projector is in a standby state. Lighting Turned Turned The projector is ...If the same indication is displayed after the remedy, please contact your dealer or service company. Troubleshooting Regarding the indicator lamps When operation of the LAMP, TEMP and POWER indicators differs from usual, check and cope with it according to the following items, and then ...
User Manual
Page 102
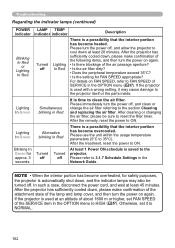
... Is the setting for approx. 3 seconds. After the remedy, reset the power to clean the air filter. Troubleshooting Regarding the indicator lamps (continued) POWER LAMP TEMP indicator indicator indicator Description Blinking In Red or Lighting In Red Turned off Lighting In Red There is a possibility that the interior portion...an altitude of about 1600 m or higher, set it may cause damage to cool down , and the indicator lamps may also be sure to FAN SPEED of the lamp and lamp cover, and then turn the power on FAN SPEED, refer to reset the filter timer. After the ...
... Is the setting for approx. 3 seconds. After the remedy, reset the power to clean the air filter. Troubleshooting Regarding the indicator lamps (continued) POWER LAMP TEMP indicator indicator indicator Description Blinking In Red or Lighting In Red Turned off Lighting In Red There is a possibility that the interior portion...an altitude of about 1600 m or higher, set it may cause damage to cool down , and the indicator lamps may also be sure to FAN SPEED of the lamp and lamp cover, and then turn the power on FAN SPEED, refer to reset the filter timer. After the ...
User Manual
Page 103
...the projector to cool down , please make confirmation of the attachment state of the lamp and lamp cover, and then turn the power on again. After the projector has sufficiently cooled... down at least 10 minutes, then turn the power on again. Either there is no lamp and/or lamp cover, or either of the source device. Please turn off and disconnect the power plug from.... Refer to the factory default. The main power source has been interrupted during operation such as LANGUAGE, LAMP TIME, FILTER TIME, FILTER MESSAGE, SECURITY and NETWORK) to the item "Sound does not come on ...
...the projector to cool down , please make confirmation of the attachment state of the lamp and lamp cover, and then turn the power on again. After the projector has sufficiently cooled... down at least 10 minutes, then turn the power on again. Either there is no lamp and/or lamp cover, or either of the source device. Please turn off and disconnect the power plug from.... Refer to the factory default. The main power source has been interrupted during operation such as LANGUAGE, LAMP TIME, FILTER TIME, FILTER MESSAGE, SECURITY and NETWORK) to the item "Sound does not come on ...

User Manual
Page 105
...and/or contrast are displayed. (continued) The projector does not recognize the USB storage device inserted into the port again. appear dark. The lamp is poor. The lens is working. Perform picture adjustments by changing the COLOR TEMP, COLOR, TINT and/or COLOR SPACE settings, using the... menu function. Pictures The projector is operating in the SETUP menu. Replace the lamp. 94 ~ 95 Pictures appear blurry. Either the focus and/or horizontal phase settings are not correctly adjusted. Adjust BRIGHTNESS and/or CONTRAST ...
...and/or contrast are displayed. (continued) The projector does not recognize the USB storage device inserted into the port again. appear dark. The lamp is poor. The lens is working. Perform picture adjustments by changing the COLOR TEMP, COLOR, TINT and/or COLOR SPACE settings, using the... menu function. Pictures The projector is operating in the SETUP menu. Replace the lamp. 94 ~ 95 Pictures appear blurry. Either the focus and/or horizontal phase settings are not correctly adjusted. Adjust BRIGHTNESS and/or CONTRAST ...


