
User Manual
Page 1
... read "Safety Guide" first. Be sure to incorrect handling. About this manual Various symbols are described below. Please refer to incorrect handling. Projector CP-D10 User's Manual (detailed) Operating Guide Thank you for any part of this document is not permitted... without notice. • The manufacturer assumes no responsibility for purchasing this projector. Trademark acknowledgment • Mac® ...
... read "Safety Guide" first. Be sure to incorrect handling. About this manual Various symbols are described below. Please refer to incorrect handling. Projector CP-D10 User's Manual (detailed) Operating Guide Thank you for any part of this document is not permitted... without notice. • The manufacturer assumes no responsibility for purchasing this projector. Trademark acknowledgment • Mac® ...

User Manual
Page 2
...manual 1 PICTURE menu 26 Contents 2 BRIGHTNESS, CONTRAST, GAMMA, Projector features 3 COLOR TEMP, COLOR, TINT, SHARPNESS, Preparations 3 MY MEMORY Checking the contents of package. . . 3 IMAGE menu 29 Fastening the lens cover 3 ASPECT, OVER SCAN, V POSITION, H POSITION, Part names 4 H PHASE, H SIZE, AUTO ADJUST EXECUTE Projector...47 Searching an input signal 17 SECURITY PASSWORD CHANGE, Selecting an aspect ratio 17 MyScreen PASSWORD, PIN LOCK, Adjusting the projector's elevator . . 18 TRANSITION DETECTOR, MY TEXT PASSWORD, Adjusting the focus 18 MY TEXT DISPLAY, MY TEXT WRITING...
...manual 1 PICTURE menu 26 Contents 2 BRIGHTNESS, CONTRAST, GAMMA, Projector features 3 COLOR TEMP, COLOR, TINT, SHARPNESS, Preparations 3 MY MEMORY Checking the contents of package. . . 3 IMAGE menu 29 Fastening the lens cover 3 ASPECT, OVER SCAN, V POSITION, H POSITION, Part names 4 H PHASE, H SIZE, AUTO ADJUST EXECUTE Projector...47 Searching an input signal 17 SECURITY PASSWORD CHANGE, Selecting an aspect ratio 17 MyScreen PASSWORD, PIN LOCK, Adjusting the projector's elevator . . 18 TRANSITION DETECTOR, MY TEXT PASSWORD, Adjusting the focus 18 MY TEXT DISPLAY, MY TEXT WRITING...

User Manual
Page 3
...the contents of the lens. Make sure that the knot on the side of package Your projector should come with two AA batteries (2) Power cord (3) Computer cable (4) Lens cover and Strap (5) User's manuals (Book x1, CD x1) (6) Security label POSITION MENU ESC ENTER RESET (2) (3) ...(5) (6) NOTE • Keep the original packing materials, for future reshipment. When mounting the projector upside down such as shown in step 2 below . ...
...the contents of the lens. Make sure that the knot on the side of package Your projector should come with two AA batteries (2) Power cord (3) Computer cable (4) Lens cover and Strap (5) User's manuals (Book x1, CD x1) (6) Security label POSITION MENU ESC ENTER RESET (2) (3) ...(5) (6) NOTE • Keep the original packing materials, for future reshipment. When mounting the projector upside down such as shown in step 2 below . ...

User Manual
Page 8
...smoking spaces or a kitchen. ►Position the projector to the vents on the bottom of the projector. NOTE • The projector may get wet. If the projector falls or is knocked over, it may make a...more between the sides of the projector and other objects such as walls. • Do not place the projector on metallic thing or anything containing liquid near the projector. ►Use only the ... and leave installing and removing the projector with your dealer before a special installation such as a wobbly or inclined stand. • Do not place the projector on its side, front or rear ...
...smoking spaces or a kitchen. ►Position the projector to the vents on the bottom of the projector. NOTE • The projector may get wet. If the projector falls or is knocked over, it may make a...more between the sides of the projector and other objects such as walls. • Do not place the projector on metallic thing or anything containing liquid near the projector. ►Use only the ... and leave installing and removing the projector with your dealer before a special installation such as a wobbly or inclined stand. • Do not place the projector on its side, front or rear ...
User Manual
Page 9
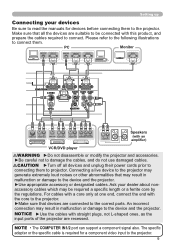
... port can support a component signal also. The specific adapter or the specific cable is required for devices before connecting them to the projector. 9 Please refer to the following illustrations to the correct ports. For cables with a core only at one end, connect the end with this ... noises or other abnormalities that may result in malfunction or damage to connect. Ask your devices Be sure to read the manuals for a component video input to the projector. CAUTION ►Turn off all the devices are recessed. PC Monitor AUDIO OUT RGB OUT AUDIO OUT RGB OUT RS...
... port can support a component signal also. The specific adapter or the specific cable is required for devices before connecting them to the projector. 9 Please refer to the following illustrations to the correct ports. For cables with a core only at one end, connect the end with this ... noises or other abnormalities that may result in malfunction or damage to connect. Ask your devices Be sure to read the manuals for a component video input to the projector. CAUTION ►Turn off all the devices are recessed. PC Monitor AUDIO OUT RGB OUT AUDIO OUT RGB OUT RS...
User Manual
Page 10
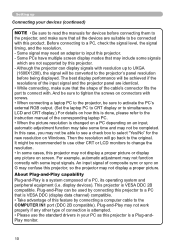
...to activate the PC's external RGB output. (Set the laptop PC to CRT display or to simultaneous LCD and CRT display.) For details on connectors with screws. • When connecting a laptop PC to the projector, be used by connecting a computer cable to the COMPUTER IN1 port (DDC 2B compatible). About ...product. It might be recommended to use the standard drivers in your devices (continued) NOTE • Be sure to read the manuals for the new resolution on screen. This projector is VESA DDC 2B compatible. Some signal may not be able to see a check box to select "Yes/No" for ...
...to activate the PC's external RGB output. (Set the laptop PC to CRT display or to simultaneous LCD and CRT display.) For details on connectors with screws. • When connecting a laptop PC to the projector, be used by connecting a computer cable to the COMPUTER IN1 port (DDC 2B compatible). About ...product. It might be recommended to use the standard drivers in your devices (continued) NOTE • Be sure to read the manuals for the new resolution on screen. This projector is VESA DDC 2B compatible. Some signal may not be able to see a check box to select "Yes/No" for ...
User Manual
Page 11
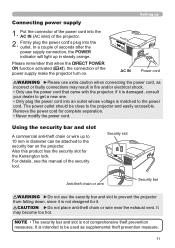
... use the power cord that when the DIRECT POWER ON function activated ( 42), the connection of the power supply make the projector turn on the projector. In a couple of the projector. 2. CAUTION ►Do not place anti-theft chain or wire near the exhaust vent. NOTE • The security bar ...IN (AC inlet) of seconds after the power supply connection, the POWER indicator will light up Connecting power supply 1. For details, see the manual of the power cord into the outlet. It may result in diameter can be close to be used as incorrect or faulty connections may become...
... use the power cord that when the DIRECT POWER ON function activated ( 42), the connection of the power supply make the projector turn on the projector. In a couple of the projector. 2. CAUTION ►Do not place anti-theft chain or wire near the exhaust vent. NOTE • The security bar ...IN (AC inlet) of seconds after the power supply connection, the POWER indicator will light up Connecting power supply 1. For details, see the manual of the power cord into the outlet. It may result in diameter can be close to be used as incorrect or faulty connections may become...
User Manual
Page 18
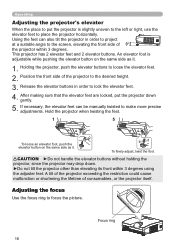
... focus Use the focus ring to loose the elevator feet. 2. Position the front side of consumables, or the projector itself. If necessary, the elevator feet can also tilt the projector in order to lock the elevator feet. 4. To finely adjust, twist the foot. Focus ring 18 ... the elevator feet to make more precise adjustments. Hold the projector when twisting the feet. 1 5 To loose an elevator foot, push the elevator button on the same side as it . 1. This projector has 2 elevator feet and 2 elevator buttons. Using the feet can be manually twisted to place the...
... focus Use the focus ring to loose the elevator feet. 2. Position the front side of consumables, or the projector itself. If necessary, the elevator feet can also tilt the projector in order to lock the elevator feet. 4. To finely adjust, twist the foot. Focus ring 18 ... the elevator feet to make more precise adjustments. Hold the projector when twisting the feet. 1 5 To loose an elevator foot, push the elevator button on the same side as it . 1. This projector has 2 elevator feet and 2 elevator buttons. Using the feet can be manually twisted to place the...

User Manual
Page 45
... ***HRS PASSED ....." FILTER MESSAGE Use the ▲/▼ cursor button to set by the message when to the projector, environment around the projector, etc., the automatic adjustment may not work correctly. Adjust the selected element using the ◄/► cursor buttons....ENTER) button on the remote control to disable the automatic adjustment, and make adjustment manually. FINE FAST DISABLE SERVICE FINE: Finer tuning including the H.SIZE adjustment. Note that the projector is noisier when the HIGH is selected. OPTION menu Item Description Selecting this feature...
... ***HRS PASSED ....." FILTER MESSAGE Use the ▲/▼ cursor button to set by the message when to the projector, environment around the projector, etc., the automatic adjustment may not work correctly. Adjust the selected element using the ◄/► cursor buttons....ENTER) button on the remote control to disable the automatic adjustment, and make adjustment manually. FINE FAST DISABLE SERVICE FINE: Finer tuning including the H.SIZE adjustment. Note that the projector is noisier when the HIGH is selected. OPTION menu Item Description Selecting this feature...
User Manual
Page 56
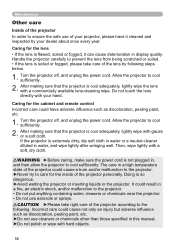
...a fire, an electric shock, and/or malfunction to the projector. • Do not put anything containing water, cleaners or chemicals near the projector. • Do not use cleaners or chemicals other than those specified in this manual. ►Do not polish or wipe with gauze or a soft ...cloth. It could cause a burn and/or malfunction to the projector. ►Never try to care for the inside of the projector personally. Allow the projector to cool sufficiently. 2. Turn...
...a fire, an electric shock, and/or malfunction to the projector. • Do not put anything containing water, cleaners or chemicals near the projector. • Do not use cleaners or chemicals other than those specified in this manual. ►Do not polish or wipe with gauze or a soft ...cloth. It could cause a burn and/or malfunction to the projector. ►Never try to care for the inside of the projector personally. Allow the projector to cool sufficiently. 2. Turn...
User Manual
Page 58
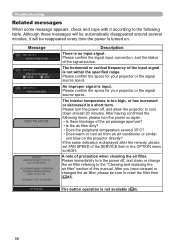
... air filter" section of the signal source. Please confirm the signal input connection, and the status of this manual. Please confirm the specs for your projector or the signal source specs. After having confirmed the following table. If the same indication is turned on the...
... air filter" section of the signal source. Please confirm the signal input connection, and the status of this manual. Please confirm the specs for your projector or the signal source specs. After having confirmed the following table. If the same indication is turned on the...

User Manual
Page 61
... - 15, 16 15, 21, 44 (Continued on . The main power source has been interrupted during operation such as by referring to the manual of these has not been properly fixed. Please turn the power on again. 11, 14 53, 54 The signal cables are outputted. ...sounds nor pictures are not correctly connected. AV MUTE may be easy to be mistaken for sounds are mismatched. Troubleshooting Shutting the projector down Only when the projector can reset all settings When it is hard to correct some wrong settings, the FACTORY RESET function of SERVICE item in ....
... - 15, 16 15, 21, 44 (Continued on . The main power source has been interrupted during operation such as by referring to the manual of these has not been properly fixed. Please turn the power on again. 11, 14 53, 54 The signal cables are outputted. ...sounds nor pictures are not correctly connected. AV MUTE may be easy to be mistaken for sounds are mismatched. Troubleshooting Shutting the projector down Only when the projector can reset all settings When it is hard to correct some wrong settings, the FACTORY RESET function of SERVICE item in ....
Technical Manual
Page 1
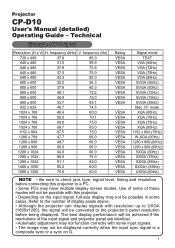
... (75Hz) VGA (85Hz) SVGA (56Hz) SVGA (60Hz) SVGA (72Hz) SVGA (75Hz) SVGA (85Hz) Mac 16" mode XGA (60Hz) XGA (70Hz) XGA (75Hz) XGA (85Hz) 1152 x 864 (75Hz) W-XGA (60Hz) 1280 x 800 (60Hz) 1280 x 960 (60Hz) SXGA (60Hz) SXGA (75Hz) SXGA (85Hz) SXGA+ (60Hz...projector to the projector's panel resolution before connecting this projector. • Depending on G. 1 Use of some of the input signal and projector panel are identical. • Automatic adjustment may not function correctly with some cases. Refer to the number of PC signal Resolution (H x V) H. Projector CP-D10 User's Manual...
... (75Hz) VGA (85Hz) SVGA (56Hz) SVGA (60Hz) SVGA (72Hz) SVGA (75Hz) SVGA (85Hz) Mac 16" mode XGA (60Hz) XGA (70Hz) XGA (75Hz) XGA (85Hz) 1152 x 864 (75Hz) W-XGA (60Hz) 1280 x 800 (60Hz) 1280 x 960 (60Hz) SXGA (60Hz) SXGA (75Hz) SXGA (85Hz) SXGA+ (60Hz...projector to the projector's panel resolution before connecting this projector. • Depending on G. 1 Use of some of the input signal and projector panel are identical. • Automatic adjustment may not function correctly with some cases. Refer to the number of PC signal Resolution (H x V) H. Projector CP-D10 User's Manual...

