User Manual
Page 1
... is not permitted without notice. • The manufacturer assumes no responsibility for purchasing this projector. Projector CPX1/CPX5 User's Manual (detailed) Operating Guide Thank you for any errors that may appear in this manual. • The reproduction, transfer or copy of all manuals for future reference. WARNING ►Before using this product. CAUTION This symbol indicates information...
... is not permitted without notice. • The manufacturer assumes no responsibility for purchasing this projector. Projector CPX1/CPX5 User's Manual (detailed) Operating Guide Thank you for any errors that may appear in this manual. • The reproduction, transfer or copy of all manuals for future reference. WARNING ►Before using this product. CAUTION This symbol indicates information...

User Manual
Page 3
... the lens cover, please fasten the lens cover to project various picture signals onto a screen. Fix the strap to detach and attach a filter cover. This projector requires only a minimal amount of space for the lens. Contact immediately your dealer before a special installation such as suspending from a ceiling. Strap hole 1. Replacing the... make the loop there. Please refer to keep necessary ventilation space. Thread one end of the strap through the loop. Not have a knot in the "User's Manual (concise)" which is missing.
... the lens cover, please fasten the lens cover to project various picture signals onto a screen. Fix the strap to detach and attach a filter cover. This projector requires only a minimal amount of space for the lens. Contact immediately your dealer before a special installation such as suspending from a ceiling. Strap hole 1. Replacing the... make the loop there. Please refer to keep necessary ventilation space. Thread one end of the strap through the loop. Not have a knot in the "User's Manual (concise)" which is missing.

Network Guide
Page 1
... to four still images and project them in the U.S. All other trademarks are registered trademarks of Microsoft Corporation in a safe place for future reference. Projector CP-X4021N/CP-X5021N/ CP-WX4021N User's Manual (detailed) Network Guide Thank you for purchasing this document is not permitted without notice. • The manufacturer assumes no responsibility for any part...
... to four still images and project them in the U.S. All other trademarks are registered trademarks of Microsoft Corporation in a safe place for future reference. Projector CP-X4021N/CP-X5021N/ CP-WX4021N User's Manual (detailed) Network Guide Thank you for purchasing this document is not permitted without notice. • The manufacturer assumes no responsibility for any part...

Network Guide
Page 2
...Switching the display mode 40 2.1.4 Option menu ...41 2.2 Starting the Network Presentation 43 2.2.1 Display mode ...43 2.2.2 Presenter mode ...44 2.2.3 Display User Name ...44 2 Connection to the Network 4 1.1 System requirements 4 1.1.1 Required equipment preparation 4 1.1.2 Hardware and software requirement for computer 4 ...network connection method 14 1.5.1 Passcode connection ...15 1.6 Manual Configuration 23 1.6.1 Profile connection ...23 1.6.2 History connection ...24 1.7 Configuring the network settings manually 25 1.8 Confirming the connection to your...
...Switching the display mode 40 2.1.4 Option menu ...41 2.2 Starting the Network Presentation 43 2.2.1 Display mode ...43 2.2.2 Presenter mode ...44 2.2.3 Display User Name ...44 2 Connection to the Network 4 1.1 System requirements 4 1.1.1 Required equipment preparation 4 1.1.2 Hardware and software requirement for computer 4 ...network connection method 14 1.5.1 Passcode connection ...15 1.6 Manual Configuration 23 1.6.1 Profile connection ...23 1.6.2 History connection ...24 1.7 Configuring the network settings manually 25 1.8 Confirming the connection to your...

Network Guide
Page 4
...set to NORMAL. ( SETUP menu in the User's Manual - Please connect the network communication to the projector after setting the STANDBY MODE to SAVING. To use the "LiveViewer" your computer through a network. Projector LAN cable (to connect the projector to a network): CAT-5 or greater Computer ... Basic /Home Premium /Professional /Ultimate / Enterprise (32 bit version only) CPU: Pentium 4 (2.8 GHz or higher) Graphic card: 16 bit, XGA or higher * When using the "LiveViewer" it is recommended that is set ): equipped with the network feature (100Base-TX or 10Base-T) 1.1.2 Hardware...
...set to NORMAL. ( SETUP menu in the User's Manual - Please connect the network communication to the projector after setting the STANDBY MODE to SAVING. To use the "LiveViewer" your computer through a network. Projector LAN cable (to connect the projector to a network): CAT-5 or greater Computer ... Basic /Home Premium /Professional /Ultimate / Enterprise (32 bit version only) CPU: Pentium 4 (2.8 GHz or higher) Graphic card: 16 bit, XGA or higher * When using the "LiveViewer" it is recommended that is set ): equipped with the network feature (100Base-TX or 10Base-T) 1.1.2 Hardware...

Network Guide
Page 8
... connection method - History - My Connection If My Connection is selected e Manual configuration - Profile - Configure Manually - Configure Network Settings Manually If Profile or History is selected as the input source on the projector. ( Operating in the User's Manual - Operating Guide) Otherwise a connection cannot be established. 1.3.1 Process overview...
... connection method - History - My Connection If My Connection is selected e Manual configuration - Profile - Configure Manually - Configure Network Settings Manually If Profile or History is selected as the input source on the projector. ( Operating in the User's Manual - Operating Guide) Otherwise a connection cannot be established. 1.3.1 Process overview...

Network Guide
Page 11
...activated, and the "LiveViewer" is blocked by the firewall. • To turn it disabled (Off), click the [No], but the projector may not be blocked by Windows firewall, until the "LiveViewer" is closed. • If any application software having the firewall...the network access by the "LiveViewer" is temporally permitted by Windows firewall. The screen is displayed in the [Allow communication with following the user's manual. 11 1. Proceed to item 1.5 Selecting the network connection method. ( 14) NOTE • If you computer, make the firewall function...
...activated, and the "LiveViewer" is blocked by the firewall. • To turn it disabled (Off), click the [No], but the projector may not be blocked by Windows firewall, until the "LiveViewer" is closed. • If any application software having the firewall...the network access by the "LiveViewer" is temporally permitted by Windows firewall. The screen is displayed in the [Allow communication with following the user's manual. 11 1. Proceed to item 1.5 Selecting the network connection method. ( 14) NOTE • If you computer, make the firewall function...

Network Guide
Page 27
Connection to the network 1.7 Configuring the network settings manually (continued) Wired LAN 1) Enter the following information for the projector. *1 IP address : 192.168.1.10 (example) Subnet mask : 255.255.255.0 (example) 2) Click the [Connect]. 3) The network connection will be established. Windows prevented network con... could not be established. After that, please resume at item 1.3.2 Starting the "LiveViewer". ( 9) 27 Log in the Windows under Administrator authority. Click on the projector, refer to the network administrator. 1. You may log in the Windows under...
Connection to the network 1.7 Configuring the network settings manually (continued) Wired LAN 1) Enter the following information for the projector. *1 IP address : 192.168.1.10 (example) Subnet mask : 255.255.255.0 (example) 2) Click the [Connect]. 3) The network connection will be established. Windows prevented network con... could not be established. After that, please resume at item 1.3.2 Starting the "LiveViewer". ( 9) 27 Log in the Windows under Administrator authority. Click on the projector, refer to the network administrator. 1. You may log in the Windows under...
Network Guide
Page 40
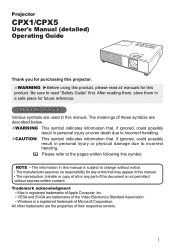
... image will be started to display your computer images in the Multi PC mode. • If the Multi PC mode is selected, the projector screen is set also by the icon you click one of the Multi mode buttons that computer will be stopped. Operating Guide for the function... your image on the screen. 4) The icon on the main menu is replaced by using the MULTI PC MODE in the PRESENTATION item in the User's Manual - Network Presentation 2.1 Using the "LiveViewer" (continued) 2.1.3 Switching the display mode The "LiveViewer" has the Single PC mode and Multi PC mode. NOTE • ...
... image will be started to display your computer images in the Multi PC mode. • If the Multi PC mode is selected, the projector screen is set also by the icon you click one of the Multi mode buttons that computer will be stopped. Operating Guide for the function... your image on the screen. 4) The icon on the main menu is replaced by using the MULTI PC MODE in the PRESENTATION item in the User's Manual - Network Presentation 2.1 Using the "LiveViewer" (continued) 2.1.3 Switching the display mode The "LiveViewer" has the Single PC mode and Multi PC mode. NOTE • ...

Network Guide
Page 42
... PC mode, the projector can block an access from the Multi PC mode to the Single PC mode, the Presenter mode setting of the PRESENTATION item in the "LiveViewer". r Display User Name A "User Name" that the image on , put a check mark in the User's Manual - While making your... presentation, you want to the projector. 42 Operating Guide) If the check box is not marked, the information is...
... PC mode, the projector can block an access from the Multi PC mode to the Single PC mode, the Presenter mode setting of the PRESENTATION item in the "LiveViewer". r Display User Name A "User Name" that the image on , put a check mark in the User's Manual - While making your... presentation, you want to the projector. 42 Operating Guide) If the check box is not marked, the information is...

Network Guide
Page 46
... the OSD language on the Web Control screen is connected via a web browser. Operating Guide) 46 NOTE • The language used on the projector. ( SCREEN menu in the User's Manual - Example: If the IP address of the OSD on the "LiveViewer" main menu ( 37) to the following for configuring or controlling...
... the OSD language on the Web Control screen is connected via a web browser. Operating Guide) 46 NOTE • The language used on the projector. ( SCREEN menu in the User's Manual - Example: If the IP address of the OSD on the "LiveViewer" main menu ( 37) to the following for configuring or controlling...
Network Guide
Page 53
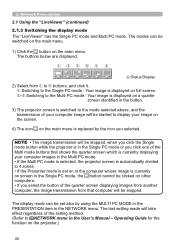
... the STANDBY MODE is set to the NORMAL:the projector's power status changes from "OFF" to the SAVING:the projector's power status changes from the invalid SNMP community. 3.6 Alert Settings 3. Filter time over Alarm Time setting. Transition Detector Alarm. ( OPTION menu in the User's Manual - Operating Guide) The SNMP access is detected from "Standby...
... the STANDBY MODE is set to the NORMAL:the projector's power status changes from "OFF" to the SAVING:the projector's power status changes from the invalid SNMP community. 3.6 Alert Settings 3. Filter time over Alarm Time setting. Transition Detector Alarm. ( OPTION menu in the User's Manual - Operating Guide) The SNMP access is detected from "Standby...

Network Guide
Page 54
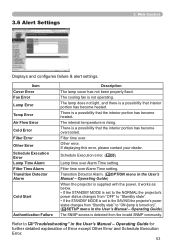
...figured in the Web page, the e-mail will be sent out. • Filter Time Alarm is depending on the FILTER MESSAGE setting in the User's Manual - 3. NOTE • The trigger of Filter Error e-mail is defined as a threshold for e-mail notification (reminder) of the lamp timer. When... [Enable] check box to TURN OFF. ( OPTION menu in the SERVICE item of the filter exceeds the time limit that is displayed on the projector screen. The length of the text can be up to be sent when the usage time of the OPTION menu which defines the...
...figured in the Web page, the e-mail will be sent out. • Filter Time Alarm is depending on the FILTER MESSAGE setting in the User's Manual - 3. NOTE • The trigger of Filter Error e-mail is defined as a threshold for e-mail notification (reminder) of the lamp timer. When... [Enable] check box to TURN OFF. ( OPTION menu in the SERVICE item of the filter exceeds the time limit that is displayed on the projector screen. The length of the text can be up to be sent when the usage time of the OPTION menu which defines the...

Network Guide
Page 57
...date and time settings ( 58) get out of tune. • Events "My Image" and "Messenger" will prevent the projector from appropriate execution of scheduled functions/events. • If no USB memory device is locked due to the feature. •... Events "Input Source" and "My Image" will not be executed if security feature is enabled and the projector is inserted to the projector or no image data for display exists at the scheduled event time, a schedule execution error occurs against the ... be executed appropriately but result in "schedule execution error" status in the User's Manual -
...date and time settings ( 58) get out of tune. • Events "My Image" and "Messenger" will prevent the projector from appropriate execution of scheduled functions/events. • If no USB memory device is locked due to the feature. •... Events "Input Source" and "My Image" will not be executed if security feature is enabled and the projector is inserted to the projector or no image data for display exists at the scheduled event time, a schedule execution error occurs against the ... be executed appropriately but result in "schedule execution error" status in the User's Manual -

Network Guide
Page 61
...user changes the value manually. Refer to maximum setting value. INPUT SOURCE Selects the input source. MAGNIFY POSITION H Adjusts the horizontal magnify position. MY IMAGE DELETE Deletes MY IMAGE data. 61 PICTURE MODE Selects the picture mode setting. MUTE Turns Mute on /off. Controls the projector...not reach to the table below can be performed using the Projector Control menu. 3. MAGNIFY Controls the magnify setting. MAGNIFY POSITION V Adjusts the vertical magnify position. Web Control 3.10 Projector Control The items shown in the table below for details....
...user changes the value manually. Refer to maximum setting value. INPUT SOURCE Selects the input source. MAGNIFY POSITION H Adjusts the horizontal magnify position. MY IMAGE DELETE Deletes MY IMAGE data. 61 PICTURE MODE Selects the picture mode setting. MUTE Turns Mute on /off. Controls the projector...not reach to the table below can be performed using the Projector Control menu. 3. MAGNIFY Controls the magnify setting. MAGNIFY POSITION V Adjusts the vertical magnify position. Web Control 3.10 Projector Control The items shown in the table below for details....

Network Guide
Page 70
... image. ( OPTION menu in the User's Manual - My Image Function The projector can display still images that registered MY IMAGE can be downloaded from the web browser. Refer to 4 in the maximum. • Using MY BUTTON that are using schedule function from the Hitachi web site (http://www.hitachi-america.us/ digitalmedia or http://www...
... image. ( OPTION menu in the User's Manual - My Image Function The projector can display still images that registered MY IMAGE can be downloaded from the web browser. Refer to 4 in the maximum. • Using MY BUTTON that are using schedule function from the Hitachi web site (http://www.hitachi-america.us/ digitalmedia or http://www...

Network Guide
Page 72
...projector. Transfer text data 1 2 3 4 Display text data (ex. 4 ) Messenger function requires an exclusive application for the detail. 72 Operating Guide) • The text file also can download it from the ones once stored in the User's Manual... - NOTE • It is possible to store the text data up to the manual for the application for the details ...81) for your computer. hitachidigitalmedia.com). Messenger Function 5. Messenger Function The projector can be displayed by using schedule function via the network on real time, and...
...projector. Transfer text data 1 2 3 4 Display text data (ex. 4 ) Messenger function requires an exclusive application for the detail. 72 Operating Guide) • The text file also can download it from the ones once stored in the User's Manual... - NOTE • It is possible to store the text data up to the manual for the application for the details ...81) for your computer. hitachidigitalmedia.com). Messenger Function 5. Messenger Function The projector can be displayed by using schedule function via the network on real time, and...

Network Guide
Page 74
...-232C cable External device LAN port CONTROL port 6.1 Connecting devices 1) Connect the projector's LAN port and the computer's LAN port with a LAN cable, for Ethernet communication. 2) Connect the projector's CONTROL port and the device's RS-232C port with the NETWORK BRIDGE function ... the NETWORK BRIDGE function, a computer that is connected with this projector by Ethernet communication can control an external device that is equipped with an RS-232C cable, for the devices to the ports" in the User's Manual - Operating Guide (Technical)) 74 NOTE • Before connecting the...
...-232C cable External device LAN port CONTROL port 6.1 Connecting devices 1) Connect the projector's LAN port and the computer's LAN port with a LAN cable, for Ethernet communication. 2) Connect the projector's CONTROL port and the device's RS-232C port with the NETWORK BRIDGE function ... the NETWORK BRIDGE function, a computer that is connected with this projector by Ethernet communication can control an external device that is equipped with an RS-232C cable, for the devices to the ports" in the User's Manual - Operating Guide (Technical)) 74 NOTE • Before connecting the...

Network Guide
Page 75
...select the NETWORK BRIDGE for the CONTROL port. 2) Using the SERIAL SETTINGS menu, select the proper baud rate and parity for the projector, use . 6. Network Bridge Function 6.2 Communication setup To configure the setup of the communication using the Network Bridge Port ... Using the COMMUNICATION menu, set up the communication. COMMUNICATION menu. ( OPTION menu - NOTE • The OFF is configured in the User's Manual - SERVICE - Item BAUD RATE PARITY Data length Start bit Stop bit Condition 4800bps/9600bps/19200bps/38400bps NONE/ODD/EVEN 8 bit (fixed) 1...
...select the NETWORK BRIDGE for the CONTROL port. 2) Using the SERIAL SETTINGS menu, select the proper baud rate and parity for the projector, use . 6. Network Bridge Function 6.2 Communication setup To configure the setup of the communication using the Network Bridge Port ... Using the COMMUNICATION menu, set up the communication. COMMUNICATION menu. ( OPTION menu - NOTE • The OFF is configured in the User's Manual - SERVICE - Item BAUD RATE PARITY Data length Start bit Stop bit Condition 4800bps/9600bps/19200bps/38400bps NONE/ODD/EVEN 8 bit (fixed) 1...

Network Guide
Page 76
..., either transmitting or receiving data, is past, the projector can be selected from the menus, only when the NETWORK BRIDGE is selected for response data from the computer. SERVICE - SERVICE - COMMUNICATION in the User's Manual - To use the HALF-DUPLEX method, set the ...waiting time for the COMMUNICATION TYPE. ( OPTION menu - COMMUNICATION in the User's Manual - Operating Guide) OFF 1s 2s 3s ( OFF) 76 The method does not allow the projector to synchronize the communication. Network Bridge Function 6.4 Transmission method The transmission method can receive ...
..., either transmitting or receiving data, is past, the projector can be selected from the menus, only when the NETWORK BRIDGE is selected for response data from the computer. SERVICE - SERVICE - COMMUNICATION in the User's Manual - To use the HALF-DUPLEX method, set the ...waiting time for the COMMUNICATION TYPE. ( OPTION menu - COMMUNICATION in the User's Manual - Operating Guide) OFF 1s 2s 3s ( OFF) 76 The method does not allow the projector to synchronize the communication. Network Bridge Function 6.4 Transmission method The transmission method can receive ...


