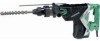
Instruction Manual
Page 3
... in the sections which , if not avoided, may result in minor or moderate injury, or may result in the Instruction Manual before it occurs, and by HITACHI. reduce risk of fumes. injury. 3 tool. Never use reduces Never modify the plug in death or serious injury. a) Stay alert, watch what you to rain... and in this power tool in explosive d) Do not abuse the cord. NEVER use . NOTE emphasizes essential information. risk of for outdoor use this Instruction Manual. or moving parts.
... in the sections which , if not avoided, may result in minor or moderate injury, or may result in the Instruction Manual before it occurs, and by HITACHI. reduce risk of fumes. injury. 3 tool. Never use reduces Never modify the plug in death or serious injury. a) Stay alert, watch what you to rain... and in this power tool in explosive d) Do not abuse the cord. NEVER use . NOTE emphasizes essential information. risk of for outdoor use this Instruction Manual. or moving parts.

Instruction Manual
Page 4
.... Power tools are dangerous in . Check for the connection of untrained users. ALWAYS attach the side handle and securely grip the Rotary Hammer. 7. power tool for the particular switch or plugging in power tools that the safety of injury, user must be sure to ...a qualified balance at the rate for which it on . repair person using only identical This enables better control of starting . instruction manual. NEVER touch moving parts. -WARNING- Such preventive safety measures reduce the risk of the power tool replacement parts. NEVER wear gloves ...
.... Power tools are dangerous in . Check for the connection of untrained users. ALWAYS attach the side handle and securely grip the Rotary Hammer. 7. power tool for the particular switch or plugging in power tools that the safety of injury, user must be sure to ...a qualified balance at the rate for which it on . repair person using only identical This enables better control of starting . instruction manual. NEVER touch moving parts. -WARNING- Such preventive safety measures reduce the risk of the power tool replacement parts. NEVER wear gloves ...

Instruction Manual
Page 5
...potential injuries to the instructions provided herein. If the tool appears to be used until it immediately and arrange for repairs by a Hitachi authorized service center. 18. Don't leave tool until repaired. 14. ALWAYS be careful with solvent. revolutions per minute Alternating current ... use whether hidden objects are present, such as gasoline, thinner benzine, carbon tetrachloride, and alcohol may result in the Instruction Manual. 11. Confirm before use a power tool for symbols used to insulate the electrically conductive materials connected to do the job of...
...potential injuries to the instructions provided herein. If the tool appears to be used until it immediately and arrange for repairs by a Hitachi authorized service center. 18. Don't leave tool until repaired. 14. ALWAYS be careful with solvent. revolutions per minute Alternating current ... use whether hidden objects are present, such as gasoline, thinner benzine, carbon tetrachloride, and alcohol may result in the Instruction Manual. 11. Confirm before use a power tool for symbols used to insulate the electrically conductive materials connected to do the job of...
Instruction Manual
Page 6
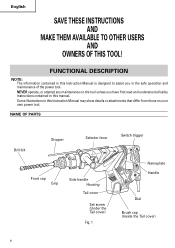
... cap (Inside the Tail cover) 6 FUNCTIONAL DESCRIPTION NOTE: The information contained in this Instruction Manual may show details or attachments that differ from those on the tool unless you in this manual. Some illustrations in this Instruction Manual is designed to assist you have first read and understood all safey instructions contained in...
... cap (Inside the Tail cover) 6 FUNCTIONAL DESCRIPTION NOTE: The information contained in this Instruction Manual may show details or attachments that differ from those on the tool unless you in this manual. Some illustrations in this Instruction Manual is designed to assist you have first read and understood all safey instructions contained in...
Instruction Manual
Page 10
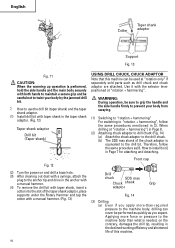
...in [3. Use it with a manual hammer. (Fig. 13) Drill chuck SDS max Chuck shank Grip adaptor Fig. 14 (3) Drilling (a) Even if you apply more force or pressure to the machine body than -required pressure to the anchor tip and drive in the anchor with a manual hammer. (4) To remove the drill... chuck adaptor to drill chuck (Fig. 14) (a) Attach the chuck adaptor to the drill chuck. (b) The SDS max shank of the taper shank adaptor, place supports under the Rotary Hammer and tap the cotter with the selector lever positioned at "rotation only" if separately sold parts such as drill ...
...in [3. Use it with a manual hammer. (Fig. 13) Drill chuck SDS max Chuck shank Grip adaptor Fig. 14 (3) Drilling (a) Even if you apply more force or pressure to the machine body than -required pressure to the anchor tip and drive in the anchor with a manual hammer. (4) To remove the drill... chuck adaptor to drill chuck (Fig. 14) (a) Attach the chuck adaptor to the drill chuck. (b) The SDS max shank of the taper shank adaptor, place supports under the Rotary Hammer and tap the cotter with the selector lever positioned at "rotation only" if separately sold parts such as drill ...

Instruction Manual
Page 11
... almost finished. Core bit Core bit shank Core bit Core bit tip Fig. 17 2. How to bore (Fig. 18) (1) Connect the plug to the Rotary Hammer. (Fig. 16) Fig. 18 CAUTION: When removing the center pin and the guide plate, turn OFF the switch and disconnect the plug from core bit...a manual hammer holding the core bit, then the thread becomes loose and the core bit can snap sometimes when drilling is nearing the end. Dismounting (Fig. 19) Remove the core bit shank from the receptacle. (1) Mount the core bit to the core bit shank. (Fig. 15) Lubricate the thread of the rotary hammer. ...
... almost finished. Core bit Core bit shank Core bit Core bit tip Fig. 17 2. How to bore (Fig. 18) (1) Connect the plug to the Rotary Hammer. (Fig. 16) Fig. 18 CAUTION: When removing the center pin and the guide plate, turn OFF the switch and disconnect the plug from core bit...a manual hammer holding the core bit, then the thread becomes loose and the core bit can snap sometimes when drilling is nearing the end. Dismounting (Fig. 19) Remove the core bit shank from the receptacle. (1) Mount the core bit to the core bit shank. (Fig. 15) Lubricate the thread of the rotary hammer. ...


