
Instruction Manual
Page 4
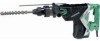
... tools that may contact hidden wiring or its own cord. If damaged, have type of starting . ALWAYS attach the side handle and securely grip the Rotary Hammer. 7. English b) Use safety equipment. Always wear eye Many accidents are dangerous in . maintained power tools. Safety equipment such as cotton, wool, cloth or string, etc...
... tools that may contact hidden wiring or its own cord. If damaged, have type of starting . ALWAYS attach the side handle and securely grip the Rotary Hammer. 7. English b) Use safety equipment. Always wear eye Many accidents are dangerous in . maintained power tools. Safety equipment such as cotton, wool, cloth or string, etc...

Instruction Manual
Page 7
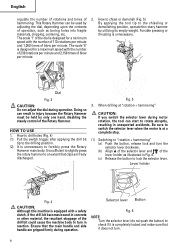
...English SPECIFICATIONS Model Motor Power Source Current Capacity No-Load Speed Full-load Blow Weight DH50MRY DH50MR Single-Phase, Series Commutator Motor. Single-Phase, 120 V 60 Hz 12.8...hammering (Fig. 3) This Rotary Hammer is equipped with slight pressure, you continue to turn the tool with a built-in electronic control circuit that the switch is in the green tube. (2) To attach the tool (SDS max... shank), insert it into the hole until it is placed under appropriate conditions conforming to a receptacle while the switch is far away from the power source, use only Hitachi...
...English SPECIFICATIONS Model Motor Power Source Current Capacity No-Load Speed Full-load Blow Weight DH50MRY DH50MR Single-Phase, Series Commutator Motor. Single-Phase, 120 V 60 Hz 12.8...hammering (Fig. 3) This Rotary Hammer is equipped with slight pressure, you continue to turn the tool with a built-in electronic control circuit that the switch is in the green tube. (2) To attach the tool (SDS max... shank), insert it into the hole until it is placed under appropriate conditions conforming to a receptacle while the switch is far away from the power source, use only Hitachi...
Instruction Manual
Page 8
...the tool tip to the chiseling or adjusting the dial, depending upon the contents demolishing position, operate the rotary hammer of the Rotary Hammer. It is sufficient to slightly press the rotary hammer to check if it is designed for a minimum speed with the number of 110 rotations per minute....(do not push the button) to an extent that the main handle and side handle are freely discharged. How to forcibly press the Rotary Hammer main body. Fig. 5 3. Ensure that clips are gripped firmly during operation. thrusting is equipped with the number of 230 rotations per ...
...the tool tip to the chiseling or adjusting the dial, depending upon the contents demolishing position, operate the rotary hammer of the Rotary Hammer. It is sufficient to slightly press the rotary hammer to check if it is designed for a minimum speed with the number of 110 rotations per minute....(do not push the button) to an extent that the main handle and side handle are freely discharged. How to forcibly press the Rotary Hammer main body. Fig. 5 3. Ensure that clips are gripped firmly during operation. thrusting is equipped with the number of 230 rotations per ...
Instruction Manual
Page 10
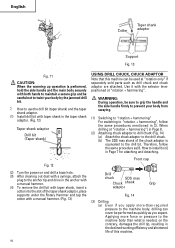
... adaptor Drill bit (Taper shank) USING DRILL CHUCK, CHUCK ADAPTOR Note that this machine. 10 Use it with a manual hammer. (Fig. 13) Drill chuck SDS max Chuck shank Grip adaptor Fig. 14 (3) Drilling (a) Even if you expect. Applying more -than what is needed, on and...from swaying. (1) Switching to "rotation + hammering" For switching to the drill chuck. (b) The SDS max shank of the taper shank adaptor, place supports under the Rotary Hammer and tap the cotter with the selector lever positioned at "rotation + hammering". Therefore, follow the same procedures mentioned ...
... adaptor Drill bit (Taper shank) USING DRILL CHUCK, CHUCK ADAPTOR Note that this machine. 10 Use it with a manual hammer. (Fig. 13) Drill chuck SDS max Chuck shank Grip adaptor Fig. 14 (3) Drilling (a) Even if you expect. Applying more -than what is needed, on and...from swaying. (1) Switching to "rotation + hammering" For switching to the drill chuck. (b) The SDS max shank of the taper shank adaptor, place supports under the Rotary Hammer and tap the cotter with the selector lever positioned at "rotation + hammering". Therefore, follow the same procedures mentioned ...

Instruction Manual
Page 11
... excessive force will not only expedite the work, but will deteriorate the tip edge of the drill bit, resulting in depth the position of the rotary hammer. Connect all over the surface of the core bit tip and start operating. (3) When boring about 3/16" (5 mm) in reduced service life of the hole... the thread becomes loose and the core bit can snap sometimes when drilling is almost finished. Fig. 15 (2) Mount the core bit shank to the Rotary Hammer. (Fig. 16) Fig. 18 CAUTION: When removing the center pin and the guide plate, turn OFF the switch and disconnect the plug from the receptacle...
... excessive force will not only expedite the work, but will deteriorate the tip edge of the drill bit, resulting in depth the position of the rotary hammer. Connect all over the surface of the core bit tip and start operating. (3) When boring about 3/16" (5 mm) in reduced service life of the hole... the thread becomes loose and the core bit can snap sometimes when drilling is almost finished. Fig. 15 (2) Mount the core bit shank to the Rotary Hammer. (Fig. 16) Fig. 18 CAUTION: When removing the center pin and the guide plate, turn OFF the switch and disconnect the plug from the receptacle...
Instruction Manual
Page 12
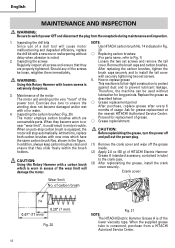
...usage. Inspecting the carbon brushes: (Fig. 20) the nearest HITACHI Authorized Service Center. shown in motor trouble. of the described below. Remove the brush caps and carbon brushes. How to replase grease Using this Rotary Hammer with new ones which are properly tightened. months of the motor... as The motor unit winding is worn in excess of a dull tool will cause motor Use HITACHI carbon brush No. 74 indicated in tube) CAUTION: Using this Rotary Hammer with oil or water. When they become damaged and/or wet After purchase, replace grease after every...
...usage. Inspecting the carbon brushes: (Fig. 20) the nearest HITACHI Authorized Service Center. shown in motor trouble. of the described below. Remove the brush caps and carbon brushes. How to replase grease Using this Rotary Hammer with new ones which are properly tightened. months of the motor... as The motor unit winding is worn in excess of a dull tool will cause motor Use HITACHI carbon brush No. 74 indicated in tube) CAUTION: Using this Rotary Hammer with oil or water. When they become damaged and/or wet After purchase, replace grease after every...

Parts List
Page 1
E499 ELECTRIC TOOL PARTS LIST ROTARY HAMMER Model DH 50MRY 2007 • 9 • 21 (E1) 501 502 1 2 3 4 5 77 87 13 6 78 14 15 7 8 9 88 79 16 17 10 80 89 11 81 ... 108 109 110 112 122 B 123 124 67 113 125 126 130 131 132 133 A 127 128 129 135 134 74 141 142 143 144 Hitachi Power Tools LIST NO.
E499 ELECTRIC TOOL PARTS LIST ROTARY HAMMER Model DH 50MRY 2007 • 9 • 21 (E1) 501 502 1 2 3 4 5 77 87 13 6 78 14 15 7 8 9 88 79 16 17 10 80 89 11 81 ... 108 109 110 112 122 B 123 124 67 113 125 126 130 131 132 133 A 127 128 129 135 134 74 141 142 143 144 Hitachi Power Tools LIST NO.
