

User Manual
Page 1
... this product. Operating Guide Thank you for future reference. NOTE • The information in a safe place for purchasing this product, please read the "User's Manual - Projector ED-S8240/ED-X8250 User's Manual - WARNING ►Before using this projector. Safety Guide" and related manuals to change without express written consent. All other trademarks are described below.
... this product. Operating Guide Thank you for future reference. NOTE • The information in a safe place for purchasing this product, please read the "User's Manual - Projector ED-S8240/ED-X8250 User's Manual - WARNING ►Before using this projector. Safety Guide" and related manuals to change without express written consent. All other trademarks are described below.
User Manual
Page 2
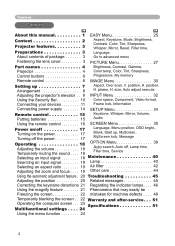
... . . . 24 Using the menu function 24 2 phase, H. Content Content About this manual 1 EASY Menu 25 Content 2 Projector features 3 Aspect, Keystone, Mode, Brightness, Contrast, Color, Tint, Sharpness, Whisper, Mirror, Reset, Filter time, Preparations 3 Language, About contents of ...package 3 Go to advanced menu Fastening the lens cover 3 PICTURE Menu 27 Part names 4 Brightness, Contrast, Gamma, Projector 4 Color temp, Color, Tint, Sharpness, Control buttons 6 Progressive, My memory Remote control 6 IMAGE Menu 30 Setting up , ...
... . . . 24 Using the menu function 24 2 phase, H. Content Content About this manual 1 EASY Menu 25 Content 2 Projector features 3 Aspect, Keystone, Mode, Brightness, Contrast, Color, Tint, Sharpness, Whisper, Mirror, Reset, Filter time, Preparations 3 Language, About contents of ...package 3 Go to advanced menu Fastening the lens cover 3 PICTURE Menu 27 Part names 4 Brightness, Contrast, Gamma, Projector 4 Color temp, Color, Tint, Sharpness, Control buttons 6 Progressive, My memory Remote control 6 IMAGE Menu 30 Setting up , ...

User Manual
Page 3
...Brightness) lamp gives you a higher brightness image on the rivet. 3. Quick Guide". Put the strap into the strap hole. Your projector should come with its many signal sources like PC, DVD and so on. Use special caution for future reshipment. NOTE • ... well as bright and clean enough for reducing acoustic noise to realize quieter operation. Strap ring Strap Bottom side 1. Projector features / Preparations Projector features This projector is extremely compact and slim, which gives you more flexibility and usability to use the original packing materials. ...
...Brightness) lamp gives you a higher brightness image on the rivet. 3. Quick Guide". Put the strap into the strap hole. Your projector should come with its many signal sources like PC, DVD and so on. Use special caution for future reshipment. NOTE • ... well as bright and clean enough for reducing acoustic noise to realize quieter operation. Strap ring Strap Bottom side 1. Projector features / Preparations Projector features This projector is extremely compact and slim, which gives you more flexibility and usability to use the original packing materials. ...

User Manual
Page 4
Part names Part names Projector Lamp cover (41) (Lamp unit is inside.) Zoom knob (19) Focus ring (19) Vent (7) Lens (17) Lens cover (3) ... intake vent are inside.) Bottom side WARNING ►During use or immediately after use, do not touch around the lamp and vents of the projector. () It could cause a burn. 4
Part names Part names Projector Lamp cover (41) (Lamp unit is inside.) Zoom knob (19) Focus ring (19) Vent (7) Lens (17) Lens cover (3) ... intake vent are inside.) Bottom side WARNING ►During use or immediately after use, do not touch around the lamp and vents of the projector. () It could cause a burn. 4
User Manual
Page 5
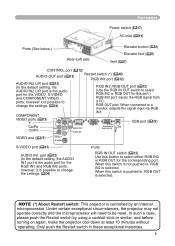
... port is the audio port for the VIDEO, S-VIDEO and COMPONENT VIDEO ports, however it is selected. NOTE (*) About Restart switch: This projector is possible to change the settings. 34) Ports RGB IN OUT switch (12) Use this switch is not pushed in these ...it is controlled by using a cocktail stick or similar, and before turning on again, make the projector cool down at least 10 minutes without operating. Under certain exceptional circumstances, the projector may not operate correctly and the microprocessor will need to a monitor, outputs the signal input via RGB...
... port is the audio port for the VIDEO, S-VIDEO and COMPONENT VIDEO ports, however it is selected. NOTE (*) About Restart switch: This projector is possible to change the settings. 34) Ports RGB IN OUT switch (12) Use this switch is not pushed in these ...it is controlled by using a cocktail stick or similar, and before turning on again, make the projector cool down at least 10 minutes without operating. Under certain exceptional circumstances, the projector may not operate correctly and the microprocessor will need to a monitor, outputs the signal input via RGB...
User Manual
Page 7
...and pay attention enough to ventilation. A fall or a turnover could cause a fire, a burn and/or malfunction to the projector. • Do not stop up, block and cover the projector's vents. • Keep a space of 30 cm or more between the sides and other objects such as a heater. • ...Put nothing about lens and vents of projector. Damping the projector or inserting liquid in the projector could cause a fire, an electric shock and/or malfunction to keep the light from directly hitting the...
...and pay attention enough to ventilation. A fall or a turnover could cause a fire, a burn and/or malfunction to the projector. • Do not stop up, block and cover the projector's vents. • Keep a space of 30 cm or more between the sides and other objects such as a heater. • ...Put nothing about lens and vents of projector. Damping the projector or inserting liquid in the projector could cause a fire, an electric shock and/or malfunction to keep the light from directly hitting the...

User Manual
Page 8
... the illustrations and tables below to the screen (±10%) (c) The height of the screen (±10%) 4:3 16:9 (c) up (a) (a) (c) down For the model ED-S8240 (a) Screen size [inch (m)] 4 : 3 screen (b) Projection distance (c) Screen height [m (inch)] [cm (inch)] min. down up 30 (0.8) 0.9 (36) ...(b) Projection distance [m (inch)] min. The values shown in the table are calculated for a full size screen: ED-S8240 : 800×600, ED-X8250 : 1024×768 (a) The screen size (diagonal) (b) (b) Distance from the projector to determine the screen size and projection distance.
... the illustrations and tables below to the screen (±10%) (c) The height of the screen (±10%) 4:3 16:9 (c) up (a) (a) (c) down For the model ED-S8240 (a) Screen size [inch (m)] 4 : 3 screen (b) Projection distance (c) Screen height [m (inch)] [cm (inch)] min. down up 30 (0.8) 0.9 (36) ...(b) Projection distance [m (inch)] min. The values shown in the table are calculated for a full size screen: ED-S8240 : 800×600, ED-X8250 : 1024×768 (a) The screen size (diagonal) (b) (b) Distance from the projector to determine the screen size and projection distance.
User Manual
Page 9
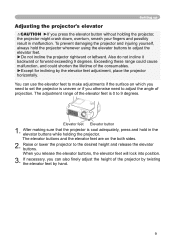
...to adjust the angle of the consumables. ►Except for inclining by hand. 9 Raise or lower the projector to adjust the elevator feet. ►Do not incline the projector rightward or leftward. When you can use the elevator feet to make adjustments if the surface on the both... buttons and the elevator feet are on which you need to 9 degrees. Setting up Adjusting the projector's elevator CAUTION ►If you press the elevator button without holding the projector, the projector might crash down, overturn, smash your fingers and possibly result in the elevator buttons while ...
...to adjust the angle of the consumables. ►Except for inclining by hand. 9 Raise or lower the projector to adjust the elevator feet. ►Do not incline the projector rightward or leftward. When you can use the elevator feet to make adjustments if the surface on the both... buttons and the elevator feet are on which you need to 9 degrees. Setting up Adjusting the projector's elevator CAUTION ►If you press the elevator button without holding the projector, the projector might crash down, overturn, smash your fingers and possibly result in the elevator buttons while ...
User Manual
Page 10
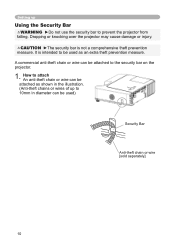
...diameter can be used) Security Bar Anti-theft chain or wire [sold separately] 10 Dropping or knocking over the projector may cause damage or injury. How to attach An anti-theft chain or wire can be attached to the security bar on... the projector. 1. A commercial anti-theft chain or wire can be attached as an extra theft prevention measure. It is not a ... wires of up Using the Security Bar WARNING ►Do not use the security bar to prevent the projector from falling.
...diameter can be used) Security Bar Anti-theft chain or wire [sold separately] 10 Dropping or knocking over the projector may cause damage or injury. How to attach An anti-theft chain or wire can be attached to the security bar on... the projector. 1. A commercial anti-theft chain or wire can be attached as an extra theft prevention measure. It is not a ... wires of up Using the Security Bar WARNING ►Do not use the security bar to prevent the projector from falling.

User Manual
Page 11
...corresponding laptop computer. • Secure the screws on an input, automatic adjustment function may take advantage of this function by connecting this projector. • For some RGB signal modes, the optional Mac adapter is necessary. • When the image resolution is changed on...to connect a laptop computer to change the resolution. Use of the computer, its operating system and peripheral equipment (i.e. This projector is compatible with this projector to a computer is attempted. • Please use other abnormalities that you may not be used with your devices CAUTION ...
...corresponding laptop computer. • Secure the screws on an input, automatic adjustment function may take advantage of this function by connecting this projector. • For some RGB signal modes, the optional Mac adapter is necessary. • When the image resolution is changed on...to connect a laptop computer to change the resolution. Use of the computer, its operating system and peripheral equipment (i.e. This projector is compatible with this projector to a computer is attempted. • Please use other abnormalities that you may not be used with your devices CAUTION ...
User Manual
Page 14
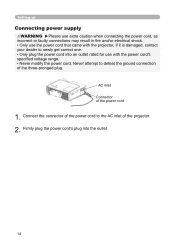
... incorrect or faulty connections may result in fire and/or electrical shock. • Only use with the projector. Never attempt to defeat the ground connection of the power cord 1. If it is damaged, contact your dealer to the... AC inlet of the projector. 2. AC inlet Connector of the three-pronged plug. Connect the connector of the power cord to newly get correct... rated for use the power cord that came with the power cord's specified voltage range. • Never modify the power cord.
... incorrect or faulty connections may result in fire and/or electrical shock. • Only use with the projector. Never attempt to defeat the ground connection of the power cord 1. If it is damaged, contact your dealer to the... AC inlet of the projector. 2. AC inlet Connector of the three-pronged plug. Connect the connector of the power cord to newly get correct... rated for use the power cord that came with the power cord's specified voltage range. • Never modify the power cord.

User Manual
Page 16
...the reflected signal. • Since the remote control uses infrared light to send signals to keep the light from directly hitting the projector's remote sensor. Remote control Using the remote control CAUTION ►Be careful in a safe place if you won't be using the remote control...; When strong lights (such as direct sunlight) or light from an extremely close range (such as from an inverter fluorescent lamp), hit the projector's remote sensor, the remote control may cause to function. It may result in malfunction. • Remove the batteries from the remote control and store...
...the reflected signal. • Since the remote control uses infrared light to send signals to keep the light from directly hitting the projector's remote sensor. Remote control Using the remote control CAUTION ►Be careful in a safe place if you won't be using the remote control...; When strong lights (such as direct sunlight) or light from an extremely close range (such as from an inverter fluorescent lamp), hit the projector's remote sensor, the remote control may cause to function. It may result in malfunction. • Remove the batteries from the remote control and store...
User Manual
Page 17
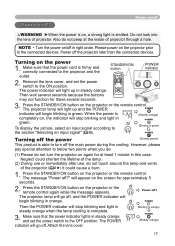
...ON position. POWER Turning off the power (Steady green) This product is complete. 3. Press the STANDBY/ON button on the projector or the remote control. The projector lamp will go off. Do not look into the lens of the lamp. (2) During use or immediately after use, do not.... Press the STANDBY/ON button on the power 1. POWER Then the POWER indicator will stop blinking and light in right order. Turning on the projector or the remote control. The power indicator will appear on the screen for approximately 5 seconds. 2. Attach the lens cover. (Blinking in green)...
...ON position. POWER Turning off the power (Steady green) This product is complete. 3. Press the STANDBY/ON button on the projector or the remote control. The projector lamp will go off. Do not look into the lens of the lamp. (2) During use or immediately after use, do not.... Press the STANDBY/ON button on the power 1. POWER Then the POWER indicator will stop blinking and light in right order. Turning on the projector or the remote control. The power indicator will appear on the screen for approximately 5 seconds. 2. Attach the lens cover. (Blinking in green)...
User Manual
Page 18
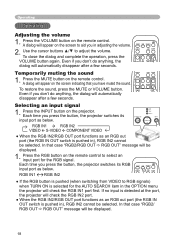
... MENU PAGE UP VOLUME OFF ENDENTEPARGE DOWN MUTE FERSECEZE KEYRSTEOSNEET POSITION MENU Selecting an input signal 1. Each time you press the button, the projector switches its input port as below . ASPECT AUTO BLANK RGB IN1 RGB IN2 MAGNIFY ON HOME PAGE UP VOLUME ●... aid you don't do anything , the dialog will appear on the remote control. Even if you in the OPTION menu FREEZE KEYSTONE the projector will be displayed. Press the MUTE button on the screen indicating that you don't do anything , the dialog will be displayed. 1. In...
... MENU PAGE UP VOLUME OFF ENDENTEPARGE DOWN MUTE FERSECEZE KEYRSTEOSNEET POSITION MENU Selecting an input signal 1. Each time you press the button, the projector switches its input port as below . ASPECT AUTO BLANK RGB IN1 RGB IN2 MAGNIFY ON HOME PAGE UP VOLUME ●... aid you don't do anything , the dialog will appear on the remote control. Even if you in the OPTION menu FREEZE KEYSTONE the projector will be displayed. Press the MUTE button on the screen indicating that you don't do anything , the dialog will be displayed. 1. In...
User Manual
Page 19
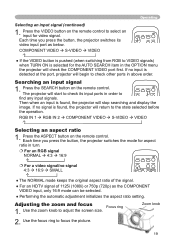
...Selecting an input signal (continued) 1. FREEZE KEYSTONE ● For an HDTV signal of the signal. ESC RESET Each time you press the button, the projector switches its input ports in turn. For an RGB signal NORMAL 4:3 16:9 VIDEO RGB SEARCH For a video... Press the SEARCH button on the remote control. ENTER Adjusting the zoom and focus Focus ring 1. Zoom knob ESC RESET 2. The projector will begin to select an input for the AUTO SEARCH item in above oENrTEdR er. POSITION MENU ● Performing the automatic adjustment ...
...Selecting an input signal (continued) 1. FREEZE KEYSTONE ● For an HDTV signal of the signal. ESC RESET Each time you press the button, the projector switches its input ports in turn. For an RGB signal NORMAL 4:3 16:9 VIDEO RGB SEARCH For a video... Press the SEARCH button on the remote control. ENTER Adjusting the zoom and focus Focus ring 1. Zoom knob ESC RESET 2. The projector will begin to select an input for the AUTO SEARCH item in above oENrTEdR er. POSITION MENU ● Performing the automatic adjustment ...

User Manual
Page 21
... OFF button of MAGNIFY on the screen VIDEO RGB SEARCH ASPECT AUTO BLANK (although the indication will disappear in the SETUP menu, if the projector screen is inclined or angled downward, this function may not work correctly. ● When the zoom adjustment is set to the TELE (telephoto.... ENTER To exit the MAGNIFY mode and restore the screen to the WIDE (wide-angle focus) whenever possible. ESC RESET ● The projector automatically exits the MAGNIFY mode when the input signal is changed, or when the display condition is selected to the MIRROR item in several seconds...
... OFF button of MAGNIFY on the screen VIDEO RGB SEARCH ASPECT AUTO BLANK (although the indication will disappear in the SETUP menu, if the projector screen is inclined or angled downward, this function may not work correctly. ● When the zoom adjustment is set to the TELE (telephoto.... ENTER To exit the MAGNIFY mode and restore the screen to the WIDE (wide-angle focus) whenever possible. ESC RESET ● The projector automatically exits the MAGNIFY mode when the input signal is changed, or when the display condition is selected to the MIRROR item in several seconds...

User Manual
Page 22
...for long time, the LCD panel might possibly be displayed instead of the screen of VIDEO RGB SEARCH input signal. Do not leave the projector in the SCREEN ASPECT AUTO BLANK menu (35). The blank screen will be printed. The "FREEZE" indication will enter the FREEZE ...mode. POSITION MENU ● The projector automatically exits the FREEZE mode when the input signal changes, or when one of STANDBY/ON, SEARCH, RGB, VIDEO, BLANK, AUTO, ASPECESCT, VOLURMESETE,...
...for long time, the LCD panel might possibly be displayed instead of the screen of VIDEO RGB SEARCH input signal. Do not leave the projector in the SCREEN ASPECT AUTO BLANK menu (35). The blank screen will be printed. The "FREEZE" indication will enter the FREEZE ...mode. POSITION MENU ● The projector automatically exits the FREEZE mode when the input signal changes, or when one of STANDBY/ON, SEARCH, RGB, VIDEO, BLANK, AUTO, ASPECESCT, VOLURMESETE,...

User Manual
Page 23
... could damage your computer's hardware manual for details. • The USB control can be used only for trapezoidal distortion, zooming in pointing device (e.g. Connect the projector's USB port to move the mouse pointer diagonally). • This function is not available while the lamp is warming up (the POWER indicator flashes...
... could damage your computer's hardware manual for details. • The USB control can be used only for trapezoidal distortion, zooming in pointing device (e.g. Connect the projector's USB port to move the mouse pointer diagonally). • This function is not available while the lamp is warming up (the POWER indicator flashes...

User Manual
Page 24
... In the Advanced MENU 2. Then press the cursor button ► on the projector or remote control, or the ENTER button on the remote control to select an item. Note that items whose functions are classified into each purpose. EASY MENU cosists of these menus is displayed. 24 The ...is selected, or when a certain input signal is operated OFF END PAGE DOWN MUTE using the same methods. Press the MENU button on the projector. Use the cursor buttons ▲/▼ to operate the item. Each of the selected item will appear. Press the MENU button on the remote...
... In the Advanced MENU 2. Then press the cursor button ► on the projector or remote control, or the ENTER button on the remote control to select an item. Note that items whose functions are classified into each purpose. EASY MENU cosists of these menus is displayed. 24 The ...is selected, or when a certain input signal is operated OFF END PAGE DOWN MUTE using the same methods. Press the MENU button on the projector. Use the cursor buttons ▲/▼ to operate the item. Each of the selected item will appear. Press the MENU button on the remote...
User Manual
Page 25
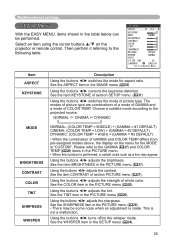
... SHARPNESS NORMAL +0 +0 +0 +0 3 WHISPER BRIGHT MIRROR NORMAL RESET FILTER TIME 0h LANGUAGE ENGLISH Go To Advance Menu... Using the buttons ◄/► turns off/on the projector or remote control. Then perform it referring to the projected source. Using the buttons ◄/► corrects the keystone distortion. See the item KEYSTONE of...
... SHARPNESS NORMAL +0 +0 +0 +0 3 WHISPER BRIGHT MIRROR NORMAL RESET FILTER TIME 0h LANGUAGE ENGLISH Go To Advance Menu... Using the buttons ◄/► turns off/on the projector or remote control. Then perform it referring to the projected source. Using the buttons ◄/► corrects the keystone distortion. See the item KEYSTONE of...


