User Manual
Page 2
..., Connecting your devices 11 Frame lock, Information Connecting power supply 14 SETUP Menu 34 Remote control 15 Putting batteries 15 Keystone, Whisper, Mirror, Volume, Audio Using the remote control 16 SCREEN Menu 35 Power on/off 17 Turning on the power 17 Turning...cover 3 PICTURE Menu 27 Part names 4 Brightness, Contrast, Gamma, Projector 4 Color temp, Color, Tint, Sharpness, Control buttons 6 Progressive, My memory Remote control 6 IMAGE Menu 30 Setting up , MyScreen, MyScreen lock, Message Operating 18 Adjusting the volume 18 Temporarily muting the sound . . . . ...
..., Connecting your devices 11 Frame lock, Information Connecting power supply 14 SETUP Menu 34 Remote control 15 Putting batteries 15 Keystone, Whisper, Mirror, Volume, Audio Using the remote control 16 SCREEN Menu 35 Power on/off 17 Turning on the power 17 Turning...cover 3 PICTURE Menu 27 Part names 4 Brightness, Contrast, Gamma, Projector 4 Color temp, Color, Tint, Sharpness, Control buttons 6 Progressive, My memory Remote control 6 IMAGE Menu 30 Setting up , MyScreen, MyScreen lock, Message Operating 18 Adjusting the volume 18 Temporarily muting the sound . . . . ...

User Manual
Page 4
... (41) (Lamp unit is inside.) Zoom knob (19) Focus ring (19) Vent (7) Lens (17) Lens cover (3) Control buttons (6) Remote sensor (16) Speaker Security bar (10) (Use for attaching a commercial anti-theft chain or wire.) Front-Right side Elevator button (9) Elevator foot...
... (41) (Lamp unit is inside.) Zoom knob (19) Focus ring (19) Vent (7) Lens (17) Lens cover (3) Control buttons (6) Remote sensor (16) Speaker Security bar (10) (Use for attaching a commercial anti-theft chain or wire.) Front-Right side Elevator button (9) Elevator foot...

User Manual
Page 6
... buttons 24) STANDBY/ON button (17) LAMP indicator (46, 47) TEMP indicator (46, 47) POWER indicator (17) INPUT button (18) Remote control SEARCH button (19) RGB button (18) VIDEO button (19) ASPECT button (19) HOME button (23) MAGNIFY ON button (...
... buttons 24) STANDBY/ON button (17) LAMP indicator (46, 47) TEMP indicator (46, 47) POWER indicator (17) INPUT button (18) Remote control SEARCH button (19) RGB button (18) VIDEO button (19) ASPECT button (19) HOME button (23) MAGNIFY ON button (...
User Manual
Page 7
..., humid or dusty place. Then using damaged projector could cause a fire, a burn and/or malfunction to keep the light from directly hitting the projector's remote sensor. 7 The high temperature of the projector could result in a fire and/or an electric shock. • Do not place the projector on a carpet...
..., humid or dusty place. Then using damaged projector could cause a fire, a burn and/or malfunction to keep the light from directly hitting the projector's remote sensor. 7 The high temperature of the projector could result in a fire and/or an electric shock. • Do not place the projector on a carpet...
User Manual
Page 15
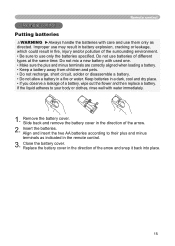
... in the direction of the arrow. 2. Do not use only the batteries specified. Insert the batteries. Replace the battery cover in the direction of the arrow and snap it back into place. 15 Remote control Remote control Putting batteries WARNING ►Always handle the batteries with care and use them only...
... in the direction of the arrow. 2. Do not use only the batteries specified. Insert the batteries. Replace the battery cover in the direction of the arrow and snap it back into place. 15 Remote control Remote control Putting batteries WARNING ►Always handle the batteries with care and use them only...

User Manual
Page 16
... range (such as from an inverter fluorescent lamp), hit the projector's remote sensor, the remote control may be sure to use the remote control in an area free from obstacles that could block the remote control's output signal to the projector. 16 may cause to the left and ...right of the remote sensor). • Also a remote signal reflected in the screen etc. The remote control works with a 60 degree range (30 degrees to function. Adjust the direction of the remote sensor is 3 meters with the projector's remote sensor. 30º 30º approx. ...
... range (such as from an inverter fluorescent lamp), hit the projector's remote sensor, the remote control may be sure to use the remote control in an area free from obstacles that could block the remote control's output signal to the projector. 16 may cause to the left and ...right of the remote sensor). • Also a remote signal reflected in the screen etc. The remote control works with a 60 degree range (30 degrees to function. Adjust the direction of the remote sensor is 3 meters with the projector's remote sensor. 30º 30º approx. ...
User Manual
Page 17
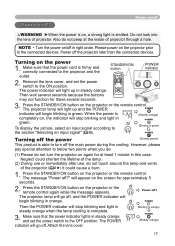
... orange) POWER (Blinking in green. Do not look into the lens of projector. When the power is completely on the projector or the remote control. Then wait several seconds because the buttons may not function for these several seconds. Attach the lens cover. (Blinking in right order.... Turning on the projector or the remote control again while the message appears. Press the STANDBY/ON button on the power 1. Power off ?" NOTE • Turn the power on...
... orange) POWER (Blinking in green. Do not look into the lens of projector. When the power is completely on the projector or the remote control. Then wait several seconds because the buttons may not function for these several seconds. Attach the lens cover. (Blinking in right order.... Turning on the projector or the remote control again while the message appears. Press the STANDBY/ON button on the power 1. Power off ?" NOTE • Turn the power on...
User Manual
Page 18
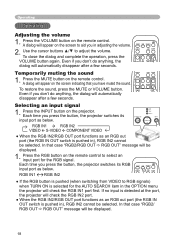
.... To restore the sound, press the MUTE or VOLUME button. In that case "RGB2/RGB OUT RGB OUT" message will appear on the remote control to adjust the volume. ASPECT AUTO BLANK RGB IN1 RGB IN2 MAGNIFY ON HOME PAGE UP VOLUME ● If the RGB button... port functions as an RGB out port (the POSITION RGB IN MENU OUT switch is detected at the port, the projector will appear on the remote control. Press the RGB button on the screen indicating that case "RENGTER B2/ RGB OUT RGB OUT" message will automatically disappear after a few ...
.... To restore the sound, press the MUTE or VOLUME button. In that case "RGB2/RGB OUT RGB OUT" message will appear on the remote control to adjust the volume. ASPECT AUTO BLANK RGB IN1 RGB IN2 MAGNIFY ON HOME PAGE UP VOLUME ● If the RGB button... port functions as an RGB out port (the POSITION RGB IN MENU OUT switch is detected at the port, the projector will appear on the remote control. Press the RGB button on the screen indicating that case "RENGTER B2/ RGB OUT RGB OUT" message will automatically disappear after a few ...
User Manual
Page 19
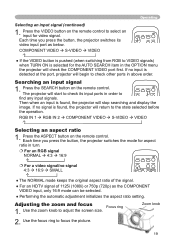
...9679; Performing the automatic adjustment initializes the aspect ratio setting. Use the zoom knob to focus the picture. 19 Press the VIDEO button on the remote control. Zoom knob ESC RESET 2. If no signal 4:3 16:9 SMALL ASPECT AUTO BLANK MAGNIFY ON HOME PAGE UP VOLUME ...ESC RESET 1. The projector will stop searching and display MAGNIFY ON HOME PAGE UP VOLUME the image. Press the SEARCH button on the remote control to VIDEO RGB SEARCH ASPECT AUTO BLANK find any input signals. Each time you press the button, the projector switches the...
...9679; Performing the automatic adjustment initializes the aspect ratio setting. Use the zoom knob to focus the picture. 19 Press the VIDEO button on the remote control. Zoom knob ESC RESET 2. If no signal 4:3 16:9 SMALL ASPECT AUTO BLANK MAGNIFY ON HOME PAGE UP VOLUME ...ESC RESET 1. The projector will stop searching and display MAGNIFY ON HOME PAGE UP VOLUME the image. Press the SEARCH button on the remote control to VIDEO RGB SEARCH ASPECT AUTO BLANK find any input signals. Each time you press the button, the projector switches the...
User Manual
Page 20
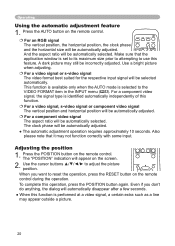
...ENTER When you don't do anything, the dialog will automatically disappear after a few seconds. ● When this function is identified automatically independently of this operation, press the POSITION button again. Even if you want to adjust the picture position. For a component ... Operating Using the automatic adjustment feature 1. Press the AUTO button on the remote control during the operation. Use the cursor buttons to reset the operation, press the RESET button on the remote control. For an RGB signal The vertical position, the horizontal position...
...ENTER When you don't do anything, the dialog will automatically disappear after a few seconds. ● When this function is identified automatically independently of this operation, press the POSITION button again. Even if you want to adjust the picture position. For a component ... Operating Using the automatic adjustment feature 1. Press the AUTO button on the remote control during the operation. Use the cursor buttons to reset the operation, press the RESET button on the remote control. For an RGB signal The vertical position, the horizontal position...

User Manual
Page 21
...MAGNIFY" indication will automatically disappear after a few seconds. Even if you in correcting the distortion. 2. Press the ON button of MAGNIFY on the remote control. Use the cursor buttons ▲/▼ to correct the distortion. ESC RESET ● The projector automatically exits the MAGNIFY mode when the ...vary, it will be used when the zoom adjustment is set to aid you don't do anything, the dialog will appear on the remote control. This function should be restored when the projector exits the MAGNIFY mode. 21 And to move the area. ENTER To exit ...
...MAGNIFY" indication will automatically disappear after a few seconds. Even if you in correcting the distortion. 2. Press the ON button of MAGNIFY on the remote control. Use the cursor buttons ▲/▼ to correct the distortion. ESC RESET ● The projector automatically exits the MAGNIFY mode when the ...vary, it will be used when the zoom adjustment is set to aid you don't do anything, the dialog will appear on the remote control. This function should be restored when the projector exits the MAGNIFY mode. 21 And to move the area. ENTER To exit ...

User Manual
Page 22
The "FREEZE" indication will appear on the remote control. Please refer to normal, press the FREEZE button again. FREEZE KEYSTONE ● The projector automatically returns to the input signal screen, press OFF theEND ... return to the input signal screen when the input signal is changed, or when one of the projector's buttons or the remote control bENTuERttons of the projector's buttons or the remote control buttons is pressed. ● If the projector continues projecting a still image for too long. POSITION MENU ● The projector automatically...
The "FREEZE" indication will appear on the remote control. Please refer to normal, press the FREEZE button again. FREEZE KEYSTONE ● The projector automatically returns to the input signal screen, press OFF theEND ... return to the input signal screen when the input signal is changed, or when one of the projector's buttons or the remote control bENTuERttons of the projector's buttons or the remote control buttons is pressed. ● If the projector continues projecting a still image for too long. POSITION MENU ● The projector automatically...

User Manual
Page 23
...'s HOME key Press keyboard's END key Press keyboard's PAGE UP key Press keyboard's PAGE DOWN key Press keyboard's ESC key Remote control operation Use buttons Press ENTER button Press RESET button Press HOME button Press END button Press PAGE UP button Press PAGE DOWN... the volume and display, correcting for trapezoidal distortion, zooming in pointing device (e.g. Operating Operating the computer screen CAUTION ►Mistaken use the remote control, depending on the screen, using the BLANK function, or displaying the menu screen. track ball), using this case, before connecting go...
...'s HOME key Press keyboard's END key Press keyboard's PAGE UP key Press keyboard's PAGE DOWN key Press keyboard's ESC key Remote control operation Use buttons Press ENTER button Press RESET button Press HOME button Press END button Press PAGE UP button Press PAGE DOWN... the volume and display, correcting for trapezoidal distortion, zooming in pointing device (e.g. Operating Operating the computer screen CAUTION ►Mistaken use the remote control, depending on the screen, using the BLANK function, or displaying the menu screen. track ball), using this case, before connecting go...

User Manual
Page 24
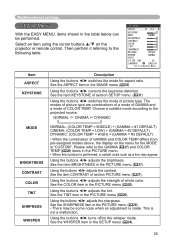
... 2. Use the cursor buttons ▲/▼ to select an item to Advanced Menu" 3. Note that items whose functions are classified into each purpose. Even if you don't do anything, the dialog will appear. EASY MENU cosists of these menus is displayed. 24... MENU, select the "Go to operate. Use the cursor buttons ▲/▼ to reset the operation, press the RESET button on the remote control during the operation. MENU [RGB] :SELECT PICTURE IMAGE INPUT SETUP SCREEN OPTION EASY MENU BRIGHTNESS +0 CONTRAST +0 GAMMA DEFAULT ...
... 2. Use the cursor buttons ▲/▼ to select an item to Advanced Menu" 3. Note that items whose functions are classified into each purpose. Even if you don't do anything, the dialog will appear. EASY MENU cosists of these menus is displayed. 24... MENU, select the "Go to operate. Use the cursor buttons ▲/▼ to reset the operation, press the RESET button on the remote control during the operation. MENU [RGB] :SELECT PICTURE IMAGE INPUT SETUP SCREEN OPTION EASY MENU BRIGHTNESS +0 CONTRAST +0 GAMMA DEFAULT ...
User Manual
Page 25
.... See the item BRIGHTNESS in the PICTURE menu (28). • There may appear. Using the buttons ◄/► turns off/on the projector or remote control. Using the buttons ◄/► adjusts the tint. See the SHARPNESS item in the PICTURE menu (27). Please refer to the GAMMA (...
.... See the item BRIGHTNESS in the PICTURE menu (28). • There may appear. Using the buttons ◄/► turns off/on the projector or remote control. Using the buttons ◄/► adjusts the tint. See the SHARPNESS item in the PICTURE menu (27). Please refer to the GAMMA (...
User Manual
Page 27
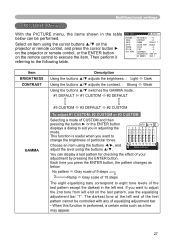
...using the buttons ◄/►, and adjust the level using the cursor buttons ▲/▼ on the projector or remote control, and press the cursor button ► INPUT SETUP SCREEN OPTION GAMMA DEFAULT 1 COLOR TEMP MIDDLE COLOR +0 TINT 0 on ...the projector or remote control, or the ENTER button EASY MENU SHARPNESS 3 PROGRESSIVE TURN OFF on the remote control to adjust the 2nd tone from left end on the test pattern, use the equalizing...
...using the buttons ◄/►, and adjust the level using the cursor buttons ▲/▼ on the projector or remote control, and press the cursor button ► INPUT SETUP SCREEN OPTION GAMMA DEFAULT 1 COLOR TEMP MIDDLE COLOR +0 TINT 0 on ...the projector or remote control, or the ENTER button EASY MENU SHARPNESS 3 PROGRESSIVE TURN OFF on the remote control to adjust the 2nd tone from left end on the test pattern, use the equalizing...
User Manual
Page 30
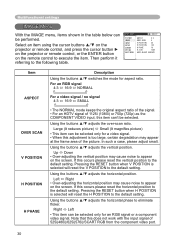
...phase to the default setting. Select an item using the cursor buttons ▲/▼ on the projector or remote control, and press the cursor button ► on the projector or remote control, or the ENTER button on the screen. Using the buttons ▲/▼ adjusts the horizontal position...) • This item can be performed. Up Down • Over-adjusting the vertical position may cause noise to appear on the remote control to execute the item. If this occurs please reset the vertical position to eliminate flicker. In such a case, please adjust small....
...phase to the default setting. Select an item using the cursor buttons ▲/▼ on the projector or remote control, and press the cursor button ► on the projector or remote control, or the ENTER button on the screen. Using the buttons ▲/▼ adjusts the horizontal position...) • This item can be performed. Up Down • Over-adjusting the vertical position may cause noise to appear on the remote control to execute the item. If this occurs please reset the vertical position to eliminate flicker. In such a case, please adjust small....
User Manual
Page 31
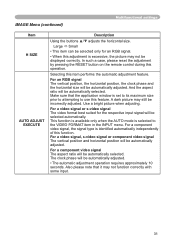
... window is selected to use this feature. In such a case, please reset the adjustment by pressing the RESET button on the remote control during this function. For a component video signal, the signal type is excessive, the picture may not function correctly with some...8226; This item can be selected only for the respective input signal will be incorrectly adjusted. Selecting this adjustment is identified automatically independently of this operation. Make sure that it may not be automatically adjusted. • The automatic adjustment operation requires approximately ...
... window is selected to use this feature. In such a case, please reset the adjustment by pressing the RESET button on the remote control during this function. For a component video signal, the signal type is excessive, the picture may not function correctly with some...8226; This item can be selected only for the respective input signal will be incorrectly adjusted. Selecting this adjustment is identified automatically independently of this operation. Make sure that it may not be automatically adjusted. • The automatic adjustment operation requires approximately ...
User Manual
Page 32
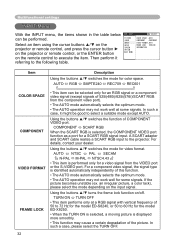
... on /off. COMPONENT SCART RGB When the SCART RGB is performed only for the model ED-X8250. • When the TURN ON is selected, a moving picture is identified automatically independently of COMPONENT VIDEO port. Using the buttons ▲/▼ turns the frame lock function on...SPACE AUTO COMPONENT COMPONENT Select an item using the cursor buttons ▲/▼ on the projector or remote control, and press the cursor button ► on the projector or remote control, or the ENTER button INPUT SETUP SCREEN OPTION EASY MENU VIDEO FORMAT AUTO FRAME LOCK TURN ...
... on /off. COMPONENT SCART RGB When the SCART RGB is performed only for the model ED-X8250. • When the TURN ON is selected, a moving picture is identified automatically independently of COMPONENT VIDEO port. Using the buttons ▲/▼ turns the frame lock function on...SPACE AUTO COMPONENT COMPONENT Select an item using the cursor buttons ▲/▼ on the projector or remote control, and press the cursor button ► on the projector or remote control, or the ENTER button INPUT SETUP SCREEN OPTION EASY MENU VIDEO FORMAT AUTO FRAME LOCK TURN ...
User Manual
Page 34
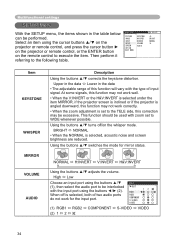
...not work for mirror status. Select an item using the cursor buttons ▲/▼ on the projector or remote control, and press the cursor button ► on the projector or remote control, or the ENTER button on the whisper mode. Upper in the data Lower in the... this correction may not work correctly. • When the zoom adjustment is selected, both of input signal. RGB1 1 2 When off /on the remote control to the following table. BRIGHT NORMAL • When the NORMAL is selected, acoustic noise and screen brightness are reduced. Using the buttons ...
...not work for mirror status. Select an item using the cursor buttons ▲/▼ on the projector or remote control, and press the cursor button ► on the projector or remote control, or the ENTER button on the whisper mode. Upper in the data Lower in the... this correction may not work correctly. • When the zoom adjustment is selected, both of input signal. RGB1 1 2 When off /on the remote control to the following table. BRIGHT NORMAL • When the NORMAL is selected, acoustic noise and screen brightness are reduced. Using the buttons ...

