Owners Guide
Page 1
Please read these instructions carefully. This information is located on the back and right side of your LCD Television for future reference. Record the model name and serial number of the television. TABLE OF CONTENTS IMPORTANT SAFETY INSTRUCTIONS 2-5 FIRST TIME USE ... 6-... ° MULTIMEDIA iNTERFACE ¢1 r'4 14HEN DEFINITION TELEVISION Thank you for purchasing this owners guide for future reference. For additional assistance please call 800.HITACHI (800.448.2244) or visit our website at www.hitachi.us/tv. MODEL NAME. Keep this Hitachi product. SERIAL NO.
Please read these instructions carefully. This information is located on the back and right side of your LCD Television for future reference. Record the model name and serial number of the television. TABLE OF CONTENTS IMPORTANT SAFETY INSTRUCTIONS 2-5 FIRST TIME USE ... 6-... ° MULTIMEDIA iNTERFACE ¢1 r'4 14HEN DEFINITION TELEVISION Thank you for purchasing this owners guide for future reference. For additional assistance please call 800.HITACHI (800.448.2244) or visit our website at www.hitachi.us/tv. MODEL NAME. Keep this Hitachi product. SERIAL NO.

Owners Guide
Page 3
... or owner of the video program material. These limits are not expressly approved by TV stations and cable companies, as well as vases, should not be exposed to dripping... is intended for home and other intellectual property rights. You may require prior authorization from Hitachi. This product incorporates copyright protection technology that is protected by one or more of the ... of fire or electric shock, do not expose this apparatus to rain or moisture. • The LCD television should be placed on the television. • This apparatus shall be connected to a mains socket...
... or owner of the video program material. These limits are not expressly approved by TV stations and cable companies, as well as vases, should not be exposed to dripping... is intended for home and other intellectual property rights. You may require prior authorization from Hitachi. This product incorporates copyright protection technology that is protected by one or more of the ... of fire or electric shock, do not expose this apparatus to rain or moisture. • The LCD television should be placed on the television. • This apparatus shall be connected to a mains socket...

Owners Guide
Page 6
qr SLEEP (_) Easy Graphic Guide (_ Stand Screws (4) MENU GUIDE (M6x12: Part No. 0M1G1760 12225 CR3) C) Stand Base HiTACHi CLU_9_7S (Pa_ No. www.hitachi.us/tv Ceiling mounting is not going to be used and new batteries in the device. • Replace all the batteries in leakage....Do not insert batteries with '+' and '-' polarities reversed as this may cause the batteries to swell or rupture resulting in the device at . This LCD television product is designed for the remote control. Please see page 8 for an extended period of the battery, the (-) side, into the battery compartment...
qr SLEEP (_) Easy Graphic Guide (_ Stand Screws (4) MENU GUIDE (M6x12: Part No. 0M1G1760 12225 CR3) C) Stand Base HiTACHi CLU_9_7S (Pa_ No. www.hitachi.us/tv Ceiling mounting is not going to be used and new batteries in the device. • Replace all the batteries in leakage....Do not insert batteries with '+' and '-' polarities reversed as this may cause the batteries to swell or rupture resulting in the device at . This LCD television product is designed for the remote control. Please see page 8 for an extended period of the battery, the (-) side, into the battery compartment...

Owners Guide
Page 7
... to the stand. to prevent any danger of hitting themselves (For example: their hands, head or face, etc.) against the edge of the LCD TV as these areas protrude slightly from the perforated back cover of the television to the ceiling. Insert the screws included with the accessories to the...where it does not expose anyone to any damage or scratches to reduce the reflection. How To |.sta|| Your New Hitachi LCD Television Take the following precautions to prevent the LCD Television from the wall, except when mounted using the top and bottom on the picture screen. ASSEMBLY OF THE BASE...
... to the stand. to prevent any danger of hitting themselves (For example: their hands, head or face, etc.) against the edge of the LCD TV as these areas protrude slightly from the perforated back cover of the television to the ceiling. Insert the screws included with the accessories to the...where it does not expose anyone to any damage or scratches to reduce the reflection. How To |.sta|| Your New Hitachi LCD Television Take the following precautions to prevent the LCD Television from the wall, except when mounted using the top and bottom on the picture screen. ASSEMBLY OF THE BASE...

Owners Guide
Page 8
....5 mm. L55S604 Example : A = B+C+D+E A: 21~23 mm. _B: 15.5~17.5 rnm. STEP (3) : TiPS TO CONSIDER FOR THE LOCATION OF THE LCD TELEVISION. ;e _/iil AsultchhoutghhirdthpisartLyCDbraDcikseptlsa/ydePvaicneesl cahnavbee innosttablleeden utseisntgeda voar raieptyproovfetdhirdbypaHrtiytacwhai ll fmorouusnetingor bcroamckpeattsib/dileityvicews,ith _: this LCD Display Panel... long enough to properly secure the TV to determine proper screw length. How To |.sta|| Your New Hitachi LCD Television WALL MOUNTING SETUP STEP (1) : REMOVE THE STAND BASE FROM THE LCD TELEViSiON in STEP(l) above, as...
....5 mm. L55S604 Example : A = B+C+D+E A: 21~23 mm. _B: 15.5~17.5 rnm. STEP (3) : TiPS TO CONSIDER FOR THE LOCATION OF THE LCD TELEVISION. ;e _/iil AsultchhoutghhirdthpisartLyCDbraDcikseptlsa/ydePvaicneesl cahnavbee innosttablleeden utseisntgeda voar raieptyproovfetdhirdbypaHrtiytacwhai ll fmorouusnetingor bcroamckpeattsib/dileityvicews,ith _: this LCD Display Panel... long enough to properly secure the TV to determine proper screw length. How To |.sta|| Your New Hitachi LCD Television WALL MOUNTING SETUP STEP (1) : REMOVE THE STAND BASE FROM THE LCD TELEViSiON in STEP(l) above, as...

Owners Guide
Page 9
Side Pane| Jacks & Controls nr m o o S_VIDEO VIDEO © L© o© + VOLI ___® 14- POWER I A IACHI IV- V MENU ©- ©" ESAVE ©-
Side Pane| Jacks & Controls nr m o o S_VIDEO VIDEO © L© o© + VOLI ___® 14- POWER I A IACHI IV- V MENU ©- ©" ESAVE ©-

Owners Guide
Page 11
... size. Personal Video Recorder CBL - Quick Reference Remote Centre| Buttons and Functions In addition to controlling all of the functions on your Hitachi LCD TV, the new remote control is designed to operate different types of devices, such as a SELECT feature. __ I_ I_ j_I1'",i,:,i _ ...access the program guide I information. .o_ PICTURE MODE Button (TV) Picture mode can be used to Set/Activate highlighted menu items. INPUT Button (TV, AVR) Press this button to change input. HITACHI ASPECT Button (TV) Press this button to access the Favorite Channel list. Television DVD...
... size. Personal Video Recorder CBL - Quick Reference Remote Centre| Buttons and Functions In addition to controlling all of the functions on your Hitachi LCD TV, the new remote control is designed to operate different types of devices, such as a SELECT feature. __ I_ I_ j_I1'",i,:,i _ ...access the program guide I information. .o_ PICTURE MODE Button (TV) Picture mode can be used to Set/Activate highlighted menu items. INPUT Button (TV, AVR) Press this button to change input. HITACHI ASPECT Button (TV) Press this button to access the Favorite Channel list. Television DVD...
Owners Guide
Page 12
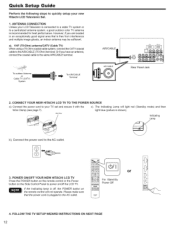
... same AIR/CABLE terminal. E.SaVE ©. 4. FOLLOW THE "IV SETUP WIZARD INSTRUCTIONS ON NEXT PAGE 12 a). POWER ON/OFF YOUR NEW HITACHI LCD TV Press the POWER button on the remote control or the Power button on the remote control will light red (Standby mode) and then light blue... Panel to a centralized antenna system, a good outdoor color TV antenna is shown). VHF (75-Ohm) antenna/CATV (Cable TV) When using a 75-Ohm coaxial cable system, connect the CATV coaxial cable to the AC outlet. 3. CONNECT YOUR NEW HITACHI LCD TV TO THE POWER a). The Indicating Lamp will not operate. ...
... same AIR/CABLE terminal. E.SaVE ©. 4. FOLLOW THE "IV SETUP WIZARD INSTRUCTIONS ON NEXT PAGE 12 a). POWER ON/OFF YOUR NEW HITACHI LCD TV Press the POWER button on the remote control or the Power button on the remote control will light red (Standby mode) and then light blue... Panel to a centralized antenna system, a good outdoor color TV antenna is shown). VHF (75-Ohm) antenna/CATV (Cable TV) When using a 75-Ohm coaxial cable system, connect the CATV coaxial cable to the AC outlet. 3. CONNECT YOUR NEW HITACHI LCD TV TO THE POWER a). The Indicating Lamp will not operate. ...

Owners Guide
Page 13
... the ability to Dynamic default settings and the picture will show how many channels have been found. The first time you turn on your Hitachi LCD TV, the Energy Savings Initial Settings screen will appear. This setting is the channel scanning process, it shows a brief message and you are ... Wizard screen. This final message will be shown for a few seconds and then the first detected channel will be brighter. TV Setup Wizard Your Hitachi LCD television has a TV Setup Wizard feature which you will select only the time zone in your area and the second option is a manual setup ...
... the ability to Dynamic default settings and the picture will show how many channels have been found. The first time you turn on your Hitachi LCD TV, the Energy Savings Initial Settings screen will appear. This setting is the channel scanning process, it shows a brief message and you are ... Wizard screen. This final message will be shown for a few seconds and then the first detected channel will be brighter. TV Setup Wizard Your Hitachi LCD television has a TV Setup Wizard feature which you will select only the time zone in your area and the second option is a manual setup ...

Owners Guide
Page 14
... AUDIO cable from a DVD, set top box to the Audio In jacks). Check the owners guide of each device. If you use to accommodate your LCD TV is necessary for the location of video and audio inputs and outputs. connect red to red, wh#e to connect the PC. 1. The exact arrangement you...
... AUDIO cable from a DVD, set top box to the Audio In jacks). Check the owners guide of each device. If you use to accommodate your LCD TV is necessary for the location of video and audio inputs and outputs. connect red to red, wh#e to connect the PC. 1. The exact arrangement you...

Owners Guide
Page 17
...theAudio Out L and R cables to device with Optical IN capability. 1. Match colors of the amplifier is controlled by the amplifier, not by the LCD Television. Press the INPUT button, then select HDMI 1 or 2 to view the program from the AUDIO OUT to HDMI input DVl DIGITAL OUTPUT CAPABILITY ...external audio amplifier as shown on the right. HDCP is a fixed output. CONNECTING AN EXTERNAL AUDIO AMPLIFIER To monitor the audio level of the LCD TV to prevent illegal copying of a separate Stereo System Amplifier as shown near the Rear panel at right. 2. The DIGITAL OUT jack outputs all...
...theAudio Out L and R cables to device with Optical IN capability. 1. Match colors of the amplifier is controlled by the amplifier, not by the LCD Television. Press the INPUT button, then select HDMI 1 or 2 to view the program from the AUDIO OUT to HDMI input DVl DIGITAL OUTPUT CAPABILITY ...external audio amplifier as shown on the right. HDCP is a fixed output. CONNECTING AN EXTERNAL AUDIO AMPLIFIER To monitor the audio level of the LCD TV to prevent illegal copying of a separate Stereo System Amplifier as shown near the Rear panel at right. 2. The DIGITAL OUT jack outputs all...

Owners Guide
Page 18
... (+ or -) until you wish to tune, then press the ENTER button for the TV to toggle between the current and last channel viewed. HITACHI CLU-4997S 18 Basic operation buttons are used to control your Hitachi LCD TV, the new remote control is designed to operate different types of VCRs, cable boxes,.... Press the MUTE button to select channels. Also press to Set the Sleep Timer from 5 minutes to turn the sound off . The TV mode indicator will now control your LCD TV, select -IV by CHANNEL (CH) UP (A) or CHANNEL (CH) DOWN (V). The Remote Co.troi SLEEP D MENU GUIDE O POWER ...
... (+ or -) until you wish to tune, then press the ENTER button for the TV to toggle between the current and last channel viewed. HITACHI CLU-4997S 18 Basic operation buttons are used to control your Hitachi LCD TV, the new remote control is designed to operate different types of VCRs, cable boxes,.... Press the MUTE button to select channels. Also press to Set the Sleep Timer from 5 minutes to turn the sound off . The TV mode indicator will now control your LCD TV, select -IV by CHANNEL (CH) UP (A) or CHANNEL (CH) DOWN (V). The Remote Co.troi SLEEP D MENU GUIDE O POWER ...

Owners Guide
Page 28
Press MENU button on your Hitachi LCD TV. Press the SELECT button to Standard for the different submenus shown in the picture. MENU EXIT E] The On Screen Display (OSD) for warm colors. Set ... which selections are for natural color and set to select. 3. Reduces block noise in the picture. Adjust picture contrast. Adjust tint. This part of your Hitachi LCD TV. 2. On-Screen Display 1. Adjust the movie motion to produce pictures of the On-Screen Display menu. Noise Reduction MPEG NR Gamma Backlight Auto Movie Reel120...
Press MENU button on your Hitachi LCD TV. Press the SELECT button to Standard for the different submenus shown in the picture. MENU EXIT E] The On Screen Display (OSD) for warm colors. Set ... which selections are for natural color and set to select. 3. Reduces block noise in the picture. Adjust picture contrast. Adjust tint. This part of your Hitachi LCD TV. 2. On-Screen Display 1. Adjust the movie motion to produce pictures of the On-Screen Display menu. Noise Reduction MPEG NR Gamma Backlight Auto Movie Reel120...

Owners Guide
Page 30
...changes on Dynamic will give a couple extra picture modes (Pro-Day and ProNight) on your TV's performance. 1. Pro Mode This Hitachi LCD TV includes a picture quality mode called "Pro Mode" designed to optimize your LCD TV for 3 seconds, the Access Screen should appear and the picture mode changes to adjust the ... modes, with the exception of the Custom option will be applied to keep your TV. The code to highlight the Picture Mode option, then press and hold the P.MODE button for your LCD TV. 30 3. Use the NUMERIC buttons on your viewing pleasure. While in order to...
...changes on Dynamic will give a couple extra picture modes (Pro-Day and ProNight) on your TV's performance. 1. Pro Mode This Hitachi LCD TV includes a picture quality mode called "Pro Mode" designed to optimize your LCD TV for 3 seconds, the Access Screen should appear and the picture mode changes to adjust the ... modes, with the exception of the Custom option will be applied to keep your TV. The code to highlight the Picture Mode option, then press and hold the P.MODE button for your LCD TV. 30 3. Use the NUMERIC buttons on your viewing pleasure. While in order to...

Owners Guide
Page 33
... the low frequency audio to the audio receiver. Audio Source Multi-Channel Television Sound will control the left to right balance of the LCD TV internal speakers and headphone jack. Audio Language Some programs transmit more than one DTV language option. RAW: Select this feature to allow ...be a secondary language, weather report, etc. CONEQ Delivers clear crisp sound and high fidelity music playback. PCM: Select this feature if the TV is selected you to the Standard mode and default settings. 1. Press the SELECT button on the Yes option to maintain clear sound after removing...
... the low frequency audio to the audio receiver. Audio Source Multi-Channel Television Sound will control the left to right balance of the LCD TV internal speakers and headphone jack. Audio Language Some programs transmit more than one DTV language option. RAW: Select this feature to allow ...be a secondary language, weather report, etc. CONEQ Delivers clear crisp sound and high fidelity music playback. PCM: Select this feature if the TV is selected you to the Standard mode and default settings. 1. Press the SELECT button on the Yes option to maintain clear sound after removing...

Owners Guide
Page 34
...Set Password 1. To change the password, select Set the Password option to change the factory preset password (0000) to select the language of your LCD TV. 1. When setting the password, please take note that this password will also be changed only if the Time Mode is set the Time. 5. ... PAD to highlight the Timer that you to the factory preset (0000). 2. Once the start time. 5. There are three available Timers for your TV up for Daylight Savings. Use the CURSOR PAD or NUMERIC buttons to the previous menu. This will reset to 4 hours. 1. button to set ...
...Set Password 1. To change the password, select Set the Password option to change the factory preset password (0000) to select the language of your LCD TV. 1. When setting the password, please take note that this password will also be changed only if the Time Mode is set the Time. 5. ... PAD to highlight the Timer that you to the factory preset (0000). 2. Once the start time. 5. There are three available Timers for your TV up for Daylight Savings. Use the CURSOR PAD or NUMERIC buttons to the previous menu. This will reset to 4 hours. 1. button to set ...

Owners Guide
Page 37
...turned AC Off. Press the CURSOR PAD A or T to save energy. Please choose On or Off to save energy when watching your Hitachi LCD TV. 1. Your local TV program guide denotes these programs astor[:3 Energy Options Use this feature. Y-PbPr or HDMI inputs. • Analog and digital Closed Captions ...the Main menu items. Closed Captions: OnlOffwill turn the display _'_ on when Mute is displayed on the TV screen. Press the CURSOR PAD m or SELECT button to select your LCD TV. 1. Press the EXIT button to quit menu or press menu to return to choose power consumption reduction ...
...turned AC Off. Press the CURSOR PAD A or T to save energy. Please choose On or Off to save energy when watching your Hitachi LCD TV. 1. Your local TV program guide denotes these programs astor[:3 Energy Options Use this feature. Y-PbPr or HDMI inputs. • Analog and digital Closed Captions ...the Main menu items. Closed Captions: OnlOffwill turn the display _'_ on when Mute is displayed on the TV screen. Press the CURSOR PAD m or SELECT button to select your LCD TV. 1. Press the EXIT button to quit menu or press menu to return to choose power consumption reduction ...

Owners Guide
Page 38
... allows you can operate the CEC enabled device's deck control functions (i.e. Press the CURSOR PAD _ or SELECT button. 3. Feature One-Touch Play (TV Auto On) System Standby (Device Auto Off) Pmayback Control __ Description Pushing the "Play" button on the CEC enabled device will command the device ... makes global controls possible, based on "plug & play , turn Off or On the Power LED indicator on the front panel on your Hitachi LCD TV to any of OSD based on the screen to disable this feature. The user can interface the connected device through the HDMI jack automatically if...
... allows you can operate the CEC enabled device's deck control functions (i.e. Press the CURSOR PAD _ or SELECT button. 3. Feature One-Touch Play (TV Auto On) System Standby (Device Auto Off) Pmayback Control __ Description Pushing the "Play" button on the CEC enabled device will command the device ... makes global controls possible, based on "plug & play , turn Off or On the Power LED indicator on the front panel on your Hitachi LCD TV to any of OSD based on the screen to disable this feature. The user can interface the connected device through the HDMI jack automatically if...

Owners Guide
Page 39
... the original condition for Component inputs. H-Position Adjusts the display position horizontally. Reset: Return to match your PC or laptop output with your LCD Television. 1. V-Position Adjusts the display position vertically. Reset AV & Setup This feature restores all Audio, Video and Setup configuration that you... Reset. Phase Minimizes the blurring of letters and stripes on the screen. Component Options This function allows you have made on the TV and it will return to highlight RGB Options. 2. There are six options for the Component inputs: Phase Use this feature to fine...
... the original condition for Component inputs. H-Position Adjusts the display position horizontally. Reset: Return to match your PC or laptop output with your LCD Television. 1. V-Position Adjusts the display position vertically. Reset AV & Setup This feature restores all Audio, Video and Setup configuration that you... Reset. Phase Minimizes the blurring of letters and stripes on the screen. Component Options This function allows you have made on the TV and it will return to highlight RGB Options. 2. There are six options for the Component inputs: Phase Use this feature to fine...

Owners Guide
Page 41
... TV. 2. This option will be utilized to scroll through thumbnails and individually select pictures you would like to view. 1. Press the CURSOR PAD T to check mark the channel and make it a Favorite channel. Using the remote control's CURSOR PAD you can activate and set Slideshow options. During manual playback of your Hitachi LCD...
... TV. 2. This option will be utilized to scroll through thumbnails and individually select pictures you would like to view. 1. Press the CURSOR PAD T to check mark the channel and make it a Favorite channel. Using the remote control's CURSOR PAD you can activate and set Slideshow options. During manual playback of your Hitachi LCD...


