
User Manual
Page 3
... The Air Filterʜʜʜʜ39 Other Care 40 Caring For The Inside Of The Projector 40 Caring For The Lens ʜʜʜʜʜ40 Caring For The Cabinet And Remote Control 40 Troubleshooting 41 Related Messages 41 Regarding The Indicator Lamps 43 Phenomena That May Easily Be...
... The Air Filterʜʜʜʜ39 Other Care 40 Caring For The Inside Of The Projector 40 Caring For The Lens ʜʜʜʜʜ40 Caring For The Cabinet And Remote Control 40 Troubleshooting 41 Related Messages 41 Regarding The Indicator Lamps 43 Phenomena That May Easily Be...

User Manual
Page 4
... IN R/L port I VIDEO IN port J S-VIDEO port K COMPONENT port L RGB OUT port M AUDIO OUT port 7 REMOTE CONTROL port 8 DC OUT port 9 AC Inlet 0 Power switch - Control buttons See the following page. 4 Projector (Front/Right) - Part Names Projector TEMP LAMP STANDBY/ON LENS SHIFT BNG COMPONENT S-VIDEO VIDEO MENU 3 5 4 FOCUS ZOOM KEYSTONE SEARCH RESET...
... IN R/L port I VIDEO IN port J S-VIDEO port K COMPONENT port L RGB OUT port M AUDIO OUT port 7 REMOTE CONTROL port 8 DC OUT port 9 AC Inlet 0 Power switch - Control buttons See the following page. 4 Projector (Front/Right) - Part Names Projector TEMP LAMP STANDBY/ON LENS SHIFT BNG COMPONENT S-VIDEO VIDEO MENU 3 5 4 FOCUS ZOOM KEYSTONE SEARCH RESET...

User Manual
Page 5
...STANDBY/ON LENS SHIFT BNG COMPONENT S-VIDEO VIDEO MENU INTER RESET FOCUS ZOOM RGB M1-D INPUT KEYSTONE SEARCH Control Panel on the Projector Remote Control 1 STANDBY/ON button 4 LENS SHIFT buttons 6 SEARCH button q ZOOM buttons w FOCUS buttons e KEYSTONE button r MENU... ENTER ESC MENU POSITION RESET AUTO MAGNFY PinP VOLUME ON FREEZE MUTE OFF KEYSTONE SEARCH 1 2 3 ID CHANGE o p [ \ ] a d t g l ; 6 ' Remote Control 1 STANDBY/ON button and STANDBY/ON indicator 2 TEMP indicator 3 LAMP indicator 4 LENS SHIFT buttons 5 INPUT dial 6 SEARCH button 7 M1-D indicator 8 RGB indicator 9 BNC...
...STANDBY/ON LENS SHIFT BNG COMPONENT S-VIDEO VIDEO MENU INTER RESET FOCUS ZOOM RGB M1-D INPUT KEYSTONE SEARCH Control Panel on the Projector Remote Control 1 STANDBY/ON button 4 LENS SHIFT buttons 6 SEARCH button q ZOOM buttons w FOCUS buttons e KEYSTONE button r MENU... ENTER ESC MENU POSITION RESET AUTO MAGNFY PinP VOLUME ON FREEZE MUTE OFF KEYSTONE SEARCH 1 2 3 ID CHANGE o p [ \ ] a d t g l ; 6 ' Remote Control 1 STANDBY/ON button and STANDBY/ON indicator 2 TEMP indicator 3 LAMP indicator 4 LENS SHIFT buttons 5 INPUT dial 6 SEARCH button 7 M1-D indicator 8 RGB indicator 9 BNC...
User Manual
Page 7
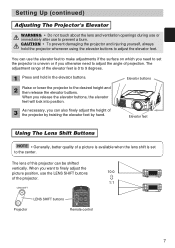
.... 1 Press and hold the projector whenever using the elevator buttons to adjust the angle of this projector can use the elevator feet to make adjustments if the surface on which you need to adjust the elevator feet. The lens of projection. BLANK ASPECT LASER Remote control 10:0 1 :1 7... The adjustment range of the projector. When you release the elevator buttons, the elevator feet will lock into position. 3 As necessary, you want ...
.... 1 Press and hold the projector whenever using the elevator buttons to adjust the angle of this projector can use the elevator feet to make adjustments if the surface on which you need to adjust the elevator feet. The lens of projection. BLANK ASPECT LASER Remote control 10:0 1 :1 7... The adjustment range of the projector. When you release the elevator buttons, the elevator feet will lock into position. 3 As necessary, you want ...
User Manual
Page 9
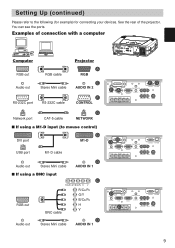
... Y BNC R-AUDIO IN-L VIDEO S-VIDEO Computer RGB out RGB cable Audio out Stereo Mini cable RS-232C port RS-232C cable Projector A RGB E AUDIO IN 2 F CONTROL E AUDIO IN1 AUDIO IN2 A RGB REMOTE CONTROL FG CONTROL NETWORK RGB OUT AUDIO OUT CR/PR Ca/Pa Y R/CR/PR G/Y B/CB/PB H V BNC R-AUDIO IN-L VIDEO...
... Y BNC R-AUDIO IN-L VIDEO S-VIDEO Computer RGB out RGB cable Audio out Stereo Mini cable RS-232C port RS-232C cable Projector A RGB E AUDIO IN 2 F CONTROL E AUDIO IN1 AUDIO IN2 A RGB REMOTE CONTROL FG CONTROL NETWORK RGB OUT AUDIO OUT CR/PR Ca/Pa Y R/CR/PR G/Y B/CB/PB H V BNC R-AUDIO IN-L VIDEO...
User Manual
Page 10
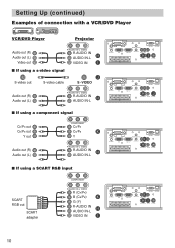
... VCR/DVD Player Projector Audio out (R) Audio out (L) Video out R-AUDIO IN-L VIDEO R-AUDIO IN AUDIO IN-L H VIDEO IN I ■ If using a s-video signal S-video out S-video cable J S -VIDEO Audio out (R) Audio out (L) R-AUDIO IN-L VIDEO R-AUDIO IN H AUDIO IN-L AUDIO IN1 REMOTE CONTROL CONTROL NETWORK ... RGB out SCART adapter COMPONENT R-AUDIO IN-L VIDEO R (CR/PR) B (CB/PB) K G (Y) R-AUDIO IN H AUDIO IN-L VIDEO IN I AUDIO IN1 REMOTE CONTROL K CONTROL NETWORK AUDIO IN2 RGB RGB OUT R/CR/PR G/Y B/CB/PB H V AUDIO OUT CR/PR Ca/Pa Y HI R-AUDIO IN-L VIDEO S-VIDEO BNC...
... VCR/DVD Player Projector Audio out (R) Audio out (L) Video out R-AUDIO IN-L VIDEO R-AUDIO IN AUDIO IN-L H VIDEO IN I ■ If using a s-video signal S-video out S-video cable J S -VIDEO Audio out (R) Audio out (L) R-AUDIO IN-L VIDEO R-AUDIO IN H AUDIO IN-L AUDIO IN1 REMOTE CONTROL CONTROL NETWORK ... RGB out SCART adapter COMPONENT R-AUDIO IN-L VIDEO R (CR/PR) B (CB/PB) K G (Y) R-AUDIO IN H AUDIO IN-L VIDEO IN I AUDIO IN1 REMOTE CONTROL K CONTROL NETWORK AUDIO IN2 RGB RGB OUT R/CR/PR G/Y B/CB/PB H V AUDIO OUT CR/PR Ca/Pa Y HI R-AUDIO IN-L VIDEO S-VIDEO BNC...

User Manual
Page 11
...the ground connection of the three-pronged plug. • Make sure that came with amplifier) Speaker Audio in Stereo Mini cable Projector M AUDIO OUT AUDIO IN1 AUDIO IN2 RGB RGB OUT REMOTE CONTROL M AUDIO OUT CR/PR Ca/Pa CONTROL Y NETWORK R/CR/PR G/Y B/CB/PB H V BNC R-AUDIO IN-L... IN-L VIDEO S-VIDEO AC Inlet Connector Outlet Plug 11 Setting Up (continued) Connecting to a monitor Monitor RGB in RGB cable Projector L RGB OUT AUDIO IN1 AUDIO IN2 RGB L RGB OUT REMOTE CONTROL AUDIO OUT CR/PR Ca/Pa CONTROL Y NETWORK R/CR/PR G/Y B/CB/PB H V BNC R-AUDIO IN-L VIDEO ...
...the ground connection of the three-pronged plug. • Make sure that came with amplifier) Speaker Audio in Stereo Mini cable Projector M AUDIO OUT AUDIO IN1 AUDIO IN2 RGB RGB OUT REMOTE CONTROL M AUDIO OUT CR/PR Ca/Pa CONTROL Y NETWORK R/CR/PR G/Y B/CB/PB H V BNC R-AUDIO IN-L... IN-L VIDEO S-VIDEO AC Inlet Connector Outlet Plug 11 Setting Up (continued) Connecting to a monitor Monitor RGB in RGB cable Projector L RGB OUT AUDIO IN1 AUDIO IN2 RGB L RGB OUT REMOTE CONTROL AUDIO OUT CR/PR Ca/Pa CONTROL Y NETWORK R/CR/PR G/Y B/CB/PB H V BNC R-AUDIO IN-L VIDEO ...
User Manual
Page 12
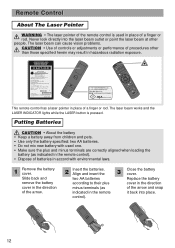
... ASPECT LASER BLANK NEXT PREVIOUS ENTER INTERLINK ELECTRONICS JQA P S C MADE IN CHINA MENU AUTO ESPCOSITMIOANGNOFNRYOESFEFPTinFPREKEEZYVESOTLOUNMMEEUTSEEARCH 1 2 3 ID CHANGE This remote control has a laser pointer in place of procedures other people. Align and insert the 3 Close the battery cover. Slide back and ...battery cover in the direction of the arrow and snap indicated in the direction minus terminals (as indicated in the remote control). • Dispose of batteries in hazardous radiation exposure. Putting Batteries CAUTION • About the battery &#...
... ASPECT LASER BLANK NEXT PREVIOUS ENTER INTERLINK ELECTRONICS JQA P S C MADE IN CHINA MENU AUTO ESPCOSITMIOANGNOFNRYOESFEFPTinFPREKEEZYVESOTLOUNMMEEUTSEEARCH 1 2 3 ID CHANGE This remote control has a laser pointer in place of procedures other people. Align and insert the 3 Close the battery cover. Slide back and ...battery cover in the direction of the arrow and snap indicated in the direction minus terminals (as indicated in the remote control). • Dispose of batteries in hazardous radiation exposure. Putting Batteries CAUTION • About the battery &#...
User Manual
Page 13
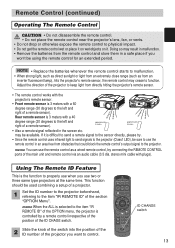
... You can use the remote control as from the remote control and store them in the screen etc. Adjust the direction of the projector to keep light from directly hitting the projector's remote sensor. • The remote control works with the projector's remote sensor. • Front remote sensor is 3 meters ...of the switch into the position of the ID number of a remote sensor). Remote Control (continued) Operating The Remote Control CAUTION • Do not disassemble the remote control. • Do not place the remote control near the projector's lens, fan, or vents. • Do not drop or...
... You can use the remote control as from the remote control and store them in the screen etc. Adjust the direction of the projector to keep light from directly hitting the projector's remote sensor. • The remote control works with the projector's remote sensor. • Front remote sensor is 3 meters ...of the switch into the position of the ID number of a remote sensor). Remote Control (continued) Operating The Remote Control CAUTION • Do not disassemble the remote control. • Do not place the remote control near the projector's lens, fan, or vents. • Do not drop or...

User Manual
Page 14
...of the mouse/keyboard control could damage your equipment. • Only connect to the computer via the M1-D cable. memo The projector would be enabled. BLANK ASPECT LASER PREVIOUS NEXT ENTER ESC MENU POSITION RESET AUTO MAGNFY PinP VOLUME ON FREEZE MUTE OFF KEYSTONE SEARCH... 14 LASER INDICATOR STANDBY/ON VIDEO RGB ++ LENS SHIFT FOCUS -- + ZOOM - Mistaken use the remote control, depending on the right. Then functions illustrated below will connect. Remote Control (continued) Using The Mouse/Keyboard Control Function CAUTION • Before connecting, read the manuals of...
...of the mouse/keyboard control could damage your equipment. • Only connect to the computer via the M1-D cable. memo The projector would be enabled. BLANK ASPECT LASER PREVIOUS NEXT ENTER ESC MENU POSITION RESET AUTO MAGNFY PinP VOLUME ON FREEZE MUTE OFF KEYSTONE SEARCH... 14 LASER INDICATOR STANDBY/ON VIDEO RGB ++ LENS SHIFT FOCUS -- + ZOOM - Mistaken use the remote control, depending on the right. Then functions illustrated below will connect. Remote Control (continued) Using The Mouse/Keyboard Control Function CAUTION • Before connecting, read the manuals of...
User Manual
Page 15
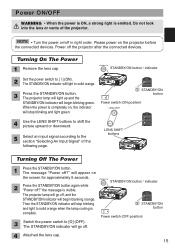
... buttons to shift the picture upward or downward. 5 Select an input signal according to the section "Selecting An Input Signal" of the projector. NOTE • Turn the power on the screen for approximately 5 seconds. LENS SHIFT COMPONENTBNG S-VIDEO RGB M1-D INPUT INTER KEYSTONE SEARCH... RESET VIDEO STANDBY/ON MENU TEMP LAMP FOCUS ZOOM AUDIO IN1 REMOTE CONTROL CONTROL NETWORK AUDIO IN2 RGB RGB OUT R/CR/PR G/Y B/CB/PB H V AUDIO OUT CR/PR Ca/Pa Y BNC R-AUDIO ...
... buttons to shift the picture upward or downward. 5 Select an input signal according to the section "Selecting An Input Signal" of the projector. NOTE • Turn the power on the screen for approximately 5 seconds. LENS SHIFT COMPONENTBNG S-VIDEO RGB M1-D INPUT INTER KEYSTONE SEARCH... RESET VIDEO STANDBY/ON MENU TEMP LAMP FOCUS ZOOM AUDIO IN1 REMOTE CONTROL CONTROL NETWORK AUDIO IN2 RGB RGB OUT R/CR/PR G/Y B/CB/PB H V AUDIO OUT CR/PR Ca/Pa Y BNC R-AUDIO ...
User Manual
Page 16
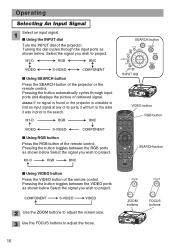
... the input ports as shown below . M1-D RGB BNC VIDEO S-VIDEO COMPONENT ■ Using RGB button Press the RGB button of the projector or the remote control. Select the signal you wish to project. M1-D RGB BNC ■ Using VIDEO button Press the VIDEO button of the... projector. Operating Selecting An Input Signal 1 Select an input signal. ■ Using the INPUT dial Turn the INPUT dial of the remote control. Pressing the button toggles between the RGB ports as shown below Select the ...
... the input ports as shown below . M1-D RGB BNC VIDEO S-VIDEO COMPONENT ■ Using RGB button Press the RGB button of the projector or the remote control. Select the signal you wish to project. M1-D RGB BNC ■ Using VIDEO button Press the VIDEO button of the... projector. Operating Selecting An Input Signal 1 Select an input signal. ■ Using the INPUT dial Turn the INPUT dial of the remote control. Pressing the button toggles between the RGB ports as shown below Select the ...
User Manual
Page 20
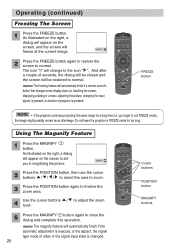
... as an afterimage. blanking the screen, displaying a dialog or a menu, adjusting the picture, changing the input signal) is pressed, or a button of projector is changed. LASER INDICATOR STANDBY/ON VIDEO RGB ++ LENS SHIFT FOCUS -- + ZOOM - you in FREEZE mode for a long time (i.e. As illustrated on... to the icon " ". As illustrated on the right, a dialog will appear on the right, a dialog will automatically finish if a remote control's button that changes some display state (ex. BLANK ASPECT LASER PREVIOUS NEXT ENTER ESC MENU POSITION RESET AUTO MAGNFY PinP VOLUME ON FREEZE...
... as an afterimage. blanking the screen, displaying a dialog or a menu, adjusting the picture, changing the input signal) is pressed, or a button of projector is changed. LASER INDICATOR STANDBY/ON VIDEO RGB ++ LENS SHIFT FOCUS -- + ZOOM - you in FREEZE mode for a long time (i.e. As illustrated on... to the icon " ". As illustrated on the right, a dialog will appear on the right, a dialog will automatically finish if a remote control's button that changes some display state (ex. BLANK ASPECT LASER PREVIOUS NEXT ENTER ESC MENU POSITION RESET AUTO MAGNFY PinP VOLUME ON FREEZE...
User Manual
Page 22
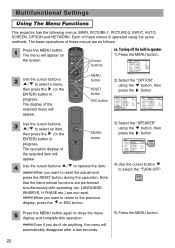
... Select the "OPTION" using the button, then press the button. MENU MAIN PICTURE-1 PICTURE-2 INPUT AUTO SCREEN OPTION NETWORK : SELECT VOLUME SPEAKER IR REMOTE IR REMOTE ID LAMP TIME FILTER TIME SERVICE RESET 16 TURN ON ALL 1234 h 4321 h OPTION SPEAKER TURN ON TURN OFF 4) Use the cursor button to operate... the RESET button during the operation. LANGUAGE, WHISPER, H PHASE etc.) are performed simultaneously with operating (ex. Multifunctional Settings Using The Menu Functions This projector has the following menus: MAIN, PICTURE-1, PICTURE-2, INPUT, AUTO, SCREEN, OPTION and NETWORK.
... Select the "OPTION" using the button, then press the button. MENU MAIN PICTURE-1 PICTURE-2 INPUT AUTO SCREEN OPTION NETWORK : SELECT VOLUME SPEAKER IR REMOTE IR REMOTE ID LAMP TIME FILTER TIME SERVICE RESET 16 TURN ON ALL 1234 h 4321 h OPTION SPEAKER TURN ON TURN OFF 4) Use the cursor button to operate... the RESET button during the operation. LANGUAGE, WHISPER, H PHASE etc.) are performed simultaneously with operating (ex. Multifunctional Settings Using The Menu Functions This projector has the following menus: MAIN, PICTURE-1, PICTURE-2, INPUT, AUTO, SCREEN, OPTION and NETWORK.

User Manual
Page 33
... menu. Perform each operation in accordance with the instructions in speaker works. OPTION IR REMOTE FRONT TOP REAR ENT IR REMOTE ID LAMP TIME Select a number as this number. When the ALL is selected, the projector is continued to 0. Select the RESET using button to reset the timer. : RESET...using the / buttons. : High Low Select the TURN ON or the TURN OFF using the / buttons. : ALL 1 2 3 The projector is controlled by a remote control irrespective of the position of the air filter after cleaning or replacement, to 0. The filter timer counts the used time of the same number...
... menu. Perform each operation in accordance with the instructions in speaker works. OPTION IR REMOTE FRONT TOP REAR ENT IR REMOTE ID LAMP TIME Select a number as this number. When the ALL is selected, the projector is continued to 0. Select the RESET using button to reset the timer. : RESET...using the / buttons. : High Low Select the TURN ON or the TURN OFF using the / buttons. : ALL 1 2 3 The projector is controlled by a remote control irrespective of the position of the air filter after cleaning or replacement, to 0. The filter timer counts the used time of the same number...

User Manual
Page 40
Caring For The Cabinet And Remote Control 1 Turn off the projector, and unplug the power cord. 2 Wipe lightly with a soft, dry cloth. 40...carefully read the "User's Manual - Safety Guide". • Before caring, make sure the power switch is off the projector, and unplug the power cord. 2 Lightly wipe the lens with hard objects. Do not touch about once every 2 ...years. Doing so is dangerous. Do not touch the lens directly with your projector, please have adverse influence such as discoloration, peeling paint, etc. • Do not use cleaner or chemicals...
Caring For The Cabinet And Remote Control 1 Turn off the projector, and unplug the power cord. 2 Wipe lightly with a soft, dry cloth. 40...carefully read the "User's Manual - Safety Guide". • Before caring, make sure the power switch is off the projector, and unplug the power cord. 2 Lightly wipe the lens with hard objects. Do not touch about once every 2 ...years. Doing so is dangerous. Do not touch the lens directly with your projector, please have adverse influence such as discoloration, peeling paint, etc. • Do not use cleaner or chemicals...

User Manual
Page 47
... Drive system Pixels Lens Lamp Speaker Power supply Power consumption Temperature range Size Weight (mass) Ports Optional Parts Lamp Air filter Others Specification Liquid crystal projector 2.5 cm (0.99 type) TFT active matrix 786,432 pixels (1024 horizontal x 768 vertical) Zoom lens F=1.7 ~ 2.4 f=30.5 ~ 45.8...1 AUDIO IN 2 AUDIO IN R/L RGB output port RGB OUT Audio output port AUDIO OUT Control port CONTROL Other ports NETWORK REMOTE CONTROL DC OUT DT00601 NJ08081 • Please consult your dealer or service company. Specifications NOTE • This specifications are subject ...
... Drive system Pixels Lens Lamp Speaker Power supply Power consumption Temperature range Size Weight (mass) Ports Optional Parts Lamp Air filter Others Specification Liquid crystal projector 2.5 cm (0.99 type) TFT active matrix 786,432 pixels (1024 horizontal x 768 vertical) Zoom lens F=1.7 ~ 2.4 f=30.5 ~ 45.8...1 AUDIO IN 2 AUDIO IN R/L RGB output port RGB OUT Audio output port AUDIO OUT Control port CONTROL Other ports NETWORK REMOTE CONTROL DC OUT DT00601 NJ08081 • Please consult your dealer or service company. Specifications NOTE • This specifications are subject ...

Quick Start Guide
Page 1
...RESET AUTO MAGNFY PinP VOLUME ON FREEZE MUTE OFF KEYSTONE SEARCH 1 2 3 ID CHANGE 3 1 Projector & Lens Cap 7 2 Power cords (UK, US, Europe) 3 RGB cable 4 Video/Audio cable 5 M1-D cable 6 Remote control 7 Batteries (for future reference. Max. Safety Guide" and these manuals to change without express...) 1 TEMP LAMP STANDBY/ON LENS SHIFT BNG COMPONENT S-VIDEO VIDEO MENU INTER RESET FOCUS ZOOM RGB M1-D INPUT KEYSTONE SEARCH Projector CP-X1200/CP-X1250 User's Manual - NOTE • The information in case of this document or contents is not permitted without notice. •...
...RESET AUTO MAGNFY PinP VOLUME ON FREEZE MUTE OFF KEYSTONE SEARCH 1 2 3 ID CHANGE 3 1 Projector & Lens Cap 7 2 Power cords (UK, US, Europe) 3 RGB cable 4 Video/Audio cable 5 M1-D cable 6 Remote control 7 Batteries (for future reference. Max. Safety Guide" and these manuals to change without express...) 1 TEMP LAMP STANDBY/ON LENS SHIFT BNG COMPONENT S-VIDEO VIDEO MENU INTER RESET FOCUS ZOOM RGB M1-D INPUT KEYSTONE SEARCH Projector CP-X1200/CP-X1250 User's Manual - NOTE • The information in case of this document or contents is not permitted without notice. •...
Quick Start Guide
Page 2
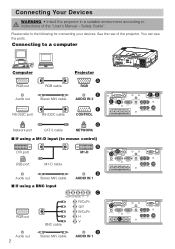
...devices. Connecting to a computer LENS SHIFT COMPONENTBNG S-VIDEO RGB M1-D INPUT INTER KEYSTONE SEARCH RESET VIDEO STANDBY/ON MENU TEMP LAMP FOCUS ZOOM AUDIO IN1 REMOTE CONTROL CONTROL NETWORK AUDIO IN2 RGB RGB OUT R/CR/PR G/Y B/CB/PB H V AUDIO OUT CR/PR Ca/Pa Y BNC R-AUDIO IN-L... VIDEO S-VIDEO Computer RGB out RGB cable Audio out Stereo Mini cable RS-232C port RS-232C cable Projector A RGB E AUDIO IN 2 F CONTROL E AUDIO IN1 AUDIO IN2 A RGB REMOTE CONTROL FG CONTROL NETWORK RGB OUT AUDIO OUT CR/PR Ca/Pa Y R/CR/PR G/Y B/CB/PB H V BNC R-...
...devices. Connecting to a computer LENS SHIFT COMPONENTBNG S-VIDEO RGB M1-D INPUT INTER KEYSTONE SEARCH RESET VIDEO STANDBY/ON MENU TEMP LAMP FOCUS ZOOM AUDIO IN1 REMOTE CONTROL CONTROL NETWORK AUDIO IN2 RGB RGB OUT R/CR/PR G/Y B/CB/PB H V AUDIO OUT CR/PR Ca/Pa Y BNC R-AUDIO IN-L... VIDEO S-VIDEO Computer RGB out RGB cable Audio out Stereo Mini cable RS-232C port RS-232C cable Projector A RGB E AUDIO IN 2 F CONTROL E AUDIO IN1 AUDIO IN2 A RGB REMOTE CONTROL FG CONTROL NETWORK RGB OUT AUDIO OUT CR/PR Ca/Pa Y R/CR/PR G/Y B/CB/PB H V BNC R-...
Quick Start Guide
Page 4
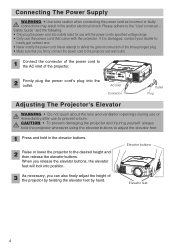
... shock. When you release the elevator buttons, the elevator feet will lock into position. 3 As necessary, you firmly connect the power cord to the projector and wall outlet. 1 Connect the connector of the three-pronged plug. • Make sure that came with the power cord's specified voltage range. ... cord into the outlet. LENS SHIFT COMPONENTBNG S-VIDEO RGB M1-D INPUT INTER KEYSTONE SEARCH RESET VIDEO STANDBY/ON MENU TEMP LAMP FOCUS ZOOM AUDIO IN1 REMOTE CONTROL CONTROL NETWORK AUDIO IN2 RGB RGB OUT R/CR/PR G/Y B/CB/PB H V AUDIO OUT CR/PR Ca/Pa Y BNC R-AUDIO IN-L ...
... shock. When you release the elevator buttons, the elevator feet will lock into position. 3 As necessary, you firmly connect the power cord to the projector and wall outlet. 1 Connect the connector of the three-pronged plug. • Make sure that came with the power cord's specified voltage range. ... cord into the outlet. LENS SHIFT COMPONENTBNG S-VIDEO RGB M1-D INPUT INTER KEYSTONE SEARCH RESET VIDEO STANDBY/ON MENU TEMP LAMP FOCUS ZOOM AUDIO IN1 REMOTE CONTROL CONTROL NETWORK AUDIO IN2 RGB RGB OUT R/CR/PR G/Y B/CB/PB H V AUDIO OUT CR/PR Ca/Pa Y BNC R-AUDIO IN-L ...

