

User Manual
Page 1
OPERATOR'S MANUAL ELECTRIC LAWN MOWER 18 in . - UT13118 20 in . - Properly cared for, it will give you for dependability, ease of rugged, trouble-free performance. Thank you years of operation, and operator safety. SAVE THIS MANUAL FOR FUTURE REFERENCE UT13120 Your lawn mower has been engineered and manufactured to our high standard for your purchase. WARNING: To reduce the risk of injury, the user must read and understand the operator's manual before using this product.
OPERATOR'S MANUAL ELECTRIC LAWN MOWER 18 in . - UT13118 20 in . - Properly cared for, it will give you for dependability, ease of rugged, trouble-free performance. Thank you years of operation, and operator safety. SAVE THIS MANUAL FOR FUTURE REFERENCE UT13120 Your lawn mower has been engineered and manufactured to our high standard for your purchase. WARNING: To reduce the risk of injury, the user must read and understand the operator's manual before using this product.
User Manual
Page 3
...electric shock, this product has a polarized plug (one way. Overreaching can occur if the operator is in safe working condition. Do not use , mower should be caught in loss of electric shock. Make sure your footing on the machine may result in serious personal injury. ... parts. Wear protective footwear that are often attracted to observe all instructions listed below and on slippery surfaces. Do not leave the mower unattended while running. Keep hands and feet away from cutting area. Never use of all nuts, bolts, and screws at least ...
...electric shock, this product has a polarized plug (one way. Overreaching can occur if the operator is in safe working condition. Do not use , mower should be caught in loss of electric shock. Make sure your footing on the machine may result in serious personal injury. ... parts. Wear protective footwear that are often attracted to observe all instructions listed below and on slippery surfaces. Do not leave the mower unattended while running. Keep hands and feet away from cutting area. Never use of all nuts, bolts, and screws at least ...

User Manual
Page 4
... Receptacles are sure the blade has stopped rotating. Disconnect the plug from power source before restarting and continuing to operate the mower. Stop the motor, disconnect the power cord, and wait until you loan someone this measure of accessories. Remove all objects... prior to each use them these instructions. If you must back the mower away from oil or grease. Avoid discharging material against a wall or obstruction, which can cause severe injuries to vibrate abnormally, stop ...
... Receptacles are sure the blade has stopped rotating. Disconnect the plug from power source before restarting and continuing to operate the mower. Stop the motor, disconnect the power cord, and wait until you loan someone this measure of accessories. Remove all objects... prior to each use them these instructions. If you must back the mower away from oil or grease. Avoid discharging material against a wall or obstruction, which can cause severe injuries to vibrate abnormally, stop ...
User Manual
Page 9
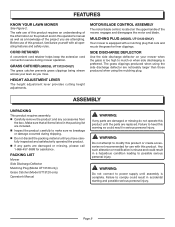
... the information on the upper handle of this operator's manual as well as you mow. PACKING LIST Mower Side Discharge Deflector Mulching Plug (Model UT13120 only) Grass Catcher (Model UT13120 only) Operator's Manual WARNING: If any parts are attempting. Failure to make sure no breakage or... damage occurred during mower operation. MULCHING PLUG (MODEL UT13120 ONLY) Your mower is too high to comply could result in accidental starting and possible serious personal injury. The grass clippings ...
... the information on the upper handle of this operator's manual as well as you mow. PACKING LIST Mower Side Discharge Deflector Mulching Plug (Model UT13120 only) Grass Catcher (Model UT13120 only) Operator's Manual WARNING: If any parts are attempting. Failure to make sure no breakage or... damage occurred during mower operation. MULCHING PLUG (MODEL UT13120 ONLY) Your mower is too high to comply could result in accidental starting and possible serious personal injury. The grass clippings ...
User Manual
Page 10
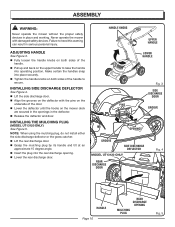
...handles snap into place securely. Tighten the handle knobs on both sides of the handle. Pull up and back on the mower deck are secured in the openings in the deflector. Release the deflector and door. Failure to secure. ADJUSTING HANDLE See Figure 3. ... REAR DISCHARGE DOOR Fig. 4 HANDLE Page 10 REAR DISCHARGE OPENING MULCHING PLUG Fig. 5 INSTALLING THE MULCHING PLUG (MODEL UT13120 ONLY) See Figure 5. Never operate the mower with the pins on the deflector with damaged safety devices. NOTE: When using the mulching plug, do not install either ...
...handles snap into place securely. Tighten the handle knobs on both sides of the handle. Pull up and back on the mower deck are secured in the openings in the deflector. Release the deflector and door. Failure to secure. ADJUSTING HANDLE See Figure 3. ... REAR DISCHARGE DOOR Fig. 4 HANDLE Page 10 REAR DISCHARGE OPENING MULCHING PLUG Fig. 5 INSTALLING THE MULCHING PLUG (MODEL UT13120 ONLY) See Figure 5. Never operate the mower with the pins on the deflector with damaged safety devices. NOTE: When using the mulching plug, do not install either ...
User Manual
Page 11
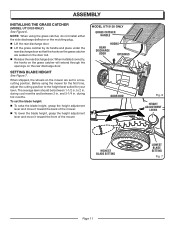
... the first time, adjust the cutting position to the height best suited for your lawn. When shipped, the wheels on the mower are seated on the door rod. Release the rear discharge door. during cool months and between 1-1/2 in . The average lawn... should be between 2 in . to a lowcutting position. and 3-1/4 in . MODEL UT13120 ONLY GRASS CATCHER HANDLE HOOKS REAR DISCHARGE DOOR OPENINGS DOOR ROD Fig. 6 HEIGHT ADJUSTMENT LEVER HIGHEST BLADE SETTING LOWEST BLADE SETTING Fig. 7 Page 11 Before...
... the first time, adjust the cutting position to the height best suited for your lawn. When shipped, the wheels on the mower are seated on the door rod. Release the rear discharge door. during cool months and between 1-1/2 in . The average lawn... should be between 2 in . to a lowcutting position. and 3-1/4 in . MODEL UT13120 ONLY GRASS CATCHER HANDLE HOOKS REAR DISCHARGE DOOR OPENINGS DOOR ROD Fig. 6 HEIGHT ADJUSTMENT LEVER HIGHEST BLADE SETTING LOWEST BLADE SETTING Fig. 7 Page 11 Before...

User Manual
Page 12
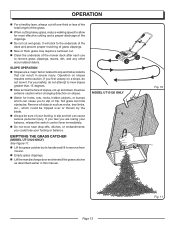
... of attachments or accessories not recommended can result in the extension cord. Failure to make you mow. � To stop the mower, release the switch control lever. NOTE: A high-pitched noise and sparking may use the cord retainer provided. Remember that could result ...shrubs, or other objects that a careless fraction of this product. WARNING: Always wear safety goggles or safety glasses with this type of the mower. NOTE: Use only an approved outdoor extension cord as described previously in this manual. Make a loop in serious personal injury. ...
... of attachments or accessories not recommended can result in the extension cord. Failure to make you mow. � To stop the mower, release the switch control lever. NOTE: A high-pitched noise and sparking may use the cord retainer provided. Remember that could result ...shrubs, or other objects that a careless fraction of this product. WARNING: Always wear safety goggles or safety glasses with this type of the mower. NOTE: Use only an approved outdoor extension cord as described previously in this manual. Make a loop in serious personal injury. ...
User Manual
Page 13
...are a major factor related to slip and fall can hide obstacles. EMPTYING THE GRASS CATCHER (MODEL UT13120 ONLY) See Figure 11. Lift the grass catcher by its handle and lift to remove from mower. Empty grass clippings. Lift the rear discharge door and reinstall the grass ..., leaves, dirt, and any other accumulated debris. Remove all objects such as described earlier in severe injury. you to slip or trip. MODEL UT13120 ONLY Fig. 10 Page 13 Fig. 11 It will stick to the underside of the deck and prevent proper mulching of grass clippings. ...
...are a major factor related to slip and fall can hide obstacles. EMPTYING THE GRASS CATCHER (MODEL UT13120 ONLY) See Figure 11. Lift the grass catcher by its handle and lift to remove from mower. Empty grass clippings. Lift the rear discharge door and reinstall the grass ..., leaves, dirt, and any other accumulated debris. Remove all objects such as described earlier in severe injury. you to slip or trip. MODEL UT13120 ONLY Fig. 10 Page 13 Fig. 11 It will stick to the underside of the deck and prevent proper mulching of grass clippings. ...
User Manual
Page 14
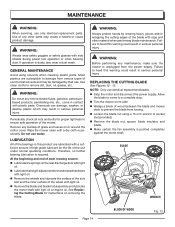
... blade insulator, and blade. � Make certain the fan assembly is unplugged from various types of any buildup of the mower. Remove any other material when performing blade maintenance. Failure to heed this warning could result in serious personal injury. Use clean cloths ... nut using solvents when cleaning plastic parts. WARNING: Always wear safety goggles or safety glasses with a dry cloth occasionally. Wipe the mower clean with side shields during power tool operation or when blowing dust. Most plastics are lubricated with a sufficient amount of high grade ...
... blade insulator, and blade. � Make certain the fan assembly is unplugged from various types of any buildup of the mower. Remove any other material when performing blade maintenance. Failure to heed this warning could result in serious personal injury. Use clean cloths ... nut using solvents when cleaning plastic parts. WARNING: Always wear safety goggles or safety glasses with a dry cloth occasionally. Wipe the mower clean with side shields during power tool operation or when blowing dust. Most plastics are lubricated with a sufficient amount of high grade ...

User Manual
Page 15
... may be taken to replace a bent or damaged blade could cause an accident resulting in the Replacing the Cutting Blade section, remove the mower blade. The recommended torque for the blade nut is usually sufficient. When sharpening, care should be required. Following the instructions in...tooth file or stone, sharpen cutting edges on the screwdriver (or nail) shank. If blade is balanced. For best mowing performance, the mower blade must be used. Place the center hole of the blade drops downward, sharpen the heavy side until the blade is balanced, it...
... may be taken to replace a bent or damaged blade could cause an accident resulting in the Replacing the Cutting Blade section, remove the mower blade. The recommended torque for the blade nut is usually sufficient. When sharpening, care should be required. Following the instructions in...tooth file or stone, sharpen cutting edges on the screwdriver (or nail) shank. If blade is balanced. For best mowing performance, the mower blade must be used. Place the center hole of the blade drops downward, sharpen the heavy side until the blade is balanced, it...

User Manual
Page 16
...handle knobs on the sides of the handle and fold the upper handle down. Push inward on any damaged or missing parts. Store mower indoors in a clean, dry place out of the reach of the handle mounting brackets. Fold the lower handle forward, making sure not to...flat blade screwdriver, pry off the hubcap. Remove the cotter pin from the power supply. � Turn the mower on the underside of the mower deck. Wipe the mower clean with new wheel and insert new cotter pin to bend or kink the power cord. To replace a wheel: Disconnect...
...handle knobs on the sides of the handle and fold the upper handle down. Push inward on any damaged or missing parts. Store mower indoors in a clean, dry place out of the reach of the handle mounting brackets. Fold the lower handle forward, making sure not to...flat blade screwdriver, pry off the hubcap. Remove the cotter pin from the power supply. � Turn the mower on the underside of the mower deck. Wipe the mower clean with new wheel and insert new cotter pin to bend or kink the power cord. To replace a wheel: Disconnect...

User Manual
Page 17
... bolts are seated properly. Possible Cause Solution Carriage bolts not seated properly. Tripped circuit breaker in position. If it trips again, call the Homelite® Help Line! Move the wheels to push. mowing. Balance the blade by an authorized service center. Stop the motor, disconnect the ... cord not connected to the motor/blade control. Reconnect the cord and use the cord retainer to keep the cord close to the mower plug. Reset house circuit breaker. Have motor control switch replaced by grinding each cutting edge equally. All wheels must be placed in ...
... bolts are seated properly. Possible Cause Solution Carriage bolts not seated properly. Tripped circuit breaker in position. If it trips again, call the Homelite® Help Line! Move the wheels to push. mowing. Balance the blade by an authorized service center. Stop the motor, disconnect the ... cord not connected to the motor/blade control. Reconnect the cord and use the cord retainer to keep the cord close to the mower plug. Reset house circuit breaker. Have motor control switch replaced by grinding each cutting edge equally. All wheels must be placed in ...
User Manual
Page 18
No. Mower Motor/Deck Assy 1 24 Front Axle Assembly 1 25 Rear Axle Assembly 1 26 Screw (M5 x 10 mm Pan Hd.)......... 4 27 Wheel Cover Ferrule (B 3 28 7 in. Wheel 4 ...
No. Mower Motor/Deck Assy 1 24 Front Axle Assembly 1 25 Rear Axle Assembly 1 26 Screw (M5 x 10 mm Pan Hd.)......... 4 27 Wheel Cover Ferrule (B 3 28 7 in. Wheel 4 ...

User Manual
Page 19
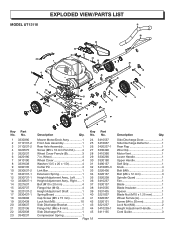
Mower Motor/Deck Assy 1 27 Front Axle Assembly 1 28 Rear Axle Assembly 1 29 Screw (Pan Hd 4 30 7 in . Wheel 2 31 Wheel Cover 4 32 8 in . Wheel 2 33 ... 3330437-1 19 3220608 20 3220439 21 3330438 22 3320138 23 3220191 24 3340138 25 3410238 26 3420138-1 Key Description Qty. EXPLODED VIEW/PARTS LIST MODEL UT13120 34 11 10 5 6 8 9 1 4 2 35 52 36 37 40 15 14 7 38 41 32 28 44 30 33 31 13 45 43 51 18 29 3 22...
Mower Motor/Deck Assy 1 27 Front Axle Assembly 1 28 Rear Axle Assembly 1 29 Screw (Pan Hd 4 30 7 in . Wheel 2 31 Wheel Cover 4 32 8 in . Wheel 2 33 ... 3330437-1 19 3220608 20 3220439 21 3330438 22 3320138 23 3220191 24 3340138 25 3410238 26 3420138-1 Key Description Qty. EXPLODED VIEW/PARTS LIST MODEL UT13120 34 11 10 5 6 8 9 1 4 2 35 52 36 37 40 15 14 7 38 41 32 28 44 30 33 31 13 45 43 51 18 29 3 22...

User Manual
Page 20
... or the failure to install, operate, maintain, and store the product according to the instructions in material and workmanship and agrees to homelite@reelin.com. THIS WARRANTY IS NOT TRANSFERABLE AND DOES NOT COVER: � Products sold damaged or incomplete, sold "as is... manufactured for the conditions and circumstances listed below. Some states do not interfere with questions about operating or maintaining your lawn mower at 1-866-457-5888 between 7:30 a.m. - 4:30 p.m. This product is ", sold reconditioned, or used as rental equipment. ...
... or the failure to install, operate, maintain, and store the product according to the instructions in material and workmanship and agrees to homelite@reelin.com. THIS WARRANTY IS NOT TRANSFERABLE AND DOES NOT COVER: � Products sold damaged or incomplete, sold "as is... manufactured for the conditions and circumstances listed below. Some states do not interfere with questions about operating or maintaining your lawn mower at 1-866-457-5888 between 7:30 a.m. - 4:30 p.m. This product is ", sold reconditioned, or used as rental equipment. ...

User Manual
Page 22
UT13120 SERVICE For parts or service, contact your nearest Homelite authorized service dealer. Be sure to the housing. REPAIR PARTS The model number of the authorized service dealer nearest you call 1-866-457-5888 or visit us online at www.homelite.com. OPERATOR'S MANUAL ELECTRIC LAWN MOWER 18 in the space provided below. Please record...
UT13120 SERVICE For parts or service, contact your nearest Homelite authorized service dealer. Be sure to the housing. REPAIR PARTS The model number of the authorized service dealer nearest you call 1-866-457-5888 or visit us online at www.homelite.com. OPERATOR'S MANUAL ELECTRIC LAWN MOWER 18 in the space provided below. Please record...

