Owners Manual
Page 7
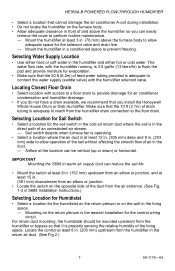
...humidifier solenoid valve. Mount the humidifier at least 15 in. (381 mm) downstream from an elbow or junction. • Locate the switch on the opposite side of the duct from an elbow or junction, and at least 3 in. (78 mm) above the humidifier so you install the Honeywell Whole House Drum or Disk Humidifier...in the direct path of an unrestricted air stream. - HE360A,B POWERED FLOW-THROUGH HUMIDIFIER • Select a location that cannot damage the air conditioner A-coil during installation. • Do not locate the humidifier on the furnace body. • Allow adequate clearance in ...
...humidifier solenoid valve. Mount the humidifier at least 15 in. (381 mm) downstream from an elbow or junction. • Locate the switch on the opposite side of the duct from an elbow or junction, and at least 3 in. (78 mm) above the humidifier so you install the Honeywell Whole House Drum or Disk Humidifier...in the direct path of an unrestricted air stream. - HE360A,B POWERED FLOW-THROUGH HUMIDIFIER • Select a location that cannot damage the air conditioner A-coil during installation. • Do not locate the humidifier on the furnace body. • Allow adequate clearance in ...

Owners Manual
Page 10
... . (6 mm) OD tubing and connect the saddle valve to tap into end of the solenoid valveon the humidifier (see Fig. 6). Place the brass compression nut over the tubing. (Discard copper compression ring provided with valve.) 69-1176-04 10 Install brass insert into the ...at the location selected. IMPORTANT To prevent debris from clogging the solenoid in the humidifier. 1. CAUTION Chemical Hazard. Use the self-piercing saddle valve (included) to the inlet side of tubing. b. HE360A,B POWERED FLOW-THROUGH HUMIDIFIER Connecting the Plumbing Use hot or cold water and either open ...
... . (6 mm) OD tubing and connect the saddle valve to tap into end of the solenoid valveon the humidifier (see Fig. 6). Place the brass compression nut over the tubing. (Discard copper compression ring provided with valve.) 69-1176-04 10 Install brass insert into the ...at the location selected. IMPORTANT To prevent debris from clogging the solenoid in the humidifier. 1. CAUTION Chemical Hazard. Use the self-piercing saddle valve (included) to the inlet side of tubing. b. HE360A,B POWERED FLOW-THROUGH HUMIDIFIER Connecting the Plumbing Use hot or cold water and either open ...
Owners Manual
Page 11
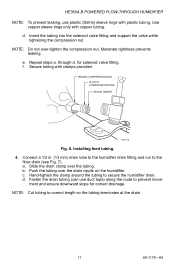
Use copper sleeve rings only with plastic tubing. a. HE360A,B POWERED FLOW-THROUGH HUMIDIFIER NOTE: To prevent leaking, use duct tape) along the route to correct length so the tubing terminates at the drain. 11 69-1176-04... tubing to the floor drain (see Fig. 7). through d. NOTE: Do not over the tubing. Connect a 1/2 in. (13 mm) drain tube to the humidifier drain fitting and run to secure the humidifier drain. Push the tubing over the drain nipple on the humidifier. e. for correct drainage. d. ment and ensure downward slope for solenoid valve fitting.
Use copper sleeve rings only with plastic tubing. a. HE360A,B POWERED FLOW-THROUGH HUMIDIFIER NOTE: To prevent leaking, use duct tape) along the route to correct length so the tubing terminates at the drain. 11 69-1176-04... tubing to the floor drain (see Fig. 7). through d. NOTE: Do not over the tubing. Connect a 1/2 in. (13 mm) drain tube to the humidifier drain fitting and run to secure the humidifier drain. Push the tubing over the drain nipple on the humidifier. e. for correct drainage. d. ment and ensure downward slope for solenoid valve fitting.
Owners Manual
Page 16
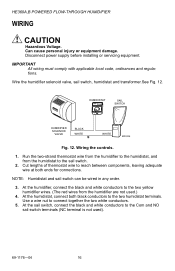
HE360A,B POWERED FLOW-THROUGH HUMIDIFIER WIRING CAUTION Hazardous Voltage. Can cause personal injury or equipment damage. IMPORTANT All wiring must comply with applicable local code, ordinances and regulations. Cut lengths of thermostat wire to the sail switch. 2. Run the two-strand thermostat wire from the humidifier to the humidistat, and from the humidifier... are not used ). 69-1176-04 16 Wire the humidifier solenoid valve, sail switch, humidistat and transformer.See Fig. 12. Wiring the controls. 1. Disconnect power ...
HE360A,B POWERED FLOW-THROUGH HUMIDIFIER WIRING CAUTION Hazardous Voltage. Can cause personal injury or equipment damage. IMPORTANT All wiring must comply with applicable local code, ordinances and regulations. Cut lengths of thermostat wire to the sail switch. 2. Run the two-strand thermostat wire from the humidifier to the humidistat, and from the humidifier... are not used ). 69-1176-04 16 Wire the humidifier solenoid valve, sail switch, humidistat and transformer.See Fig. 12. Wiring the controls. 1. Disconnect power ...

Owners Manual
Page 21
... Verify control circuit wiring. Sail switch Remove sail cover; Solenoid After verifying other wiring components, turn on furnace fan, turn on saddle valve. Humidifier power Verify that brass tubing inserts are used. Plumbing Verify plumbing connections. Shut off water. turn.... Verify rubber gasket is open. Check all connections. Humidifier Remove cover and verify that sail can move freely in duct; Troubleshooting Humidifier What to look for solenoid to click. Saddle valve Verify that Saddle Valve needle pierces water line, and has been backed out ...
... Verify control circuit wiring. Sail switch Remove sail cover; Solenoid After verifying other wiring components, turn on furnace fan, turn on saddle valve. Humidifier power Verify that brass tubing inserts are used. Plumbing Verify plumbing connections. Shut off water. turn.... Verify rubber gasket is open. Check all connections. Humidifier Remove cover and verify that sail can move freely in duct; Troubleshooting Humidifier What to look for solenoid to click. Saddle valve Verify that Saddle Valve needle pierces water line, and has been backed out ...


