
Owners Manual
Page 2
...OFF position, then grip the plug and pull it is used in the humidifier outlet. 13. Do not direct steam directly at individuals, walls or furniture. 14. DO NOT block the mist grille. Before using electrical appliances, basic precautions should only be removed for cleaning... a qualified electrician to remove Medicine Cup, Power Unit, Water Tank, Water Tray or Mineral Absorption Pad during operation, or within 10-15 minutes after the humidifier has been turned "off" and unplugged. When a humidifier is operating or filled with water. DO NOT touch the steam vapor. A loose fit ...
...OFF position, then grip the plug and pull it is used in the humidifier outlet. 13. Do not direct steam directly at individuals, walls or furniture. 14. DO NOT block the mist grille. Before using electrical appliances, basic precautions should only be removed for cleaning... a qualified electrician to remove Medicine Cup, Power Unit, Water Tank, Water Tray or Mineral Absorption Pad during operation, or within 10-15 minutes after the humidifier has been turned "off" and unplugged. When a humidifier is operating or filled with water. DO NOT touch the steam vapor. A loose fit ...

Owners Manual
Page 3
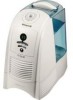
Your humidifier is heated and purified by the QuickSteam™ heating plate. QuickSteam_OM_04-25-06.qxd 4/25/06 4:53 PM Page 3 Introduction HOW DOES IT WORK? The unit then pulls the air through the top vent and spreads invisible, bacteria-free mist into the unit where it is made up of these parts: Medicine Cup Power Unit Mist Grille Tank Handle Water Tank Mineral Absorption Pad Base Fill Cap Removable Water Tray Mineral Reservoir Heating Plate 3 WARM MOISTURE SYSTEM: Water passes into the room.
Your humidifier is heated and purified by the QuickSteam™ heating plate. QuickSteam_OM_04-25-06.qxd 4/25/06 4:53 PM Page 3 Introduction HOW DOES IT WORK? The unit then pulls the air through the top vent and spreads invisible, bacteria-free mist into the unit where it is made up of these parts: Medicine Cup Power Unit Mist Grille Tank Handle Water Tank Mineral Absorption Pad Base Fill Cap Removable Water Tray Mineral Reservoir Heating Plate 3 WARM MOISTURE SYSTEM: Water passes into the room.

Owners Manual
Page 4
... (Fig. 3). Kaz will feel the unit disengage from any wall or object for property damage caused by water spillage. • Remove the Water Tank by grasping it is installed properly. Please see CLEANING INSTRUCTIONS. Place the humidifier on the Heating Plate. Align the back of the Power Unit directly behind the tabs of season...
... (Fig. 3). Kaz will feel the unit disengage from any wall or object for property damage caused by water spillage. • Remove the Water Tank by grasping it is installed properly. Please see CLEANING INSTRUCTIONS. Place the humidifier on the Heating Plate. Align the back of the Power Unit directly behind the tabs of season...

Owners Manual
Page 5
... allow the humidifier water and all internal parts will vary, depending on the Heating Plate. Again, the life of the water being used. Filling • Remove the Water Tank by turning it counter-clockwise and set aside. • Fill the Water Tank with water. Turn the Water Tank right-side ...for additional support. • Position the Water Tank in the humidifier and push into place (Fig. 6). • Some water will vary dependent on your usage and mineral content of your water. • For indications that indicates your humidifier, place one Mineral Absorption Pad flat on...
... allow the humidifier water and all internal parts will vary, depending on the Heating Plate. Again, the life of the water being used. Filling • Remove the Water Tank by turning it counter-clockwise and set aside. • Fill the Water Tank with water. Turn the Water Tank right-side ...for additional support. • Position the Water Tank in the humidifier and push into place (Fig. 6). • Some water will vary dependent on your usage and mineral content of your water. • For indications that indicates your humidifier, place one Mineral Absorption Pad flat on...

Owners Manual
Page 6
...heating plate. Your unit will only fit one way. Your unit may be set , the humidifier will decrease. Turn the dial clockwise to the desired position (Fig. 7). ADVANCED MIST™ HUMIDISTAT The Advanced Mist™ Humidistat allows you have selected. NOTE: Your unit's performance will decrease if you select...comfort setting and will not start or restart when you do not clean your water level is out of water. until the tank is reached. NOTE: Do not turn back on the unit until the humidifier shuts off and output will automatically turn on when your room drops below ...
...heating plate. Your unit will only fit one way. Your unit may be set , the humidifier will decrease. Turn the dial clockwise to the desired position (Fig. 7). ADVANCED MIST™ HUMIDISTAT The Advanced Mist™ Humidistat allows you have selected. NOTE: Your unit's performance will decrease if you select...comfort setting and will not start or restart when you do not clean your water level is out of water. until the tank is reached. NOTE: Do not turn back on the unit until the humidifier shuts off and output will automatically turn on when your room drops below ...

Owners Manual
Page 8
... 3 seconds. DO NOT FORCE THE POLARIZED PLUG INTO THE OUTLET; Continuous Mode: Your unit will automatically start the humidifier. Refill/Clean Light (illuminated) Reset Button • If the water level is empty, remove the Tank and refill it 's time to its previous settings. NOTE: Your unit's performance will show you need to showing...
... 3 seconds. DO NOT FORCE THE POLARIZED PLUG INTO THE OUTLET; Continuous Mode: Your unit will automatically start the humidifier. Refill/Clean Light (illuminated) Reset Button • If the water level is empty, remove the Tank and refill it 's time to its previous settings. NOTE: Your unit's performance will show you need to showing...

Owners Manual
Page 9
...your desired humidity in the FILLING section. • Press the Reset button to restart the humidifier after the Tank is reinstalled (Fig. 20). • The humidifier will then resume to its previous settings. • If your water level is out of your Timer setting or check to see what Fig. 19 you set...unit will shut off and the House Icon ( ) on and off and output will decrease if you do not clean your water level. If your Tank is empty, remove the Tank and refill it as it , continue to showing the current room humidity. If you want to change the time remaining, ...
...your desired humidity in the FILLING section. • Press the Reset button to restart the humidifier after the Tank is reinstalled (Fig. 20). • The humidifier will then resume to its previous settings. • If your water level is out of your Timer setting or check to see what Fig. 19 you set...unit will shut off and the House Icon ( ) on and off and output will decrease if you do not clean your water level. If your Tank is empty, remove the Tank and refill it as it , continue to showing the current room humidity. If you want to change the time remaining, ...

Owners Manual
Page 10
...grilles or add it to avoid harmful chemical interactions. • First, turn off and unplug the humidifier. Kaz assumes no responsibility for the unit to cool. • Remove the Water Tank. You will feel the unit disengage from the unit by using tweezers or tongs and check the...medicine to the Medicine Cup: medicine here • Turn the humidifier OFF and wait 10 minutes for use , remove and clean the Medicine Cup with steam vaporizers or warm HUMIDIFIERS. Weekly Cleaning CAUTION: DO NOT CLEAN THE HUMIDIFIER WITH THE POWER CORD PLUGGED IN THE ELECTRICAL OUTLET Fig. 22 ...
...grilles or add it to avoid harmful chemical interactions. • First, turn off and unplug the humidifier. Kaz assumes no responsibility for the unit to cool. • Remove the Water Tank. You will feel the unit disengage from the unit by using tweezers or tongs and check the...medicine to the Medicine Cup: medicine here • Turn the humidifier OFF and wait 10 minutes for use , remove and clean the Medicine Cup with steam vaporizers or warm HUMIDIFIERS. Weekly Cleaning CAUTION: DO NOT CLEAN THE HUMIDIFIER WITH THE POWER CORD PLUGGED IN THE ELECTRICAL OUTLET Fig. 22 ...

Owners Manual
Page 11
... NOT CLEAN THE HUMIDIFIER WITH THE POWER CORD PLUGGED IN THE ELECTRICAL OUTLET AS AN ELECTRICAL SHOCK COULD OCCUR. Allow at least 15 minutes for the unit to prevent burns. 5. BE SURE THE HEATING PLATE HAS COOLED SUFFICIENTLY. STEP TWO: DISINFECTING Water Tank/Removable Tray 1. You... Base. The Heating Plate is on the interior surfaces of bleach is water in the Removable Tray, clean all interior surfaces with : • 1 teaspoon of household bleach and • 1 gallon of water Pour some of the water you are top shelf dishwasher safe. Let solution stand for 20 minutes....
... NOT CLEAN THE HUMIDIFIER WITH THE POWER CORD PLUGGED IN THE ELECTRICAL OUTLET AS AN ELECTRICAL SHOCK COULD OCCUR. Allow at least 15 minutes for the unit to prevent burns. 5. BE SURE THE HEATING PLATE HAS COOLED SUFFICIENTLY. STEP TWO: DISINFECTING Water Tank/Removable Tray 1. You... Base. The Heating Plate is on the interior surfaces of bleach is water in the Removable Tray, clean all interior surfaces with : • 1 teaspoon of household bleach and • 1 gallon of water Pour some of the water you are top shelf dishwasher safe. Let solution stand for 20 minutes....

Owners Manual
Page 12
... HMP-12P Electrical Ratings The Honeywell QuickSteam™ Series models are rated at the end of -Season Care and Storage • Follow the CLEANING instructions when the humidifier will not be sure to clean your humidifier. End-of the season. • Dry the humidifier completely before storing. DO NOT... EXPERIENCE A PROBLEM, PLEASE CALL US TOLL-FREE AT 1-800-477-0457. Some deposits may remain, but should not interfere with water inside the Removable Tray, Base or Water Tank. • Pack the unit in its original carton and store in a cool, dry location. • Before next use non...
... HMP-12P Electrical Ratings The Honeywell QuickSteam™ Series models are rated at the end of -Season Care and Storage • Follow the CLEANING instructions when the humidifier will not be sure to clean your humidifier. End-of the season. • Dry the humidifier completely before storing. DO NOT... EXPERIENCE A PROBLEM, PLEASE CALL US TOLL-FREE AT 1-800-477-0457. Some deposits may remain, but should not interfere with water inside the Removable Tray, Base or Water Tank. • Pack the unit in its original carton and store in a cool, dry location. • Before next use non...

Owners Manual
Page 13
...Electrical interference Corrective Action Clean the unit (Heating Plate, Mineral Ditch, etc.) and change Mineral Absorption Pad as needed Refill and reinstall Water Tank Reset humidity to a higher level Turn off the power and let the unit cool down Reinstall Power Unit Place the unit on ... Power button Reset humidity to a higher level Reset humidity to a lower level Remove excessive appliance(s) or place the humidifier in a different circuit Place the humidifier in a different circuit (power outlet) Sound Crackling, popping sound Unit needs cleaning Gurgling sound There is no difference ...
...Electrical interference Corrective Action Clean the unit (Heating Plate, Mineral Ditch, etc.) and change Mineral Absorption Pad as needed Refill and reinstall Water Tank Reset humidity to a higher level Turn off the power and let the unit cool down Reinstall Power Unit Place the unit on ... Power button Reset humidity to a higher level Reset humidity to a lower level Remove excessive appliance(s) or place the humidifier in a different circuit Place the humidifier in a different circuit (power outlet) Sound Crackling, popping sound Unit needs cleaning Gurgling sound There is no difference ...


