Manual
Page 2
...owner's manual. others may damage the cleaner. • Always turn off all parts of your sales receipt to run appliance over cord. Model Serial number Hint: Attach your HOOVER product. Please enter the COMPLETE model and serial numbers in the instructions. X XXXXXXXXXXX...Power Hand Tool Belt ..10 Replacing Edge Groomers 9 Replacing Headlight 9 Thermal Protector 11 Warranty 12 © 2004 The Hoover Company www.hoover.com 2 Important Safeguards When using an electrical appliance, always follow basic precautions, including the following: READ ALL INSTRUCTIONS BEFORE ...
...owner's manual. others may damage the cleaner. • Always turn off all parts of your sales receipt to run appliance over cord. Model Serial number Hint: Attach your HOOVER product. Please enter the COMPLETE model and serial numbers in the instructions. X XXXXXXXXXXX...Power Hand Tool Belt ..10 Replacing Edge Groomers 9 Replacing Headlight 9 Thermal Protector 11 Warranty 12 © 2004 The Hoover Company www.hoover.com 2 Important Safeguards When using an electrical appliance, always follow basic precautions, including the following: READ ALL INSTRUCTIONS BEFORE ...
Manual
Page 3
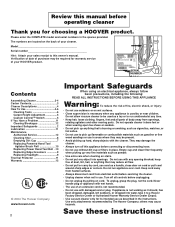
...1. Please do not return this product to find the service outlet nearest you need any assistance: Visit our website at www.hoover.com. Hose E. Powered hand tool H. Discard cardboard, but keep screws for an automated referral of service outlet locations (U.S. ...C. Hose holder Cleaner Assembly 1-3 1-4 D F H I . If you OR Call 1-800-944-9200 for assembly (Figs. 1-6 and 1-7). Find the parts shown above before disposing of handle. Furniture nozzle G. Crevice wand 1-5 A B Remove cardboard (A) and four screws from handle section. Assembly Carton contents 1-1 ...
...1. Please do not return this product to find the service outlet nearest you need any assistance: Visit our website at www.hoover.com. Hose E. Powered hand tool H. Discard cardboard, but keep screws for an automated referral of service outlet locations (U.S. ...C. Hose holder Cleaner Assembly 1-3 1-4 D F H I . If you OR Call 1-800-944-9200 for assembly (Figs. 1-6 and 1-7). Find the parts shown above before disposing of handle. Furniture nozzle G. Crevice wand 1-5 A B Remove cardboard (A) and four screws from handle section. Assembly Carton contents 1-1 ...
Manual
Page 7
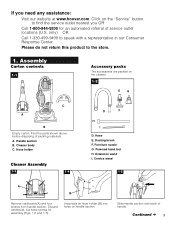
...: It is in operation, the prefilter screen will collect fine particles that the dirt cup be seen collecting in the left side of the following parts: Lid (A) Dirt Cup (B) Pre-filter (C) HEPA Cartridge Filter (D) Dirt Opening (E) Handle (F) While the cleaner is not necessary to remove the HEPA cartridge filter to empty...
...: It is in operation, the prefilter screen will collect fine particles that the dirt cup be seen collecting in the left side of the following parts: Lid (A) Dirt Cup (B) Pre-filter (C) HEPA Cartridge Filter (D) Dirt Opening (E) Handle (F) While the cleaner is not necessary to remove the HEPA cartridge filter to empty...

Manual
Page 8
... clean air to ensure that it in place. DO NOT tap soft pleated sides of HEPA cartridge filter in the cup. Tap filter until no part of pre-filter screen extends above top edge of pre-filter. Slide filter assembly down all the way, ensure that no more dust particles fall... from pre-filter. To remove this could damage the filter. Snap closed. The filter assembly can be removed for HOOVER part No. 40110009. Replace lid and return cup to clean filter assembly 3-6 Remove dirt cup and dirt cup lid as this filter when it becomes dirty...
... clean air to ensure that it in place. DO NOT tap soft pleated sides of HEPA cartridge filter in the cup. Tap filter until no part of pre-filter screen extends above top edge of pre-filter. Slide filter assembly down all the way, ensure that no more dust particles fall... from pre-filter. To remove this could damage the filter. Snap closed. The filter assembly can be removed for HOOVER part No. 40110009. Replace lid and return cup to clean filter assembly 3-6 Remove dirt cup and dirt cup lid as this filter when it becomes dirty...
Manual
Page 9
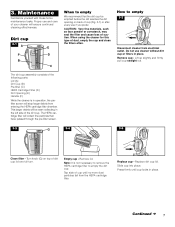
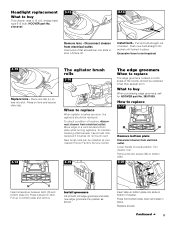
... check condition of cleaner. What to buy This cleaner uses a 12 volt, wedge base type 912 bulb, HOOVER part No. 27313107. 3-13 3-14 Remove lens - Lower handle to replace The edge groomers, located on both ... Remove bottom plate Disconnect cleaner from electrical outlet. Install bulb - New brush rolls can be installed at your nearest Hoover Factory Service Center. 3-19 The edge groomers When to lowest position. Lift lens off both sides of flat screwdriver ...167; 9 Headlight replacement What to buy When purchasing edge groomers, ask for HOOVER part No. 39511009.
... check condition of cleaner. What to buy This cleaner uses a 12 volt, wedge base type 912 bulb, HOOVER part No. 27313107. 3-13 3-14 Remove lens - Lower handle to replace The edge groomers, located on both ... Remove bottom plate Disconnect cleaner from electrical outlet. Install bulb - New brush rolls can be installed at your nearest Hoover Factory Service Center. 3-19 The edge groomers When to lowest position. Lift lens off both sides of flat screwdriver ...167; 9 Headlight replacement What to buy When purchasing edge groomers, ask for HOOVER part No. 39511009.
Manual
Page 10
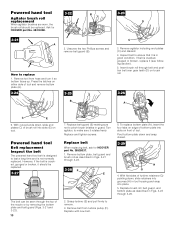
... two Phillips screws and remove belt guard (B). Insert brush roll through 3-26. Replace with new belt. 8. Replace belt When replacing belt, ask for HOOVER part No. 48414088. 3-21 A 3-22 B 2. Replace brush roll, belt guard, and bottom plate as described in Figs. 3-23 through belt and position... belt over gear teeth (D) on tool. Ask for HOOVER part No. 38528037. 1. Replace belt guard (B) making sure not to last a long time and is designed to pinch brush bristles in tool housing ...
... two Phillips screws and remove belt guard (B). Insert brush roll through 3-26. Replace with new belt. 8. Replace belt When replacing belt, ask for HOOVER part No. 48414088. 3-21 A 3-22 B 2. Replace brush roll, belt guard, and bottom plate as described in Figs. 3-23 through belt and position... belt over gear teeth (D) on tool. Ask for HOOVER part No. 38528037. 1. Replace belt guard (B) making sure not to last a long time and is designed to pinch brush bristles in tool housing ...

Manual
Page 12
...blockage occurs during the warranted period. Service To obtain approved HOOVER service and genuine HOOVER parts, locate the nearest Hoover Factory Service Center or Authorized Hoover Warranty Service Dealer (Depot) by the complete model number when requesting information or ordering parts. (The model number appears on -line at no cost... to you, all labor and parts to place this warranty gives you specific legal rights, you mail your cleaner to The Hoover Company in North Canton for service, this warranty or the availability of the following ...
...blockage occurs during the warranted period. Service To obtain approved HOOVER service and genuine HOOVER parts, locate the nearest Hoover Factory Service Center or Authorized Hoover Warranty Service Dealer (Depot) by the complete model number when requesting information or ordering parts. (The model number appears on -line at no cost... to you, all labor and parts to place this warranty gives you specific legal rights, you mail your cleaner to The Hoover Company in North Canton for service, this warranty or the availability of the following ...


