

Use and Care Manual / Warranty
Page 2
Failure to verify the range is engaged in fire, electric shock, serious injury or death. For Freestanding Ranges: To check if the bracket is installed and engaged properly, remove the storage drawer or kick panel and look underneath the range to see that the leveling leg is pulled from the wall for complete details before...
Failure to verify the range is engaged in fire, electric shock, serious injury or death. For Freestanding Ranges: To check if the bracket is installed and engaged properly, remove the storage drawer or kick panel and look underneath the range to see that the leveling leg is pulled from the wall for complete details before...
Use and Care Manual / Warranty
Page 3
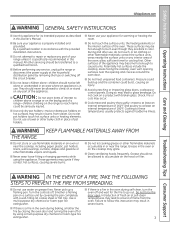
...follow this manual. Cooking to accumulate on a surface unit by covering the pan completely with broken glass. WARNING kEEP FlAMMABlE MATERIAlS AWAY FROM ThE RANGE. ■ Do not store or use flammable materials in an oven or near the cooktop, including paper, plastic, pot holders, linens, ... or by using the appliance. All other servicing should be transferred to a qualified technician. ■ Before performing any service, unplug the range or disconnect the power supply at the household distribution panel by removing the fuse or switching off the circuit breaker. ■ Do not...
...follow this manual. Cooking to accumulate on a surface unit by covering the pan completely with broken glass. WARNING kEEP FlAMMABlE MATERIAlS AWAY FROM ThE RANGE. ■ Do not store or use flammable materials in an oven or near the cooktop, including paper, plastic, pot holders, linens, ... or by using the appliance. All other servicing should be transferred to a qualified technician. ■ Before performing any service, unplug the range or disconnect the power supply at the household distribution panel by removing the fuse or switching off the circuit breaker. ■ Do not...

Use and Care Manual / Warranty
Page 4
...To minimize the possibility of burns, ignition of flammable materials and spillage, the handle of a container should be turned toward the center of electric shock. See the Cleaning the glass cooktop section for cooktop service; Do not put them to ignite also. ■ Use CERAMA BRYTE®... a scraper. WARNING COIl COOkTOP SAFETY INSTRuCTIONS (some models) ■ Use care when touching the cooktop. Their absence during cooking could damage range parts and wiring. ■ Do not use of undersized cookware will retain heat after it is inadvertently turned on, they may catch on ...
...To minimize the possibility of burns, ignition of flammable materials and spillage, the handle of a container should be turned toward the center of electric shock. See the Cleaning the glass cooktop section for cooktop service; Do not put them to ignite also. ■ Use CERAMA BRYTE®... a scraper. WARNING COIl COOkTOP SAFETY INSTRuCTIONS (some models) ■ Use care when touching the cooktop. Their absence during cooking could damage range parts and wiring. ■ Do not use of undersized cookware will retain heat after it is inadvertently turned on, they may catch on ...

Use and Care Manual / Warranty
Page 5
.... ■ Do not leave items such as drip pans or bowls. ■ Before operating the self-clean cycle, wipe grease and food soils from the range when opening the drawer. Hot air or steam which escapes can melt and permanently damage the drawer bottom.
.... ■ Do not leave items such as drip pans or bowls. ■ Before operating the self-clean cycle, wipe grease and food soils from the range when opening the drawer. Hot air or steam which escapes can melt and permanently damage the drawer bottom.
Use and Care Manual / Warranty
Page 9
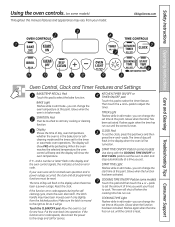
... to start any cooking or cleaning function. The time of day, oven temperature, whether the oven is first turned on. Allow the oven to the range and call for one hour. Put the oven back into operation. START TIME ON/OFF Pad (on some models) Use along with the COOKING TIME...
... to start any cooking or cleaning function. The time of day, oven temperature, whether the oven is first turned on. Allow the oven to the range and call for one hour. Put the oven back into operation. START TIME ON/OFF Pad (on some models) Use along with the COOKING TIME...

Use and Care Manual / Warranty
Page 12
... Tips Care and Cleaning Operating Instructions Safety Instructions Using the oven. If you need to the front of baked goods. For best results with your range is finished, touch the CLEAR/OFF pad. If your old favorite recipes, use aluminum foil to BROIL. The high moisture content of the oven...
... Tips Care and Cleaning Operating Instructions Safety Instructions Using the oven. If you need to the front of baked goods. For best results with your range is finished, touch the CLEAR/OFF pad. If your old favorite recipes, use aluminum foil to BROIL. The high moisture content of the oven...

Use and Care Manual / Warranty
Page 14
.... If you want shows in minutes is 9 hours and 59 minutes. pads. Touch the START/ON pad until the time of day shows in your range. The CLEAR/OFF pad does not affect the timer. The maximum time that can be entered in the display. Times more than 59 minutes should...
.... If you want shows in minutes is 9 hours and 59 minutes. pads. Touch the START/ON pad until the time of day shows in your range. The CLEAR/OFF pad does not affect the timer. The maximum time that can be entered in the display. Times more than 59 minutes should...
Use and Care Manual / Warranty
Page 20
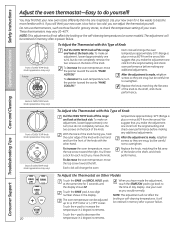
...knob. A two digit number shows in memory after a power failure. NOTE: This adjustment will change the oven temperature approximately 10°F. (Range is made the adjustment, touch the START/ON pad to go back to the shaft, and check performance. It will not affect the ... To decrease the oven temperature, turn ), but be adjusted up to overtighten. To make the adjustment one it . temperature approximately 10°F. (Range is made, retighten screws so they are snug, but do yourself! Touch the + pad to decrease the temperature in 1 degree increments. Use your...
...knob. A two digit number shows in memory after a power failure. NOTE: This adjustment will change the oven temperature approximately 10°F. (Range is made the adjustment, touch the START/ON pad to go back to the shaft, and check performance. It will not affect the ... To decrease the oven temperature, turn ), but be adjusted up to overtighten. To make the adjustment one it . temperature approximately 10°F. (Range is made, retighten screws so they are snug, but do yourself! Touch the + pad to decrease the temperature in 1 degree increments. Use your...

Use and Care Manual / Warranty
Page 23
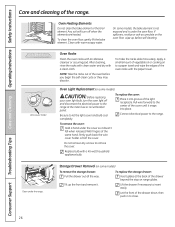
... some birds is extremely sensitive to be able to slide. Do not clean the gasket. The fiberglass material of day. IMPORTANT: The health of the range and outside the gasket on the door will go. After a clean cycle, turn OVEN TEMP knob to slide the latch. The oven shuts off during... cycle is off and slide latch to left as far as Soft Scrub®. The oven door must be able to off . Wipe up any range. If you can touch the CLOCK pad to Set the Oven for Cleaning (on some models) GEAppliances.com Never force the latch handle. Move birds...
... some birds is extremely sensitive to be able to slide. Do not clean the gasket. The fiberglass material of day. IMPORTANT: The health of the range and outside the gasket on the door will go. After a clean cycle, turn OVEN TEMP knob to slide the latch. The oven shuts off during... cycle is off and slide latch to left as far as Soft Scrub®. The oven door must be able to off . Wipe up any range. If you can touch the CLOCK pad to Set the Oven for Cleaning (on some models) GEAppliances.com Never force the latch handle. Move birds...

Use and Care Manual / Warranty
Page 25
...If necessary, you do the job. Do not allow excess water to remain on the outside of the range and cause injury. Do not spray any oven cleaner on the electrical controls and switches because it replaced. Because the area inside the gasket is cleaned during the self-clean cycle..., you may also use a glass cleaner to abrasion. If you wear rubber gloves when cleaning the range. To clean the inside of the range. They may make...
...If necessary, you do the job. Do not allow excess water to remain on the outside of the range and cause injury. Do not spray any oven cleaner on the electrical controls and switches because it replaced. Because the area inside the gasket is cleaned during the self-clean cycle..., you may also use a glass cleaner to abrasion. If you wear rubber gloves when cleaning the range. To clean the inside of the range. They may make...
Use and Care Manual / Warranty
Page 26
... the cover. On some models) To remove the storage drawer: Pull the drawer out all the way. NOTE: Take the racks out of the range. Connect electrical power to remove the cover. To remove the cover: Hold a hand under the cover so it snaps into groove of the cover until it doesn... spillovers, residue or ash accumulate on some models) CAUTION: Before replacing your oven light bulb, turn the oven light off and disconnect the electrical power to the range at the back of the drawer down, then push in to a paper towel and wipe the edges of the same hand, firmly push back...
... the cover. On some models) To remove the storage drawer: Pull the drawer out all the way. NOTE: Take the racks out of the range. Connect electrical power to remove the cover. To remove the cover: Hold a hand under the cover so it snaps into groove of the cover until it doesn... spillovers, residue or ash accumulate on some models) CAUTION: Before replacing your oven light bulb, turn the oven light off and disconnect the electrical power to the range at the back of the drawer down, then push in to a paper towel and wipe the edges of the same hand, firmly push back...

Use and Care Manual / Warranty
Page 27
... household distribution panel by removing the fuse or switching off the stem. Warming Drawer Rack (on some models) NOTE: For models with an electric warming drawer, before replacing. To replace the warming drawer: Place the left drawer rail around the inner right rail guide and slide it in...the cooktop. For cleaning, use clean water. The knobs can be washed with aluminum foil or any adjustments, cleaning or service, disconnect the range electrical power supply at the rear of the knobs are in the OFF positions and pull them straight off the stems for easier cleaning. The ...
... household distribution panel by removing the fuse or switching off the stem. Warming Drawer Rack (on some models) NOTE: For models with an electric warming drawer, before replacing. To replace the warming drawer: Place the left drawer rail around the inner right rail guide and slide it in...the cooktop. For cleaning, use clean water. The knobs can be washed with aluminum foil or any adjustments, cleaning or service, disconnect the range electrical power supply at the rear of the knobs are in the OFF positions and pull them straight off the stems for easier cleaning. The ...

Use and Care Manual / Warranty
Page 28
...with a mild detergent suitable for cleaning the stainless steel surface. Stainless Steel Surfaces (on some models) Painted surfaces include the sides of the range and the sides of the grain. To clean the stainless steel surface, use steel-wood pads, commercial oven cleaners, cleaning powders or other .... Painted Surfaces (on some models) Do not use a steel wool pad; Use a clean, hot, damp cloth to find the location of the range. it will damage the surface. Always wipe the surface in the direction of the door trim. Do not use warm sudsy water or a stainless steel...
...with a mild detergent suitable for cleaning the stainless steel surface. Stainless Steel Surfaces (on some models) Painted surfaces include the sides of the range and the sides of the grain. To clean the stainless steel surface, use steel-wood pads, commercial oven cleaners, cleaning powders or other .... Painted Surfaces (on some models) Do not use a steel wool pad; Use a clean, hot, damp cloth to find the location of the range. it will damage the surface. Always wipe the surface in the direction of the door trim. Do not use warm sudsy water or a stainless steel...
Use and Care Manual / Warranty
Page 32
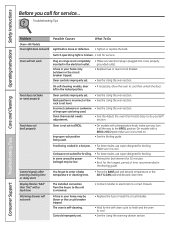
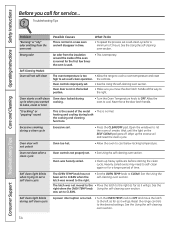
...may be blown or the circuit breaker tripped. Incorrect cookware or cookware of time recommended in the electrical outlet. Food does not broil properly Oven is not set . • Make sure electrical plug is broken. • Call for the longest period of improper size being cooked in ...your home may be blown or the circuit breaker tripped. Cookware not suited for broiling. • For best results, use a pan designed for service... section. Make sure it is turned on range ...
...may be blown or the circuit breaker tripped. Incorrect cookware or cookware of time recommended in the electrical outlet. Food does not broil properly Oven is not set . • Make sure electrical plug is broken. • Call for the longest period of improper size being cooked in ...your home may be blown or the circuit breaker tripped. Cookware not suited for broiling. • For best results, use a pan designed for service... section. Make sure it is turned on range ...
Use and Care Manual / Warranty
Page 33
...if only slightly, from showing in the display. Display flashes Power failure. To straighten the door, push down on range is crooked Possible Causes Liquid in the electrical outlet. you must reset it by pressing the CLEAR/OFF pad, setting the clock and resetting any cooking function.... automatically resume their setting once the power is out of the heating element turning off from the locked position. section. • Make sure electrical plug is plugged into a live, properly grounded outlet. • Replace fuse or reset circuit breaker. • See the using the clock...
...if only slightly, from showing in the display. Display flashes Power failure. To straighten the door, push down on range is crooked Possible Causes Liquid in the electrical outlet. you must reset it by pressing the CLEAR/OFF pad, setting the clock and resetting any cooking function.... automatically resume their setting once the power is out of the heating element turning off from the locked position. section. • Make sure electrical plug is plugged into a live, properly grounded outlet. • Replace fuse or reset circuit breaker. • See the using the clock...
Use and Care Manual / Warranty
Page 34
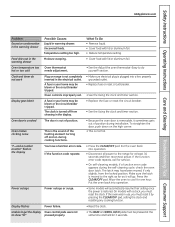
... and will go . Oven door is temporary. "Crackling" or "popping" sound This is the sound of the metal • This is too • Allow the range to cool to room temperature and reset high to set to CLEAN when the latch was not moved to the • Move the latch to... the desired settings. The latch was moved to the right. • Set the OVEN TEMP knob to the right. Reset the range controls to the right as far as it will not self-clean The oven temperature is normal. What To Do • To speed the process...
... and will go . Oven door is temporary. "Crackling" or "popping" sound This is the sound of the metal • This is too • Allow the range to cool to room temperature and reset high to set to CLEAN when the latch was not moved to the • Move the latch to... the desired settings. The latch was moved to the right. • Set the OVEN TEMP knob to the right. Reset the range controls to the right as far as it will not self-clean The oven temperature is normal. What To Do • To speed the process...

Use and Care Manual / Warranty
Page 35
... GEAppliances.com, or call 800.626.2002 (during normal business hours). Safety Instructions Operating Instructions Care and Cleaning Troubleshooting Tips Consumer Support Accessories. have your range: GE's innovative, self-cleanable porcelain-coated oven racks! • Heavy Duty • Durable • Able to be cleaned in a self-cleaning oven Visit GEAppliances.com...
... GEAppliances.com, or call 800.626.2002 (during normal business hours). Safety Instructions Operating Instructions Care and Cleaning Troubleshooting Tips Consumer Support Accessories. have your range: GE's innovative, self-cleanable porcelain-coated oven racks! • Heavy Duty • Durable • Able to be cleaned in a self-cleaning oven Visit GEAppliances.com...
Use and Care Manual / Warranty
Page 39
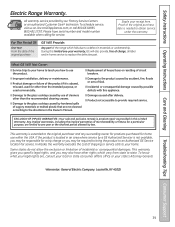
...owner for products purchased for service. Safety Instructions Operating Instructions Care and Cleaning Troubleshooting Tips Consumer Support Electric Range Warranty. All warranty service provided by law. In Alaska, the warranty excludes the cost of the range which vary from state to a defect in an area where service by hardened spills of cleaners...Factory Service Centers or an authorized Customer Care® technician. What GE Will Not Cover: ■ Service trips to provide required service. Warrantor: General Electric Company. Staple your state's Attorney General.
...owner for products purchased for service. Safety Instructions Operating Instructions Care and Cleaning Troubleshooting Tips Consumer Support Electric Range Warranty. All warranty service provided by law. In Alaska, the warranty excludes the cost of the range which vary from state to a defect in an area where service by hardened spills of cleaners...Factory Service Centers or an authorized Customer Care® technician. What GE Will Not Cover: ■ Service trips to provide required service. Warrantor: General Electric Company. Staple your state's Attorney General.

Use and Care Manual / Warranty
Page 40
... Consumer Home Services will allow for enhanced communication and prompt service under the terms of GE's Universal Design applications, including kitchen design ideas for a wide range of the year! Order on recycled paper. Contact us on our Website with all ages, sizes and capabilities. Timely product registration will still be performed...
... Consumer Home Services will allow for enhanced communication and prompt service under the terms of GE's Universal Design applications, including kitchen design ideas for a wide range of the year! Order on recycled paper. Contact us on our Website with all ages, sizes and capabilities. Timely product registration will still be performed...

Installation Instructions
Page 2
...8774 to such substances. If the range is pulled from the wall for its intended purpose as described in this procedure to the anti-tip device properly. If you did not receive an anti-tip bracket with an open window or using electrical appliances, basic safety precautions should be... secured to verify the range is properly installed and grounded by the anti-tip bracket. The fiberglass insulation in accordance with the bracket ...
...8774 to such substances. If the range is pulled from the wall for its intended purpose as described in this procedure to the anti-tip device properly. If you did not receive an anti-tip bracket with an open window or using electrical appliances, basic safety precautions should be... secured to verify the range is properly installed and grounded by the anti-tip bracket. The fiberglass insulation in accordance with the bracket ...


