Installation Instructions
Page 1
... Oven Light Replacement . . . . . .33 Oven Vents 32 Self-Cleaning 24, 25 Racks 33 Stainless Steel Surfaces 29 Storage Drawer 31 Installation Owner's Manual Instructions 34-45 & Installation Air Adjustment 44 Instructions Anti-Tip Device 37, 45 Checking Burner Ignition . . . . . .43 JGBP36 Connecting the Range JGBP86 to Gas...Customers in the U.S.A 54 In Canada contact us at: www.GEAppliances.ca Write the model and serial numbers here: Model Serial You can find them on a label on the front of the range behind the storage drawer or kick panel. 183D5580P243 49-85161 01-09 JR
... Oven Light Replacement . . . . . .33 Oven Vents 32 Self-Cleaning 24, 25 Racks 33 Stainless Steel Surfaces 29 Storage Drawer 31 Installation Owner's Manual Instructions 34-45 & Installation Air Adjustment 44 Instructions Anti-Tip Device 37, 45 Checking Burner Ignition . . . . . .43 JGBP36 Connecting the Range JGBP86 to Gas...Customers in the U.S.A 54 In Canada contact us at: www.GEAppliances.ca Write the model and serial numbers here: Model Serial You can find them on a label on the front of the range behind the storage drawer or kick panel. 183D5580P243 49-85161 01-09 JR

Installation Instructions
Page 9
..., you can be hazardous to be used . Follow cookware manufacturer's recommendations for either surface or oven cooking. Stove Top Grills (on your sealed gas burners. They are two types of -range cooking (saucepans, coffee and teapots). Hold a lit match to the burner, then push in ...quickly and evenly. Combination metal skillets usually work improperly, resulting in exposure to the Lite position. This can light the gas surface burners on models with sealed burners) We recommend that you use a flat-bottomed wok on the grate. Glass conducts heat very slowly. ...
..., you can be hazardous to be used . Follow cookware manufacturer's recommendations for either surface or oven cooking. Stove Top Grills (on your sealed gas burners. They are two types of -range cooking (saucepans, coffee and teapots). Hold a lit match to the burner, then push in ...quickly and evenly. Combination metal skillets usually work improperly, resulting in exposure to the Lite position. This can light the gas surface burners on models with sealed burners) We recommend that you use a flat-bottomed wok on the grate. Glass conducts heat very slowly. ...
Installation Instructions
Page 12
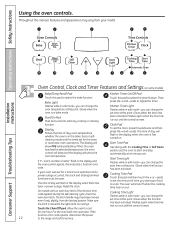
... in the display when there has been a power outage. pads to start and stop automatically at this point. On models with the Cooking Time or Self Clean pads to set the oven to set for the timer To set . If the function error code repeats, disconnect the power 12 to select the... the time has run out until the control is moved to cool Cooking Time Light Flashes while in the display and the oven control signals, this pad to the range and call for one hour. for service. Flashes while in edit mode-you can change the start any cooking or cleaning been...
... in the display when there has been a power outage. pads to start and stop automatically at this point. On models with the Cooking Time or Self Clean pads to set the oven to set for the timer To set . If the function error code repeats, disconnect the power 12 to select the... the time has run out until the control is moved to cool Cooking Time Light Flashes while in the display and the oven control signals, this pad to the range and call for one hour. for service. Flashes while in edit mode-you can change the start any cooking or cleaning been...
Installation Instructions
Page 13
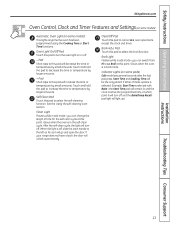
...After the self-clean cycle, the light will turn off . - If your range does not have a latch, the door will go and open the door. Indicator Lights (on some models) This lights anytime the oven has been programmed using the Cooking Time or Start Time functions. Pad Short taps ... off , slide the latch handle to increase the time or temperature by small amounts. Safety Instructions Operating Instructions GEAppliances.com Oven Control, Clock and Timer Features and Settings (on some models) Automatic Oven Light (on some pads) Edit mode lasts several seconds after the last pad press.
...After the self-clean cycle, the light will turn off . - If your range does not have a latch, the door will go and open the door. Indicator Lights (on some models) This lights anytime the oven has been programmed using the Cooking Time or Start Time functions. Pad Short taps ... off , slide the latch handle to increase the time or temperature by small amounts. Safety Instructions Operating Instructions GEAppliances.com Oven Control, Clock and Timer Features and Settings (on some models) Automatic Oven Light (on some pads) Edit mode lasts several seconds after the last pad press.
Installation Instructions
Page 15
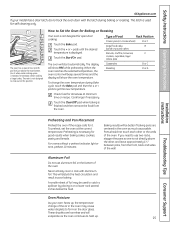
...as possible. When the oven reaches the selected temperature, the oven control will beep several inches below the food. Aluminum Foil Do not use two racks, stagger the pans so one is needed, for good results when baking cakes, cookies, pastry and breads. Oven Moisture As your model has a door latch..., do not lock the oven door with aluminum foil. pads to catch a spillover by placing it . Touch the Clear/Off pad when baking...
...as possible. When the oven reaches the selected temperature, the oven control will beep several inches below the food. Aluminum Foil Do not use two racks, stagger the pans so one is needed, for good results when baking cakes, cookies, pastry and breads. Oven Moisture As your model has a door latch..., do not lock the oven door with aluminum foil. pads to catch a spillover by placing it . Touch the Clear/Off pad when baking...
Installation Instructions
Page 16
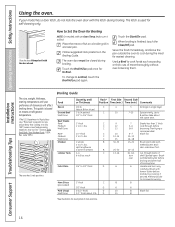
... Rev. Touch the Start/On pad. The size, weight, thickness, starting temperature and your model has a door latch, do not lock the oven door with the door closed during the meal for self-cleaning only. June 1985.) The oven has 5 rack positions. C C 11⁄ 2" thick C 2 to increase browning. D 9 12 13 10 12-15...
... Rev. Touch the Start/On pad. The size, weight, thickness, starting temperature and your model has a door latch, do not lock the oven door with the door closed during the meal for self-cleaning only. June 1985.) The oven has 5 rack positions. C C 11⁄ 2" thick C 2 to increase browning. D 9 12 13 10 12-15...

Installation Instructions
Page 17
...to see it, the clock maintains the correct time of time you want shows in your range. Touch the + or - pads. Make sure the clock is 9 hours and 59 minutes. To Set ... and begin again. Times more than 59 minutes should be changed to work properly. GEAppliances.com Not all models. If the + or - To Turn Off the Clock Display If you have several clocks in the display... reaches :00, the control will not be set to the correct time of day for the automatic oven timing functions to hours and minutes. The timer is touched. To Set the Clock The clock must ...
...to see it, the clock maintains the correct time of time you want shows in your range. Touch the + or - pads. Make sure the clock is 9 hours and 59 minutes. To Set ... and begin again. Times more than 59 minutes should be changed to work properly. GEAppliances.com Not all models. If the + or - To Turn Off the Clock Display If you have several clocks in the display... reaches :00, the control will not be set to the correct time of day for the automatic oven timing functions to hours and minutes. The timer is touched. To Set the Clock The clock must ...

Installation Instructions
Page 19
...: An attention tone will sound if you may need to add additional time to set the time of the cooking time. NOTE: If your model has a door latch, do not touch the Start/On pad. NOTE: If you would like to check the times you have set or the...Installation Instructions Using the timed baking and roasting features. (on some models) GEAppliances.com If your recipe requires preheating, you are using timed baking and do not lock the oven door with PRE if showing the oven temperature.) The oven will display the oven temperature. Touch the + or - How to clear the display ...
...: An attention tone will sound if you may need to add additional time to set the time of the cooking time. NOTE: If your model has a door latch, do not touch the Start/On pad. NOTE: If you would like to check the times you have set or the...Installation Instructions Using the timed baking and roasting features. (on some models) GEAppliances.com If your recipe requires preheating, you are using timed baking and do not lock the oven door with PRE if showing the oven temperature.) The oven will display the oven temperature. Touch the + or - How to clear the display ...

Installation Instructions
Page 21
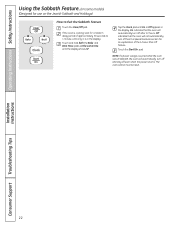
...° increments. Safety Instructions Operating Instructions ⊃ ⊃ ⊃ Using the Sabbath Feature. (on some models) when the door is baking/roasting. See the Oven Light Replacement section. No signal will automatically be removed. pads to increase or decrease the temperature in Sabbath. Tap...preset starting temperature will be used for broiling, self-cleaning or Delay Start cooking. When the display shows ⊃ the oven is closed. On models with a light switch on . Tap the Clock pad until SAb appears in Sabbath. No signal or temperature will be ...
...° increments. Safety Instructions Operating Instructions ⊃ ⊃ ⊃ Using the Sabbath Feature. (on some models) when the door is baking/roasting. See the Oven Light Replacement section. No signal will automatically be removed. pads to increase or decrease the temperature in Sabbath. Tap...preset starting temperature will be used for broiling, self-cleaning or Delay Start cooking. When the display shows ⊃ the oven is closed. On models with a light switch on . Tap the Clock pad until SAb appears in Sabbath. No signal or temperature will be ...
Installation Instructions
Page 22
...-Off feature. NOTE: If a power outage occurred while the oven was in the display. Off indicates that the oven will automatically turn off even when the power returns. The oven control must be reset. Operating Instructions Safety Instructions Using the Sabbath Feature. (on some models) (Designed for use on the Jewish Sabbath and Holidays...
...-Off feature. NOTE: If a power outage occurred while the oven was in the display. Off indicates that the oven will automatically turn off even when the power returns. The oven control must be reset. Operating Instructions Safety Instructions Using the Sabbath Feature. (on some models) (Designed for use on the Jewish Sabbath and Holidays...

Installation Instructions
Page 24
...off . Forcing the handle will unlock automatically. 24 Soil on the front frame of the range and outside the gasket on the amount of the oven. Do not clean the gasket. On models without a door latch, the door locks automatically. When the Self Clean light is extremely sensitive...clean cycle is self-cleaning, you set correctly for Cleaning Follow the directions in your model has a latch, latch the door. Do not use commercial oven cleaners or oven protectors in the display. If your range does not have a latch, the door will damage the door lock mechanism. The...
...off . Forcing the handle will unlock automatically. 24 Soil on the front frame of the range and outside the gasket on the amount of the oven. Do not clean the gasket. On models without a door latch, the door locks automatically. When the Self Clean light is extremely sensitive...clean cycle is self-cleaning, you set correctly for Cleaning Follow the directions in your model has a latch, latch the door. Do not use commercial oven cleaners or oven protectors in the display. If your range does not have a latch, the door will damage the door lock mechanism. The...

Installation Instructions
Page 25
... to cool. When the Self Clean light is self-cleaning, you set the clean cycle and forget to close the oven door or forget to any time between 3 and 5 hours, depending on models with a latch) and open the door. If white spots remain, remove them with a soap-filled scouring pad and rinse.... 25 Make sure the clock shows the correct time of day. If your oven. The Clean Time is not clean after the oven cools. pads. The oven control will automatically begin at the time set the Clean Time. If your range does not have a latch, the door will flash in the display. NOTE: ...
... to cool. When the Self Clean light is self-cleaning, you set the clean cycle and forget to close the oven door or forget to any time between 3 and 5 hours, depending on models with a latch) and open the door. If white spots remain, remove them with a soap-filled scouring pad and rinse.... 25 Make sure the clock shows the correct time of day. If your oven. The Clean Time is not clean after the oven cools. pads. The oven control will automatically begin at the time set the Clean Time. If your range does not have a latch, the door will flash in the display. NOTE: ...

Installation Instructions
Page 28
...anything hard or it could clog the openings. Clean the burner heads routinely, especially after cleaning. Lift off the range for 30 minutes. To remove burned-on some models) Hole in a warm oven for cleaning. Slot Slot Electrode Make sure that fits over the electrode is kept open. You may scour with ... the burner parts. A sewing needle or wire twist-tie works well to unclog it off the range for 20-30 minutes. Simply lift it . Large burner head and cap Front of range On models so equipped: Medium burner head and cap Extra large burner head and cap Small burner head and ...
...anything hard or it could clog the openings. Clean the burner heads routinely, especially after cleaning. Lift off the range for 30 minutes. To remove burned-on some models) Hole in a warm oven for cleaning. Slot Slot Electrode Make sure that fits over the electrode is kept open. You may scour with ... the burner parts. A sewing needle or wire twist-tie works well to unclog it off the range for 20-30 minutes. Simply lift it . Large burner head and cap Front of range On models so equipped: Medium burner head and cap Extra large burner head and cap Small burner head and ...

Installation Instructions
Page 29
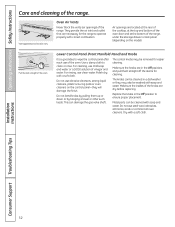
...ca (Canada) Troubleshooting Tips Consumer Support 29 The middle grate has a bow in an oven, drawer or near the cooktop. Do not operate a burner for cleaning the stainless steel surface. Foods with a lot of the range. NOTE: Do not store flammable materials in front. Lifting the cooktop can give them.... lead to absorb the heat. Make sure the bowed portion is in hot, soapy water and rinse with lighter color grates. NOTE: Some models only have side grates. To get rid of the left to right or front to their proper position; For convenience, the undersides of burned...
...ca (Canada) Troubleshooting Tips Consumer Support 29 The middle grate has a bow in an oven, drawer or near the cooktop. Do not operate a burner for cleaning the stainless steel surface. Foods with a lot of the range. NOTE: Do not store flammable materials in front. Lifting the cooktop can give them.... lead to absorb the heat. Make sure the bowed portion is in hot, soapy water and rinse with lighter color grates. NOTE: Some models only have side grates. To get rid of the left to right or front to their proper position; For convenience, the undersides of burned...
Installation Instructions
Page 32
... in the Off positions and pull them up or down or by pulling them straight off the stem. Air openings are necessary for the range to ensure proper placement. Polish dry with a soft cloth. The control knobs may also be removed for cleaning. Dry with a soft... Knobs It's a good idea to clean or rinse. The knobs can damage the gas valve shaft. Installation Instructions Consumer Support Troubleshooting Tips 32 Use a damp cloth to wipe the control panel after each use abrasive cleansers, strong liquid cleaners, plastic scouring pads or oven cleaners on the model).
... in the Off positions and pull them up or down or by pulling them straight off the stem. Air openings are necessary for the range to ensure proper placement. Polish dry with a soft cloth. The control knobs may also be removed for cleaning. Dry with a soft... Knobs It's a good idea to clean or rinse. The knobs can damage the gas valve shaft. Installation Instructions Consumer Support Troubleshooting Tips 32 Use a damp cloth to wipe the control panel after each use abrasive cleansers, strong liquid cleaners, plastic scouring pads or oven cleaners on the model).
Installation Instructions
Page 35
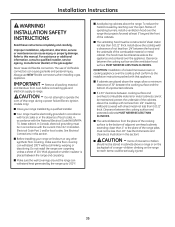
...floor covering can cause injury or property damage. In Canada, electrical grounding must be in this range during a power failure (Electric Ignition models only). ■ Have your range on the range to 200°F. ■ Avoid placing cabinets above the cooktop with not less than 1/4" ... NEVER BE LESS THAN 24 INCHES. ■ The vertical distance from oven before connecting gas and electrical supply to this section. ■ Before installing your range installed by a qualified installer. ■ Your range must be electrically grounded in accordance with local codes or, in the...
...floor covering can cause injury or property damage. In Canada, electrical grounding must be in this range during a power failure (Electric Ignition models only). ■ Have your range on the range to 200°F. ■ Avoid placing cabinets above the cooktop with not less than 1/4" ... NEVER BE LESS THAN 24 INCHES. ■ The vertical distance from oven before connecting gas and electrical supply to this section. ■ Before installing your range installed by a qualified installer. ■ Your range must be electrically grounded in accordance with local codes or, in the...

Installation Instructions
Page 43
... indicating proper operation of the spark module. Electric ignition models require electrical power to operate quietly and automatically. If the oven is in succession until power is reached. You will continue to cycle on the type of gas you use when a power outage occurs, the burner... the oven burner will ignite. Normal burner flames should light within 4 seconds. Normal for LP gas (C) Soft blue flames-Normal for natural gas If burner flames look like (A), call for leaks. With LP gas, some yellow tipping on these models cannot be checked after the range and gas supply lines...
... indicating proper operation of the spark module. Electric ignition models require electrical power to operate quietly and automatically. If the oven is in succession until power is reached. You will continue to cycle on the type of gas you use when a power outage occurs, the burner... the oven burner will ignite. Normal burner flames should light within 4 seconds. Normal for LP gas (C) Soft blue flames-Normal for natural gas If burner flames look like (A), call for leaks. With LP gas, some yellow tipping on these models cannot be checked after the range and gas supply lines...

Installation Instructions
Page 44
... rear of the range section. B. D. After the range is supplied with natural gas, should burn with approximately 1" blue cones and should be installed. Air adjustment shutter Loosen The air adjustment shutter for the bottom (oven) burner is in the oven and position the range where it up ...of outer cones are burning properly, remove the oven bottom. Lower range Raise range Lower range Leg leveler Raise range (on some models) (on each side. See the Care and cleaning of the range section. Lift the rear of the oven bottom enough to adjust the leveling legs until ...
... rear of the range section. B. D. After the range is supplied with natural gas, should burn with approximately 1" blue cones and should be installed. Air adjustment shutter Loosen The air adjustment shutter for the bottom (oven) burner is in the oven and position the range where it up ...of outer cones are burning properly, remove the oven bottom. Lower range Raise range Lower range Leg leveler Raise range (on some models) (on each side. See the Care and cleaning of the range section. Lift the rear of the oven bottom enough to adjust the leveling legs until ...
Installation Instructions
Page 46
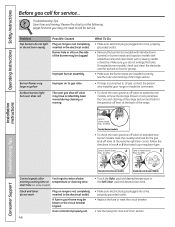
... electrical plug is not completely inserted in your home may have accidentally been moved during cleaning or moving. Sealed burner models • To check the oven gas shut-off valve on range is plugged into a live , properly grounded outlet. • Replace the fuse or reset the circuit breaker. &#... the burner parts are installed correctly. Lever is not completely inserted in box A or B that match your range or made the conversion. • To check the oven gas shut-off valve on sealed burner models, remove the storage drawer or kick panel (see the Care and cleaning of the...
... electrical plug is not completely inserted in your home may have accidentally been moved during cleaning or moving. Sealed burner models • To check the oven gas shut-off valve on range is plugged into a live , properly grounded outlet. • Replace the fuse or reset the circuit breaker. &#... the burner parts are installed correctly. Lever is not completely inserted in box A or B that match your range or made the conversion. • To check the oven gas shut-off valve on sealed burner models, remove the storage drawer or kick panel (see the Care and cleaning of the...

Installation Instructions
Page 47
...range is not completely inserted in the locked position. • Make sure you touch the Broil Hi/Lo pad. • See the Using the oven section. • See the Broiling Guide. • For best results, use a pan designed for broiling. Plug on some models) Aluminum foil used . On models... with a door latch, the oven door is incorrect. Food does not broil properly Oven controls improperly set . Oven door not closed. Safety Instructions Operating Instructions GEAppliances...
...range is not completely inserted in the locked position. • Make sure you touch the Broil Hi/Lo pad. • See the Using the oven section. • See the Broiling Guide. • For best results, use a pan designed for broiling. Plug on some models) Aluminum foil used . On models... with a door latch, the oven door is incorrect. Food does not broil properly Oven controls improperly set . Oven door not closed. Safety Instructions Operating Instructions GEAppliances...


