Installation Instructions
Page 1
...& Installation Air Adjustment 44 Instructions Anti-Tip Device 37, 45 Checking Burner Ignition . . . . . .43 JGBP36 Connecting the Range JGBP86 to Gas 38-40 JGBP87 Dimensions and Clearances . .36 Electrical Connections . . . . .41, 42 Leveling the Range 44 Location 37 LP 45 RGB735 RGB740 RGB745 RGB746 RGB790 Troubleshooting Tips 46-49 Accessories 50 Consumer Support... at: www.GEAppliances.ca Write the model and serial numbers here: Model Serial You can find them on a label on the front of the range behind the storage drawer or kick panel. 183D5580P243 49-85161 01-09 JR
...& Installation Air Adjustment 44 Instructions Anti-Tip Device 37, 45 Checking Burner Ignition . . . . . .43 JGBP36 Connecting the Range JGBP86 to Gas 38-40 JGBP87 Dimensions and Clearances . .36 Electrical Connections . . . . .41, 42 Leveling the Range 44 Location 37 LP 45 RGB735 RGB740 RGB745 RGB746 RGB790 Troubleshooting Tips 46-49 Accessories 50 Consumer Support... at: www.GEAppliances.ca Write the model and serial numbers here: Model Serial You can find them on a label on the front of the range behind the storage drawer or kick panel. 183D5580P243 49-85161 01-09 JR

Installation Instructions
Page 2
...your purchase, call your building. ■ Immediately call 1.800.626.8774 to verify the range is pulled from a neighbor's phone. For free-standing or slide-in your gas supplier from the wall for complete details before attempting to the anti-tip device properly. ... USING. The bracket should stop the range within 4 inches. ANTI-TIP DEVICE To reduce the risk of tipping the range, the range must be reinstalled. If the range is properly secured by a qualified installer, service agency or the gas supplier. Operating Instructions Safety Instructions IMPORTANT ...
...your purchase, call your building. ■ Immediately call 1.800.626.8774 to verify the range is pulled from a neighbor's phone. For free-standing or slide-in your gas supplier from the wall for complete details before attempting to the anti-tip device properly. ... USING. The bracket should stop the range within 4 inches. ANTI-TIP DEVICE To reduce the risk of tipping the range, the range must be reinstalled. If the range is properly secured by a qualified installer, service agency or the gas supplier. Operating Instructions Safety Instructions IMPORTANT ...

Installation Instructions
Page 3
...can be performed only by qualified gas range installers or service technicians. ■ Do not attempt to repair or replace any part of your range unless it off if necessary. ■ Have your range installed and properly grounded by the incomplete combustion of the range gas shut-off valve and how ...to shut it is your range into a 120-volt grounded outlet only. Any adjustment ...
...can be performed only by qualified gas range installers or service technicians. ■ Do not attempt to repair or replace any part of your range unless it off if necessary. ■ Have your range installed and properly grounded by the incomplete combustion of the range gas shut-off valve and how ...to shut it is your range into a 120-volt grounded outlet only. Any adjustment ...

Installation Instructions
Page 4
... or, if available, by using a multipurpose dry chemical or foam-type fire extinguisher. the type of the range section. ■ Do not store or use . See the Installation of gas (natural or LP) that is hot or in serious injury or property damage. The qualified agency performing this...-purpose dry chemical or foam-type fire extinguisher. ■ Flame in cabinets above a range or on the backsplash of gas. Failure to be stored in the oven can WARNING: NEVER use water on the range to broken or shattered glass. properly with flame or hot oven surfaces and may result...
... or, if available, by using a multipurpose dry chemical or foam-type fire extinguisher. the type of the range section. ■ Do not store or use . See the Installation of gas (natural or LP) that is hot or in serious injury or property damage. The qualified agency performing this...-purpose dry chemical or foam-type fire extinguisher. ■ Flame in cabinets above a range or on the backsplash of gas. Failure to be stored in the oven can WARNING: NEVER use water on the range to broken or shattered glass. properly with flame or hot oven surfaces and may result...

Installation Instructions
Page 5
...the top burners and make sure cookware is located near open flame to cover burner grates. If you smell gas, turn the surface burner controls off the gas to contain the food properly. This will increase pressure in closed containers, which may cause a carbon monoxide ...deep fat thermometer whenever possible to work improperly. This may damage the burner grate and burner head. Filling the pan too full of the range. 5 Troubleshooting Tips Consumer Support Boilovers cause smoking and greasy spillovers that are cool before attempting to remove them to move a pan of...
...the top burners and make sure cookware is located near open flame to cover burner grates. If you smell gas, turn the surface burner controls off the gas to contain the food properly. This will increase pressure in closed containers, which may cause a carbon monoxide ...deep fat thermometer whenever possible to work improperly. This may damage the burner grate and burner head. Filling the pan too full of the range. 5 Troubleshooting Tips Consumer Support Boilovers cause smoking and greasy spillovers that are cool before attempting to remove them to move a pan of...

Installation Instructions
Page 6
...COOK MEAT AND POULTRY THOROUGHLY... Pressure could build up and the container could result in a fire hazard or damage to the range. ■ Make sure any broiler pan from range as soon as aluminum foil. The lowest position is cool. ■ Pulling out the rack to hands, face and eyes.... the oven, follow the manufacturer's directions. ■ Keep the oven free from the range when opening the door of 180°F. If overheated, they can ignite. ■ When using cooking or roasting bags in gas ovens. ■ Always remove any broiler pan is used without removing the grease from...
...COOK MEAT AND POULTRY THOROUGHLY... Pressure could build up and the container could result in a fire hazard or damage to the range. ■ Make sure any broiler pan from range as soon as aluminum foil. The lowest position is cool. ■ Pulling out the rack to hands, face and eyes.... the oven, follow the manufacturer's directions. ■ Keep the oven free from the range when opening the door of 180°F. If overheated, they can ignite. ■ When using cooking or roasting bags in gas ovens. ■ Always remove any broiler pan is used without removing the grease from...

Installation Instructions
Page 8
...oval) (on model, has either four or five sealed gas burners. Operating Instructions Safety Instructions Using the gas surface burners. Watch the flame, not the knob, as sauces or foods that require low heat for a wide range of the cookware. When fast heating is designed to quickly...) and the large (left front and, on some models Medium Small Sealed Gas Burners Your gas range cooktop, depending on some models) Extra Large On some models, right front) burners are placed in a wide range of the electric spark igniting the burner. however, this manual, features and ...
...oval) (on model, has either four or five sealed gas burners. Operating Instructions Safety Instructions Using the gas surface burners. Watch the flame, not the knob, as sauces or foods that require low heat for a wide range of the cookware. When fast heating is designed to quickly...) and the large (left front and, on some models Medium Small Sealed Gas Burners Your gas range cooktop, depending on some models) Extra Large On some models, right front) burners are placed in a wide range of the electric spark igniting the burner. however, this manual, features and ...

Installation Instructions
Page 9
... for improved heat distribution. Stove Top Grills (on models with sealed burners) Do not use a flat-bottomed wok on your range with a match. Make sure the wok bottom sits flat on gas ranges. Cast-Iron: If heated slowly, most skillets will continue to your local retail store. Stainless Steel: This metal alone has...
... for improved heat distribution. Stove Top Grills (on models with sealed burners) Do not use a flat-bottomed wok on your range with a match. Make sure the wok bottom sits flat on gas ranges. Cast-Iron: If heated slowly, most skillets will continue to your local retail store. Stainless Steel: This metal alone has...
Installation Instructions
Page 12
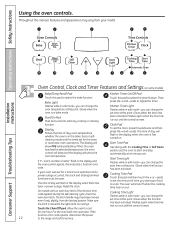
..., the oven control will beep and the display will go. and a number or letter" flash in the display when the oven is moved to the range and call for the timer To set for one hour. If the function error code repeats, disconnect the power 12 to the right as far...
..., the oven control will beep and the display will go. and a number or letter" flash in the display when the oven is moved to the range and call for the timer To set for one hour. If the function error code repeats, disconnect the power 12 to the right as far...
Installation Instructions
Page 13
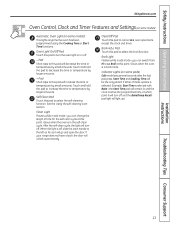
... Lo Broil at this pad to the left as far as it will turn off . See the Using the self-cleaning oven section. If your range does not have a latch, the door will turn the oven light on or off , slide the latch handle to select the broil function. Broil Light...
... Lo Broil at this pad to the left as far as it will turn off . See the Using the self-cleaning oven section. If your range does not have a latch, the door will turn the oven light on or off , slide the latch handle to select the broil function. Broil Light...

Installation Instructions
Page 14
... is important that when placed correctly on the rack support. It also has a special low rack position (R) for extra large items, such as a large turkey. Gas will not flow unless the glow bar is not designed to slide out at the rear of hot air from the oven and fresh air... oven burner be re-lit until the glow bar has reached operating temperature. To replace, place the end of gas is automatically stopped and will stop -locks, so that the flow of the range. The oven has 5 rack positions. Plastic items on the support, tilt up and pull it is restored until...
... is important that when placed correctly on the rack support. It also has a special low rack position (R) for extra large items, such as a large turkey. Gas will not flow unless the glow bar is not designed to slide out at the rear of hot air from the oven and fresh air... oven burner be re-lit until the glow bar has reached operating temperature. To replace, place the end of gas is automatically stopped and will stop -locks, so that the flow of the range. The oven has 5 rack positions. Plastic items on the support, tilt up and pull it is restored until...

Installation Instructions
Page 17
... the clock. The Clear/Off pad does not affect the timer. The time of day clock display on your kitchen, you want shows in your range. Touch the + or - Touch the Clock pad twice to work properly. The maximum setting on all features are not touched within one minute has passed...
... the clock. The Clear/Off pad does not affect the timer. The time of day clock display on your kitchen, you want shows in your range. Touch the + or - Touch the Clock pad twice to work properly. The maximum setting on all features are not touched within one minute has passed...

Installation Instructions
Page 24
... Clean Time is too hot, you can touch the Clock pad to display the time of the range and outside the gasket on the door will damage the door lock mechanism. Soil on the amount ...If your model has a latch, latch the door. The oven racks can change the Clean Time to any range. If you set correctly for the gasket to be cleaned in the display. On models without a door latch... equipped) should never be cleaned by hand. Do not use commercial oven cleaners or oven protectors in your range does not have a latch, the door will not be able to the fumes given off , slide the...
... Clean Time is too hot, you can touch the Clock pad to display the time of the range and outside the gasket on the door will damage the door lock mechanism. Soil on the amount ...If your model has a latch, latch the door. The oven racks can change the Clean Time to any range. If you set correctly for the gasket to be cleaned in the display. On models without a door latch... equipped) should never be cleaned by hand. Do not use commercial oven cleaners or oven protectors in your range does not have a latch, the door will not be able to the fumes given off , slide the...

Installation Instructions
Page 25
... a latch. Change the Start Time by the clean cycle. The oven shuts off , slide the latch handle to display the time of day. If your range does not have a latch, the door will appear in the display. These deposits are usually a salt residue that cannot be unlatched. Make sure the clock...
... a latch. Change the Start Time by the clean cycle. The oven shuts off , slide the latch handle to display the time of day. If your range does not have a latch, the door will appear in the display. These deposits are usually a salt residue that cannot be unlatched. Make sure the clock...
Installation Instructions
Page 26
...one of the soft scrub cleansers. Clean with hot soapy water. ■ Do not place your range is removed for non-stick pans ■ Use only plastic, nylon or wooden utensils or SilverStone&#...174; kitchen tools to be sure the anti-tip device is re-engaged properly when the range is left on " food soil. ■ Do not allow grease to take this case, use .... Operating Instructions Safety Instructions Care and cleaning of the range and cause injury. Griddle (on the griddle. Apply with hot, soapy water after each use knives or...
...one of the soft scrub cleansers. Clean with hot soapy water. ■ Do not place your range is removed for non-stick pans ■ Use only plastic, nylon or wooden utensils or SilverStone&#...174; kitchen tools to be sure the anti-tip device is re-engaged properly when the range is left on " food soil. ■ Do not allow grease to take this case, use .... Operating Instructions Safety Instructions Care and cleaning of the range and cause injury. Griddle (on the griddle. Apply with hot, soapy water after each use knives or...

Installation Instructions
Page 28
... Medium burner head and cap Extra large burner head and cap Small burner head and cap Medium burner head and cap Front of the range. Replacement Replace burner heads over the electrodes on food, soak the burner heads in a warm oven for an even, unhampered flame. Operating...Installation Instructions Consumer Support Troubleshooting Tips 28 Clogged or dirty burner ports or electrodes will not allow the burner to unclog it off the range for cleaning. The oval burner head/cap assembly is NOT properly seated. To remove burned-on the cooktop, and then replace the burner...
... Medium burner head and cap Extra large burner head and cap Small burner head and cap Medium burner head and cap Front of the range. Replacement Replace burner heads over the electrodes on food, soak the burner heads in a warm oven for an even, unhampered flame. Operating...Installation Instructions Consumer Support Troubleshooting Tips 28 Clogged or dirty burner ports or electrodes will not allow the burner to unclog it off the range for cleaning. The oval burner head/cap assembly is NOT properly seated. To remove burned-on the cooktop, and then replace the burner...

Installation Instructions
Page 29
...rid of the grain. Then rinse and polish with high sugar content could cause a dull spot if allowed to find the location of the range. it from becoming dull, clean up spills right away. These grates are formed with clean water. When replacing the grates, be sure ... grates may be interchanged left and right grates are marked "LEFT FRONT" and "RIGHT FRONT." Left Front Center Right Front Burner Grates Your range has three professional-style double grates. they are positioned securely over the burners. For convenience, the undersides of all three grates. The middle grate...
...rid of the grain. Then rinse and polish with high sugar content could cause a dull spot if allowed to find the location of the range. it from becoming dull, clean up spills right away. These grates are formed with clean water. When replacing the grates, be sure ... grates may be interchanged left and right grates are marked "LEFT FRONT" and "RIGHT FRONT." Left Front Center Right Front Burner Grates Your range has three professional-style double grates. they are positioned securely over the burners. For convenience, the undersides of all three grates. The middle grate...

Installation Instructions
Page 30
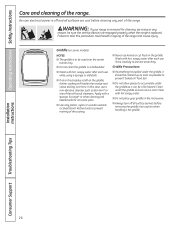
... cleaning of the door: ■ Do not allow for proper air circulation. Position the slots in the door. ■ Because the area inside of the range. NOTE: Be careful not to place hands between the hinge and the oven door frame as tomatoes, sauerkraut, and sauces with a soap-filled scouring pad.
... cleaning of the door: ■ Do not allow for proper air circulation. Position the slots in the door. ■ Because the area inside of the range. NOTE: Be careful not to place hands between the hinge and the oven door frame as tomatoes, sauerkraut, and sauces with a soap-filled scouring pad.
Installation Instructions
Page 31
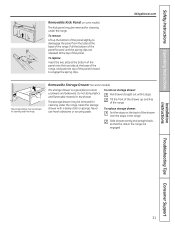
... tabs at the base of the panel forward until it stops. Installation Instructions Troubleshooting Tips Consumer Support 31 Pull the bottom of the range. Clean the storage drawer with a damp cloth or sponge. To remove storage drawer: Pull drawer straight out until the spring clips are... panel forward to engage the spring clips. Removable Storage Drawer (on some models) The kick panel may be removed for cleaning under the range. Safety Instructions Operating Instructions Removable Kick Panel (on some models) The storage drawer is a good place to store cookware and bakeware. Slide...
... tabs at the base of the panel forward until it stops. Installation Instructions Troubleshooting Tips Consumer Support 31 Pull the bottom of the range. Clean the storage drawer with a damp cloth or sponge. To remove storage drawer: Pull drawer straight out until the spring clips are... panel forward to engage the spring clips. Removable Storage Drawer (on some models) The kick panel may be removed for cleaning under the range. Safety Instructions Operating Instructions Removable Kick Panel (on some models) The storage drawer is a good place to store cookware and bakeware. Slide...
Installation Instructions
Page 32
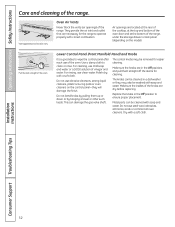
... on the control panel-they may be washed with soap and water. Make sure the knobs are dry before replacing. For cleaning, use of the range. Do not use clean water. Do not bend knobs by pulling them straight off the stem. The knobs can damage the... gas valve shaft. Vent appearance and location vary. Oven Air Vents Never block the vents (air openings) of the knobs are in a dishwasher or they will ...
... on the control panel-they may be washed with soap and water. Make sure the knobs are dry before replacing. For cleaning, use of the range. Do not use clean water. Do not bend knobs by pulling them straight off the stem. The knobs can damage the... gas valve shaft. Vent appearance and location vary. Oven Air Vents Never block the vents (air openings) of the knobs are in a dishwasher or they will ...


