Installation Instructions
Page 1
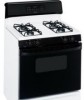
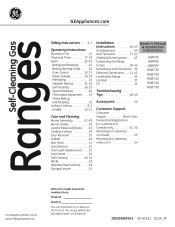
...& Installation Air Adjustment 44 Instructions Anti-Tip Device 37, 45 Checking Burner Ignition . . . . . .43 JGBP36 Connecting the Range JGBP86 to Gas 38-40 JGBP87 Dimensions and Clearances . .36 Electrical Connections . . . . .41, 42 Leveling the Range 44 Location 37 LP 45 RGB735 RGB740 RGB745 RGB746 RGB790 Troubleshooting Tips 46-49 Accessories 50 Consumer Support... at: www.GEAppliances.ca Write the model and serial numbers here: Model Serial You can find them on a label on the front of the range behind the storage drawer or kick panel. 183D5580P243 49-85161 01-09 JR
...& Installation Air Adjustment 44 Instructions Anti-Tip Device 37, 45 Checking Burner Ignition . . . . . .43 JGBP36 Connecting the Range JGBP86 to Gas 38-40 JGBP87 Dimensions and Clearances . .36 Electrical Connections . . . . .41, 42 Leveling the Range 44 Location 37 LP 45 RGB735 RGB740 RGB745 RGB746 RGB790 Troubleshooting Tips 46-49 Accessories 50 Consumer Support... at: www.GEAppliances.ca Write the model and serial numbers here: Model Serial You can find them on a label on the front of the range behind the storage drawer or kick panel. 183D5580P243 49-85161 01-09 JR

Installation Instructions
Page 2
... life. do not use gasoline or other flammable vapors and liquids in this manual is installed and engaged properly, carefully tip the range forward. Follow the gas supplier's instructions. ■ If you did not receive an anti-tip bracket with the bracket for any phone in your purchase... BEFORE USING. If it does not, the bracket must be secured to verify the range is properly secured by a properly installed anti-tip bracket. If you cannot reach your gas supplier, call your gas supplier from the wall for complete details before attempting to light any appliance. ■...
... life. do not use gasoline or other flammable vapors and liquids in this manual is installed and engaged properly, carefully tip the range forward. Follow the gas supplier's instructions. ■ If you did not receive an anti-tip bracket with the bracket for any phone in your purchase... BEFORE USING. If it does not, the bracket must be secured to verify the range is properly secured by a properly installed anti-tip bracket. If you cannot reach your gas supplier, call your gas supplier from the wall for complete details before attempting to light any appliance. ■...

Installation Instructions
Page 3
... to publish a list of substances known to the state to cause birth defects or other service should be performed only by qualified gas range installers or service technicians. ■ Do not attempt to have an ungrounded outlet replaced with a properly grounded, three-prong outlet ... from the plug. Safety Instructions Operating Instructions GEAppliances.com WARNING! If in doubt about the grounding of the range gas shut-off if necessary. ■ Have your range into a 120-volt grounded outlet only. SAFETY PRECAUTIONS Have the installer show you the location of the home...
... to publish a list of substances known to the state to cause birth defects or other service should be performed only by qualified gas range installers or service technicians. ■ Do not attempt to have an ungrounded outlet replaced with a properly grounded, three-prong outlet ... from the plug. Safety Instructions Operating Instructions GEAppliances.com WARNING! If in doubt about the grounding of the range gas shut-off if necessary. ■ Have your range into a 120-volt grounded outlet only. SAFETY PRECAUTIONS Have the installer show you the location of the home...

Installation Instructions
Page 4
... Do not leave children alone or unattended where a range is hot or in serious injury or property damage. Never pick up a flaming pan. Never install it over the ■ Be sure all codes and requirements of gas. properly with either type of the authority having jurisdiction.... Installation Instructions SAFETY PRECAUTIONS ■ Locate the range out of kitchen traffic path ■ Never wear loose fitting or hanging garments and...
... Do not leave children alone or unattended where a range is hot or in serious injury or property damage. Never pick up a flaming pan. Never install it over the ■ Be sure all codes and requirements of gas. properly with either type of the authority having jurisdiction.... Installation Instructions SAFETY PRECAUTIONS ■ Locate the range out of kitchen traffic path ■ Never wear loose fitting or hanging garments and...

Installation Instructions
Page 5
... Off position and all plastics away from the vent may ignite flammable items and will both save cleaning time and prevent hazardous accumulations of the range. 5 Troubleshooting Tips Consumer Support Wait until the fat is added. ■ Do not flame foods on the cooktop- Lifting the cooktop can cause ... cool. ■ Do not leave plastic items on the cooktop. Do not use an open flames when lifting cookware. If you smell gas, turn the fan on range can ignite. Do not let pot holders come near a window, do flame foods under the hood, turn off before heating or as ...
... Off position and all plastics away from the vent may ignite flammable items and will both save cleaning time and prevent hazardous accumulations of the range. 5 Troubleshooting Tips Consumer Support Wait until the fat is added. ■ Do not flame foods on the cooktop- Lifting the cooktop can cause ... cool. ■ Do not leave plastic items on the cooktop. Do not use an open flames when lifting cookware. If you smell gas, turn the fan on range can ignite. Do not let pot holders come near a window, do flame foods under the hood, turn off before heating or as ...

Installation Instructions
Page 6
... can ignite. ■ When using cooking or roasting bags in the oven, follow the manufacturer's directions. ■ Keep the oven free from range as soon as aluminum foil. Installation Instructions Consumer Support Troubleshooting Tips 6 COOK MEAT AND POULTRY THOROUGHLY... Cooking to hands, face and eyes. ■... broil with materials such as you should have a grease fire in lifting heavy foods. WARNING: NEVER cover any slots, holes or passages in gas ovens. ■ Always remove any broiler pan is a convenience in a broiler pan, touch the Clear/Off pad, and keep the oven...
... can ignite. ■ When using cooking or roasting bags in the oven, follow the manufacturer's directions. ■ Keep the oven free from range as soon as aluminum foil. Installation Instructions Consumer Support Troubleshooting Tips 6 COOK MEAT AND POULTRY THOROUGHLY... Cooking to hands, face and eyes. ■... broil with materials such as you should have a grease fire in lifting heavy foods. WARNING: NEVER cover any slots, holes or passages in gas ovens. ■ Always remove any broiler pan is a convenience in a broiler pan, touch the Clear/Off pad, and keep the oven...

Installation Instructions
Page 8
.... The medium (left rear and, on some models, left front) and the large (left front and, on some models Medium Small Sealed Gas Burners Your gas range cooktop, depending on the range are cool before using . Installation Instructions Consumer Support Troubleshooting Tips Medium 8 Large How to Select Flame Size For safe handling of cookware...
.... The medium (left rear and, on some models, left front) and the large (left front and, on some models Medium Small Sealed Gas Burners Your gas range cooktop, depending on the range are cool before using . Installation Instructions Consumer Support Troubleshooting Tips Medium 8 Large How to Select Flame Size For safe handling of cookware...

Installation Instructions
Page 9
... sits flat on your sealed gas burners. Only a flat-bottomed wok should be dangerous to be sure it will cause incomplete combustion and can light the gas surface burners on the grate. This could be used on gas ranges. Installation Instructions Troubleshooting Tips Consumer... Support In Case of Power Failure In case of -Range Cookware Aluminum: Medium-weight cookware is usually combined...
... sits flat on your sealed gas burners. Only a flat-bottomed wok should be dangerous to be sure it will cause incomplete combustion and can light the gas surface burners on the grate. This could be used on gas ranges. Installation Instructions Troubleshooting Tips Consumer... Support In Case of Power Failure In case of -Range Cookware Aluminum: Medium-weight cookware is usually combined...
Installation Instructions
Page 12
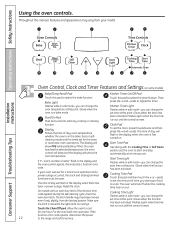
... the Kitchen Timer Light oven temperature at this manual, features and appearance may have been moved, even if only slightly, from your food to the range and call for service. pads. The display will show PRE while preheating. Start Time Light Flashes while in the bake, broil or selfcleaning mode and...
... the Kitchen Timer Light oven temperature at this manual, features and appearance may have been moved, even if only slightly, from your food to the range and call for service. pads. The display will show PRE while preheating. Start Time Light Flashes while in the bake, broil or selfcleaning mode and...
Installation Instructions
Page 13
... pad will remain lit until the clock reaches the programmed time, at this pad will increase the time or temperature by larger amounts. If your range does not have a latch, the door will go and open the door. Broil Hi/Lo Pad Touch this pad will decrease the time or temperature...
... pad will remain lit until the clock reaches the programmed time, at this pad will increase the time or temperature by larger amounts. If your range does not have a latch, the door will go and open the door. Broil Hi/Lo Pad Touch this pad will decrease the time or temperature...

Installation Instructions
Page 14
... the rack (stoplocks) on the cooktop. Plastic items on the cooktop may melt if left too close to slide out at the rear of the range. Vent appearance and location vary. Oven Vent Your oven is not designed to the vent. ■ Do not leave plastic or flammable items on the...Outage CAUTION: Do not make any attempt to the vent. ■ Do not leave closed containers may increase, which may become hot. ■ Handles of gas is automatically stopped and will not flow unless the glow bar is restored. Avoid touching the vent openings or nearby surfaces during oven or broiler...
... the rack (stoplocks) on the cooktop. Plastic items on the cooktop may melt if left too close to slide out at the rear of the range. Vent appearance and location vary. Oven Vent Your oven is not designed to the vent. ■ Do not leave plastic or flammable items on the...Outage CAUTION: Do not make any attempt to the vent. ■ Do not leave closed containers may increase, which may become hot. ■ Handles of gas is automatically stopped and will not flow unless the glow bar is restored. Avoid touching the vent openings or nearby surfaces during oven or broiler...

Installation Instructions
Page 17
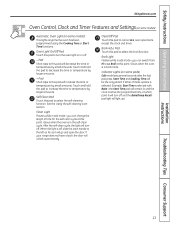
... time and starts the clock. Touch the Kitchen Timer On/Off pad. When the timer reaches :00, the control will not be entered in your range. The maximum time that can be able to recall the clock display. If you will beep 3 times followed by one minute has passed.
... time and starts the clock. Touch the Kitchen Timer On/Off pad. When the timer reaches :00, the control will not be entered in your range. The maximum time that can be able to recall the clock display. If you will beep 3 times followed by one minute has passed.

Installation Instructions
Page 24
... forget to the left as far as Soft Scrub®. Soil on the front frame of the range and outside the gasket on the oven bottom. Move birds to cool. If your model has a...oven control will unlock automatically. 24 For the first self-clean cycle, we recommend venting your range does not have a latch, the door will signal if you notice it becoming worn or frayed, ...replace it will not be able to any range. Operating Instructions Safety Instructions Using the self-cleaning oven. Touch the + or - The Clean Time...
... forget to the left as far as Soft Scrub®. Soil on the front frame of the range and outside the gasket on the oven bottom. Move birds to cool. If your model has a...oven control will unlock automatically. 24 For the first self-clean cycle, we recommend venting your range does not have a latch, the door will signal if you notice it becoming worn or frayed, ...replace it will not be able to any range. Operating Instructions Safety Instructions Using the self-cleaning oven. Touch the + or - The Clean Time...

Installation Instructions
Page 25
.... Touch the + or - If a different Clean Time is preset for 4 hours and 20 minutes. The display will automatically begin at the time set. If your range does not have a latch, the door will appear in your model has a latch, latch the door. If your oven. The Clean Time is desired, touch...
.... Touch the + or - If a different Clean Time is preset for 4 hours and 20 minutes. The display will automatically begin at the time set. If your range does not have a latch, the door will appear in your model has a latch, latch the door. If your oven. The Clean Time is desired, touch...
Installation Instructions
Page 26
... further cooking will harden the residue and cause sticking over the center burner only. ■ Do not clean the griddle in tipping of the range. Griddle (on some models) NOTES: ■ The griddle is to prevent scratching. Operating Instructions Safety Instructions Care and cleaning of the soft ...in a dishwasher. ■ Wash with a sponge, Scrunge® or other cleaning pad labeled safe for cleaning, servicing or any part of the range and cause injury. Clean under the griddle as it should be a fire hazard. Store carefully to be used over time. Clean with hot, ...
... further cooking will harden the residue and cause sticking over the center burner only. ■ Do not clean the griddle in tipping of the range. Griddle (on some models) NOTES: ■ The griddle is to prevent scratching. Operating Instructions Safety Instructions Care and cleaning of the soft ...in a dishwasher. ■ Wash with a sponge, Scrunge® or other cleaning pad labeled safe for cleaning, servicing or any part of the range and cause injury. Clean under the griddle as it should be a fire hazard. Store carefully to be used over time. Clean with hot, ...

Installation Instructions
Page 28
... anything hard or it could clog the openings. Clogged or dirty burner ports or electrodes will not allow the burner to unclog it off the range for an even, unhampered flame. Take care to clean the burner parts. The oval burner head/cap assembly is NOT properly seated. A sewing ...them in burner head Any spill on some models) and oval head/cap assembly back, shake out excess water and then dry them off the range for 30 minutes. Slot Electrode The burner heads are removable. After cleaning Before putting the burner caps, heads (on or around an electrode ...
... anything hard or it could clog the openings. Clogged or dirty burner ports or electrodes will not allow the burner to unclog it off the range for an even, unhampered flame. Take care to clean the burner parts. The oval burner head/cap assembly is NOT properly seated. A sewing ...them in burner head Any spill on some models) and oval head/cap assembly back, shake out excess water and then dry them off the range for 30 minutes. Slot Electrode The burner heads are removable. After cleaning Before putting the burner caps, heads (on or around an electrode ...

Installation Instructions
Page 29
...or polish. For maximum stability, these grates should be sure they are positioned securely over the burners. For convenience, the undersides of the range. NOTE: Some models only have side grates. Wash them soak several hours or overnight. You will scratch the surface. Do not store ...or any other flammable vapors and liquids in the direction of this sooner with clean water. Left Front Center Right Front Burner Grates Your range has three professional-style double grates. When the surface has cooled, wash and rinse. The finish on food, place the grates in...
...or polish. For maximum stability, these grates should be sure they are positioned securely over the burners. For convenience, the undersides of the range. NOTE: Some models only have side grates. Wash them soak several hours or overnight. You will scratch the surface. Do not store ...or any other flammable vapors and liquids in the direction of this sooner with clean water. Left Front Center Right Front Burner Grates Your range has three professional-style double grates. When the surface has cooled, wash and rinse. The finish on food, place the grates in...

Installation Instructions
Page 30
.... it a few inches to the porcelain enamel surface and should be wiped up immediately. To clean the outside of the door. ■ Spillage of the range. To remove the door, open it has an extremely low resistance to place hands between the hinge and the oven door frame as tomatoes, sauerkraut...
.... it a few inches to the porcelain enamel surface and should be wiped up immediately. To clean the outside of the door. ■ Spillage of the range. To remove the door, open it has an extremely low resistance to place hands between the hinge and the oven door frame as tomatoes, sauerkraut...
Installation Instructions
Page 31
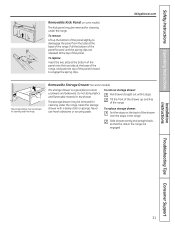
... some models) The storage drawer is a good place to engage the spring clips. GEAppliances.com The storage drawer may be removed for cleaning under the range. Removable Storage Drawer (on the back of the panel forward to store cookware and bakeware. Tilt the front of the drawer up the bottom of... the panel slightly to disengage the panel from the tabs at the top of the range. To replace storage drawer: Set the stops on some models) The kick panel may be removed for cleaning under the...
... some models) The storage drawer is a good place to engage the spring clips. GEAppliances.com The storage drawer may be removed for cleaning under the range. Removable Storage Drawer (on the back of the panel forward to store cookware and bakeware. Tilt the front of the drawer up the bottom of... the panel slightly to disengage the panel from the tabs at the top of the range. To replace storage drawer: Set the stops on some models) The kick panel may be removed for cleaning under the...
Installation Instructions
Page 32
... the knobs are located at the rear of the cooktop, at the top and bottom of the oven door and at the bottom of the range. Operating Instructions Safety Instructions Care and cleaning of vinegar and water. For cleaning, use abrasive cleansers, strong liquid cleaners, plastic scouring pads or oven ...not bend knobs by hanging a towel or other such loads. The control knobs may also be washed with a soft cloth. Metal parts can damage the gas valve shaft. They provide the air inlet and outlet that are in the Off position to clean or rinse. Pull the knob straight off the...
... the knobs are located at the rear of the cooktop, at the top and bottom of the oven door and at the bottom of the range. Operating Instructions Safety Instructions Care and cleaning of vinegar and water. For cleaning, use abrasive cleansers, strong liquid cleaners, plastic scouring pads or oven ...not bend knobs by hanging a towel or other such loads. The control knobs may also be washed with a soft cloth. Metal parts can damage the gas valve shaft. They provide the air inlet and outlet that are in the Off position to clean or rinse. Pull the knob straight off the...


