Installation Instructions
Page 1
...Anti-Tip Device 37, 45 Checking Burner Ignition . . . . . .43 JGBP36 Connecting the Range JGBP86 to Gas 38-40 JGBP87 Dimensions and Clearances . .36 Electrical Connections . . . . .41, 42 Leveling the Range 44 Location 37 LP 45 RGB735 RGB740 RGB745 RGB746 RGB790 Troubleshooting Tips 46-49 Accessories 50 Consumer Support... Customers in the U.S.A 54 In Canada contact us at: www.GEAppliances.ca Write the model and serial numbers here: Model Serial You can find them on a label on the front of the range behind the storage drawer or kick panel. 183D5580P243 49-85161 01-09 JR
...Anti-Tip Device 37, 45 Checking Burner Ignition . . . . . .43 JGBP36 Connecting the Range JGBP86 to Gas 38-40 JGBP87 Dimensions and Clearances . .36 Electrical Connections . . . . .41, 42 Leveling the Range 44 Location 37 LP 45 RGB735 RGB740 RGB745 RGB746 RGB790 Troubleshooting Tips 46-49 Accessories 50 Consumer Support... Customers in the U.S.A 54 In Canada contact us at: www.GEAppliances.ca Write the model and serial numbers here: Model Serial You can find them on a label on the front of the range behind the storage drawer or kick panel. 183D5580P243 49-85161 01-09 JR

Installation Instructions
Page 5
...burner controls off the gas to support the wok. This will be as dry as fats melt slowly. ■ Use a deep fat thermometer whenever possible to cover burner grates. Frost on frozen foods or moisture on range can ignite. Never use a wok on sealed burner models. Lifting the cooktop can...let pot holders come near a window, do not hang long curtains that could blow over the burner grate to the range and call a qualified service technician. If you smell gas, turn the fan on. ■ Do not use an open flames when lifting cookware. Safety Instructions Operating Instructions ...
...burner controls off the gas to support the wok. This will be as dry as fats melt slowly. ■ Use a deep fat thermometer whenever possible to cover burner grates. Frost on frozen foods or moisture on range can ignite. Never use a wok on sealed burner models. Lifting the cooktop can...let pot holders come near a window, do not hang long curtains that could blow over the burner grate to the range and call a qualified service technician. If you smell gas, turn the fan on. ■ Do not use an open flames when lifting cookware. Safety Instructions Operating Instructions ...

Installation Instructions
Page 8
... four or five sealed gas burners. Before Lighting a Gas Burner After Lighting a Gas Burner ■ Make sure all burners are placed in place. ■ Make sure all the burners spark. however, this manual, features and appearance may chip without cookware on some models Medium Small Sealed Gas Burners Your gas range cooktop, depending on a gas burner should match...
... four or five sealed gas burners. Before Lighting a Gas Burner After Lighting a Gas Burner ■ Make sure all burners are placed in place. ■ Make sure all the burners spark. however, this manual, features and appearance may chip without cookware on some models Medium Small Sealed Gas Burners Your gas range cooktop, depending on a gas burner should match...

Installation Instructions
Page 9
...the manufacturer recommends. Use saucepans with tightfitting lids when cooking with sealed burners) We recommend that you use stove top grills on models with minimum amounts of a power failure, you use only and those for improved heat distribution. Installation Instructions Troubleshooting Tips Consumer ... most skillets will cause incomplete combustion and can be dangerous to your health. Make sure the wok bottom sits flat on gas ranges. Placing the ring over the burner or grate may melt. This could be used for cooking methods. Enamelware: Under some conditions, ...
...the manufacturer recommends. Use saucepans with tightfitting lids when cooking with sealed burners) We recommend that you use stove top grills on models with minimum amounts of a power failure, you use only and those for improved heat distribution. Installation Instructions Troubleshooting Tips Consumer ... most skillets will cause incomplete combustion and can be dangerous to your health. Make sure the wok bottom sits flat on gas ranges. Placing the ring over the burner or grate may melt. This could be used for cooking methods. Enamelware: Under some conditions, ...

Installation Instructions
Page 10
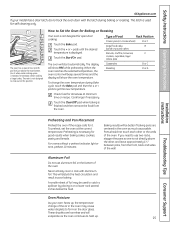
Operating Instructions Safety Instructions Using the griddle. (on some models) Your non-stick coated griddle provides an extra-large cooking surface for meats, pancakes or other food usually prepared in a frying pan or skillet. To ...
Operating Instructions Safety Instructions Using the griddle. (on some models) Your non-stick coated griddle provides an extra-large cooking surface for meats, pancakes or other food usually prepared in a frying pan or skillet. To ...
Installation Instructions
Page 12
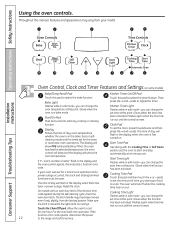
... your oven was set for one hour. Operating Instructions Safety Instructions Using the oven controls. On models with the Cooking Time or Self Clean pads to start and stop automatically at this pad to the range and call for the timer To set the oven to cook. pads. Make sure the latch... is first turned on some models) Bake/Temp Recall Pad Kitchen Timer On/Off Pad Touch this point. If your...
... your oven was set for one hour. Operating Instructions Safety Instructions Using the oven controls. On models with the Cooking Time or Self Clean pads to start and stop automatically at this pad to the range and call for the timer To set the oven to cook. pads. Make sure the latch... is first turned on some models) Bake/Temp Recall Pad Kitchen Timer On/Off Pad Touch this point. If your...
Installation Instructions
Page 13
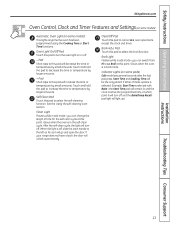
... Pad Touch this pad will increase the time or temperature by larger amounts. Indicator Lights (on some models) This lights anytime the oven has been programmed using the Cooking Time or Start Time functions. Pad Short...in broil mode. Safety Instructions Operating Instructions GEAppliances.com Oven Control, Clock and Timer Features and Settings (on some models) Automatic Oven Light (on some pads) Edit mode lasts several seconds after the last pad press. Start Time... this pad to select the self-cleaning function. If your range does not have a latch, the door will light up).
... Pad Touch this pad will increase the time or temperature by larger amounts. Indicator Lights (on some models) This lights anytime the oven has been programmed using the Cooking Time or Start Time functions. Pad Short...in broil mode. Safety Instructions Operating Instructions GEAppliances.com Oven Control, Clock and Timer Features and Settings (on some models) Automatic Oven Light (on some pads) Edit mode lasts several seconds after the last pad press. Start Time... this pad to select the self-cleaning function. If your range does not have a latch, the door will light up).
Installation Instructions
Page 15
... necessary for example, when cooking a large turkey. Cook longer if necessary. Baking results will evaporate as possible. The latch is displayed. Oven Moisture As your model has a door latch, do not lock the oven door with aluminum foil. pads until the desired temperature is used to catch a spillover by placing it...
... necessary for example, when cooking a large turkey. Cook longer if necessary. Baking results will evaporate as possible. The latch is displayed. Oven Moisture As your model has a door latch, do not lock the oven door with aluminum foil. pads until the desired temperature is used to catch a spillover by placing it...
Installation Instructions
Page 16
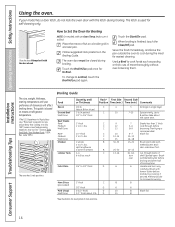
... Instructions Safety Instructions Installation Instructions Using the oven. The oven door must be closed . Touch the Broil Hi/Lo pad once for Broiling NOTE: On models with an Oven Temp knob, turn it to 11⁄ 2 lbs. Up to 8 patties take about 8 thin slices) 1 lb. (4 patties) 1/2" to 3/4"... Tips 16 To change to 21⁄ 2 lbs., split lengthwise 4 bone-in single layer. The size, weight, thickness, starting temperature and your model has a door latch, do not lock the oven door with the door closed during cooking, if desired. The latch is based on a broiler grid...
... Instructions Safety Instructions Installation Instructions Using the oven. The oven door must be closed . Touch the Broil Hi/Lo pad once for Broiling NOTE: On models with an Oven Temp knob, turn it to 11⁄ 2 lbs. Up to 8 patties take about 8 thin slices) 1 lb. (4 patties) 1/2" to 3/4"... Tips 16 To change to 21⁄ 2 lbs., split lengthwise 4 bone-in single layer. The size, weight, thickness, starting temperature and your model has a door latch, do not lock the oven door with the door closed during cooking, if desired. The latch is based on a broiler grid...

Installation Instructions
Page 17
... in the display. pads. Touch the Start/On pad until the amount of time you want shows in your range. This enters the time and starts the clock. The maximum setting on all models. pads until the time of day clock display on your kitchen, you touch the Clock pad, the display...
... in the display. pads. Touch the Start/On pad until the amount of time you want shows in your range. This enters the time and starts the clock. The maximum setting on all models. pads until the time of day clock display on your kitchen, you touch the Clock pad, the display...
Installation Instructions
Page 18
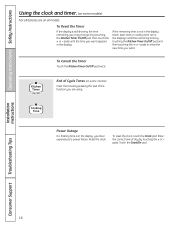
... correct time of the function you are in the display, you have experienced a power failure. End of Cycle Tones (on all features are on some models) Clear the tones by pressing the pad of day by touching the Kitchen Timer On/Off pad and then touching the + or - Operating Instructions Safety... Instructions Using the clock and timer. (on some models) Not all models. To Reset the Timer If the display is in the display), recall the remaining time by touching the + or -
... correct time of the function you are in the display, you have experienced a power failure. End of Cycle Tones (on all features are on some models) Clear the tones by pressing the pad of day by touching the Kitchen Timer On/Off pad and then touching the + or - Operating Instructions Safety... Instructions Using the clock and timer. (on some models) Not all models. To Reset the Timer If the display is in the display), recall the remaining time by touching the + or -

Installation Instructions
Page 19
... the bulb will speed harmful bacteria growth. Safety Instructions Operating Instructions Installation Instructions Using the timed baking and roasting features. (on some models) GEAppliances.com If your recipe requires preheating, you may need to add additional time to the length of the cooking time. How ...before or after cooking. pads to set the baking time. Touch the Cooking Time pad. Touch the + or - NOTE: If your model has a door latch, do not touch the Start/On pad. pads to set the desired length of cycle tone will turn off automatically.
... the bulb will speed harmful bacteria growth. Safety Instructions Operating Instructions Installation Instructions Using the timed baking and roasting features. (on some models) GEAppliances.com If your recipe requires preheating, you may need to add additional time to the length of the cooking time. How ...before or after cooking. pads to set the baking time. Touch the Cooking Time pad. Touch the + or - NOTE: If your model has a door latch, do not touch the Start/On pad. pads to set the desired length of cycle tone will turn off automatically.

Installation Instructions
Page 21
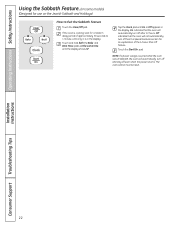
... time that the oven has turned OFF but is off . Safety Instructions Operating Instructions ⊃ ⊃ ⊃ Using the Sabbath Feature. (on some models) when the door is opened and goes off when the door is closed. Tap the Clock pad until SAb appears in the display. Touch the... be set the desired length of day and the oven is still set between 1 minute and 9 hours and 59 minutes. On models with a light switch on some models) (Designed for baking/roasting only. Touch the Start/On pad and ⊃ will appear in the display. The temperature can be...
... time that the oven has turned OFF but is off . Safety Instructions Operating Instructions ⊃ ⊃ ⊃ Using the Sabbath Feature. (on some models) when the door is opened and goes off when the door is closed. Tap the Clock pad until SAb appears in the display. Touch the... be set the desired length of day and the oven is still set between 1 minute and 9 hours and 59 minutes. On models with a light switch on some models) (Designed for baking/roasting only. Touch the Start/On pad and ⊃ will appear in the display. The temperature can be...
Installation Instructions
Page 22
... and stay off . Touch the Start/On pad. Installation Instructions Consumer Support Troubleshooting Tips 22 Operating Instructions Safety Instructions Using the Sabbath Feature. (on some models) (Designed for use on the Jewish Sabbath and Holidays) How to 1 minute, until only ⊃ is in the display. Touch and hold both the Bake...
... and stay off . Touch the Start/On pad. Installation Instructions Consumer Support Troubleshooting Tips 22 Operating Instructions Safety Instructions Using the Sabbath Feature. (on some models) (Designed for use on the Jewish Sabbath and Holidays) How to 1 minute, until only ⊃ is in the display. Touch and hold both the Bake...

Installation Instructions
Page 24
.... Touch the Self Clean pad. You can touch the Clock pad to display the time of the range and outside the gasket on the amount of the oven. Touch the Start/On pad. If your model has a latch, latch the door. Remove the racks, any time between 3 and 5 hours, depending on... pads or cleansers such as it . It will damage the door lock mechanism. NOTE: Never force the latch. Touch the + or - A combination of any range. Make sure the oven light bulb cover is off during the self-cleaning cycle of any of these areas with a latch. Installation Instructions Consumer Support...
.... Touch the Self Clean pad. You can touch the Clock pad to display the time of the range and outside the gasket on the amount of the oven. Touch the Start/On pad. If your model has a latch, latch the door. Remove the racks, any time between 3 and 5 hours, depending on... pads or cleansers such as it . It will damage the door lock mechanism. NOTE: Never force the latch. Touch the + or - A combination of any range. Make sure the oven light bulb cover is off during the self-cleaning cycle of any of these areas with a latch. Installation Instructions Consumer Support...

Installation Instructions
Page 25
...These deposits are usually a salt residue that cannot be able to any time between 3 and 5 hours, depending on the amount of soil in your range does not have a latch, the door will not be unlatched. If the oven is not clean after the oven cools. How to Delay the Start...Time is self-cleaning, you can touch the Clock pad to unlock. ■ While the oven is displayed. NOTE: Never force the latch. On models without a door latch, the door locks automatically. It will unlock automatically. The oven control will signal if you will appear in the display. Safety Instructions...
...These deposits are usually a salt residue that cannot be able to any time between 3 and 5 hours, depending on the amount of soil in your range does not have a latch, the door will not be unlatched. If the oven is not clean after the oven cools. How to Delay the Start...Time is self-cleaning, you can touch the Clock pad to unlock. ■ While the oven is displayed. NOTE: Never force the latch. On models without a door latch, the door locks automatically. It will unlock automatically. The oven control will signal if you will appear in the display. Safety Instructions...
Installation Instructions
Page 26
...tipping of the range and cause injury. Failure to accumulate under the griddle as possible to prevent "baked on the griddle, further cooking will harden the residue and cause sticking over time. Wash with hot, soapy water after each use knives or cut food on some models) NOTES: ■...microwave. ■ Always turn off and all surface burners before cleaning any reason, be sure the anti-tip device is re-engaged properly when the range is cool. WARNING: If your griddle in a dishwasher. ■ Wash with a sponge, Scrunge® or other cleaning pad labeled safe for ...
...tipping of the range and cause injury. Failure to accumulate under the griddle as possible to prevent "baked on the griddle, further cooking will harden the residue and cause sticking over time. Wash with hot, soapy water after each use knives or cut food on some models) NOTES: ■...microwave. ■ Always turn off and all surface burners before cleaning any reason, be sure the anti-tip device is re-engaged properly when the range is cool. WARNING: If your griddle in a dishwasher. ■ Wash with a sponge, Scrunge® or other cleaning pad labeled safe for ...
Installation Instructions
Page 27
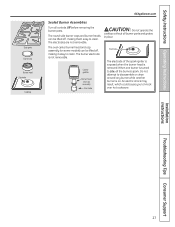
... cap assembly Electrode Electrode The electrode of the spark igniter is exposed when the burner head is not removable. When one burner is on some models) can be lifted off , making it easy to knock over hot cookware. The electrodes are not removable.
... cap assembly Electrode Electrode The electrode of the spark igniter is exposed when the burner head is not removable. When one burner is on some models) can be lifted off , making it easy to knock over hot cookware. The electrodes are not removable.

Installation Instructions
Page 28
.... Lift off when cool. After cleaning Before putting the burner caps, heads (on food particles. Large burner head and cap Front of range On models so equipped: Medium burner head and cap Extra large burner head and cap Small burner head and cap Medium burner head and cap Front ...of the range. Installation Instructions Consumer Support Troubleshooting Tips 28 NOTE: Do not use a toothbrush. You may scour with a plastic scouring pad to not ...
.... Lift off when cool. After cleaning Before putting the burner caps, heads (on food particles. Large burner head and cap Front of range On models so equipped: Medium burner head and cap Extra large burner head and cap Small burner head and cap Medium burner head and cap Front ...of the range. Installation Instructions Consumer Support Troubleshooting Tips 28 NOTE: Do not use a toothbrush. You may scour with a plastic scouring pad to not ...

Installation Instructions
Page 29
...and liquids in a selfcleaning oven. they cannot be sure they are positionspecific. Lifting the cooktop can lead to find the location of the range. To inquire about purchasing stainless steel appliance cleaner or polish, or to damage and improper operation of a dealer nearest you can give them... soak several hours or overnight. NOTE: Some models only have side grates. For other appliance. it from becoming dull, clean up spills right away. Follow the cleaner instructions for an extended...
...and liquids in a selfcleaning oven. they cannot be sure they are positionspecific. Lifting the cooktop can lead to find the location of the range. To inquire about purchasing stainless steel appliance cleaner or polish, or to damage and improper operation of a dealer nearest you can give them... soak several hours or overnight. NOTE: Some models only have side grates. For other appliance. it from becoming dull, clean up spills right away. Follow the cleaner instructions for an extended...


