
User Manual
Page 9
...feet or buttocks. that could get tangled in the wheels. • Before getting in or out of your chair, press the power button to OFF and lock the seat swivel and return the seatback to the upright position. • When seated in ... you from operating your power wheelchair safely. • Your weight exceeds 300 pounds, the weight capacity of your Hoveround® Teknique FWD, Hoveround® Teknique RWD, or Hoveround® Teknique GT power wheelchair. • Your weight exceeds 450 pounds, the maximum weight capacity of your Hoveround® Teknique XHD power wheelchair. • Your...
...feet or buttocks. that could get tangled in the wheels. • Before getting in or out of your chair, press the power button to OFF and lock the seat swivel and return the seatback to the upright position. • When seated in ... you from operating your power wheelchair safely. • Your weight exceeds 300 pounds, the weight capacity of your Hoveround® Teknique FWD, Hoveround® Teknique RWD, or Hoveround® Teknique GT power wheelchair. • Your weight exceeds 450 pounds, the maximum weight capacity of your Hoveround® Teknique XHD power wheelchair. • Your...

User Manual
Page 10
To reduce the chance of surface to another. • Do not operate the power wheelchair in a motor vehicle, even if the chair is secured to the vehicle and you are using the chair's restraint. 10 General Warnings D82007778 REV N 7/10/12 For example, a 12-inch ruler with obstacles and other people...any loose rugs or carpets and remove obstacles from the travel paths in your home. • Drive slowly over thresholds and when traveling from the power wheelchair, drive in proper environments: • Do not drive across or sideways on a slope in reverse. • Avoid ramps and slopes ...
To reduce the chance of surface to another. • Do not operate the power wheelchair in a motor vehicle, even if the chair is secured to the vehicle and you are using the chair's restraint. 10 General Warnings D82007778 REV N 7/10/12 For example, a 12-inch ruler with obstacles and other people...any loose rugs or carpets and remove obstacles from the travel paths in your home. • Drive slowly over thresholds and when traveling from the power wheelchair, drive in proper environments: • Do not drive across or sideways on a slope in reverse. • Avoid ramps and slopes ...

User Manual
Page 11
... crossing with the seatback only in the seat: • Keep your feet on footplate. To reduce the chance of serious injury or death from the power wheelchair, keep yourself properly positioned in a fully upright, locked and forward facing position. • Keep your back against the seatback, arms on the ... • Cross the road by the most direct route. Do not put weight on footplate, armrest or controller while getting into or out of the chair or lean excessively forward or sideways. • Do not carry passengers or cargo. • Do not stand on the footplate. • Do not...
... crossing with the seatback only in the seat: • Keep your feet on footplate. To reduce the chance of serious injury or death from the power wheelchair, keep yourself properly positioned in a fully upright, locked and forward facing position. • Keep your back against the seatback, arms on the ... • Cross the road by the most direct route. Do not put weight on footplate, armrest or controller while getting into or out of the chair or lean excessively forward or sideways. • Do not carry passengers or cargo. • Do not stand on the footplate. • Do not...
User Manual
Page 18
...seat and result in serious injury or death. With the joystick in the center position (neutral), turn chair power on the footplate. Move the footplate down and position your power wheelchair. 3. Standing on the footplate increases the chances of a fall from collision and tip-over of... movement. Be sure to drive the power wheelchair. Fasten the seat belt. 5. Driving Your Teknique Power Wheelchair • Sudden change in motion, loss of control, or tip-over may cause a collision or fall or ...
...seat and result in serious injury or death. With the joystick in the center position (neutral), turn chair power on the footplate. Move the footplate down and position your power wheelchair. 3. Standing on the footplate increases the chances of a fall from collision and tip-over of... movement. Be sure to drive the power wheelchair. Fasten the seat belt. 5. Driving Your Teknique Power Wheelchair • Sudden change in motion, loss of control, or tip-over may cause a collision or fall or ...

User Manual
Page 19
...engaged. 6. Gently move slowly backward. Moving the lever fully left . The power wheelchair will move backward to the left , the chair will be heard as the controller releases the motor brakes and your power wheelchair will move the joystick forward. Move the joystick lever fully right. If...move commands if a fault condition is released, the lever will return to center (neutral) and the power wheelchair will cause the chair to circle to the left will stop. The chair will not respond to move the joystick gently back and to the left . Gently move the joystick ...
...engaged. 6. Gently move slowly backward. Moving the lever fully left . The power wheelchair will move backward to the left , the chair will be heard as the controller releases the motor brakes and your power wheelchair will move the joystick forward. Move the joystick lever fully right. If...move commands if a fault condition is released, the lever will return to center (neutral) and the power wheelchair will cause the chair to circle to the left will stop. The chair will not respond to move the joystick gently back and to the left . Gently move the joystick ...
User Manual
Page 20
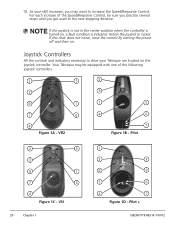
...Teknique are located on the joystick controller. For each increase of the Speed/Response Control, be equipped with one of the following joystick controllers. 2 5 2 3 3 9 1 1 5 7 6 4 6 4 Figure 1A - VR2 7 Figure 1B - Return the joystick to increase the Speed/Response Control. If the chair does not move, reset the control by turning the power...stops until you get used to the new stopping distance. Pilot + D82007778 REV N 7/10/12 Your Teknique may want to center. 10. Pilot 2 5 3 9 1 7 6 4 Figure 1C - VSI 20 Chapter 1 1 2 3 8 9 5 6 4 7...
...Teknique are located on the joystick controller. For each increase of the Speed/Response Control, be equipped with one of the following joystick controllers. 2 5 2 3 3 9 1 1 5 7 6 4 6 4 Figure 1A - VR2 7 Figure 1B - Return the joystick to increase the Speed/Response Control. If the chair does not move, reset the control by turning the power...stops until you get used to the new stopping distance. Pilot + D82007778 REV N 7/10/12 Your Teknique may want to center. 10. Pilot 2 5 3 9 1 7 6 4 Figure 1C - VSI 20 Chapter 1 1 2 3 8 9 5 6 4 7...
User Manual
Page 21
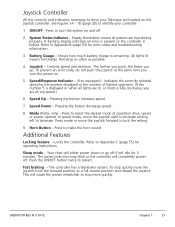
...knob is displayed or when all systems are at the same time you are functioning properly. Controls speed and direction. Horn Button - Your chair will completely power off . 2. To stop more quickly. ON/OFF - Press to select the desired mode of lighted segments. (If the number 5...Sleep mode - The system indicator may blink or the controller will either power down or go . Fast braking - See Figures 1A - 1D (page 20) to Appendix B (page 53) for operating instructions. Refer to identify your Teknique are located on and off . Joystick - Locks the controller. D82007778 ...
...knob is displayed or when all systems are at the same time you are functioning properly. Controls speed and direction. Horn Button - Your chair will completely power off . 2. To stop more quickly. ON/OFF - Press to select the desired mode of lighted segments. (If the number 5...Sleep mode - The system indicator may blink or the controller will either power down or go . Fast braking - See Figures 1A - 1D (page 20) to Appendix B (page 53) for operating instructions. Refer to identify your Teknique are located on and off . Joystick - Locks the controller. D82007778 ...
User Manual
Page 23
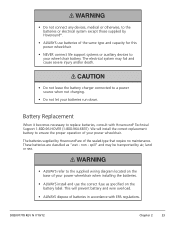
... batteries run down. • Do not connect any devices, medical or otherwise, to the batteries or electrical system except those supplied by Hoveround®. • ALWAYS use the correct fuse as "wet - We will prevent battery and wire overload. • ALWAYS dispose of batteries ...This will install the correct replacement battery to ensure the proper operation of your wheel chair battery. The electrical system may be transported by air, land or sea. • ALWAYS refer to your power wheelchair when installing the batteries. • ALWAYS install and use batteries of the ...
... batteries run down. • Do not connect any devices, medical or otherwise, to the batteries or electrical system except those supplied by Hoveround®. • ALWAYS use the correct fuse as "wet - We will prevent battery and wire overload. • ALWAYS dispose of batteries ...This will install the correct replacement battery to ensure the proper operation of your wheel chair battery. The electrical system may be transported by air, land or sea. • ALWAYS refer to your power wheelchair when installing the batteries. • ALWAYS install and use batteries of the ...

User Manual
Page 24
...8226; DO NOT connect the charging cables directly to the battery. 24 Chapter 2 D82007778 REV N 7/10/12 Explosive gas is equipped with your Hoveround® power wheelchair. • DO NOT use the charger outdoors or in areas unsheltered from the weather. • DO NOT expose the charger to moisture ...the cable or connectors. • Yanking the cable out of several different chargers. We recommend an overnight charge after the day's use the chair has had. The recharging time for the batteries will vary based on the amount of any sparks, high heat or open the charger. •...
...8226; DO NOT connect the charging cables directly to the battery. 24 Chapter 2 D82007778 REV N 7/10/12 Explosive gas is equipped with your Hoveround® power wheelchair. • DO NOT use the charger outdoors or in areas unsheltered from the weather. • DO NOT expose the charger to moisture ...the cable or connectors. • Yanking the cable out of several different chargers. We recommend an overnight charge after the day's use the chair has had. The recharging time for the batteries will vary based on the amount of any sparks, high heat or open the charger. •...

User Manual
Page 26
...the batteries are connected. A light will illuminate on the output side of the charger indicating the power is fully plugged into the controller. If the light does not go on, please check to use the chair: A. C. When the light is red, the batteries are being charged. 3. UPG 24BC5000TF-1 ...AGM sealed lead acid Charger 1. When one red and one red light is on AND the cord is on , the batteries are charging. 3. Plug the AC power cord into a 120-volt...
...the batteries are connected. A light will illuminate on the output side of the charger indicating the power is fully plugged into the controller. If the light does not go on, please check to use the chair: A. C. When the light is red, the batteries are being charged. 3. UPG 24BC5000TF-1 ...AGM sealed lead acid Charger 1. When one red and one red light is on AND the cord is on , the batteries are charging. 3. Plug the AC power cord into a 120-volt...
User Manual
Page 27
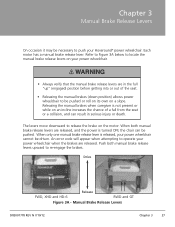
...chair can result in the full "up" (engaged) position before getting into or out of the seat. • Releasing the manual brakes (down position) allows power wheelchair to re-engage the brakes. When both manual brake release levers upward to be driven. When only one manual brake release lever is released, your Hoveround... cannot be pushed or roll on its own on a slope. Drive Release FWD, XHD and HD-6 RWD and GT Figure 3A - Refer to Figure 3A below to operate your power wheelchair. • Always verify that the manual brake release levers are released. An error code will appear ...
...chair can result in the full "up" (engaged) position before getting into or out of the seat. • Releasing the manual brakes (down position) allows power wheelchair to re-engage the brakes. When both manual brake release levers upward to be driven. When only one manual brake release lever is released, your Hoveround... cannot be pushed or roll on its own on a slope. Drive Release FWD, XHD and HD-6 RWD and GT Figure 3A - Refer to Figure 3A below to operate your power wheelchair. • Always verify that the manual brake release levers are released. An error code will appear ...

User Manual
Page 40
... in a motor vehicle even if the chair is not intended to the vehicle and you are using the chair's restraint. 40 Chapter 7 D82007778 REV N 7/10/12 Chapter 7 Options and Accessories To obtain information or pricing on accessories, contact HOVEROUND® CORPORATION at 800-96-HOVER (...kit is available. Please contact Hoveround® for the wheelchair security, it is secured to secure the rider. Optional tie-down kit is intended for additional information. Optional Tie-Down Brackets When transporting the Teknique in a motor vehicle, your power wheelchair while riding in your ...
... in a motor vehicle even if the chair is not intended to the vehicle and you are using the chair's restraint. 40 Chapter 7 D82007778 REV N 7/10/12 Chapter 7 Options and Accessories To obtain information or pricing on accessories, contact HOVEROUND® CORPORATION at 800-96-HOVER (...kit is available. Please contact Hoveround® for the wheelchair security, it is secured to secure the rider. Optional tie-down kit is intended for additional information. Optional Tie-Down Brackets When transporting the Teknique in a motor vehicle, your power wheelchair while riding in your ...
User Manual
Page 42
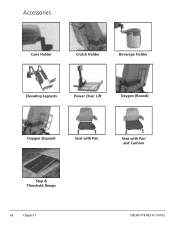
Accessories Cane Holder Crutch Holder Beverage Holder Elevating Legrests Power Chair Lift Oxygen (Round) Oxygen (Square) Seat with Pan Seat with Pan and Cushion Step & Threshold Ramps 42 Chapter 7 D82007778 REV N 7/10/12
Accessories Cane Holder Crutch Holder Beverage Holder Elevating Legrests Power Chair Lift Oxygen (Round) Oxygen (Square) Seat with Pan Seat with Pan and Cushion Step & Threshold Ramps 42 Chapter 7 D82007778 REV N 7/10/12

User Manual
Page 44
... that the armrest bolts are free to pivot. • Check that the seat swivel lock engages and holds (if so equipped). • Clean power wheelchair. (See page 45 for loose connections, damaged cables or signs of electrical damage. • Check that caster wheels rotate freely. • ...Check manual brake releases. Release each brake separately to ensure that each disables the drive when released. • Check that chair cannot be 45-50 psi.). • Check that casters are tight. • Check charger cords and connectors for instructions.) A worn or ...
... that the armrest bolts are free to pivot. • Check that the seat swivel lock engages and holds (if so equipped). • Clean power wheelchair. (See page 45 for loose connections, damaged cables or signs of electrical damage. • Check that caster wheels rotate freely. • ...Check manual brake releases. Release each brake separately to ensure that each disables the drive when released. • Check that chair cannot be 45-50 psi.). • Check that casters are tight. • Check charger cords and connectors for instructions.) A worn or ...

User Manual
Page 45
Tires - Joystick - Top Cover - Never spray the chair with a damp cloth or towel, using a mild detergent. Cleaning your Teknique The Teknique is off before attempting to clean this area. Vacuum or brush off loose material with a dry bristle brush and wipe with a damp cloth or towel, ... vehicle clean: Seat - Doing so may damage it. Brush-off dirt, then wipe with a cotton swab, using a mild detergent. Wipe with liquid. Ensure that the power switch is designed to clean.
Tires - Joystick - Top Cover - Never spray the chair with a damp cloth or towel, using a mild detergent. Cleaning your Teknique The Teknique is off before attempting to clean this area. Vacuum or brush off loose material with a dry bristle brush and wipe with a damp cloth or towel, ... vehicle clean: Seat - Doing so may damage it. Brush-off dirt, then wipe with a cotton swab, using a mild detergent. Wipe with liquid. Ensure that the power switch is designed to clean.

User Manual
Page 46
... closest to the controller. Refasten controller cable (if so equipped). 46 Chapter 9 D82007778 REV N 7/10/12 Check that vehicle power is OFF. 2. Unlock cable from arm and place on footrest or other safe location. Position keyhole portion of bracket over screw ...and slide into place. 3. Loosen forward socket head cap screw. 2. Chapter 9 Disassembling and Reassembling Your Teknique Controller Removal/Replacement Removal 1. Use the 1/4 inch hex wrench supplied with your chair (See Figure 9A below ). Slide the controller bracket forward until it hits the keyhole. (See Figure ...
... closest to the controller. Refasten controller cable (if so equipped). 46 Chapter 9 D82007778 REV N 7/10/12 Check that vehicle power is OFF. 2. Unlock cable from arm and place on footrest or other safe location. Position keyhole portion of bracket over screw ...and slide into place. 3. Loosen forward socket head cap screw. 2. Chapter 9 Disassembling and Reassembling Your Teknique Controller Removal/Replacement Removal 1. Use the 1/4 inch hex wrench supplied with your chair (See Figure 9A below ). Slide the controller bracket forward until it hits the keyhole. (See Figure ...

User Manual
Page 52
... 50 10 20 15 15 10 10 10 10 20 70 TEK RWD ALL 100 10 30 50 55 10 20 10 30 20 TEK XHD VSI / VR2 85 10 30 50 50 10 15 10 20 20 TEK HD-6 VR2 70 10 30 50 50 20 15 10 20 50... requires a programmer to the appropriate section depending on the style of the factory settings. Chapter 11 Appendixes Appendix A: Programmable Parameters The controller used on your power wheelchair is programmable for future reference. The following chart indicates the standard program values of control system on your...
... 50 10 20 15 15 10 10 10 10 20 70 TEK RWD ALL 100 10 30 50 55 10 20 10 30 20 TEK XHD VSI / VR2 85 10 30 50 50 10 15 10 20 20 TEK HD-6 VR2 70 10 30 50 50 20 15 10 20 50... requires a programmer to the appropriate section depending on the style of the factory settings. Chapter 11 Appendixes Appendix A: Programmable Parameters The controller used on your power wheelchair is programmable for future reference. The following chart indicates the standard program values of control system on your...


