

User Manual
Page 1
Digital Personal Video Recorder User's Manual PVR-9300T The default password is 0000. Please read this manual carefully before setting up your Personal Video Recorder PVR-9300T.
Digital Personal Video Recorder User's Manual PVR-9300T The default password is 0000. Please read this manual carefully before setting up your Personal Video Recorder PVR-9300T.

User Manual
Page 2
... or runs late the record time will be adjusted to record the whole programme (page GB40, GB44) • Series Link If a programme you for purchasing a Humax PVR-9300T product. Freeview Playback explained: • Accurate recording The start and end times of the programmes later that, day or week, on channels where the correct... track the signal meaning the recording will start and stop at the times sent by a News programme) you will automatically be given the option to set to record you can now record the whole series. Notice Thank you wish to record is being broadcast.
... or runs late the record time will be adjusted to record the whole programme (page GB40, GB44) • Series Link If a programme you for purchasing a Humax PVR-9300T product. Freeview Playback explained: • Accurate recording The start and end times of the programmes later that, day or week, on channels where the correct... track the signal meaning the recording will start and stop at the times sent by a News programme) you will automatically be given the option to set to record you can now record the whole series. Notice Thank you wish to record is being broadcast.

User Manual
Page 8
... 11.3 Software Update from PC GB66 12. Installation GB60 10.1 Automatic Search GB60 10.2 Manual Search GB61 10.3 Default Setting GB62 10.4 Antenna Power GB62 11. Specification GB74 13.5 Glossary GB76 13.6 Service and Support GB77 GB7 User's Manual Preferences... GB51 8.1 Parental Control GB51 8.2 Language Setting GB52 8.3 Time Setting GB53 8.4 A/V Control GB54 8.5 Miscellaneous Settings GB56 9. Appendix GB68 13.1 Menu Map GB68 13.2 Trouble Shooting GB69 13.3 Error Message GB73 13.4. Edit...
... 11.3 Software Update from PC GB66 12. Installation GB60 10.1 Automatic Search GB60 10.2 Manual Search GB61 10.3 Default Setting GB62 10.4 Antenna Power GB62 11. Specification GB74 13.5 Glossary GB76 13.6 Service and Support GB77 GB7 User's Manual Preferences... GB51 8.1 Parental Control GB51 8.2 Language Setting GB52 8.3 Time Setting GB53 8.4 A/V Control GB54 8.5 Miscellaneous Settings GB56 9. Appendix GB68 13.1 Menu Map GB68 13.2 Trouble Shooting GB69 13.3 Error Message GB73 13.4. Edit...

User Manual
Page 14
...+ Displays the channel attributes while watching a programme. SUBTITLE Displays the subtitle language list. l. CH+/CH- i. Also, displays the channel list while watching a programme. 14. WIDE Sets the display format. 1. Before Using the Product Please slide down the bottom section of TV. GUIDE Displays the programme guide. 13. OK Selects a menu or...
...+ Displays the channel attributes while watching a programme. SUBTITLE Displays the subtitle language list. l. CH+/CH- i. Also, displays the channel list while watching a programme. 14. WIDE Sets the display format. 1. Before Using the Product Please slide down the bottom section of TV. GUIDE Displays the programme guide. 13. OK Selects a menu or...

User Manual
Page 16
... TV using an RF cable to the TV, VCR or other devices. Select the most appropriate procedure depending on the equipment you encounter any problems setting up your product, please contact your local product distributor. 2.1 Connecting the Antenna Connect your aerial to the TV with the particular equipments for gaining optimum...
... TV using an RF cable to the TV, VCR or other devices. Select the most appropriate procedure depending on the equipment you encounter any problems setting up your product, please contact your local product distributor. 2.1 Connecting the Antenna Connect your aerial to the TV with the particular equipments for gaining optimum...

User Manual
Page 26
... the channel searching procedure, you press the OK button during the search, the search will be displayed. 2. You can use the installation menu to default settings.) 3.1 Search Please wait until then will stop and the channels found channels. In this case, you can delete unwanted channels from the found until the...
... the channel searching procedure, you press the OK button during the search, the search will be displayed. 2. You can use the installation menu to default settings.) 3.1 Search Please wait until then will stop and the channels found channels. In this case, you can delete unwanted channels from the found until the...

User Manual
Page 27
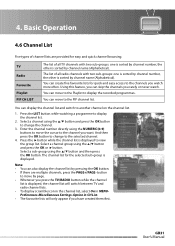
... the NUMERIC(0-9) buttons to move to 4.6 Channel List and Chapter 6. 4. Press the CH+/CH- Note: Interactive service(MHEG) is displayed. Note: The mute function remains set while you switch channels. 4.3 Text and Interactive Services If your chosen channel has digital teletext features, you can access them. In which case, simply follow...
... the NUMERIC(0-9) buttons to move to 4.6 Channel List and Chapter 6. 4. Press the CH+/CH- Note: Interactive service(MHEG) is displayed. Note: The mute function remains set while you switch channels. 4.3 Text and Interactive Services If your chosen channel has digital teletext features, you can access them. In which case, simply follow...

User Manual
Page 30
...a TV that you can select the default audio language you want in MENU-Preferences-Language Setting-Audio Language. • If your receiver is available in MENU-Preferences-Language Setting-Subtitle Language. 3. Select Off from the subtitle menu to exit the soundtrack list. Soundtrack...than compressed audio. Select Subtitle using the / button. 4. Select the subtitle language using the / button. 5. Note: • You also can set the soundtrack by pressing the SUBTITLE button on the remote control. • You can select the language for the subtitle. 1. Press the OPT+ button...
...a TV that you can select the default audio language you want in MENU-Preferences-Language Setting-Audio Language. • If your receiver is available in MENU-Preferences-Language Setting-Subtitle Language. 3. Select Off from the subtitle menu to exit the soundtrack list. Soundtrack...than compressed audio. Select Subtitle using the / button. 4. Select the subtitle language using the / button. 5. Note: • You also can set the soundtrack by pressing the SUBTITLE button on the remote control. • You can select the language for the subtitle. 1. Press the OPT+ button...
User Manual
Page 32
..., the channel list will switch between TV and radio channel lists. • To display scramble icon in the channel list, select On in MENUPreferences-Miscellaneous Settings-Option in CH List. • The favourite lists will only appear if you have created them first. Note: • You can skip the channels you...
..., the channel list will switch between TV and radio channel lists. • To display scramble icon in the channel list, select On in MENUPreferences-Miscellaneous Settings-Option in CH List. • The favourite lists will only appear if you have created them first. Note: • You can skip the channels you...

User Manual
Page 39
PVR 5.4 Chase Play You can perform TSR (Time Shifted Recording) using the bookmark in recorded programme playback. Note: You can jump to a position directly using the ... seconds. 5.5 Bookmark You can playback the programme being recorded. 5. While recording two channels simultaneously, you can watch the programme from the location you want to set a bookmark while playing back a recorded programme. Press the BOOKMARK LIST button after it has been recorded for recorded programmes.
PVR 5.4 Chase Play You can perform TSR (Time Shifted Recording) using the bookmark in recorded programme playback. Note: You can jump to a position directly using the ... seconds. 5.5 Bookmark You can playback the programme being recorded. 5. While recording two channels simultaneously, you can watch the programme from the location you want to set a bookmark while playing back a recorded programme. Press the BOOKMARK LIST button after it has been recorded for recorded programmes.
User Manual
Page 40
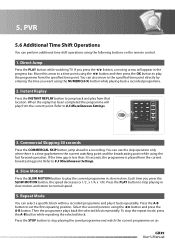
... Mode You can also move to normal speed. 5. Select the second position using the following buttons on air. Refer to set the first repeating position. Commercial Skipping 30 seconds Press the COMMERCIAL SKIP button jump ahead in slow motion. Press the A-B button to ...8.5 Miscellaneous Settings. To stop playing the saved programme and watch the current programme on the remote control. 1. PVR 5.6 Additional Time Shift Operations You can use the skip operation only when there is played...
... Mode You can also move to normal speed. 5. Select the second position using the following buttons on air. Refer to set the first repeating position. Commercial Skipping 30 seconds Press the COMMERCIAL SKIP button jump ahead in slow motion. Press the A-B button to ...8.5 Miscellaneous Settings. To stop playing the saved programme and watch the current programme on the remote control. 1. PVR 5.6 Additional Time Shift Operations You can use the skip operation only when there is played...

User Manual
Page 42
... On Time. 2. Press the GUIDE button. 2. If you select a split programme, a pop-up will be displayed. 2. The programme guide for the selected channel list is set to complete reservation. 6.
... On Time. 2. Press the GUIDE button. 2. If you select a split programme, a pop-up will be displayed. 2. The programme guide for the selected channel list is set to complete reservation. 6.

User Manual
Page 46
... any Recordings by pressing the GREEN button. 3. After selecting reserved programmes using the following functions. Note: • If the protect option of the programme is set to Enable, you wish to 7.1.4 Changing the Attribute. • You can trim the recorded programme using the GREEN button, press the RED button. 2. 7. Record 2. Deleting...
... any Recordings by pressing the GREEN button. 3. After selecting reserved programmes using the following functions. Note: • If the protect option of the programme is set to Enable, you wish to 7.1.4 Changing the Attribute. • You can trim the recorded programme using the GREEN button, press the RED button. 2. 7. Record 2. Deleting...
User Manual
Page 48
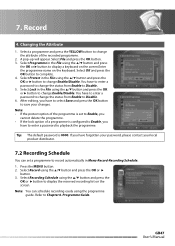
You have to enter a password to change the status from Enable to Disable. 6. Note: • If the protect option of the programme is set a programme to save your local product distributor. 7.2 Recording Schedule You can schedule recording easily using the / button and press the OK or button to... the / button and press the OK or button to change Enable/Disable. If you have to enter a password to complete. 4. Note: You can set to Enable, you cannot delete the programme. • If the lock option of the recorded programme. 2. Refer to change the attribute of a programme ...
You have to enter a password to change the status from Enable to Disable. 6. Note: • If the protect option of the programme is set a programme to save your local product distributor. 7.2 Recording Schedule You can schedule recording easily using the / button and press the OK or button to... the / button and press the OK or button to change Enable/Disable. If you have to enter a password to complete. 4. Note: You can set to Enable, you cannot delete the programme. • If the lock option of the recorded programme. 2. Refer to change the attribute of a programme ...

User Manual
Page 51
... press the OK or button. 3. Note: Auto tracking, split and series reservation in the programme guide are enabled only when Recording's Start/End Time is set the start formatting the HDD. 7. Select Record using the / button and press the OK or button. 4. Press the MENU button. 2. GB50 User's... Manual If you have forgotten your password, please contact the Humax Customer Helpline. 7.4 Recording's Start/End Time You can set to On Time. Select the time using the / button and press the OK or button. 3. You can check the free...
... press the OK or button. 3. Note: Auto tracking, split and series reservation in the programme guide are enabled only when Recording's Start/End Time is set the start formatting the HDD. 7. Select Record using the / button and press the OK or button. 4. Press the MENU button. 2. GB50 User's... Manual If you have forgotten your password, please contact the Humax Customer Helpline. 7.4 Recording's Start/End Time You can set to On Time. Select the time using the / button and press the OK or button. 3. You can check the free...

User Manual
Page 52
... Broadcaster. 2. Press the MENU button. 2. If you have forgotten your password, please contact your local product distributor. 1. Note: • You have set parental control for your password please contact the Humax Customer Helpline. Enter New Password using the / button and press the OK or button. 2. Enter the new password again to ask...
... Broadcaster. 2. Press the MENU button. 2. If you have forgotten your password, please contact your local product distributor. 1. Note: • You have set parental control for your password please contact the Humax Customer Helpline. Enter New Password using the / button and press the OK or button. 2. Enter the new password again to ask...

User Manual
Page 53
8. Preferences 8.2 Language Setting 1. Audio Priority You can select the subtitle font . 1. Manual Subtitles are displayed in the predefined subtitle language. Note: Interactive service(MHEG) is not available when ... Audio using the / button and press the OK or button. 1. Select from Auto and Manual using the / button and press the OK button. 2. Select Language Setting using the OK or button. 3. Select Audio/Subtitle Language using the / button. 2. Select Subtitle Display using the / button and press the OK or button. 2. GB52...
8. Preferences 8.2 Language Setting 1. Audio Priority You can select the subtitle font . 1. Manual Subtitles are displayed in the predefined subtitle language. Note: Interactive service(MHEG) is not available when ... Audio using the / button and press the OK or button. 1. Select from Auto and Manual using the / button and press the OK button. 2. Select Language Setting using the OK or button. 3. Select Audio/Subtitle Language using the / button. 2. Select Subtitle Display using the / button and press the OK or button. 2. GB52...

User Manual
Page 54
...2. Select Power Off using the / button. 2. Note: • Once Power On/Off is specified, it is repeated everyday. • You can set the GMT offset for the current time. 1. When you have selected Enable, enter Time using the OK or button. 3. It is automatically powered on... 1. When you receive the Digital channels from the Digital Transmitter that you have selected Enable, enter Channel No. Preferences 8.3 Time Setting You can set the time when the product is detected from . Does not use Power On. 3. Select Enable/Disable using the NUMERIC(0-9) buttons,...
...2. Select Power Off using the / button. 2. Note: • Once Power On/Off is specified, it is repeated everyday. • You can set the GMT offset for the current time. 1. When you have selected Enable, enter Time using the OK or button. 3. It is automatically powered on... 1. When you receive the Digital channels from the Digital Transmitter that you have selected Enable, enter Channel No. Preferences 8.3 Time Setting You can set the time when the product is detected from . Does not use Power On. 3. Select Enable/Disable using the NUMERIC(0-9) buttons,...

User Manual
Page 55
... the / button and press the OK or button. 2. Press the MENU button. 2. TV-SCART You can set the VCR SCART output. 1. Select from Stereo and Mono using the OK or button. 3. Audio Output You can set the audio or video output control. 1. Select from CVBS and S-Video using the OK or button.... 4. GB54 User's Manual VCR-SCART You can set the aspect ratio of your TV. 1. Select Audio Output using the / button and...
... the / button and press the OK or button. 2. Press the MENU button. 2. TV-SCART You can set the VCR SCART output. 1. Select from Stereo and Mono using the OK or button. 3. Audio Output You can set the audio or video output control. 1. Select from CVBS and S-Video using the OK or button.... 4. GB54 User's Manual VCR-SCART You can set the aspect ratio of your TV. 1. Select Audio Output using the / button and...

User Manual
Page 56
Note: If you have set the Screen Ratio to its 16:9/Auto /Wide format. 6. Select Display Format using the / button. 2. If the screen ratio is set the HDMI resolution. 1. GB55 User's Manual Display Format You can set to 4:3, you may also need to adjust your TV set to the TV screen ratio. ...1. If the screen ratio is set to 16:9 you can select an option among 16:9 Letter...
Note: If you have set the Screen Ratio to its 16:9/Auto /Wide format. 6. Select Display Format using the / button. 2. If the screen ratio is set the HDMI resolution. 1. GB55 User's Manual Display Format You can set to 4:3, you may also need to adjust your TV set to the TV screen ratio. ...1. If the screen ratio is set to 16:9 you can select an option among 16:9 Letter...


