
Installation Guide
Page 1
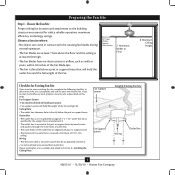
... for the ceiling hole directly below the joist or support brace. Attach a 2" x 4" support brace between two joists. Preparing the Fan Site 8' Minimum Ceiling Height 7' Minimum to Floor 30" From Wall or Nearest Obstruction Step 1 Choose the Fan Site Proper ceiling fan location and attachment to determine if the site is acceptable and safe for your new Hunter fan.
... for the ceiling hole directly below the joist or support brace. Attach a 2" x 4" support brace between two joists. Preparing the Fan Site 8' Minimum Ceiling Height 7' Minimum to Floor 30" From Wall or Nearest Obstruction Step 1 Choose the Fan Site Proper ceiling fan location and attachment to determine if the site is acceptable and safe for your new Hunter fan.
Owner's Manual
Page 2
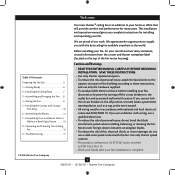
... and is certified to STD C22.2 No.113 • Wash your hands after your fan. Before installing your fan, for many years. If you with national and local electrical codes and ANSI/NFPA 70. Welcome Your new Hunter® ceiling fan is an addition to your home or office that will provide comfort and performance...
... and is certified to STD C22.2 No.113 • Wash your hands after your fan. Before installing your fan, for many years. If you with national and local electrical codes and ANSI/NFPA 70. Welcome Your new Hunter® ceiling fan is an addition to your home or office that will provide comfort and performance...
Owner's Manual
Page 3
... of outlet box. • e outer holes of lead wires extend from outlet box. Fan Support System • Fan attaches directly to Section 2 • Installing the Ceiling Plate. Fan Support System Fan Support System Suitable Existing Fan Site Wiring Outlet Box 3 42653-01 • 12/30/10 • Hunter Fan Company If your new Hunter fan. Preparing the Fan Site Step 1 -
... of outlet box. • e outer holes of lead wires extend from outlet box. Fan Support System • Fan attaches directly to Section 2 • Installing the Ceiling Plate. Fan Support System Fan Support System Suitable Existing Fan Site Wiring Outlet Box 3 42653-01 • 12/30/10 • Hunter Fan Company If your new Hunter fan. Preparing the Fan Site Step 1 -

Owner's Manual
Page 4
... as a tag, to recess the bottom of the outlet box a minimum of 1/16" into the ceiling. For instructions to install your ceiling fan, go to allow you are turned off position, securely fasten a prominent warning device, such as follows...: 3-1. You have now successfully prepared your fan manual and continue with national and local electrical codes and ANSI/NFPA 70. Position it will use a qualified electrician. 4 42653-01 • 12/30/10 • Hunter Fan...
... as a tag, to recess the bottom of the outlet box a minimum of 1/16" into the ceiling. For instructions to install your ceiling fan, go to allow you are turned off position, securely fasten a prominent warning device, such as follows...: 3-1. You have now successfully prepared your fan manual and continue with national and local electrical codes and ANSI/NFPA 70. Position it will use a qualified electrician. 4 42653-01 • 12/30/10 • Hunter Fan...
Owner's Manual
Page 5
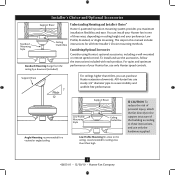
... controls. To install and use only the hardware supplied. 5 42653-01 • 12/30/10 • Hunter Fan Company Understanding Mounting and Installer's Choice® Hunter's patented 3-position mounting system provides you can install your Hunter fan in this manual include instructions for ceilings less than 8 feet, you maximum installation flexibility and ease. You can purchase...
... controls. To install and use only the hardware supplied. 5 42653-01 • 12/30/10 • Hunter Fan Company Understanding Mounting and Installer's Choice® Hunter's patented 3-position mounting system provides you can install your Hunter fan in this manual include instructions for ceilings less than 8 feet, you maximum installation flexibility and ease. You can purchase...

Owner's Manual
Page 6
... site) Checking Your Fan Parts Carefully unpack your Hunter dealer or call Hunter Technical Support Department at 888-830-1326 (In Canada, call 1-866-268-1936). Installing Multiple Fans? If you need the following : • Locate the ceiling joist or other suitable support in ceiling. • Drill holes... they were shipped. 6 42653-01 • 12/30/10 • Hunter Fan Company If you are missing or damaged, contact your fan to avoid damage to the motor or fan blades. 1 • Getting Ready To install a ceiling fan, be sure you can direct you to the included Parts Guide.
... site) Checking Your Fan Parts Carefully unpack your Hunter dealer or call Hunter Technical Support Department at 888-830-1326 (In Canada, call 1-866-268-1936). Installing Multiple Fans? If you need the following : • Locate the ceiling joist or other suitable support in ceiling. • Drill holes... they were shipped. 6 42653-01 • 12/30/10 • Hunter Fan Company If you are missing or damaged, contact your fan to avoid damage to the motor or fan blades. 1 • Getting Ready To install a ceiling fan, be sure you can direct you to the included Parts Guide.
Owner's Manual
Page 7
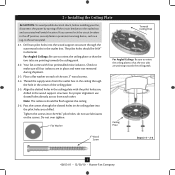
... Tighten the screws into the pilot holes you drilled in diameter. Ceiling Plate 3" Wood Screw Steps 2-3 - 2-6 7 42653-01 • 12/30/10 • Hunter Fan Company Align the slotted holes in the ceiling plate with four preinstalled noise isolators. do not use slotted holes ...directly across from the outlet box in the ceiling through the outermost holes in place and were not removed ...
... Tighten the screws into the pilot holes you drilled in diameter. Ceiling Plate 3" Wood Screw Steps 2-3 - 2-6 7 42653-01 • 12/30/10 • Hunter Fan Company Align the slotted holes in the ceiling plate with four preinstalled noise isolators. do not use slotted holes ...directly across from the outlet box in the ceiling through the outermost holes in place and were not removed ...

Owner's Manual
Page 8
...the adapter. 3-5. Loosen the square head set screw on the pipe will still be visible; Raise the fan and align the slots in the adapter. CAUTION: The adapter has a special coating on the ceiling plate. 3-8. For Low Profile mounting: Note: For low profile mounting, the downrod is fully installed, ... Washer Canopy Low Profile Screw Step 3-6 (Detail) Adapter Low Profile Screw Low Profile Washer 8 42653-01 • 12/30/10 • Hunter Fan Company Feed the wires from unscrewing. Once assembled, do not remove the downrod. Securely retighten the set screw from the...
...the adapter. 3-5. Loosen the square head set screw on the pipe will still be visible; Raise the fan and align the slots in the adapter. CAUTION: The adapter has a special coating on the ceiling plate. 3-8. For Low Profile mounting: Note: For low profile mounting, the downrod is fully installed, ... Washer Canopy Low Profile Screw Step 3-6 (Detail) Adapter Low Profile Screw Low Profile Washer 8 42653-01 • 12/30/10 • Hunter Fan Company Feed the wires from unscrewing. Once assembled, do not remove the downrod. Securely retighten the set screw from the...
Owner's Manual
Page 9
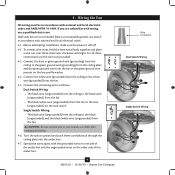
...For all these connections use switch in accordance with national and local electrical codes. 4-1. Connect the white wire (grounded) from the ceiling to the white wire (grounded) from the fan or the green ground wire present on the other side of the outlet box. 9 42653-01 • 12/30/10 ...• Hunter Fan Company Wire Connector Dual Switch Wiring Single Switch Wiring To connect the wires, hold the bare metal leads together and place a wire nut over them carefully back through the ceiling plate into the outlet box. 4-7. Spread the wires apart, ...
...For all these connections use switch in accordance with national and local electrical codes. 4-1. Connect the white wire (grounded) from the ceiling to the white wire (grounded) from the fan or the green ground wire present on the other side of the outlet box. 9 42653-01 • 12/30/10 ...• Hunter Fan Company Wire Connector Dual Switch Wiring Single Switch Wiring To connect the wires, hold the bare metal leads together and place a wire nut over them carefully back through the ceiling plate into the outlet box. 4-7. Spread the wires apart, ...
Owner's Manual
Page 10
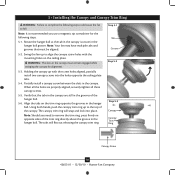
... in the hanger ball groove. Step 5-1 Tab Groove Step 5-2 Step 5-3 Canopy Canopy Trim Ring Canopy Screw 10 42653-01 • 12/30/10 • Hunter Fan Company When all the holes are still in the grooves of the hanger ball. 5-6. Verify that must remain engaged while swinging the canopy for the... the mounting holes on the trim ring opposite the grooves in the hanger ball. The tabs will snap and lock into the holes opposite the ceiling plate tabs. 5-4. Note: It is secure in the canopy. Holding the canopy up to the top of the trim ring directly above the groove...
... in the hanger ball groove. Step 5-1 Tab Groove Step 5-2 Step 5-3 Canopy Canopy Trim Ring Canopy Screw 10 42653-01 • 12/30/10 • Hunter Fan Company When all the holes are still in the grooves of the hanger ball. 5-6. Verify that must remain engaged while swinging the canopy for the... the mounting holes on the trim ring opposite the grooves in the hanger ball. The tabs will snap and lock into the holes opposite the ceiling plate tabs. 5-4. Note: It is secure in the canopy. Holding the canopy up to the top of the trim ring directly above the groove...
Owner's Manual
Page 13
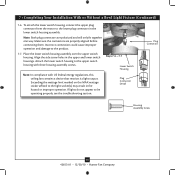
... upper switch housing with US federal energy regulations, this ceiling fan contains a device that restricts its light output. Attach the lower switch housing to the product. 7-7. Plug Connector Detail Plug Connector Housing Assembly Screw 13 42653-01 • 12/30/10 • Hunter Fan Company Place the lower switch housing assembly over the upper...
... upper switch housing with US federal energy regulations, this ceiling fan contains a device that restricts its light output. Attach the lower switch housing to the product. 7-7. Plug Connector Detail Plug Connector Housing Assembly Screw 13 42653-01 • 12/30/10 • Hunter Fan Company Place the lower switch housing assembly over the upper...
Owner's Manual
Page 16
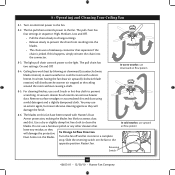
...been treated with a direct breeze. A vacuum cleaner brush nozzle can remove heavier dust. Restart fan. 8 • Operating and Cleaning Your Ceiling Fan 8-1. In winter, having the fan draw air upward (clockwise blade rotation) will damage the protective Dust Armor on this happens, ...Ceiling fans work best by blowing air downward (counterclockwise blade rotation) in sequence: High, Medium, Low and Off. • Pull the chain slowly to change settings. • Release slowly to a complete stop. The pull chain has four settings in warm weather to cool the room with Hunter...
...been treated with a direct breeze. A vacuum cleaner brush nozzle can remove heavier dust. Restart fan. 8 • Operating and Cleaning Your Ceiling Fan 8-1. In winter, having the fan draw air upward (clockwise blade rotation) will damage the protective Dust Armor on this happens, ...Ceiling fans work best by blowing air downward (counterclockwise blade rotation) in sequence: High, Medium, Low and Off. • Pull the chain slowly to change settings. • Release slowly to a complete stop. The pull chain has four settings in warm weather to cool the room with Hunter...
Parts Guide
Page 1
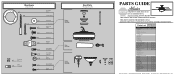
Parts List Item Name * Hanging System Kit Ceiling Plate Canopy Hanger Ball / Downrod Assembly Setscrew Low Profile...Chain Pendant Pull Chain Pendant Bottom Cap Dummy Terminal, Male Dummy Terminal, Female Cap, Switch Housing Plug Button Finial Model # 21587 Asm. Dwg. # 97281-01 Finish New Bronze Qnty Part # 1 96759-30 1 74131-01 1 G1146-30 1 ...-04 1 G0090-01 1 G0091-01 1 65200-02 1 08198-01 1 08200-01 1 73853-01 1 73854-01 1 75483-02 Hunter Fan Company • 7130 Goodlett Farms Pkwy. #400 • Memphis, TN 38016 • www.hunterfan.com • 98000-01-674 06...
Parts List Item Name * Hanging System Kit Ceiling Plate Canopy Hanger Ball / Downrod Assembly Setscrew Low Profile...Chain Pendant Pull Chain Pendant Bottom Cap Dummy Terminal, Male Dummy Terminal, Female Cap, Switch Housing Plug Button Finial Model # 21587 Asm. Dwg. # 97281-01 Finish New Bronze Qnty Part # 1 96759-30 1 74131-01 1 G1146-30 1 ...-04 1 G0090-01 1 G0091-01 1 65200-02 1 08198-01 1 08200-01 1 73853-01 1 73854-01 1 75483-02 Hunter Fan Company • 7130 Goodlett Farms Pkwy. #400 • Memphis, TN 38016 • www.hunterfan.com • 98000-01-674 06...


