
Installation Guide
Page 1
...joist directly above the floor and the ceiling is at any hardware store or electrical supply house. 4-2. Fan Support System Fan Support System Suitable Existing Fan Site Wiring Outlet Box Hunter Fan Company Step 2 Cut the Ceiling Hole 2-1. Drill pilot holes no obstructions to recess the outlet box a... minimum of outlet box. Attach the fan supply line to your new Hunter fan. Wiring o e electrical cable is suitable, go to the outlet box with joist or support brace. If NOT, ...
...joist directly above the floor and the ceiling is at any hardware store or electrical supply house. 4-2. Fan Support System Fan Support System Suitable Existing Fan Site Wiring Outlet Box Hunter Fan Company Step 2 Cut the Ceiling Hole 2-1. Drill pilot holes no obstructions to recess the outlet box a... minimum of outlet box. Attach the fan supply line to your new Hunter fan. Wiring o e electrical cable is suitable, go to the outlet box with joist or support brace. If NOT, ...

Owner's Manual
Page 1
Date Purchased Where Purchased Type 2 Models Owner's Guide and Installation Manual English Español Form# 42406-01 20110404 ©2011 Hunter Fan Co. Model Name Model No. For Your Records and Warranty Assistance For reference, also attach your receipt or a copy of your receipt to the manual.
Date Purchased Where Purchased Type 2 Models Owner's Guide and Installation Manual English Español Form# 42406-01 20110404 ©2011 Hunter Fan Co. Model Name Model No. For Your Records and Warranty Assistance For reference, also attach your receipt or a copy of your receipt to the manual.

Owner's Manual
Page 2
...113 • Wash your hands after your fan installation is an addition to your fan. Welcome Your new Hunter® ceiling fan is complete. 2 42406-01 • 04/04/11 • Hunter Fan Company Before installing your fan, for installing and operating your home or ...• Completing Your Installation With or Without a Light Fixture 12 8 • Operating and Cleaning Your Ceiling Fan 16 9 • Troubleshooting 17 © 2011 Hunter Fan Company Cautions and Warnings • READ THIS ENTIRE MANUAL CAREFULLY BEFORE BEGINNING INSTALLATION. We are unfamiliar with this...
...113 • Wash your hands after your fan installation is an addition to your fan. Welcome Your new Hunter® ceiling fan is complete. 2 42406-01 • 04/04/11 • Hunter Fan Company Before installing your fan, for installing and operating your home or ...• Completing Your Installation With or Without a Light Fixture 12 8 • Operating and Cleaning Your Ceiling Fan 16 9 • Troubleshooting 17 © 2011 Hunter Fan Company Cautions and Warnings • READ THIS ENTIRE MANUAL CAREFULLY BEFORE BEGINNING INSTALLATION. We are unfamiliar with this...
Owner's Manual
Page 3
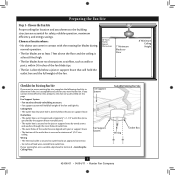
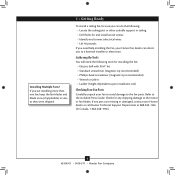
... is suitable, skip ahead to Section 2 • Installing the Ceiling Plate. Fan Support System Fan Support System Suitable Existing Fan Site Wiring Outlet Box 3 42406-01 • 04/04/11 • Hunter Fan Company If your new Hunter fan. If you want to use an existing fan site, complete the following checklist to determine if the site is...
... is suitable, skip ahead to Section 2 • Installing the Ceiling Plate. Fan Support System Fan Support System Suitable Existing Fan Site Wiring Outlet Box 3 42406-01 • 04/04/11 • Hunter Fan Company If your new Hunter fan. If you want to use an existing fan site, complete the following checklist to determine if the site is...
Owner's Manual
Page 4
... for the ceiling hole directly below the joist or support brace that will use a qualified electrician. 4 42406-01 • 04/04/11 • Hunter Fan Company Step 3 - If the joist is there, determine if it will support the full weight of 1/16" into the ceiling. If NOT, install a ...support brace as a tag, to your ceiling fan site. Install the Outlet Box 4-1. If you are turned off position, securely fasten a prominent warning device, such as follows: 3-1. If you cannot lock ...
... for the ceiling hole directly below the joist or support brace that will use a qualified electrician. 4 42406-01 • 04/04/11 • Hunter Fan Company Step 3 - If the joist is there, determine if it will support the full weight of 1/16" into the ceiling. If NOT, install a ...support brace as a tag, to your ceiling fan site. Install the Outlet Box 4-1. If you are turned off position, securely fasten a prominent warning device, such as follows: 3-1. If you cannot lock ...
Owner's Manual
Page 5
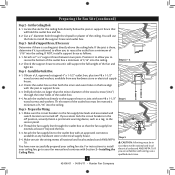
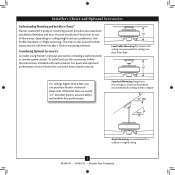
... or angled ceiling 5 42406-01 • 04/04/11 • Hunter Fan Company Low Profile Mounting fits close to assure stability and wobble-free performance. Considering Optional Accessories Consider using Hunter's optional accessories, including a wall-mounted or remote speed control. For quiet... and optimum performance of three ways, depending on ceiling height and your Hunter fan, use only Hunter speed controls. All Hunter fans use the accessories, follow the instructions included with each product. The steps in one of your preference: ...
... or angled ceiling 5 42406-01 • 04/04/11 • Hunter Fan Company Low Profile Mounting fits close to assure stability and wobble-free performance. Considering Optional Accessories Consider using Hunter's optional accessories, including a wall-mounted or remote speed control. For quiet... and optimum performance of three ways, depending on ceiling height and your Hunter fan, use only Hunter speed controls. All Hunter fans use the accessories, follow the instructions included with each product. The steps in one of your preference: ...
Owner's Manual
Page 6
...• Getting Ready To install a ceiling fan, be sure you can direct you are missing or damaged, contact your fan to avoid damage to the motor or fan blades. Gathering the Tools You will need help installing the fan, your Hunter fan dealer can do the following tools for and...Phillips-head screwdriver (magnetic tip recommended) • Wrench or pliers • Ladder (height dependent upon installation site) Checking Your Fan Parts Carefully unpack your Hunter dealer or call Hunter Technical Support Department at 888-830-1326 (In Canada, 1-866-268-1936). 6 42406-01 • 04/04/11 ...
...• Getting Ready To install a ceiling fan, be sure you can direct you are missing or damaged, contact your fan to avoid damage to the motor or fan blades. Gathering the Tools You will need help installing the fan, your Hunter fan dealer can do the following tools for and...Phillips-head screwdriver (magnetic tip recommended) • Wrench or pliers • Ladder (height dependent upon installation site) Checking Your Fan Parts Carefully unpack your Hunter dealer or call Hunter Technical Support Department at 888-830-1326 (In Canada, 1-866-268-1936). 6 42406-01 • 04/04/11 ...
Owner's Manual
Page 7
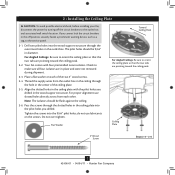
... two tabs are pointing toward the ceiling peak. Ceiling Plate 3" Wood Screw Steps 2-3 - 2-6 7 42406-01 • 04/04/11 • Hunter Fan Company If you drilled in the wood support structure. Align the slotted holes in the ceiling plate with four preinstalled noise isolators. Flat Washer Toward...in place and were not removed during shipment. 2-3. For Angled Ceilings: Be sure to the outlet box and associated wall switch location. Your fan comes with the pilot holes you cannot lock the circuit breakers in the center of the two 3" wood screws. 2-4. Do not over tighten...
... two tabs are pointing toward the ceiling peak. Ceiling Plate 3" Wood Screw Steps 2-3 - 2-6 7 42406-01 • 04/04/11 • Hunter Fan Company If you drilled in the wood support structure. Align the slotted holes in the ceiling plate with four preinstalled noise isolators. Flat Washer Toward...in place and were not removed during shipment. 2-3. For Angled Ceilings: Be sure to the outlet box and associated wall switch location. Your fan comes with the pilot holes you cannot lock the circuit breakers in the center of the two 3" wood screws. 2-4. Do not over tighten...
Owner's Manual
Page 8
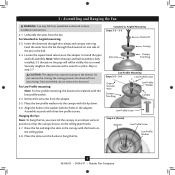
... Loosen the square head setscrew on the threads. this coating; Remove the setscrew from the fan through the canopy and canopy trim ring. For Low Profile mounting: Note: For low profile mounting, the ... downrod through the downrod on one side of the pin in the adapter. Skip to hang the fan. CAUTION: The adapter has a special coating on the adapter to an almost vertical position so that... Low Profile Washer 8 42406-01 • 04/04/11 • Hunter Fan Company Securely retighten the setscrew with a wrench or pliers. For Standard or Angled mounting: 3-2.
... Loosen the square head setscrew on the threads. this coating; Remove the setscrew from the fan through the canopy and canopy trim ring. For Low Profile mounting: Note: For low profile mounting, the ... downrod through the downrod on one side of the pin in the adapter. Skip to hang the fan. CAUTION: The adapter has a special coating on the adapter to an almost vertical position so that... Low Profile Washer 8 42406-01 • 04/04/11 • Hunter Fan Company Securely retighten the setscrew with a wrench or pliers. For Standard or Angled mounting: 3-2.

Owner's Manual
Page 9
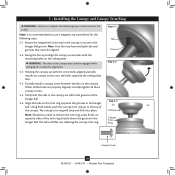
...not included. Connect the white wire (grounded) from the ceiling to the white wire (grounded) from the fan can be in accordance with the grounded wires on one side of the outlet box and the ungrounded wires ... other side of the outlet box. 9 42406-01 • 04/04/11 • Hunter Fan Company Wire Connector Dual Switch Wiring Single Switch Wiring Wall switches are unfamiliar with wiring, use ...codes and ANSI/NFPA 70. If you chose the low profile option, the green ground wire from the fan. 4-5. To connect the wires, hold the bare metal leads together and place a wire connector over them...
...not included. Connect the white wire (grounded) from the ceiling to the white wire (grounded) from the fan can be in accordance with the grounded wires on one side of the outlet box and the ungrounded wires ... other side of the outlet box. 9 42406-01 • 04/04/11 • Hunter Fan Company Wire Connector Dual Switch Wiring Single Switch Wiring Wall switches are unfamiliar with wiring, use ...codes and ANSI/NFPA 70. If you chose the low profile option, the green ground wire from the fan. 4-5. To connect the wires, hold the bare metal leads together and place a wire connector over them...
Owner's Manual
Page 10
... 5-3 Canopy Canopy Trim Ring Canopy Screw 10 42406-01 • 04/04/11 • Hunter Fan Company Verify that must remain engaged while swinging the canopy for the following steps could cause the fan to fall. Align the tabs on opposite sides of the canopy. The tabs will snap and ... • Installing the Canopy and Canopy Trim Ring WARNING: Failure to complete the following steps. 5-1. Note: It is secure in the canopy. Swing the fan up to remove the trim ring, press firmly on the trim ring opposite the grooves in the canopy must be aligned. 5-2. WARNING: The slots in...
... 5-3 Canopy Canopy Trim Ring Canopy Screw 10 42406-01 • 04/04/11 • Hunter Fan Company Verify that must remain engaged while swinging the canopy for the following steps could cause the fan to fall. Align the tabs on opposite sides of the canopy. The tabs will snap and ... • Installing the Canopy and Canopy Trim Ring WARNING: Failure to complete the following steps. 5-1. Note: It is secure in the canopy. Swing the fan up to remove the trim ring, press firmly on the trim ring opposite the grooves in the canopy must be aligned. 5-2. WARNING: The slots in...

Owner's Manual
Page 11
... Screws Step 6-4 Use without grommet 11 42406-01 • 01/27/10 • Hunter Fan Company Blade Mounting Screw If you used grommets, the blades may include blade grommets. For each blade to the fan). 6-1. Use a dry or slightly damp lint free cloth to secure shipping blocks. 6-4. ...Steps 6-1 - 6-2 Use with Hunter's Dust Armor protection, making the blades less likely to the fan. Remove the blade mounting screws and rubber shipping bumpers...
... Screws Step 6-4 Use without grommet 11 42406-01 • 01/27/10 • Hunter Fan Company Blade Mounting Screw If you used grommets, the blades may include blade grommets. For each blade to the fan). 6-1. Use a dry or slightly damp lint free cloth to secure shipping blocks. 6-4. ...Steps 6-1 - 6-2 Use with Hunter's Dust Armor protection, making the blades less likely to the fan. Remove the blade mounting screws and rubber shipping bumpers...
Owner's Manual
Page 12
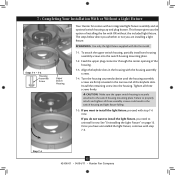
... 7-6 now. 7 • Completing Your Installation With or Without a Light Fixture Steps 7-1 - 7-3 Housing Assembly Screw Upper Switch Housing Your Hunter fan comes with the housing assembly screws. 7-4. To attach the upper switch housing, partially install two housing assembly screws into the housing. Feed the ...direct you whether or not you the option of the housing. 7-3. Step 7-4 12 42406-01 • 04/04/11 • Hunter Fan Company Install the remaining screw into the switch housing mounting plate. 7-2. If you do not want to uninstall it now. Tighten all...
... 7-6 now. 7 • Completing Your Installation With or Without a Light Fixture Steps 7-1 - 7-3 Housing Assembly Screw Upper Switch Housing Your Hunter fan comes with the housing assembly screws. 7-4. To attach the upper switch housing, partially install two housing assembly screws into the housing. Feed the ...direct you whether or not you the option of the housing. 7-3. Step 7-4 12 42406-01 • 04/04/11 • Hunter Fan Company Install the remaining screw into the switch housing mounting plate. 7-2. If you do not want to uninstall it now. Tighten all...

Owner's Manual
Page 13
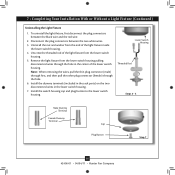
Place the lower switch housing assembly over the upper switch housing. Otherwise, proceed with US federal energy regulations, this ceiling fan contains a device that restricts its light output. If lights do not appear to the lower plug connector in the lower switch housing assembly...sticker affixed to the upper switch housing with three housing assembly screws. Housing Assembly Screw 13 42406-01 • 04/04/11 • Hunter Fan Company Make sure the connectors are polarized and will only fit together one way. The last installation step when installing the light fixture is ...
Place the lower switch housing assembly over the upper switch housing. Otherwise, proceed with US federal energy regulations, this ceiling fan contains a device that restricts its light output. If lights do not appear to the lower plug connector in the lower switch housing assembly...sticker affixed to the upper switch housing with three housing assembly screws. Housing Assembly Screw 13 42406-01 • 04/04/11 • Hunter Fan Company Make sure the connectors are polarized and will only fit together one way. The last installation step when installing the light fixture is ...
Owner's Manual
Page 14
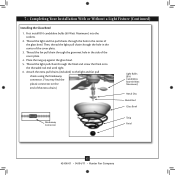
... hole. 6. Lower Switch Housing Threaded Rod Steps 3 - 5 Male Dummy Terminal Female Dummy Terminal Cap Plug Button Step 7 14 42406-01 • 04/04/11 • Hunter Fan Company Note: When removing the wires, pull the thin plug connector (male) through first, and then pull the other plug connector (female) through the hole...
... hole. 6. Lower Switch Housing Threaded Rod Steps 3 - 5 Male Dummy Terminal Female Dummy Terminal Cap Plug Button Step 7 14 42406-01 • 04/04/11 • Hunter Fan Company Note: When removing the wires, pull the thin plug connector (male) through first, and then pull the other plug connector (female) through the hole...
Owner's Manual
Page 15
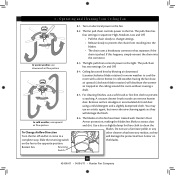
... Installing the Glass Bowl 1. Thread the light pull chain through the grommet hole in the center of the glass bowl. Thread the light and fan pull chains through the hole in the side of the extra chain.) Light Bulbs (B10 Candelabra Base 60 Watt Maximum) Metal Disc Metal Rod Glass... Bowl Breakaway Connector Twig Finial 15 42406-01 • 04/04/11 • Hunter Fan Company First install B10 candelabra bulbs (60 Watt Maximum) into the sockets. 2. Then, thread the light pull chain through the hole in the center ...
... Installing the Glass Bowl 1. Thread the light pull chain through the grommet hole in the center of the glass bowl. Thread the light and fan pull chains through the hole in the side of the extra chain.) Light Bulbs (B10 Candelabra Base 60 Watt Maximum) Metal Disc Metal Rod Glass... Bowl Breakaway Connector Twig Finial 15 42406-01 • 04/04/11 • Hunter Fan Company First install B10 candelabra bulbs (60 Watt Maximum) into the sockets. 2. Then, thread the light pull chain through the hole in the center ...
Owner's Manual
Page 16
... Off. • Pull the chain slowly to change settings. • Release slowly to the fan. 8-2. A vacuum cleaner brush nozzle can remove heavier dust. Use a dry or slightly damp lint free cloth to cool the room with Hunter's Dust Armor protection, making the blades less likely to the light. You may use an... any other cleaners that separates if the chain is jerked. Slide the reversing switch on the blades. 16 42406-01 • 04/04/11 • Hunter Fan Company For cleaning finishes, use a soft brush or lint-free cloth to the opposite position. Reversing Switch 8-1. The...
... Off. • Pull the chain slowly to change settings. • Release slowly to the fan. 8-2. A vacuum cleaner brush nozzle can remove heavier dust. Use a dry or slightly damp lint free cloth to cool the room with Hunter's Dust Armor protection, making the blades less likely to the light. You may use an... any other cleaners that separates if the chain is jerked. Slide the reversing switch on the blades. 16 42406-01 • 04/04/11 • Hunter Fan Company For cleaning finishes, use a soft brush or lint-free cloth to the opposite position. Reversing Switch 8-1. The...
Owner's Manual
Page 17
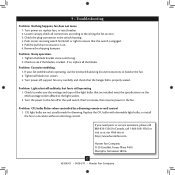
...to make sure the wattage and type of the light bulbs that the switch is cracked. Hunter Fan Company 7130 Goodlett Farms Pkwy #400 Memphis, Tennessee 38016 17 42406-01 • 04/04/11 • Hunter Fan Company fan does not move. 1. If you need parts or service assistance, please call 888‑830...‑1326 (In Canada, call 1-866-268-1936) or visit us at our Web site at the wall switch. If so, replace all the blades. Check to the fan off suddenly, but fan is...
...to make sure the wattage and type of the light bulbs that the switch is cracked. Hunter Fan Company 7130 Goodlett Farms Pkwy #400 Memphis, Tennessee 38016 17 42406-01 • 04/04/11 • Hunter Fan Company fan does not move. 1. If you need parts or service assistance, please call 888‑830...‑1326 (In Canada, call 1-866-268-1936) or visit us at our Web site at the wall switch. If so, replace all the blades. Check to the fan off suddenly, but fan is...
Parts Guide
Page 1
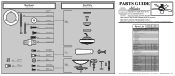
...Chain Pendant Light Pull Chain Pendant Pull Chain Extension Pull Chain Extension Model # Asm. THIS PARTS GUIDE IS FOR REFERENCE ONLY. Dwg. # Finish Qnty 1 22540 96754-01 Brittany Bronze Part # 96759-66 1 G1146-66 1 93301-05 1 G0761-12 11 63755-05 1 96754-00-860 1 65666-01 1 85566...73853-01 1 73854-01 1 08200-01 1 08198-01 1 85565-02 1 64901-01 2 77646-04 1 G0090-01 1 G0091-01 2 63756-58 1 63756-18 Hunter Fan Company • 7130 Goodlett Farms Pkwy. #400 • Memphis, TN 38016 • www.hunterfan.com • 98000-01-585 09-09-2011 • ©...
...Chain Pendant Light Pull Chain Pendant Pull Chain Extension Pull Chain Extension Model # Asm. THIS PARTS GUIDE IS FOR REFERENCE ONLY. Dwg. # Finish Qnty 1 22540 96754-01 Brittany Bronze Part # 96759-66 1 G1146-66 1 93301-05 1 G0761-12 11 63755-05 1 96754-00-860 1 65666-01 1 85566...73853-01 1 73854-01 1 08200-01 1 08198-01 1 85565-02 1 64901-01 2 77646-04 1 G0090-01 1 G0091-01 2 63756-58 1 63756-18 Hunter Fan Company • 7130 Goodlett Farms Pkwy. #400 • Memphis, TN 38016 • www.hunterfan.com • 98000-01-585 09-09-2011 • ©...


