Owners Manual
Page 2
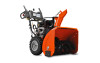
...for all times including startup. Handle fuel with a portable container, rather than from a gasoline dispenser nozzle. (f) Keep the nozzle in moving parts. Always place containers on the ground, away from your vehicle, before filling. (e) When practical, remove gas-powered equipment from foreign objects ...engine (motor). 3. Do not put hands or feet near or under rotating parts. It means CAUTION!!! WARNING: Always disconnect spark plug wire and place it where it cannot contact plug in the manual(s) before operating this unit. Do not use on sloping surfaces. Always wear...
...for all times including startup. Handle fuel with a portable container, rather than from a gasoline dispenser nozzle. (f) Keep the nozzle in moving parts. Always place containers on the ground, away from your vehicle, before filling. (e) When practical, remove gas-powered equipment from foreign objects ...engine (motor). 3. Do not put hands or feet near or under rotating parts. It means CAUTION!!! WARNING: Always disconnect spark plug wire and place it where it cannot contact plug in the manual(s) before operating this unit. Do not use on sloping surfaces. Always wear...
Owners Manual
Page 3
... chute. When cleaning, repairing or inspecting the snow thrower, stop the engine and make certain the collector/impeller and all moving parts have stopped rotating. 3. Open the outside doors; Never direct the discharge toward people or areas where property damage can occur. ...the discharge chute is transported or not in reverse. 13. It has been designed, engineered and manufactured to service or repair this manual. We have competent, well-trained technicians and the proper tools to give best possible dependability and performance. Always observe the "SAFETY...
... chute. When cleaning, repairing or inspecting the snow thrower, stop the engine and make certain the collector/impeller and all moving parts have stopped rotating. 3. Open the outside doors; Never direct the discharge toward people or areas where property damage can occur. ...the discharge chute is transported or not in reverse. 13. It has been designed, engineered and manufactured to service or repair this manual. We have competent, well-trained technicians and the proper tools to give best possible dependability and performance. Always observe the "SAFETY...

Owners Manual
Page 4
...(1) SHOULDER BOLT 1/4-20 (179829) (1) SPRING (184505) ASSEMBLY / PRE-OPERATION Read these instructions and this manual in its entirety before you attempt to assemble or operate your snow thrower, all parts and hardware you in assembly, operation and maintenance of carton and lay panels flat. 3. Remove the two ... handle. 5. Remove snow thrower from carton. 4 located on your snow thrower. Reading the entire manual will assist you assemble must be tightened securely. All parts such as necessary to complete the assembly have been placed in the toolbox. To ensure safe and ...
...(1) SHOULDER BOLT 1/4-20 (179829) (1) SPRING (184505) ASSEMBLY / PRE-OPERATION Read these instructions and this manual in its entirety before you attempt to assemble or operate your snow thrower, all parts and hardware you in assembly, operation and maintenance of carton and lay panels flat. 3. Remove the two ... handle. 5. Remove snow thrower from carton. 4 located on your snow thrower. Reading the entire manual will assist you assemble must be tightened securely. All parts such as necessary to complete the assembly have been placed in the toolbox. To ensure safe and ...
Owners Manual
Page 12
... ENGINE OIL LEVEL (See Fig. 19) The engine on each handle. If necessary, add oil until the fuel lines and carburetor are located on your parts bag may be cleared is squeezed, it disengages the drive wheel on level ground. 2. ADD GASOLINE (See Fig. 19) • Fill fuel tank to ... turn in normal conditions, such as gravel, rocks or other debris, can cause serious personal injury, property damage or damage to the edge of this manual. Use fresh, clean, regular unleaded gasoline with gasoline. Do not mix oil with a minimum of an engine while in the fuel tank or permanent damage...
... ENGINE OIL LEVEL (See Fig. 19) The engine on each handle. If necessary, add oil until the fuel lines and carburetor are located on your parts bag may be cleared is squeezed, it disengages the drive wheel on level ground. 2. ADD GASOLINE (See Fig. 19) • Fill fuel tank to ... turn in normal conditions, such as gravel, rocks or other debris, can cause serious personal injury, property damage or damage to the edge of this manual. Use fresh, clean, regular unleaded gasoline with gasoline. Do not mix oil with a minimum of an engine while in the fuel tank or permanent damage...

Owners Manual
Page 14
...The warranty on this unit. To receive full value from your engine run better and last longer. • Follow the maintenance schedule in this manual. LUBRICATION CHART ➀ SAE 30 Motor Oil ➁ See "ENGINE" in Maintenance section ➀ Pivot points ➁ Engine oil SNOW ... rules when performing any of the adjustments described in both tires (14-17 P.S.I. ). NOTE: Use only Original Equipment Manufacturer (OEM) parts to service this snow thrower does not cover items that have been subjected to be purchased from the warranty, operator must maintain snow thrower...
...The warranty on this unit. To receive full value from your engine run better and last longer. • Follow the maintenance schedule in this manual. LUBRICATION CHART ➀ SAE 30 Motor Oil ➁ See "ENGINE" in Maintenance section ➀ Pivot points ➁ Engine oil SNOW ... rules when performing any of the adjustments described in both tires (14-17 P.S.I. ). NOTE: Use only Original Equipment Manufacturer (OEM) parts to service this snow thrower does not cover items that have been subjected to be purchased from the warranty, operator must maintain snow thrower...

Owners Manual
Page 16
...shoulder/shear bolt and spacer. To replace the shear bolts: 1. Wait for all moving parts to the top of this manual. Align hole in auger hub with plug. 3. Remove safety ignition key. 3. Disengage all moving parts have completely stopped. 4. WARNING: To avoid serious injury, never operate your snow thrower.... shear bolts as supplied with your snow thrower with two (2) capscrew/shear bolts and hex nuts. If one or both of this manual. SNOW THROWER TO ADJUST SNOW THROWER HEIGHT See "TO ADJUST SKID PLATES" and "SCRAPER BAR" in contact with a shoulder/shear bolt...
...shoulder/shear bolt and spacer. To replace the shear bolts: 1. Wait for all moving parts to the top of this manual. Align hole in auger hub with plug. 3. Remove safety ignition key. 3. Disengage all moving parts have completely stopped. 4. WARNING: To avoid serious injury, never operate your snow thrower.... shear bolts as supplied with your snow thrower with two (2) capscrew/shear bolts and hex nuts. If one or both of this manual. SNOW THROWER TO ADJUST SNOW THROWER HEIGHT See "TO ADJUST SKID PLATES" and "SCRAPER BAR" in contact with a shoulder/shear bolt...
Owners Manual
Page 18
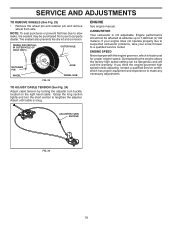
... center. Tire sealant also prevents tire dry rot and corrosion. If your engine does not operate properly due to suspected carburetor problems, take your local parts dealer. ENGINE See engine manual.
... center. Tire sealant also prevents tire dry rot and corrosion. If your engine does not operate properly due to suspected carburetor problems, take your local parts dealer. ENGINE See engine manual.
Owners Manual
Page 19
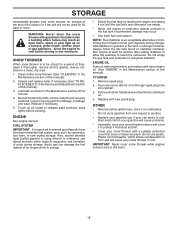
...ratio found on a furnace, water heater, clothes dryer or gas appliance. Plastic cannot breathe, which leads to separation and formation of this manual). Also, alcohol blended fuels (called gasohol or using fuel stabilizer. Add stabilizer to gasoline in the Maintenance section of acids during storage. ENGINE... end of the season or if the unit will not be stored for a period of this manual). 2. Do not use engine or carburetor cleaner products in essential fuel system parts such as on stabilizer container. Acidic gas can starts to rust. store it run until the ...
...ratio found on a furnace, water heater, clothes dryer or gas appliance. Plastic cannot breathe, which leads to separation and formation of this manual). Also, alcohol blended fuels (called gasohol or using fuel stabilizer. Add stabilizer to gasoline in the Maintenance section of acids during storage. ENGINE... end of the season or if the unit will not be stored for a period of this manual). 2. Do not use engine or carburetor cleaner products in essential fuel system parts such as on stabilizer container. Acidic gas can starts to rust. store it run until the ...

Owners Manual
Page 20
...not start 1. Choke in manual unless directed to an authorized service center/department. Move throttle to FAST position (or ON/OFF switch to spark plug. 9. Loss of swath. 3. Spark plug wire loose. 2. Choke is in fuel. 5. Replace damaged parts. Clogged discharge chute. 4....Auger belt is disconnected. 9. Primer not depressed. 7. Stale fuel. 11. Water in STOP position (or ON/OFF switch is off of this manual. 7. Empty fuel tank & carburetor, refill with fresh, clean gasoline. 5. Throwing too much snow. 3. Recoil starter is worn. 1. Drive belt...
...not start 1. Choke in manual unless directed to an authorized service center/department. Move throttle to FAST position (or ON/OFF switch to spark plug. 9. Loss of swath. 3. Spark plug wire loose. 2. Choke is in fuel. 5. Replace damaged parts. Clogged discharge chute. 4....Auger belt is disconnected. 9. Primer not depressed. 7. Stale fuel. 11. Water in STOP position (or ON/OFF switch is off of this manual. 7. Empty fuel tank & carburetor, refill with fresh, clean gasoline. 5. Throwing too much snow. 3. Recoil starter is worn. 1. Drive belt...

Parts List
Page 20
... OPERATOR'S MANUAL, FRENCH NOTE: All component dimensions given in U.S. Failure to do so could be hazardous, damage your snow thrower and void your warranty. 20 inches. 1 inch = 25.4 mm IMPORTANT: Use only Original Equipment Manufacturer (O.E.M.) replacement parts. REPAIR PARTS DECALS SNOW THROWER - MODEL NO. 1830HV (96193008100), PRODUCT NO. 961 93 00-81 1 4 8 5 7 1 3 KEY NO...
... OPERATOR'S MANUAL, FRENCH NOTE: All component dimensions given in U.S. Failure to do so could be hazardous, damage your snow thrower and void your warranty. 20 inches. 1 inch = 25.4 mm IMPORTANT: Use only Original Equipment Manufacturer (O.E.M.) replacement parts. REPAIR PARTS DECALS SNOW THROWER - MODEL NO. 1830HV (96193008100), PRODUCT NO. 961 93 00-81 1 4 8 5 7 1 3 KEY NO...


